Periódicos
Serials actions can be accessed by going to the ‘More’ menu at the top of your screen and choosing ‘Serials’ or by clicking ‘Serials’ on the main Koha staff interface page. The serials module in Koha is used for keeping track of journals, newspapers and other items that come on a regular schedule.
As with all modules, make sure you go through the related implementation checklist and system preferences before using the serials module.
Acesso: Mais > Periódicos
Managing serial frequencies
Nota
Only staff with the serials permission (or the superlibrarian permission) will be able manage frequencies.
O Koha mantém um registro da frequência de publicações para auxiliar no gerenciamento e duplicação.
Acesso: Mais > Periódicos > Gerir periodicidades
From this page you can view all of the existing frequencies in your system.
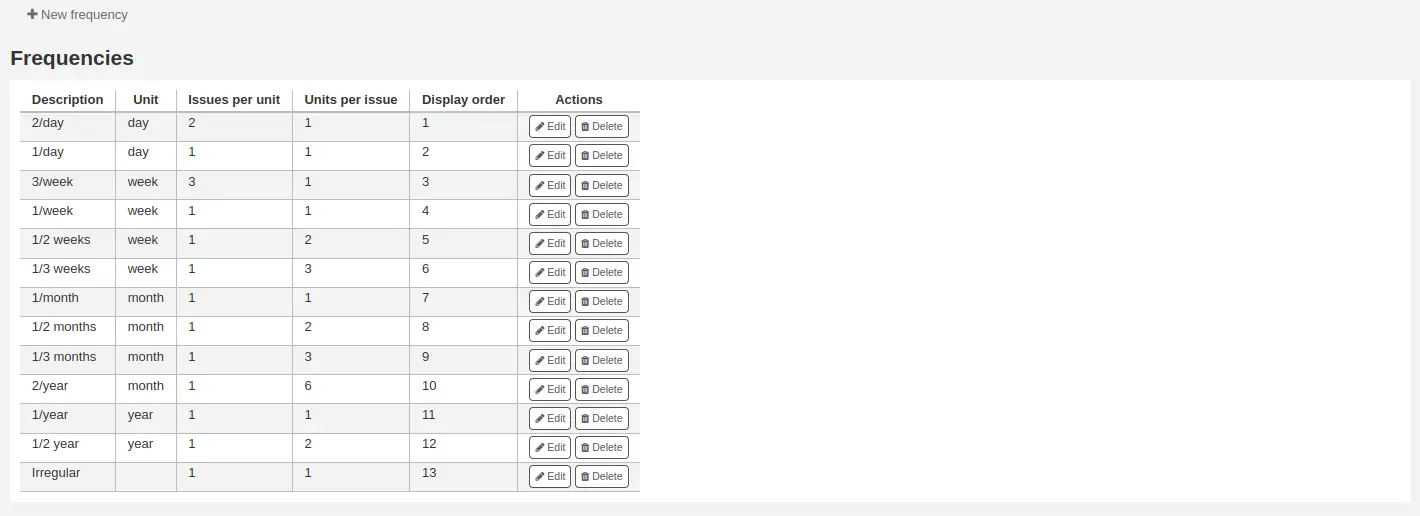
You can edit, delete and create new ones.
Adding a frequency
To add a new frequency, click on the ‘New frequency’ button.
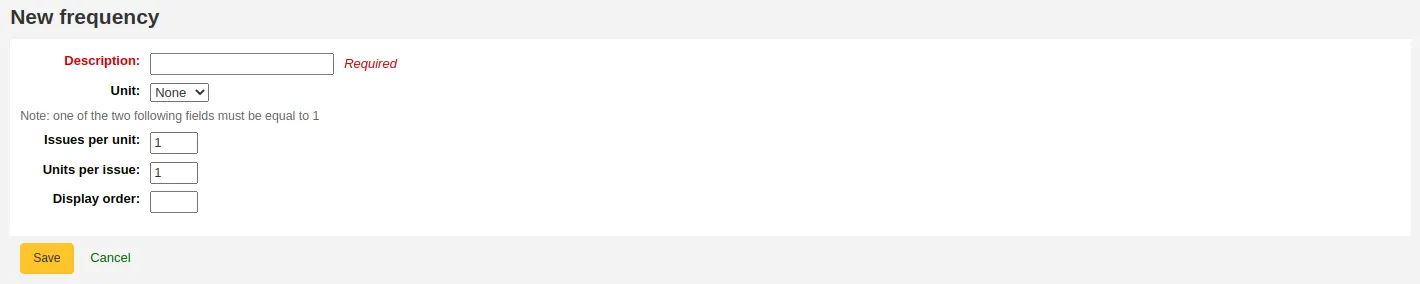
Description: this is the name that will appear in the drop-down menu when creating a new serial subscription; make sure it is descriptive
Unit: this is the unit used for counting the cycle of publication. Choose either none (for irregular frequencies), day, week, month, or year.
Issues per unit: this is how many issues are published during the unit chosen above (this will usually be 1).
Units per issue: this is how many units must we count until the next issue is published.
Display order: this is the display order in the drop-down menu when creating a new subscription (you may want to put the most used frequencies at the top and the less frequent at the bottom; the top-most position is 0). Several frequencies can have the same display order value. If this is the case, they will appear in the order they were created.
Dica
To understand ‘issues per unit’ versus ‘units per issue’ you can read it as ‘<issues per unit> issue(s) every <units per issues> <unit>’. For example, a biweekly frequency (every two weeks) would be ‘1 issue every 2 weeks’. So ‘issues per unit’ would be 1 and ‘units per issue’ would be 2. See below for more examples.
Examples
Here are some examples for most common serial publication frequencies.
Frequency |
Unit |
Issues per unit |
Units per issue |
|---|---|---|---|
Daily (“1 issue every 1 day”) |
Day |
1 |
1 |
Three times per week (“3 issues every 1 week”) |
Week |
3 |
1 |
Semiweekly (“2 issues every 1 week”) |
Week |
2 |
1 |
Weekly (“1 issue every 1 week”) |
Week |
1 |
1 |
Biweekly (“1 issue every 2 weeks”) |
Week |
1 |
2 |
Monthly (“1 issue every 1 month”) |
Month |
1 |
1 |
Bimonthly (“1 issue every 2 months”) |
Month |
1 |
2 |
Quarterly (“1 issue every 3 months”) |
Month |
1 |
3 |
Semiannual (“1 issue every 6 months”) |
Month |
1 |
6 |
Annual (“1 issue every 1 year”) |
Ano |
1 |
1 |
Biennal (“1 issue every 2 years”) |
Ano |
1 |
2 |
Gerir modelos de numeração
Nota
Only staff with the serials permission or any of the serials sub-permissions (or the superlibrarian permission) will be able to manage numbering patterns.
Every time you create a new numbering pattern in serials you can save it for later use. These patterns are accessible via the ‘Manage numbering patterns’ page.
Acesso: Mais > Periódicos > Gerir padrões de numeração
This page will list for you the numbering patterns you have saved in the past as well as a few basic patterns.
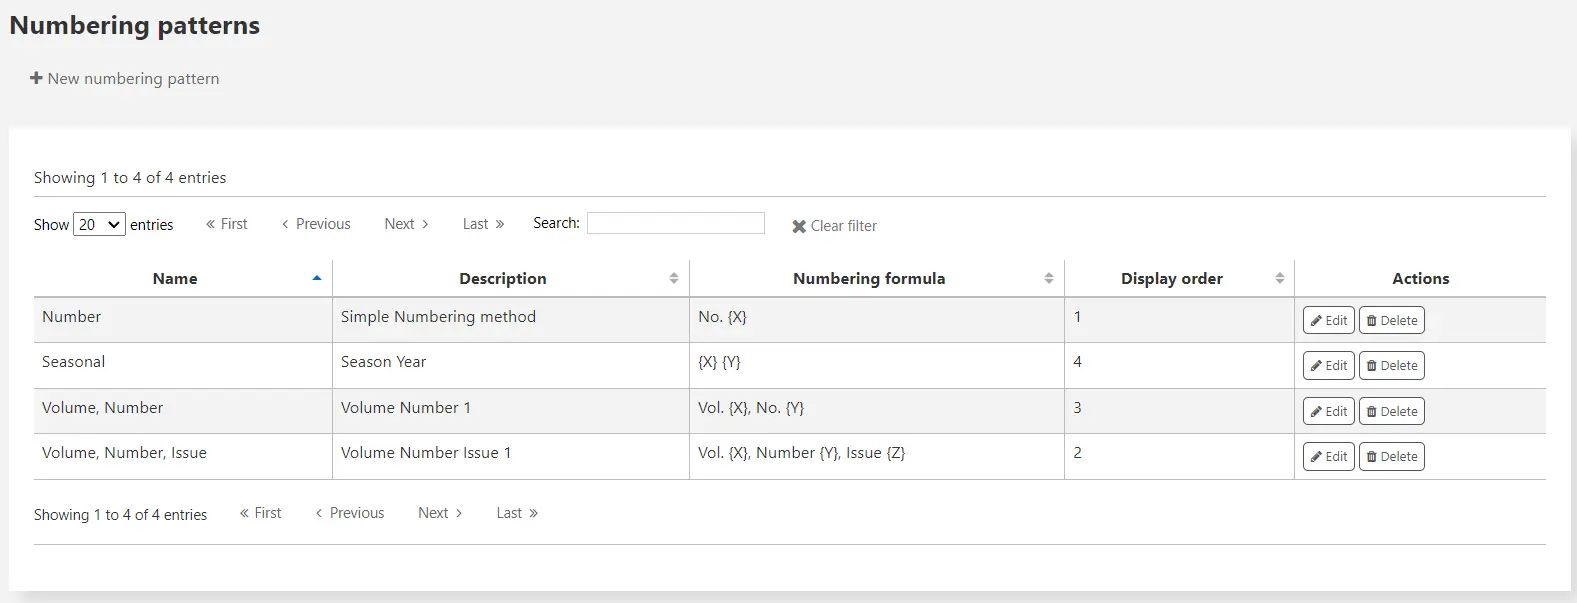
Nota
If you have upgraded from an old version of Koha (before 3.14) you will see ‘Backup patterns’ listed for patterns. This is how Koha saved your old numbering patterns. You can edit these to give them more meaningful names from here.
Adding a numbering pattern
To add new new pattern click the ‘New numbering pattern’ button.
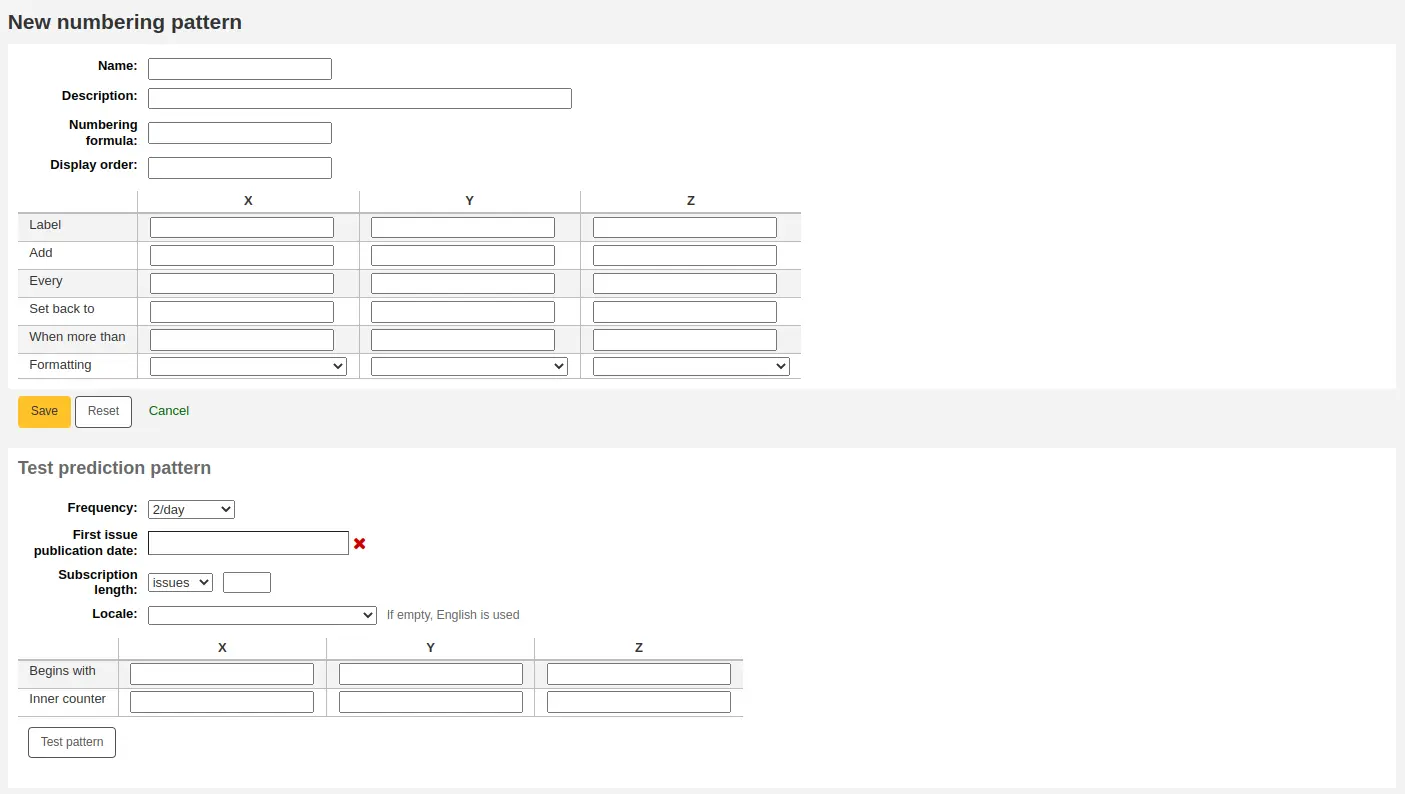
Name: this is the name that will appear in the drop-down menu when creating a new serial subscription; make sure it is descriptive.
Description: this is to further describe the numbering pattern; this does not appear when creating a new subscription, it only displays in the numbering patterns table (see above).
Numbering formula: this is what is used to create the number for each issue. You can use placeholders for up to three variables {X}, {Y}, and {Z} (which can be defined below), as well as predetermined variables:
{Day} will be replaced by the date (two digits)
{Month} will be replaced by the month number (two digits)
{Year} will be replaced by the year (four digits)
{DayName} will be replaced by the name of the day of the week
Aviso
Locale is ignored in the DayName variable. It will always be displayed in English. Use one of the X, Y, or Z variables in the table with the formatting ‘Name of day’ to have the day name in a language other than English.
{MonthName} will be replaced by the name of the month
Aviso
Locale is ignored in the MonthName variable. It will always be displayed in English. Use one of the X, Y, or Z variables in the table with the formatting ‘Name of month’ to have the month name in a language other than English.
Versão
The placeholders {Day}, {Month}, {Year}, {DayName}, and {MonthName} were added to Koha in version 24.05.
Along with the variables, you can enter any text you want to have appear in the issue number. You must also include any spaces you want to see in the issue numbers. The text will stay the same for each issue and the variables will vary.
Aviso
The variables X, Y and Z must be in capital letters and between curly brackets.
Examples
Vol. {X} No {Y}
Issue {X} ({Year}-{Month}-{Day})
{X} {Y}
Display order: this is the display order in the drop-down menu when creating a new subscription (you may want to put the most used frequencies at the top and the less frequent at the bottom; the top-most position is 0). Several frequencies can have the same display order value. If this is the case, they will appear in the order they were created.
In the table, you need to enter the parameters for each variable.
Label: this is simply a name for the variable, it is not used anywhere else, but it helps identify what the variable is supposed to be.
Add: how many numbers or units are added to the variable.
Each: the numbers or units added to the variable are added each how many issues.
Set back to: this is used for cyclic numbering; enter the starting number.
When more than: this is used for cyclic numbering; enter the last number.
Dica
When filling out these four parameter (‘add’, ‘each’, ‘set back to’ and ‘when more than’), work column by column and read it as a sentence: “Add 1 Every 1 issue, set back to 1 when greater than 10”.
Formatting: this is used if, instead of numbers, you want words to appear in your issue number. You can choose
Name of day (Monday, Tuesday, Wednesday, etc.)
Name of day (abbreviated) (Mon, Tue, Wed, etc.)
Name of month (January, February, March, etc.)
Name of month (abbreviated) (Jan, Feb, Mar, etc.)
Name of season (Spring, Summer, Fall, Winter)
Name of season (abbreviated) (Spr, Sum, Fal, Win)
Aviso
When filling out the table, you must always use numbers, even to represent names of days, months or seasons. Here are the equivalent for each
Days |
domingo |
0 |
segunda-feira |
1 |
|
terça-feira |
2 |
|
quarta-feira |
3 |
|
Quinta-feira |
4 |
|
sexta-feira |
5 |
|
sábado |
6 |
|
Months |
January |
0 |
February |
1 |
|
March |
2 |
|
April |
3 |
|
May |
4 |
|
June |
5 |
|
July |
6 |
|
August |
7 |
|
September |
8 |
|
October |
9 |
|
November |
10 |
|
December |
11 |
|
Seasons |
Spring |
0 |
Summer |
1 |
|
Fall |
2 |
|
Winter |
3 |
Before you save your numbering pattern, you can test it to make sure it behaves as you intend.
Frequency: choose a frequency that fits with your numbering pattern.
First issue publication date: choose a date where your test will start.
Subscription length: enter a number of issues, weeks or months to test your numbering pattern; if the numbering pattern is cyclic, it is recommended to try at least two cycles to see the change in cycles and make sure it behaves correctly.
Locale: if using names of days, months or season, you can choose the language in which these names will be displayed.
Nota
Locale doesn’t currently work well with season names.
Next enter the parameters for your variables.
Begins with: enter the first value for each variable, these should be the values of the issue entered in ‘First issue publication date’ above.
Inner counter: enter how many issues have already passed in the cycle, so that Koha can calculate when to cycle back.
Click ‘Test pattern’ to see the results. If the result is what you expected, you can save your numbering pattern. If the results does not match your expectations, go back and tweak the parameters and test again.
Examples
Month and year for monthly serials
Numbering formula: {X} {Y}
X
Y
Z
Etiqueta
Month
Ano
Add
1
1
Every
1
12
Set back to
0
0
When more than
11
99999
Formatting
Name of month
Volume and number for monthly serials
Numbering formula: Vol.{X} No.{Y}
X
Y
Z
Etiqueta
Volume
Number
Add
1
1
Every
12
1
Set back to
0
1
When more than
99999
12
Formatting
Season and year for quarterly serials
Numbering formula: {X} {Y}
X
Y
Z
Etiqueta
Season
Ano
Add
1
1
Every
1
4
Set back to
0
0
When more than
3
99999
Formatting
Name of season
Volume and number for weekly serials
Numbering formula: Vol.{X} No.{Y}
X
Y
Z
Etiqueta
Volume
Number
Add
1
1
Every
52
1
Set back to
0
1
When more than
99999
52
Formatting
Nota
Find more numbering patterns on Koha’s wiki [https://wiki.koha-community.org/wiki/Serial_Pattern_Library].
Adding a subscription
Nota
Only staff with the create_subscription permission (or the superlibrarian permission) will be able to add serial subscriptions.
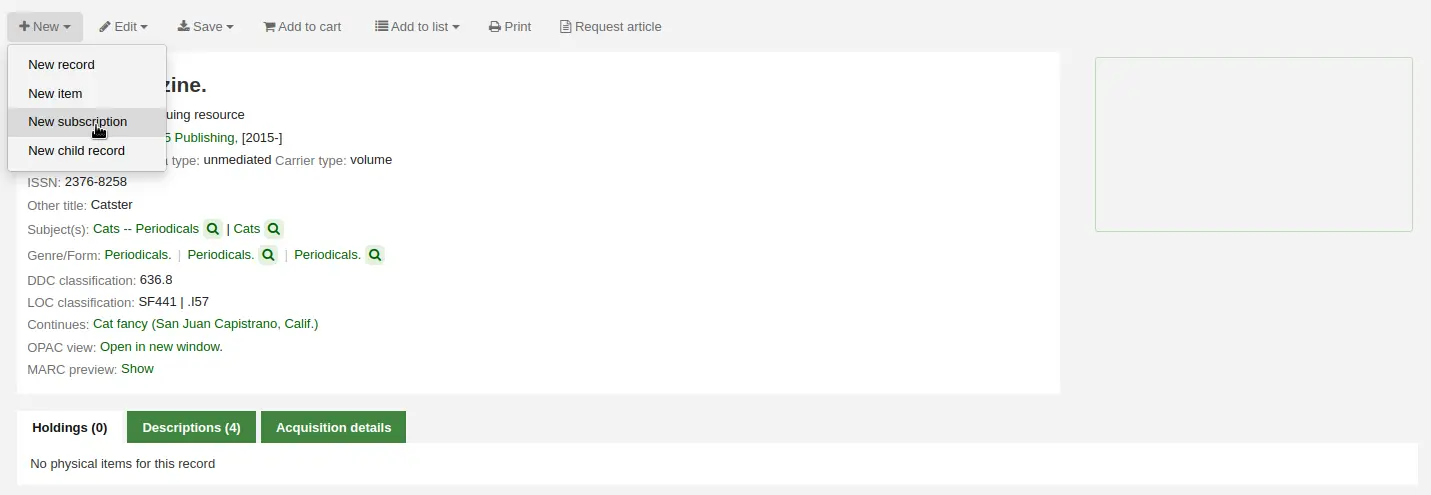
Subscriptions can be added by clicking the ‘New’ button on any bibliographic record and choosing ‘New subscription’
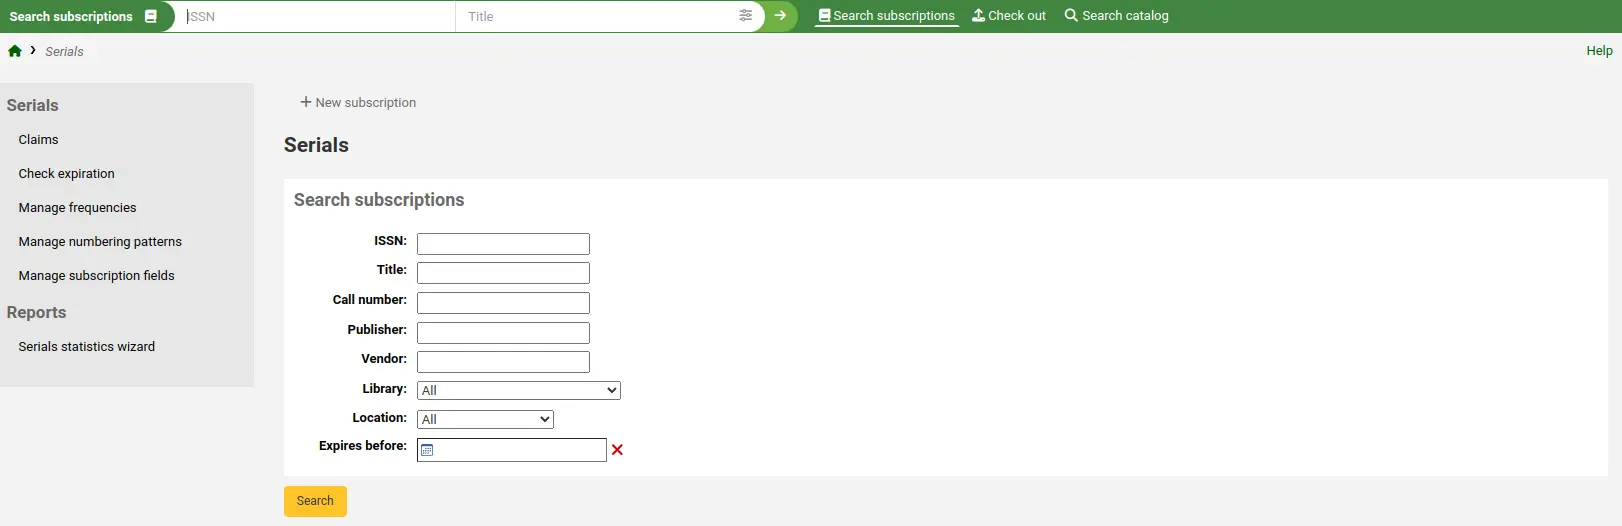
Or click the ‘New subscription’ button in the serials module
If you are entering a new subscription from the Serials module you will be presented with a blank form (if creating new from a bibliographic record the form will include the record number info).
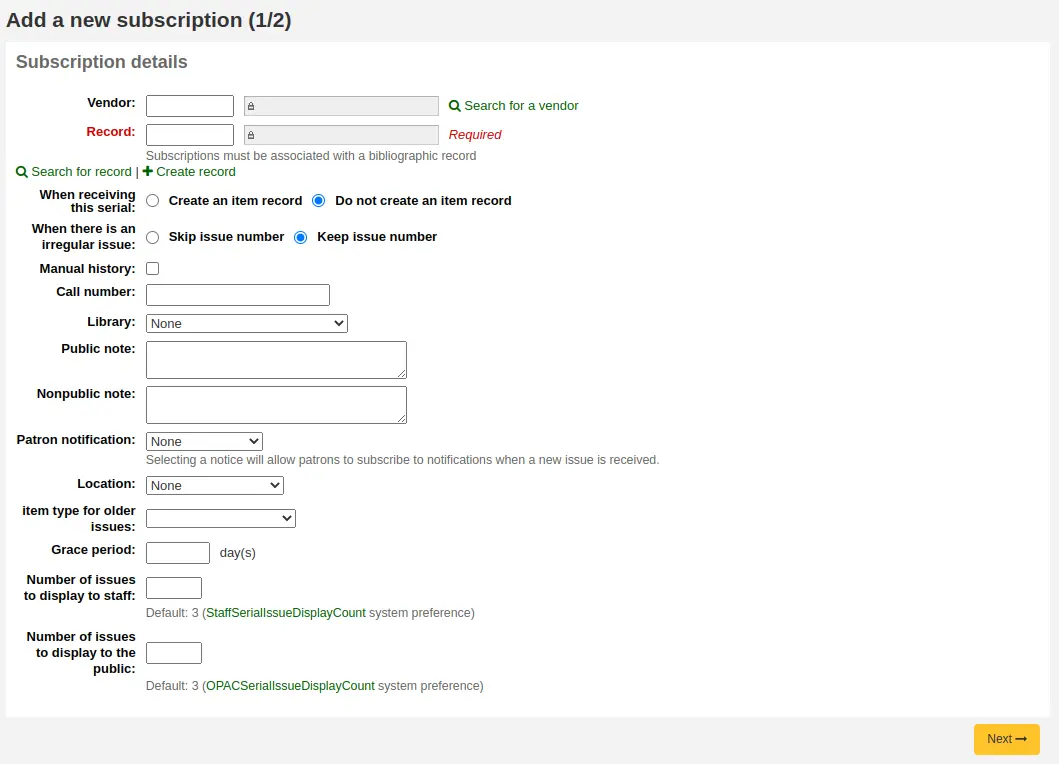
Vendor: can be found by either searching vendors entered via the Acquisitions module or manually entering the vendor ID number
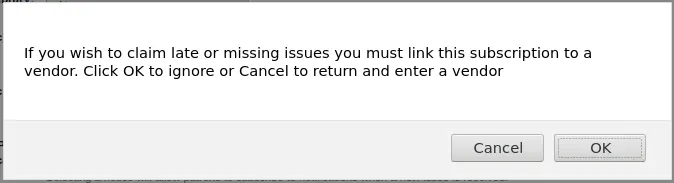
Informação do fornecedor não é obrigatória
Em aquisições, para fazer uma reclamação você precisa informar o fornecedor
Record: the biblionumber of the MARC record you’d like to link this subscription to
If you created a new subscription from a bibliographic record, the biblionumber and the title will already be filled in
You can search for an existing record by clicking on the ‘Search for record’ link below the boxes
If there is no existing bibliographic record for this subscription, you can create one by clicking on the ‘Create record’ link below the boxes
You can also manually enter the biblionumber for a record in the first box
Next you can choose whether a new item is created when receiving an issue
Nota
If you add barcodes to issues or if your circulate them, choose to create an item upon reception
When there is an irregular issue: choose how to handle irregularities in your subscription, by either skipping the issue number or keeping the issue number
Nota
If the numbers are always sequential, choose ‘Keep issue number’
Manual history: if checked, you will be able to enter serials outside the prediction pattern once the subscription is saved. For example, ‘The library has issues from June 1974 to December 1996’. To do so, go to the ‘Planning’ tab on the subscription detail page once the subscription is saved and click ‘Edit history’.
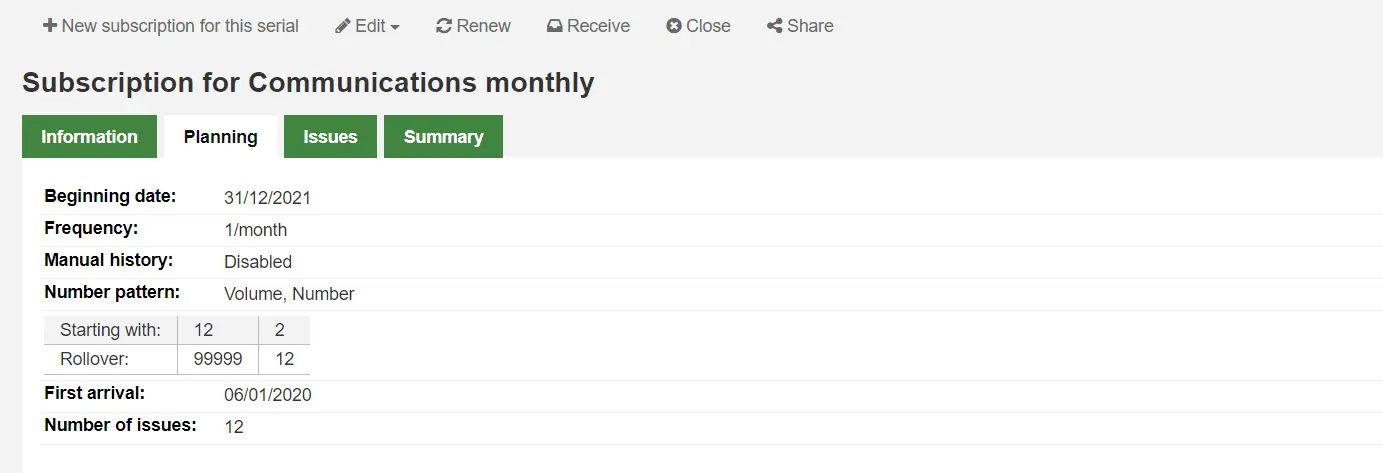
Call number: your item’s call number or call number prefix, this will be copied to items if they are created upon receiving.
Library: the branch that owns this subscription.
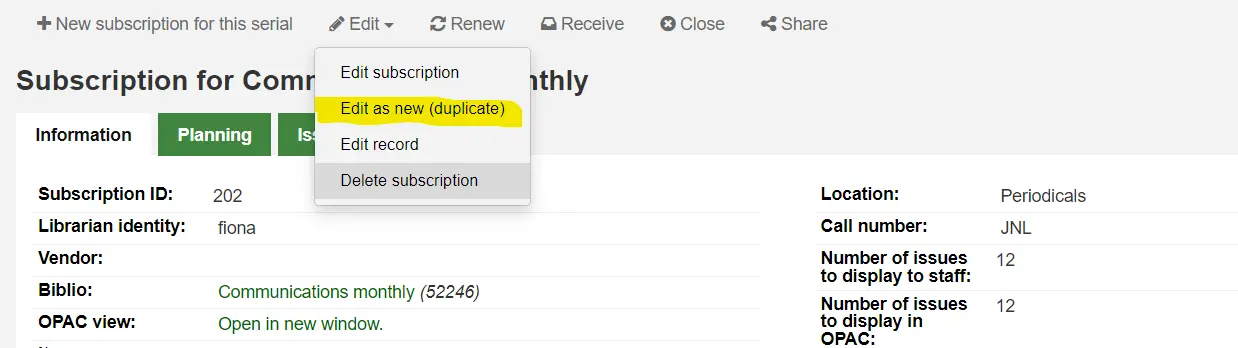
Se mais de uma biblioteca assina este periódico, você terá que fazer uma assinatura para cada biblioteca
Isto pode ser feito facilmente usando a opção ‘Editar como Novo (Duplicado)’, encontrada na página de informações de assinatura e alterando apenas o campo ‘Biblioteca’
Public note: any notes you would like to appear in the OPAC for the patrons
Nonpublic note: should be used for notes that are only visible to staff members via the staff interface
Patron notification: you can pick a notice to send to patrons who subscribe to updates on this serial via the OPAC.
For this option to appear you need to make sure that you have a ‘Serials (new issue)’-type notice set up in the ‘Notices and slips’ tool
Location: the shelving location, this will be copied to items if they are created upon receiving.
Item type: if creating items upon reception, choose the item type of the items created.
Item type for older issues: if creating items upon reception, choose the item type that will be assigned to previous issues when receiving new issues. This will only appear only if the makePreviousSerialAvailable is enabled.
Grace period: the number of days before an issue is automatically moved from ‘Expected’ status to ‘Late’. This mechanism requires that the SerialsUpdate.pl cron job is set up to run regularly.
Number of issues to display to staff: this allows you to control how many issues appear by default in the staff interface catalog, in the ‘Subscriptions’ tab of the bibliographic record.
If this is left empty, the value of the StaffSerialIssueDisplayCount system preference will be used.
Nota
Não afeta o número de exemplares que são mostrados no separador ‘Exemplares’ se estiver a criar exemplares para os números recebidos. Apenas afeta a visualização no separador ‘Assinaturas’.
Number of issues to display to the public: this allows you to control how many issues appear by default in the OPAC, in the ‘Subscriptions’ tab in bibliographic records
If this is left empty, the value of the OPACSerialIssueDisplayCount system preference will be used.
Nota
Não afeta o número de exemplares que são mostrados no separador ‘Exemplares’ se estiver a criar exemplares para os números recebidos. Apenas afeta a visualização no separador ‘Assinaturas’.
Assim que todos os dados estiverem preenchidos clique em ‘Seguinte’ para inserir a informação do padrão de numeração.
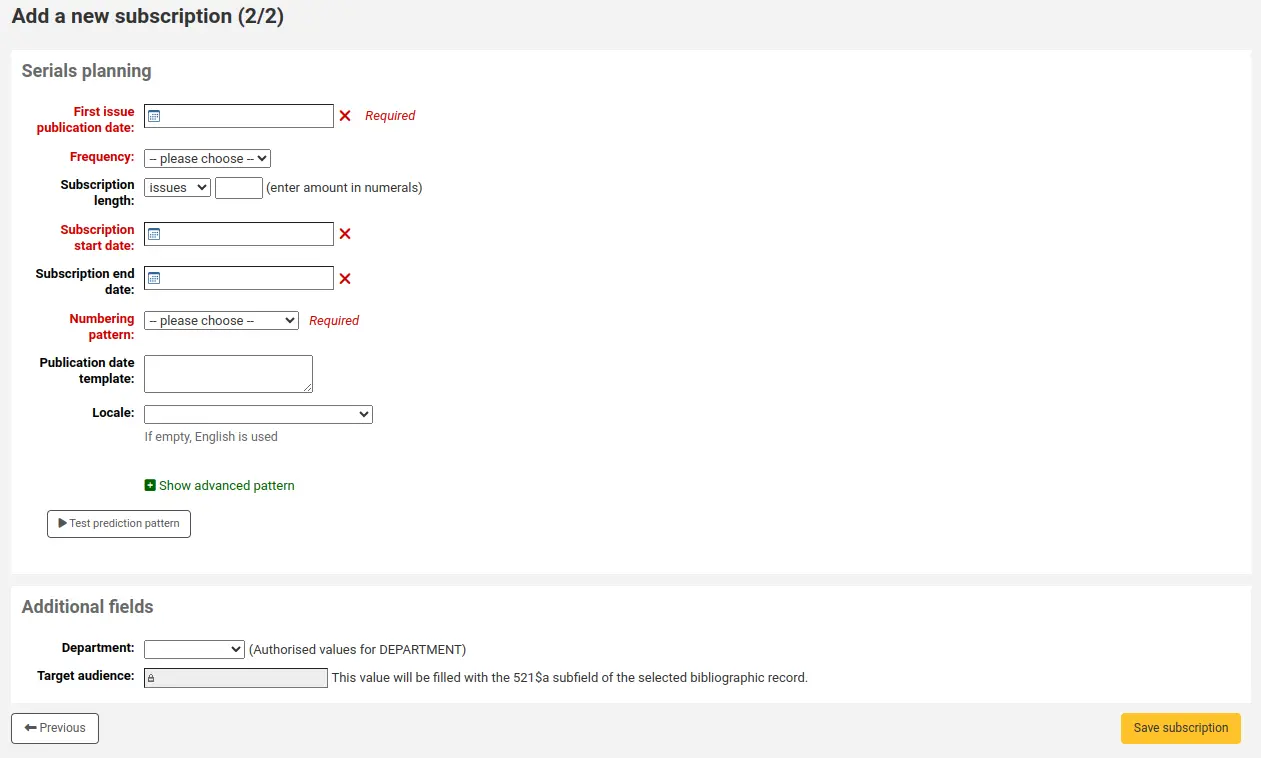
First issue publication date: enter the date of the issue you have in your hand, the date from which the prediction pattern will start
Frequency: choose the frequency of your serial. There are several predefined options all of which are visible alongside your own custom frequencies in ‘manage frequencies’. If the frequency you are looking for is not there, you can add a custom frequency.
Subscription length: enter the number of issues, weeks, or months in the subscription. This is also used for setting up renewal alerts.
Data de início da assinatura: é a data em que se inicia a assinatura. É utilizada para configurar alertas de renovação.
Data de fim da assinatura: deve ser inserida apenas para as assinaturas encerradas (caso esteja a registar um histórico de periódicos).
Padrão de numeração: escolha a forma como os fascículos são numerados. As opções aqui são as presentes na secção gerir padrões de numeração.
Se o padrão de numeração de que necessita ainda não tiver sido criado, pode criar um novo clicando em ‘Mostrar padrão avançado’ e, em seguida, em ‘Modificar padrão’. Isto equivale a adicionar um padrão de numeração (ver secção acima).
Modelo de data de publicação: este é o modelo que será utilizado para o campo ‘Publicado em (texto)’. Pode utilizar o Template Toolkit para criar o seu modelo. Por exemplo,
[% serialseq %] [% publisheddate %]preencherá o campo ‘Publicado em (texto)’ com o número e a data.Nota
Pode utilizar os seguintes campos de assinatura no modelo:
serialseq
serialseq_x
serialseq_y
serialseq_z
subscriptionid
biblionumber
status
planneddate
publisheddate
publisheddatetext
notes
routingnotes
Locale: if using names of days, months or season, you can choose the language in which these names will be displayed.
Nota
Locale doesn’t currently work well with season names.
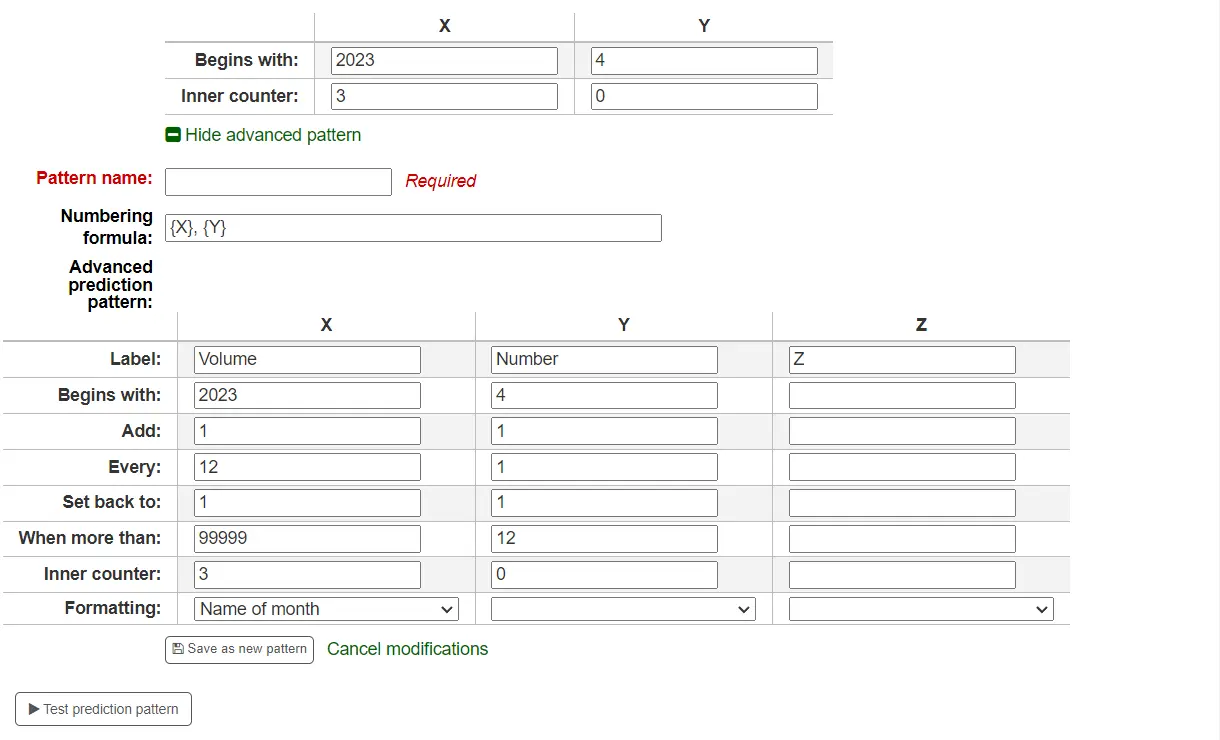
Assim que for escolhido um ‘Padrão de numeração’, aparecerá a tabela de numeração.
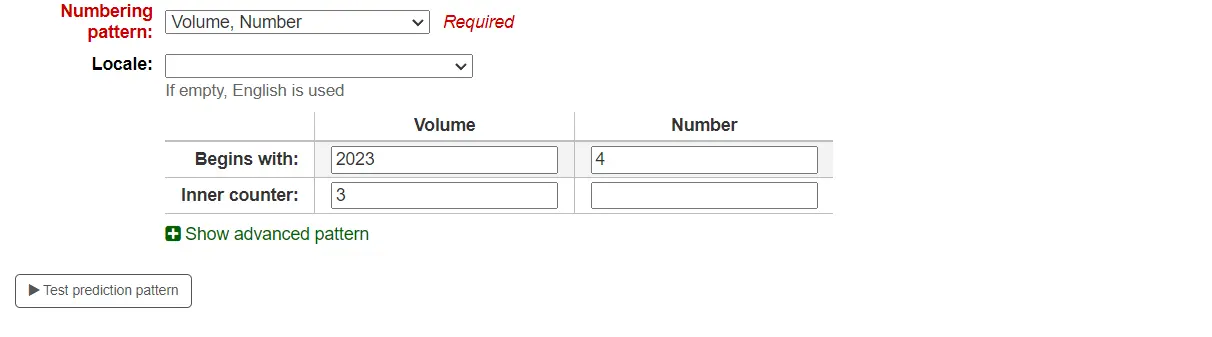
Begins with: enter the first value for each variable, these should be the values of the issue entered in ‘First issue publication date’ above.
Inner counter: enter how many issues have already passed in the cycle, so that Koha can calculate when to cycle back.
Por exemplo: Se o primeiro número recebido é “vol. 4, no. 1, iss. 796”, deve definir como “inner counter = 0” mas se for “vol. 4, no. 2, iss. 797”, deve definir “inner counter = 1”.
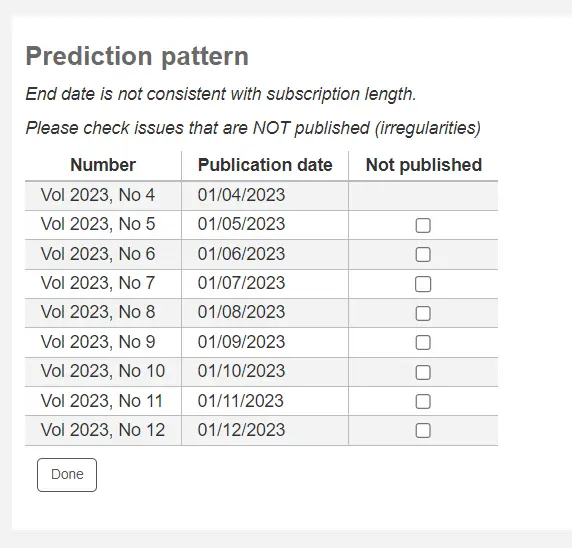
Após preencher estes dados pode carregar no botão ‘Testar padrão de numeração’ para verificar quais os números que o sistema vai gerar, se houver irregularidades pode escolher quais os números que não existem a partir da lista apresentada.
Se tiver adicionado campos personalizados, estes poderão ser editados acima dos botões, na parte inferior do ecrã
Clique em ‘Guardar assinatura’ para guardar as informações que introduziu.
Nota
Encontre exemplos na biblioteca de padrões de periódicos na wiki [https://wiki.koha-community.org/wiki/Serial_Pattern_Library].
Editar uma assinatura
Nota
Apenas colaboradores com a permission edit_subscription (ou superbibliotecários) poderão editar assinaturas existentes.
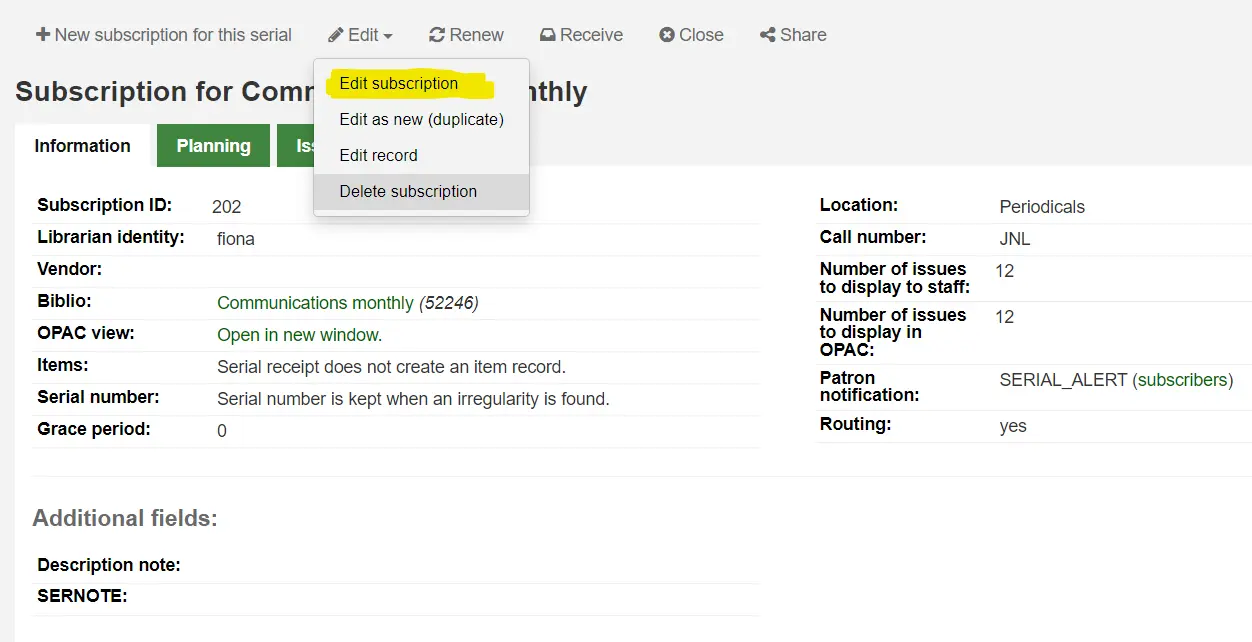
Para editar uma assinatura, clique em ‘Editar’ e em ‘Editar assinatura’ na página da assinatura. Isto levá-lo-á de volta ao mesmo formulário utilizado ao criar uma nova assinatura.
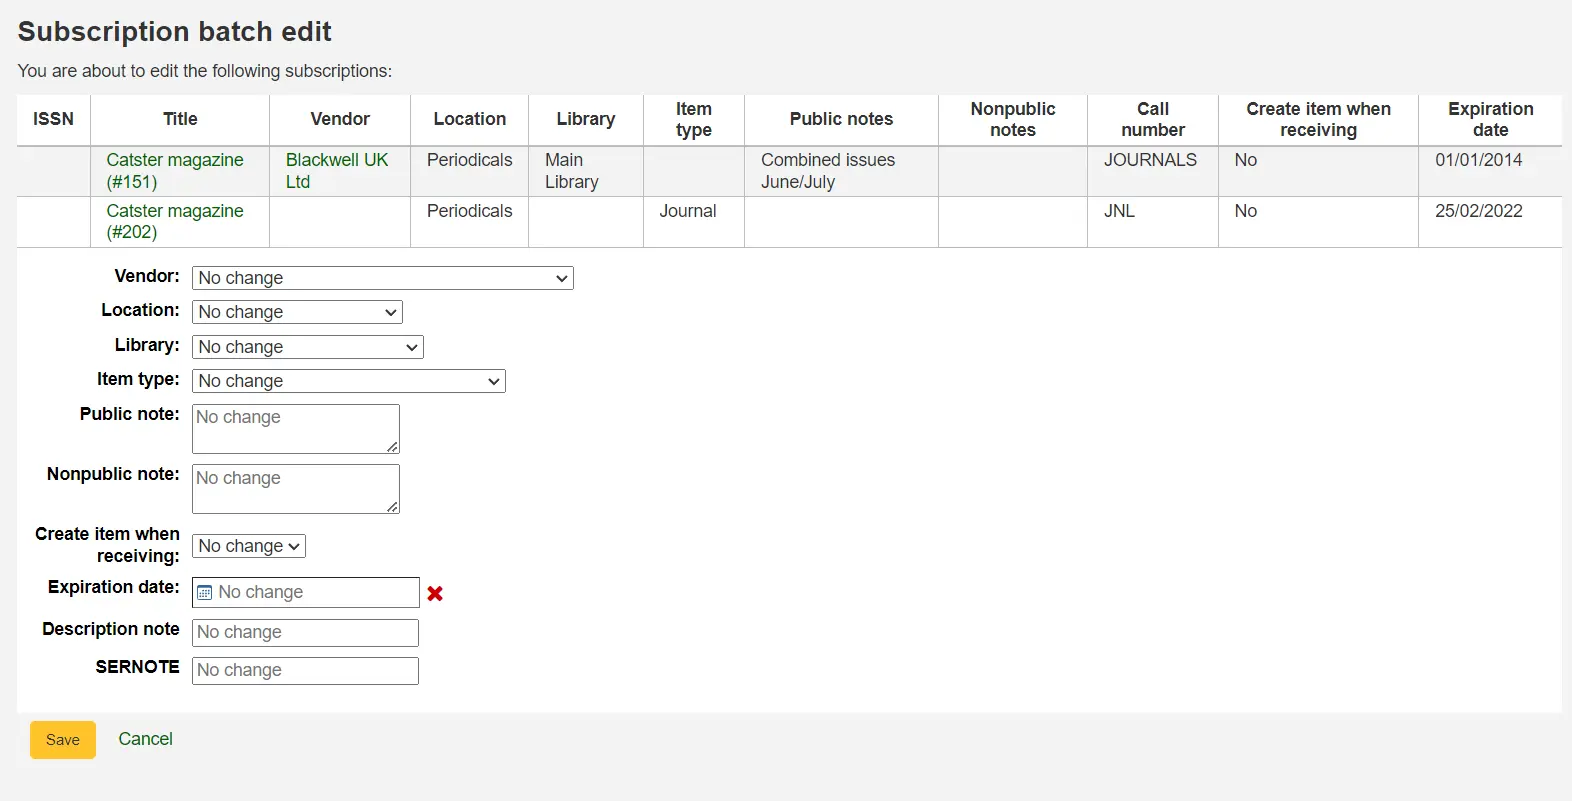
Também pode editar assinaturas em lote. Para tal, pesquise as assinaturas que pretende alterar. Nos resultados, assinale as caixas junto das assinaturas a editar. Aparecerá o endereço ‘Editar assinaturas selecionadas’.
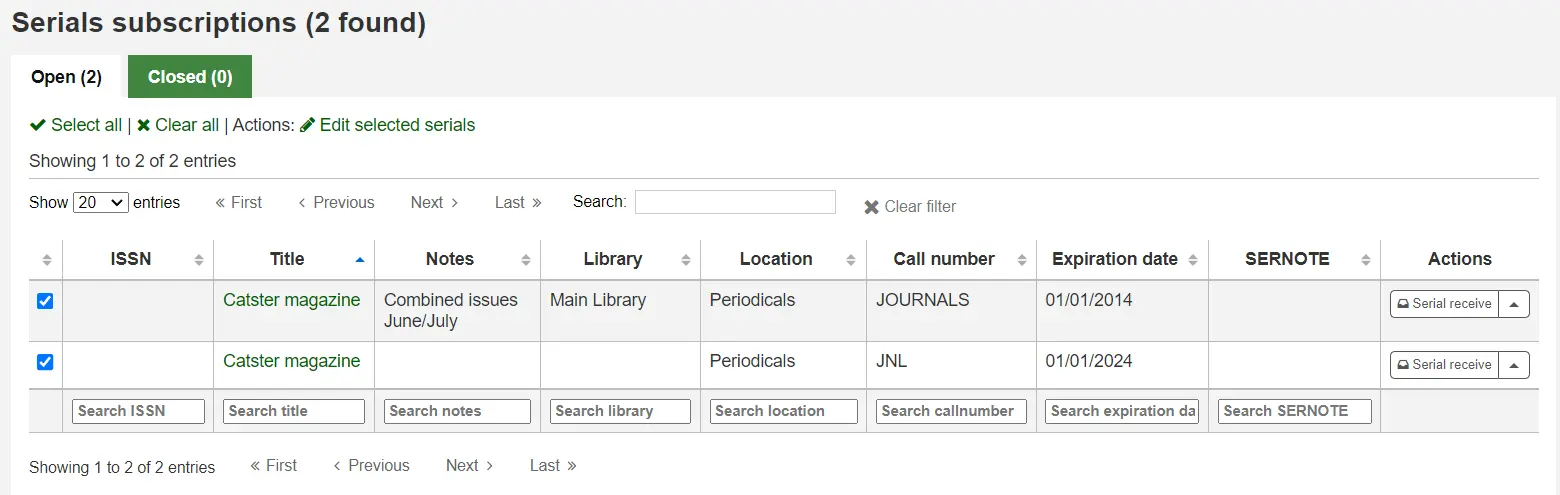
A partir daí, pode alterar:
o fornecedor
a localização na prateleira
a biblioteca
o tipo de documento
a nota pública
a nota interna
se deve ou não criar um exemplar ao receber um número
a data de expiração
quaisquer campos personalizados
Nota
Deixe o campo inalterado para manter os valores originais.
Receber números
Nota
Apenas os colaboradores com a permissão receive_serials (ou superbibliotecários) poderão receber números de assinaturas de periódicos existentes.
Os números podem ser marcados como recebidos a partir de vários locais. Para localizar uma assinatura, utilize a caixa de pesquisa na parte superior da página de Periódicos para pesquisar o periódico cujos números pretende receber:
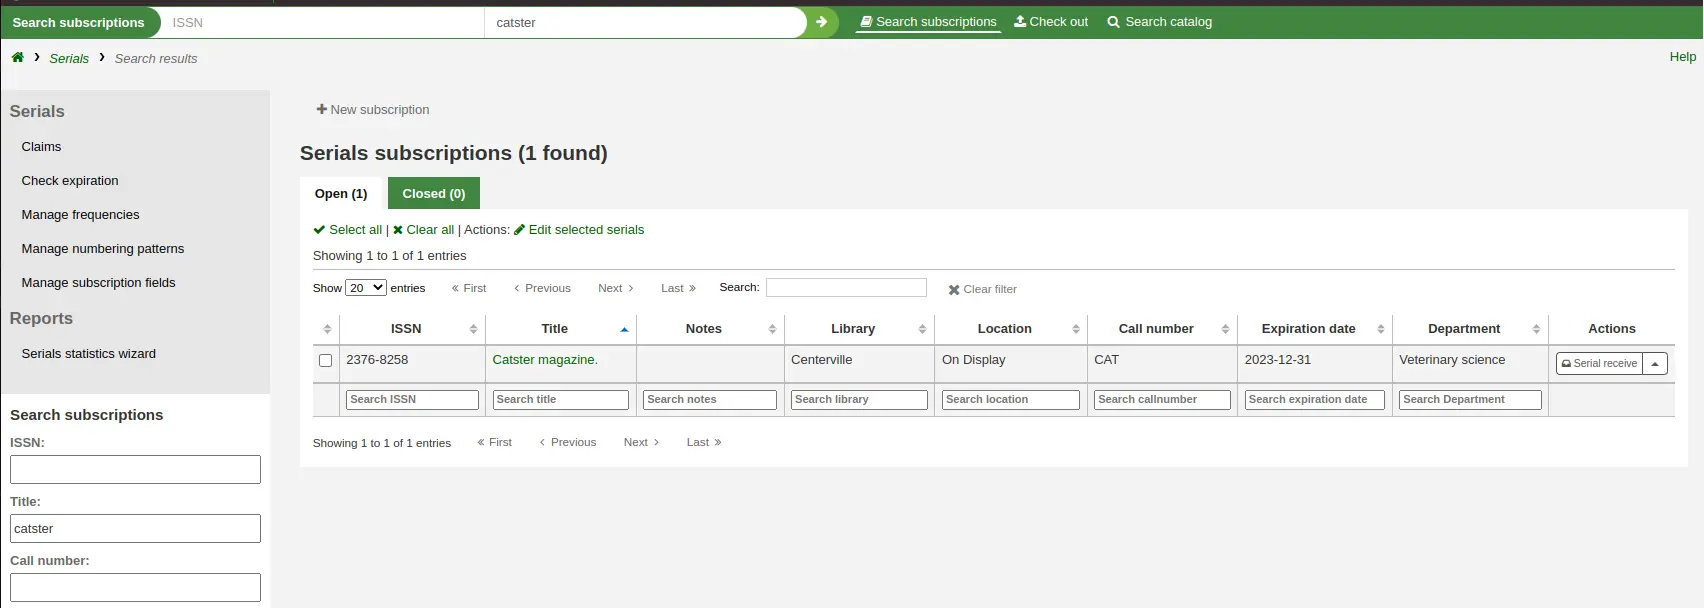
A partir dos resultados da pesquisa, pode clicar no botão ‘Receção de periódico’ ou clicar no título da assinatura e, em seguida, no botão ‘Receber’.
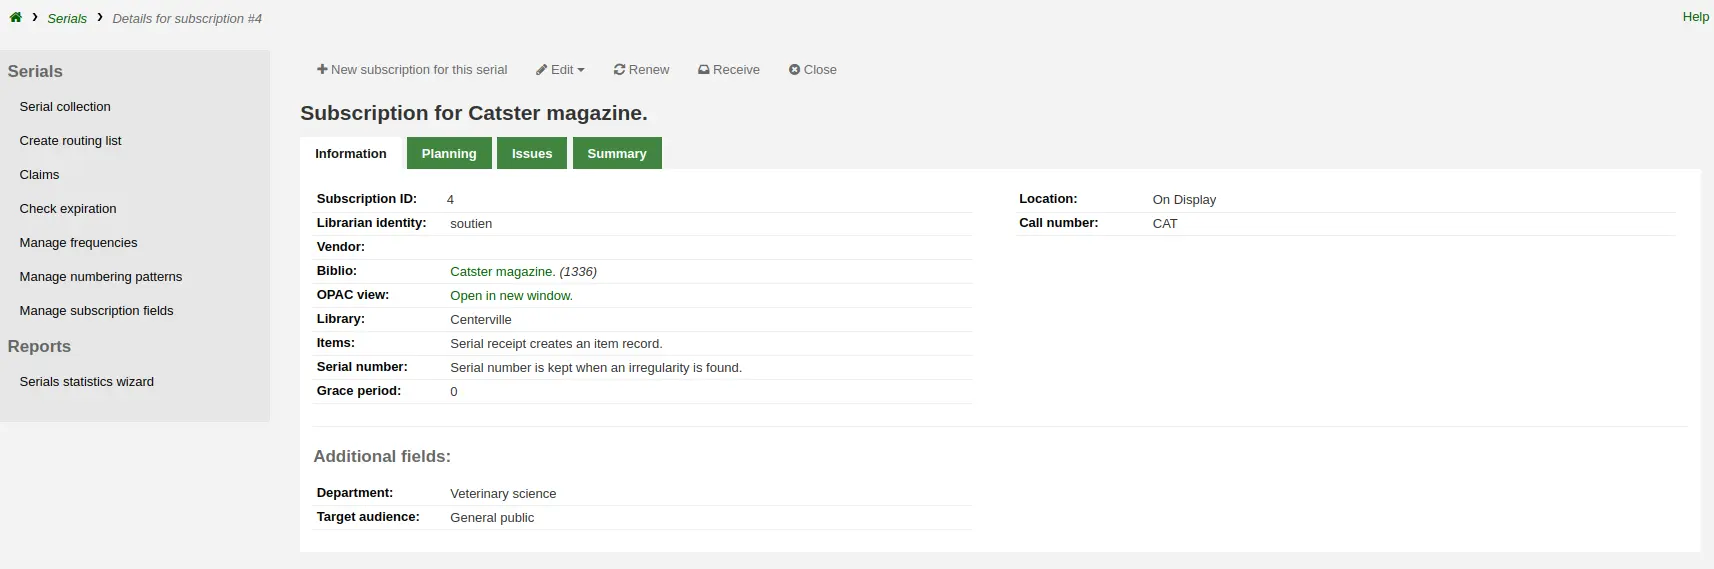
A última forma de receber periódicos é através da página ‘Coleção de periódicos’. À esquerda da página de resumo da subscrição, existe um menu com uma ligação para ‘Coleção de periódicos’.
Na página que for aberta, selecione os números que pretende receber (os previstos já devem estar marcados por omissão) e clique em ‘Editar periódicos’.
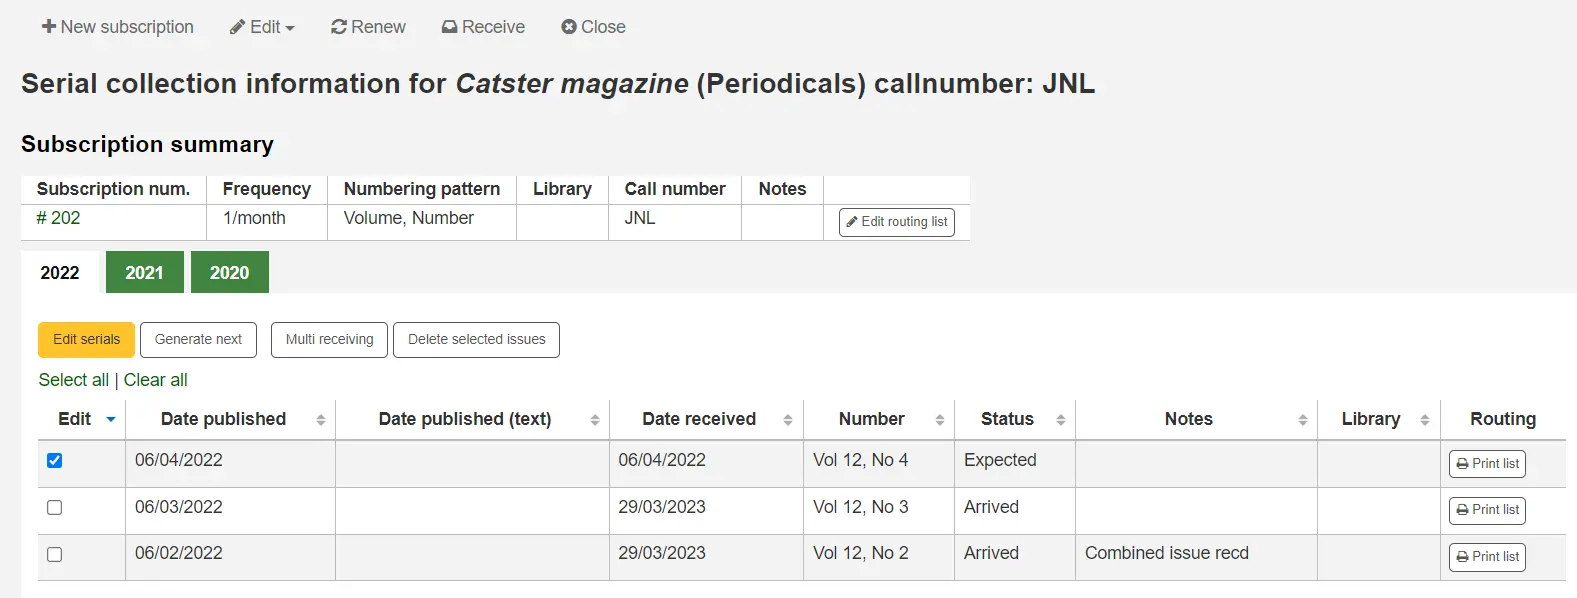
Todas as três das opções abrirá o formulário de um número recebido:
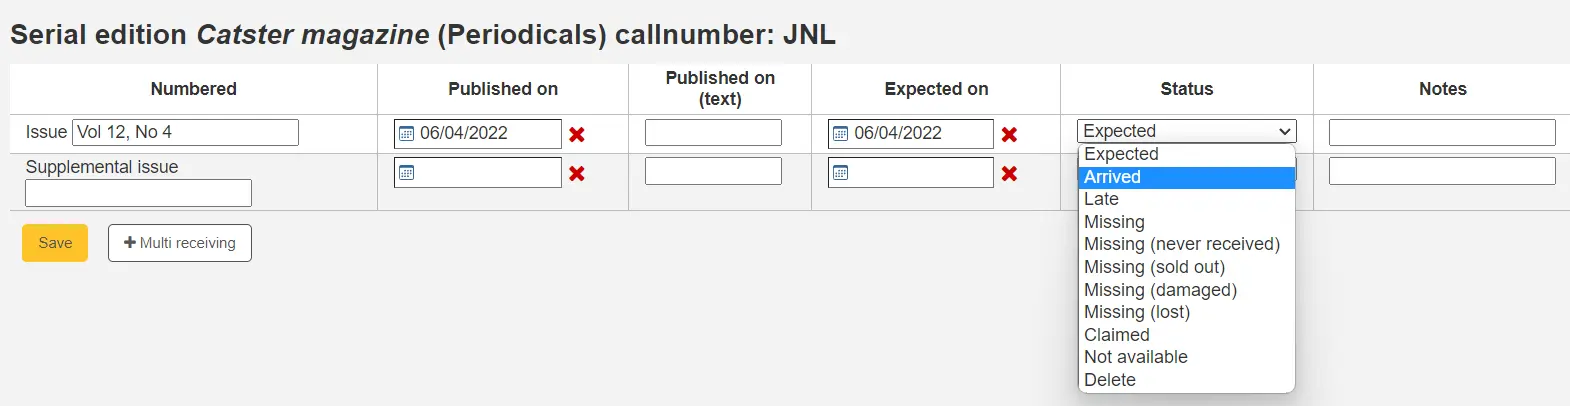
Selecione ‘Recebido’ no menu suspenso de estado para marcar um número como recebido.
Se decidiu criar um registo de exemplar para cada número, um formulário de adição de item aparecerá após selecionar ‘Recebido’. Pode adicionar vários exemplares utilizando a opção ‘Número de cópias a criar para este exemplar’, localizada na parte inferior do formulário.
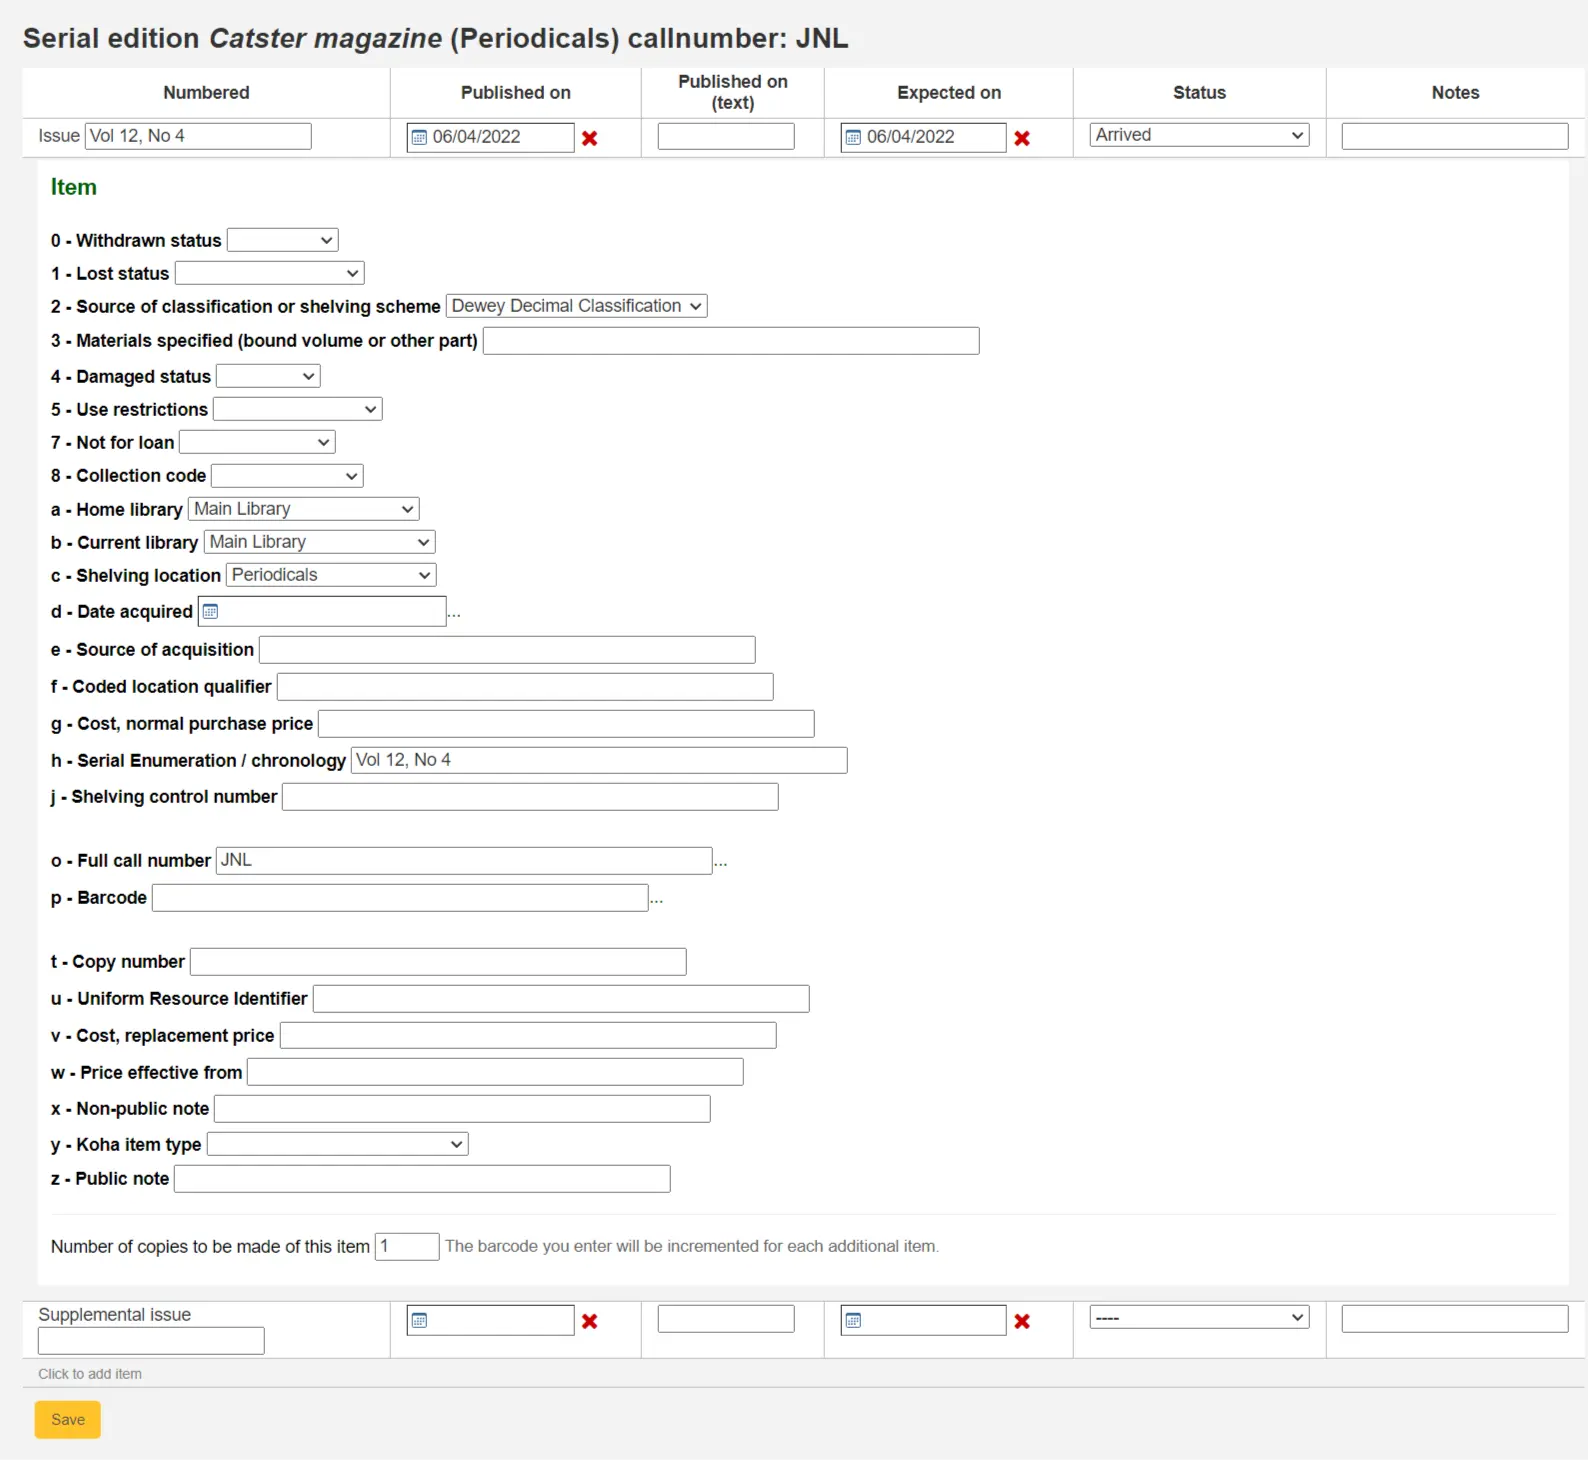
Se o número tiver um número complementar associado, preencha a informação sobre esse número complementar.
Key the entire numbering in the box after “Supplemental issue” no numbering will be inherited/auto-filled from the main issue, and exactly what you key in the box after “Supplemental issue” will be auto-filled in the item record’s Serial enumeration/chronology [MARC21 952$h] (if you create item records).
E.g., key this in its entirety if it’s what you would like displayed: “v.69 no.3 (Mar. 2015) suppl.”
If you have decided to have an item record created for each issue an item add form will appear for your supplement and for the issue itself
Assim que tiver inserido toda a sua informação pode guardar
Serial collection
Each subscription has a Serial collection page available from the main Serials menu.
From this page you can manage additional tasks related to subscription issues such as receiving multiple issues and editing.
Clicking the Generate next button will generate the next issue for you and mark the previously expected issue as ‘Late’ automatically.
Check the box in the Edit column for one or more previous issues and then click the Edit serials button. This will bring you to the same screen as when you are receiving issues. From there, you can edit the numbering, dates, status, and add notes.
Creating a routing list
Nota
Only staff with the routing permission (or the superlibrarian permission) will be able to manage routing lists.
A routing list is a list of people who receive the serial before it goes to the shelf. To enable routing lists, set your RoutingSerials preference to ‘Use’.
When on the subscription page you will see a link to the left that reads ‘Create routing list’ or ‘Edit routing list’
Clicking that link will bring you to the form to add a new routing list.
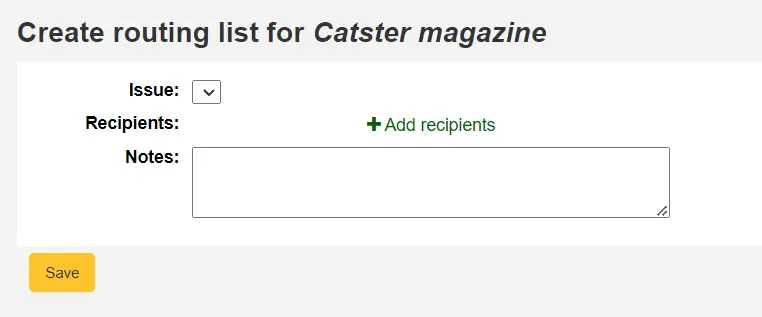
From here, click ‘Add recipients’ to add users to the routing list. In the menu that appears you can filter patrons by part of their name, their library, or their patron category.
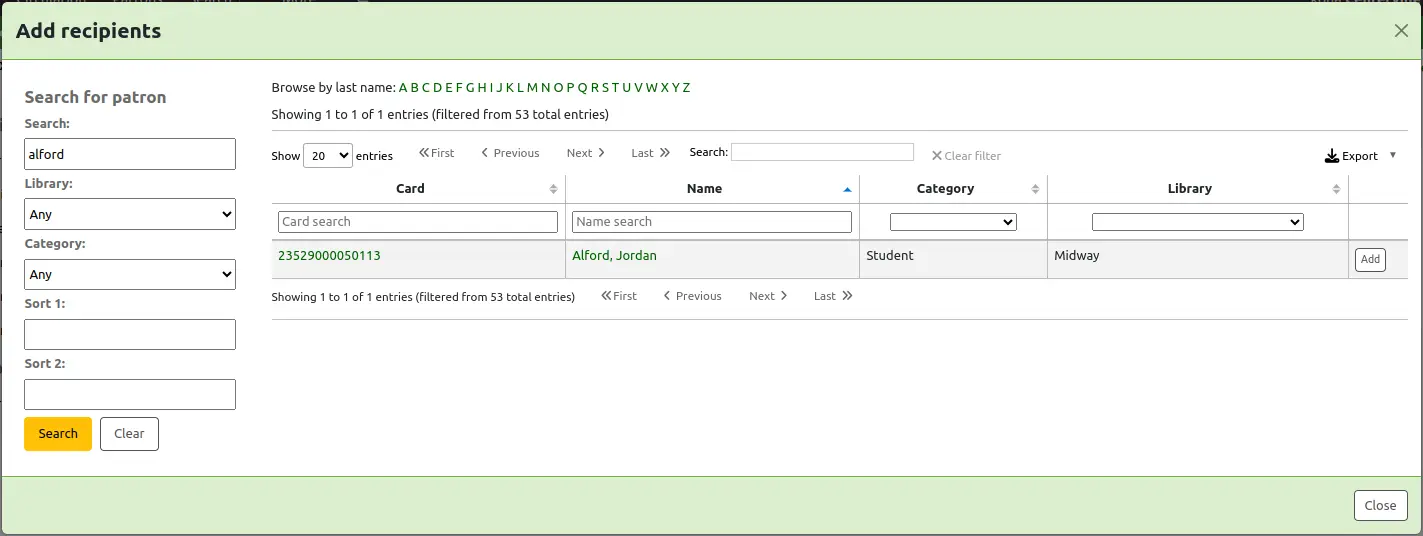
Click ‘Add’ to the right of each name to add them to the routing list. When you have chosen all of the people for the list, click the ‘Close’ button to be redirected to the routing list.
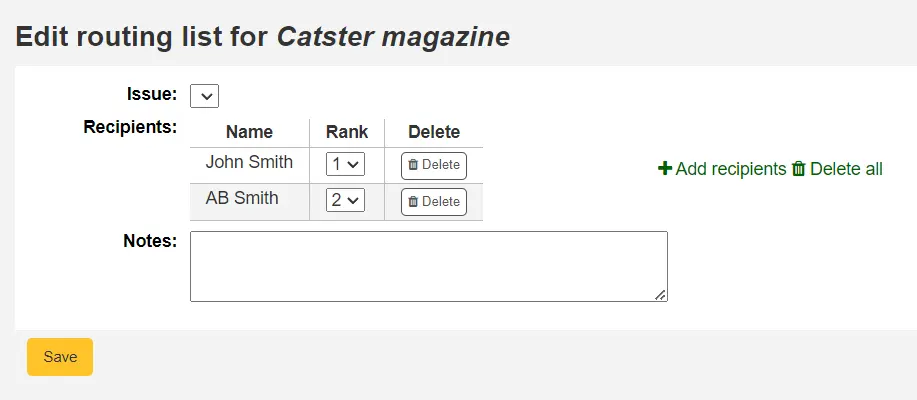
From this form, you can play with the order of the users and add notes. If you always add the same note, you can create an HTML customization with the display location ‘RoutingListNote’.
If the list looks the way you expect it to, click ‘Save’.
Next, you will be brought to a preview of the routing list. To print the list click ‘Save and preview routing slip.’ This will open a printable version of the list.
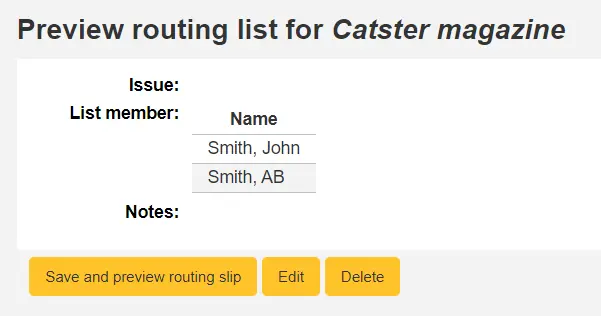
If RoutingListAddReserves is enabled, patrons listed in the routing list will automatically be added to the holds list for the issue.
To see a list of all of the routing lists for a specific patron is visit the routing lists tab on their patron record. Patrons are able to see a list of their own routing lists when logged into the OPAC in the your routing lists tab.
Subscriptions in the staff interface
Subscription information will appear on bibliographic records under the ‘Subscriptions’ tab
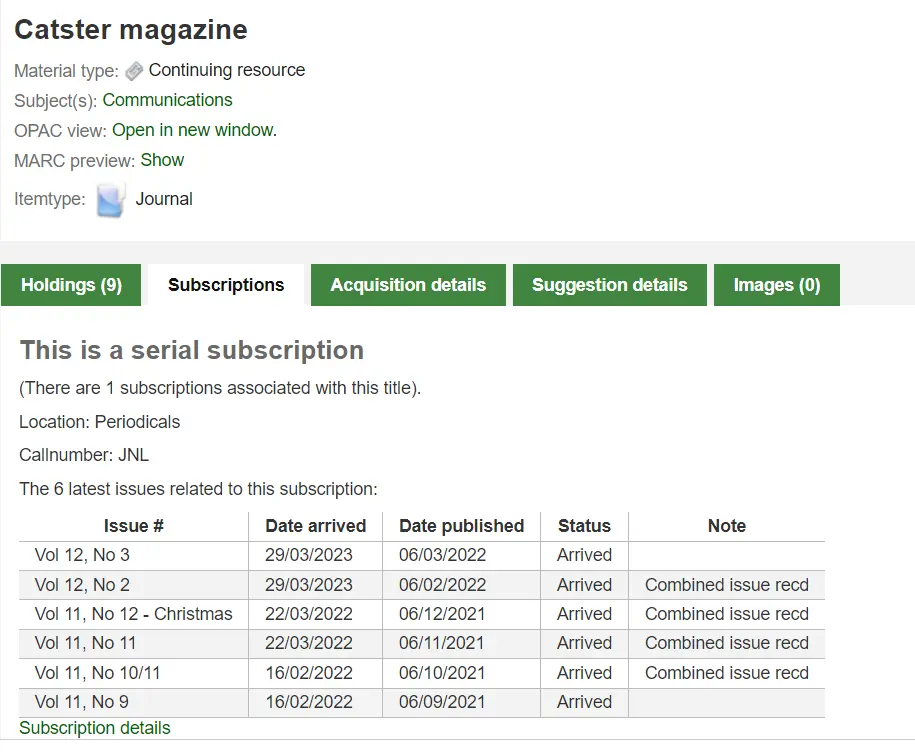
Clicking the ‘Subscription details’ link will take you to the Subscription summary page in the staff interface.
If you are using the acquisitions module to keep track of serial subscriptions you will see an extra ‘Acquisition details’ tab in your subscription details.
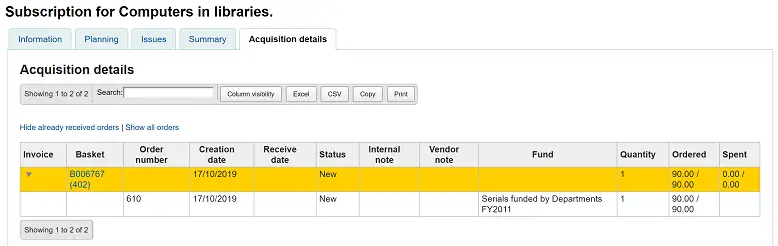
Nota
Você pode personalizar as colunas desta tabela na seção Configurações de tabela do módulo Administração (table id: orders).
Subscriptions in the OPAC
When viewing the subscription in the OPAC there will be several options. You can choose which tab appears by default with the opacSerialDefaultTab system preference.
Like in the staff interface, there will be a Subscriptions tab on the bibliographic record.
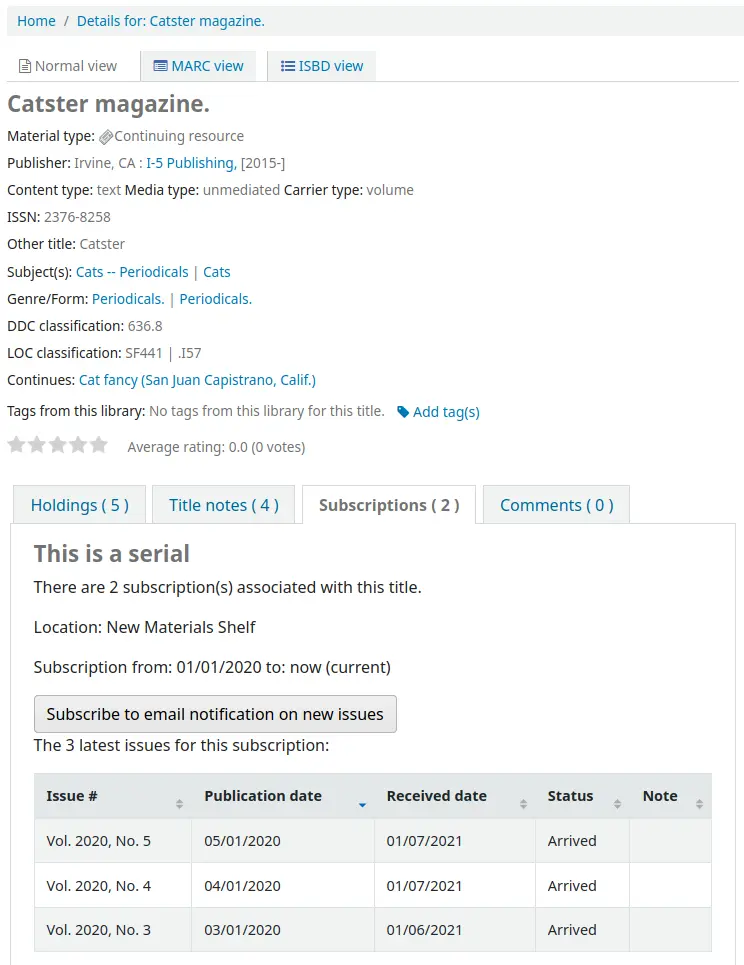
Under this tab will appear the number of issues you chose when setting up the subscription or in your OPACSerialIssueDisplayCount system preference. Clicking the ‘More details’ link will provide you with additional information about the serial history. You can set the default view of the serial history in the OPAC with the SubscriptionHistory system preference.
There are two views, brief and full. The brief serial subscription history will show basic information regarding the subscription.
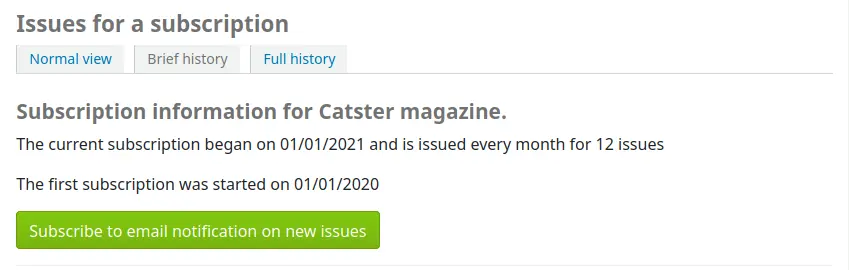
From this brief display patrons can subscribe to be notified of new issues as they are released by clicking the ‘Subscribe to email notifications of new issues’ button. This link will only appear if you have chosen to notify patrons when creating the subscription.
You can see those who subscribe to new issue alerts by going to the subscription page in the staff client and looking on the right of the ‘Information’ tab.
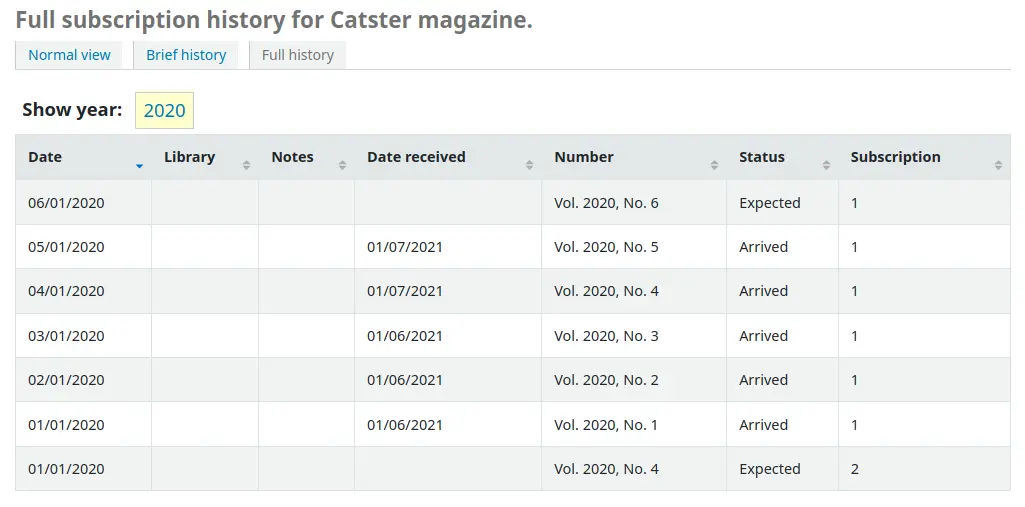
Whereas the full view shows extensive details, broken out by year, regarding the subscription
Claiming late issues
Nota
Only staff with the claim_serials permission (or the superlibrarian permission) will have access to this tool to claim late serial issues.
Koha can send email messages to your serial vendors if you have late issues. To the left of the main serials page there is a link to ‘Claims’.
Os links para reclamação também irão aparecer a esquerda na página de detalhes da assinatura
If you don’t have a claim notice defined yet you will see a warning message that you need to first define a notice in the Notices and slips tool.

Clicando em ‘Reclamações’ fará com que uma lista de periódicos de diferentes fornecedores seja aberta para que sejam geradas reclamações para números em atraso.
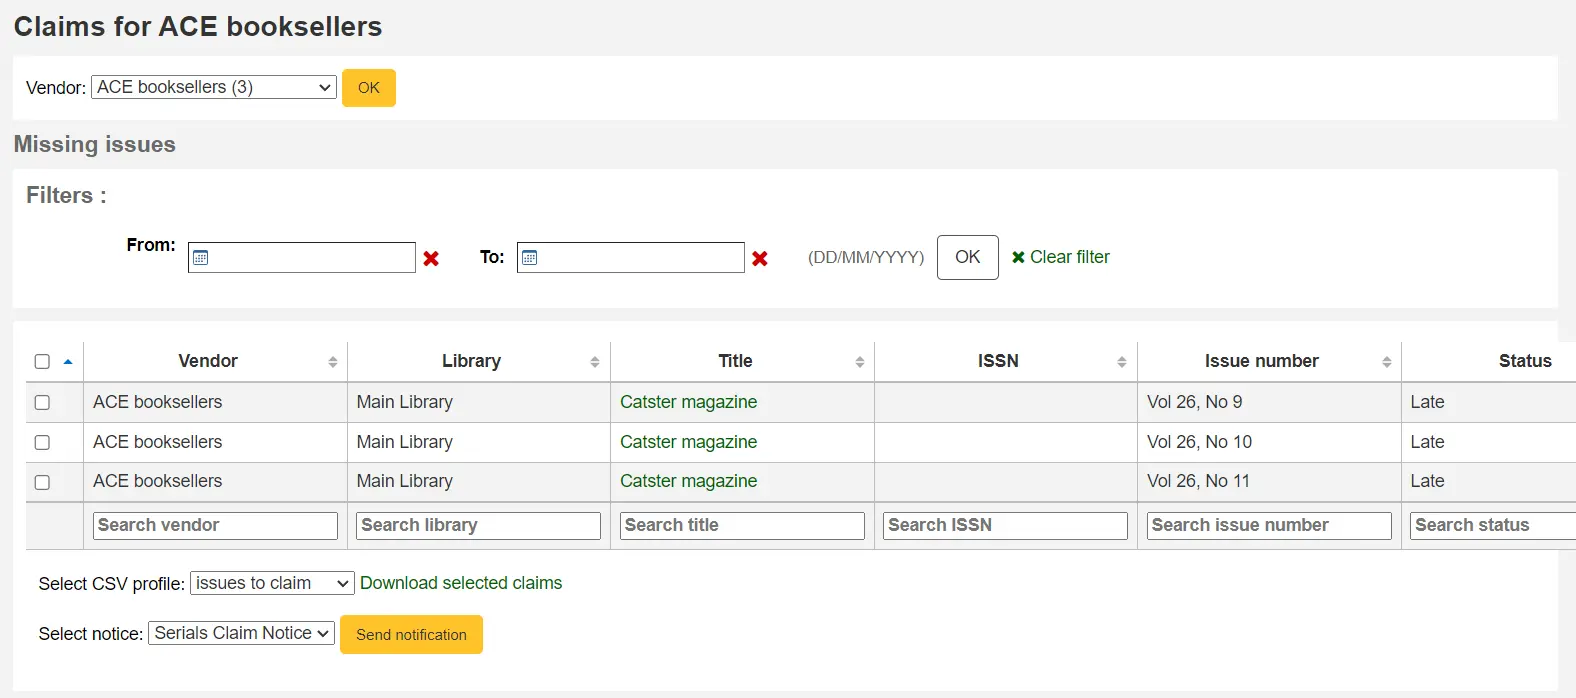
Na lista de fascículos em atraso você pode escolher para quais você deseja enviar reclamações por e-mail clicando na caixa ao lado esquerdo do fascículo em atraso, escolhendo o template do aviso e clicando em ‘Enviar notificação’.
You can also export the results to a CSV file by choosing a CSV profile and clicking ‘Download selected claims’.
Checking serial expiration
Nota
Only staff with the check_expiration permission (or the superlibrarian permission) will have access to this tool to check serial subscription expiration dates.
When adding serials you enter a subscription length, using the check expiration tool you can see when your subscriptions are about to expire. To use the tool, click the link to ‘Check expiration’ on the serials menu.
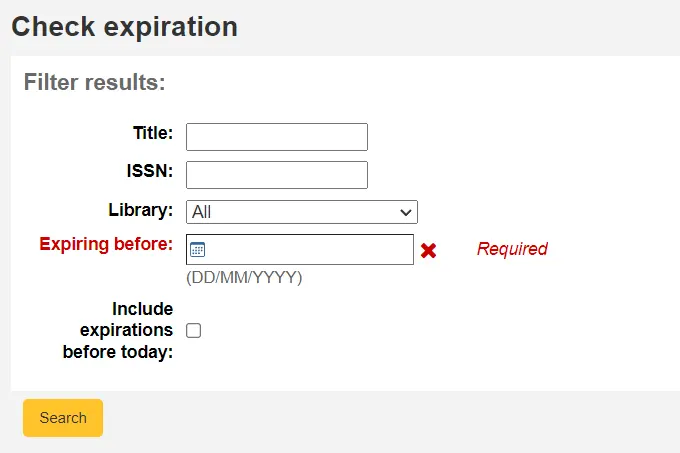
In the form that appears you need to enter at least a date to search by. You can also search by title, ISBN or library.
Nos resultados você verá todas as assinaturas que irão vencer após a data que você informou. A partir disto, você pode escolher a assinatura depois ou renová-la em um clique.

Se existir mais do que uma assinatura, pode marcar as caixas de seleção e clicar em ‘Renovar assinaturas selecionadas’ para renovar todas. As assinaturas serão renovadas pelo mesmo período da assinatura anterior (ou seja, se a última assinatura dessa publicação durou um ano, será renovada por um ano; se a última assinatura foi para 16 edições, será renovada por mais 16 edições).

Fechar uma assinatura
Quando uma assinatura expira, pode terminá-la utilizando o botão Fechar. Após o encerramento, já não é possível receber ou renovar a subscrição; só pode reabri-la.
Note que também pode terminar uma subscrição antes que esta expire.
Renovar assinaturas
Nota
Apenas os colaboradores com a permissão renew_subscription (ou superbibliotecários) poderão renovar as subscrições de revistas existentes.
Assim que clicar no botão ‘Renovar’, ser-lhe-ão apresentadas as opções de renovação.
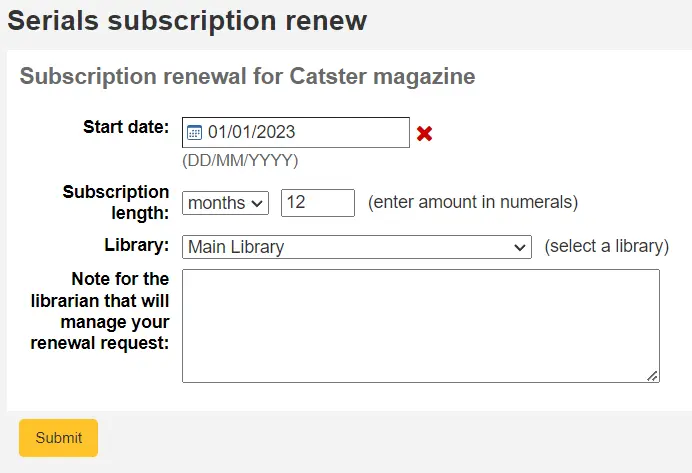
Data de início: introduza a data em que começa a sua assinatura.
Duração da assinatura: introduza o número de fascículos, semanas ou meses de duração da sua assinatura
Biblioteca: insira a biblioteca a que se destina esta assinatura; este só aparecerá se RenewSerialAddsSuggestion estiver definido para ‘Adicionar’
Nota para o bibliotecário que irá gerir o pedido de renovação: insira quaisquer observações que possa ter sobre esta renovação. Isto só aparecerá se RenewSerialAddsSuggestion estiver definido para ‘Adicionar’
Clique em ‘Enviar’.
Se a sua assinatura tiver sido terminada, não pode renová-la.
Se a sua preferência de sistema RenewSerialAddsSuggestion estiver ativada, a renovação de uma subscrição criará uma sugestão de compra no módulo de aquisições para que a equipa de aquisições a possa gerir.
Pesquisar periódicos
Ao aceder ao módulo de Periódicos, encontra uma caixa de pesquisa básica no topo, que pode ser utilizada para localizar assinaturas utilizando qualquer parte do ISSN e/ou do título, bem como um formulário de pesquisa no meio da página.
Pode também clicar no ícone ‘Mais opções’ na caixa de pesquisa, no topo da página, e clicar no endereço ‘Pesquisa avançada’ para realizar uma pesquisa mais detalhada nos seus periódicos.
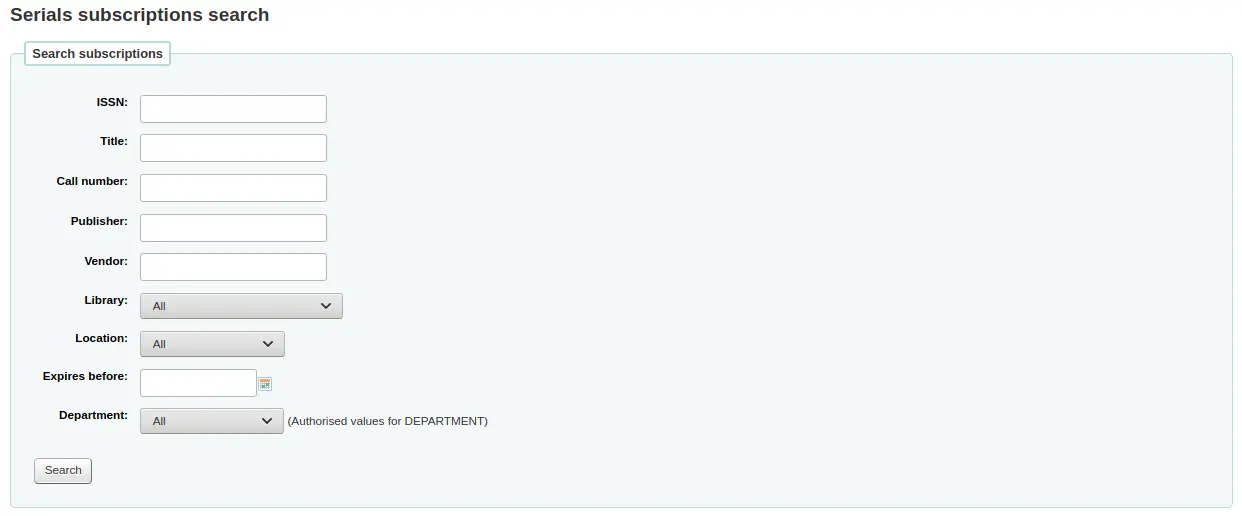
Nota
Se tiver campos adicionais que permitam a pesquisa, estes aparecerão neste formulário de pesquisa avançada.
Pode filtrar os resultados utilizando as caixas de pesquisa na parte inferior de cada coluna e ajustar a quantidade de resultados utilizando a barra de ferramentas na parte superior do conjunto de resultados.
Nota
Se tiver muitas assinaturas e o carregamento dos resultados consumir muito tempo ou recursos, pode utilizar a preferência de sistema SerialsSearchResultsLimit para limitar o número de resultados por página.
Estados dos números
Ao receber um número, altera-se o estado do fascículo para ‘Recebido’. Existem outros estados que podem ser utilizados para descrever os números.
Nota
Consulte também: tabela serials na secção de FAQ.
Esperado: este é o estado atribuído automaticamente a um novo número quando este é criado. Significa que o número ainda não chegou, mas também não está atrasado.
Recebido: este é o estado utilizado ao receber um número. Significa que o número foi recebido pela biblioteca.
Em circulação: este estado significa que o número está a circular através de uma lista de distribuição impressa. Não é atribuído automaticamente, mas pode utilizá-lo para indicar aos leitores que o número não está disponível no momento.
Nota
Este estado só está disponível quando o estado atual não é ‘Esperado’.
Enviado para encadernação: utilize este estado se enviar números para serem encadernados em volumes. Se criar exemplares para cada número, também pode utilizar o módulo de preservação para acompanhar os números enviados para encadernação. Caso não crie exemplares, pode utilizar este estado para rastrear qual o número que foi enviado.
Nota
Este estado só está disponível quando o estado atual não é ‘Esperado’.
Vinculado: utilize este estado para indicar que este número está encadernado num volume.
Nota
Este estado só está disponível quando o estado atual não é ‘Esperado’.
Atrasado: este estado significa que o número ainda não chegou e a data prevista para a sua chegada já passou. A data de atraso é determinada pela data de publicação e pelo período de tolerância definido na assinatura. Este estado é atribuído automaticamente aos números com o estado ‘Esperado’ no caso de ser criado um novo número ao clicar em ‘Gerar seguinte’ na secção Coleção de periódicos. Também pode ser aplicado automaticamente utilizando a tarefa cron SerialsUpdate.pl. Se definir manualmente um número para ‘Atrasado’, o próximo será gerado automaticamente.
Em falta: pode atribuir este estatuto a números que estejam em falta. Se não criar um exemplar para cada exemplar, esta opção pode ser utilizada para indicar qual o número em falta (no caso de um exemplar ser criado, pode utilizar o status de perdido do exemplar em vez de, ou para além do, estado do número). Também estão disponíveis estados de ausência mais específicos.
Em falta (nunca recebido): utilize este estado para indicar que o número nunca foi recebido do fornecedor.
Em falta (esgotado): utilize este estado para indicar que o número já não está disponível para compra.
Em falta (danificado): utilize este estado para indicar que o número foi danificado e já não está disponível.
Em falta (perdido): utilize este estado para indicar que o número foi perdido.
Reclamado: este estado significa que o número ainda não chegou, mas foi enviada uma solicitação de reclamação ao fornecedor. É atribuído automaticamente através do processo de reclamação, mas pode ser atribuído manualmente no caso de não enviar as reclamações através do Koha.
Não disponível: pode atribuir este estado a números que não estejam disponíveis, por qualquer motivo.
Eliminar: se selecionar este estado e guardar, o número será apagado e o próximo será criado.