-
Get there: More > Tools > Catalog > Batch item modification
This tool will allow you to modify a batch of item records in Koha.
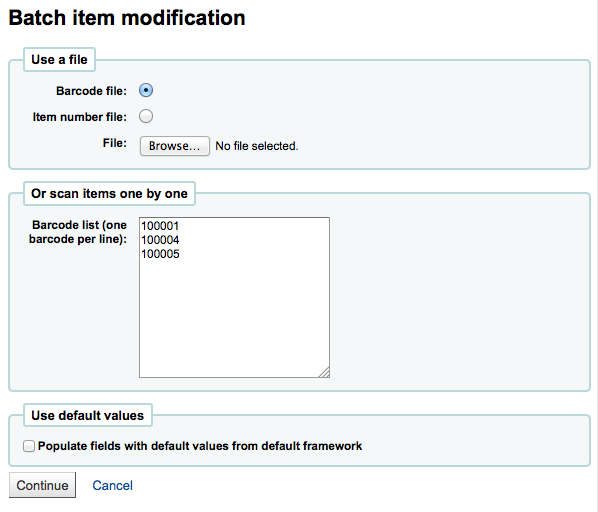
From the tool you can choose to upload a file of barcodes or item ids, or you can scan items one by one into the box below the upload tool. You can also decide the items edited should be populated with the default values you have defined in your default framework.
Once you have your file uploaded or the barcodes listed you can click 'Continue.'
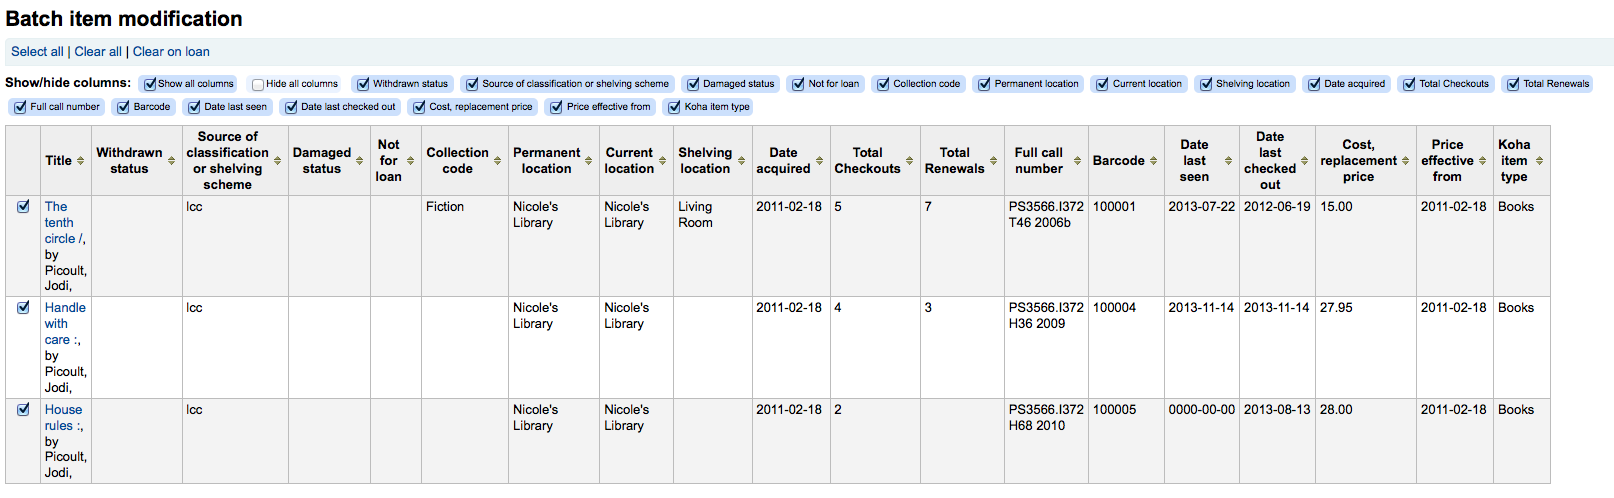
You will be presented with a summary of the items you want to modify. From here you can uncheck the items you don't want to modify before making changes in the form below. You can also hide columns you don't need to see to prevent having to scroll from left to right to see the entire item form.
Note
To uncheck all items thar are currently checked out you can click the 'Clear on loan' link at the top of the form.
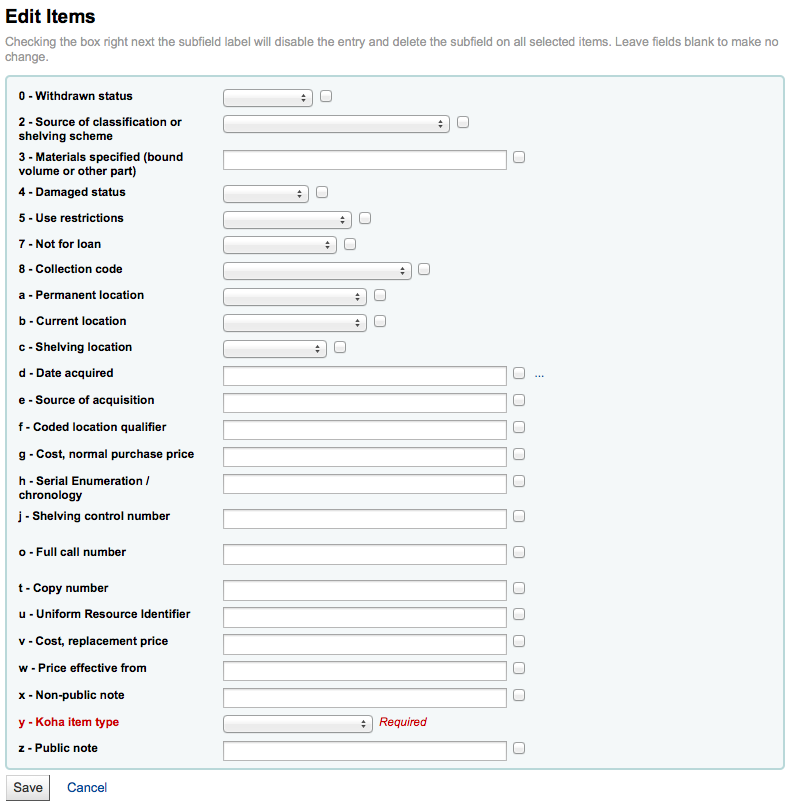
Using the edit form you can choose which fields to make edits to. By checking the checkbox to the right of each field you can clear the values in that field for the records you are modifying.
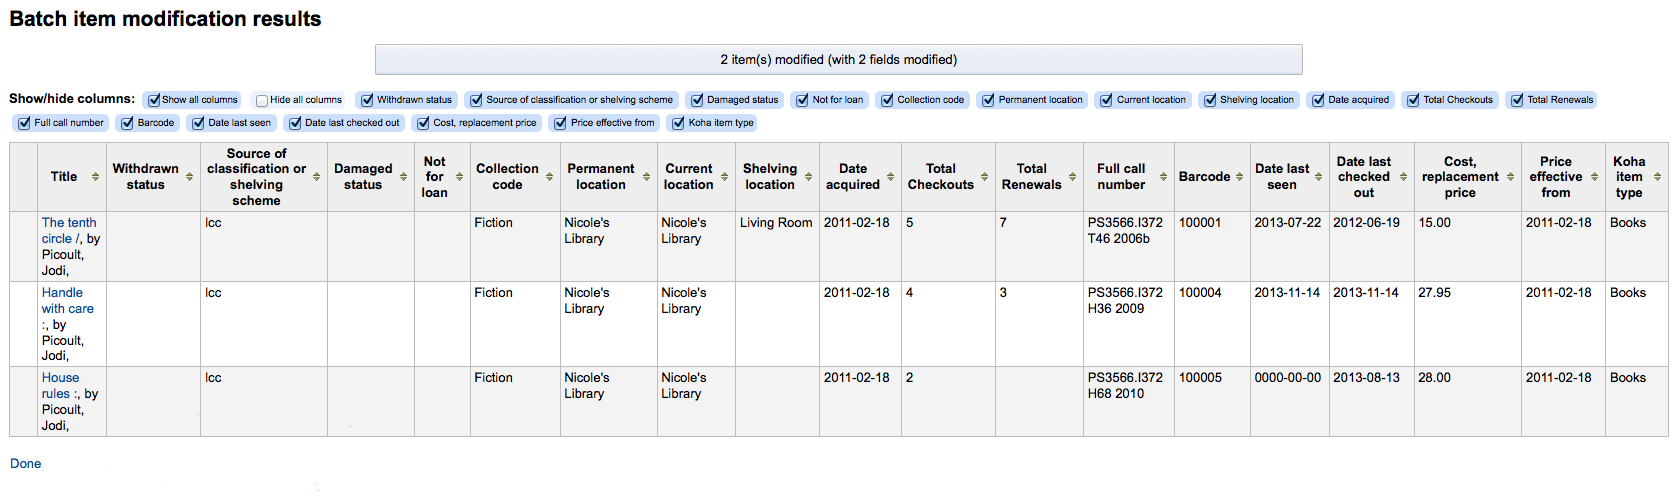
Once you have made you changes you will be presented with the resulting items.
Note
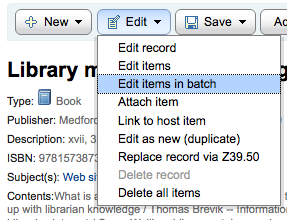
You can also edit items on one bib record in a batch by going to the bib record and clicking Edit > Edit items in batch
-
Get there: More > Tools > Catalog > Batch item deletion
This tool will allow you to delete a batch of item records from Koha.
From the tool you can choose to upload a file of barcodes or item ids, or you can scan items one by one into the box below the upload tool.
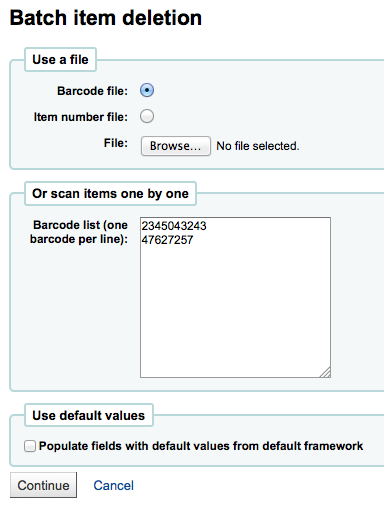
Once you have your file uploaded or the barcodes scanned you can click 'Continue.'
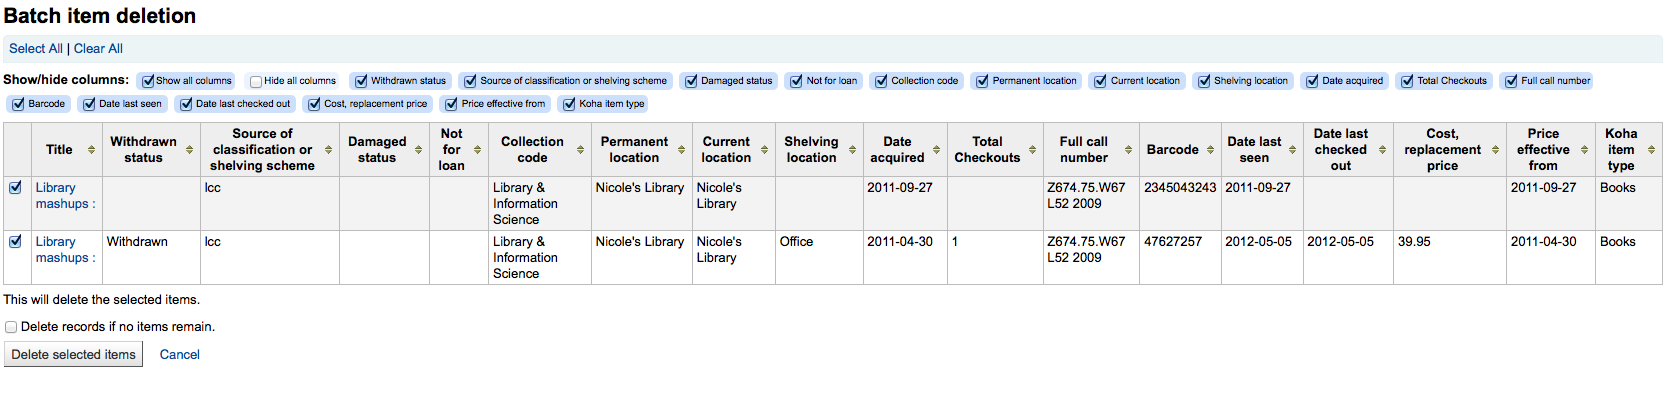
You will be presented with a confirmation screen. From here you can uncheck the items you don't want to delete and decide if Koha should delete the bib record if the last item is being deleted before clicking 'Delete selected items.' If you'd like you can delete the bibliogrphic record if you're deleting the last item by clicking the checkbox next to 'Delete records if no items remain'.
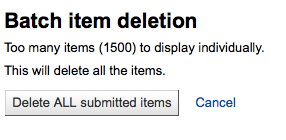
If your file (or list of scanned barcodes) has more than 1000 barcodes, Koha will be unable to present you with a list of the items. You will still be able to delete them, but not able to choose which items specifically to delete or delete the biblio records.
If the items are checked out you will be presented with an error after clicking 'Delete selected items' and the items will not be deleted.
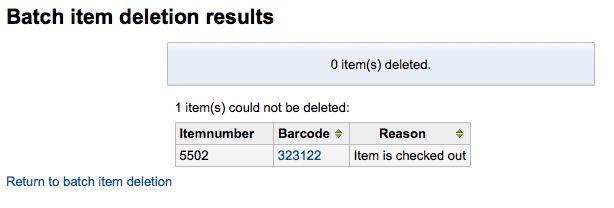
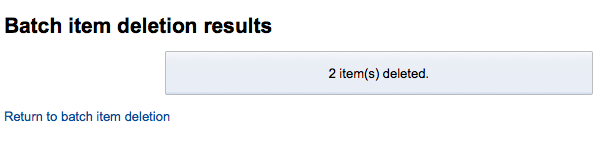
If the items can be deleted they will be and you will be presented with a confirmation of your deletion.
This tool will take a batch of record numbers for either bibliographic records or authority records and allow you to delete all those records and any items attached to them in a batch.
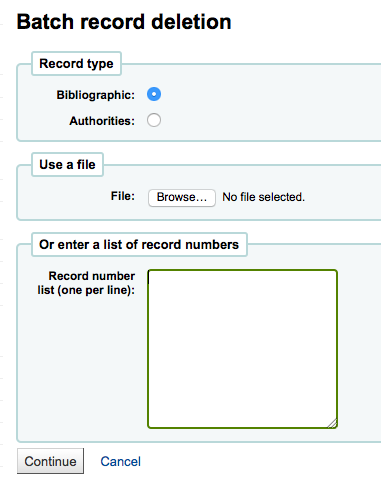
First you need to tell the tool if you're deleting bibliographic or authority records. Next you can load a file with biblionumbers or authids or enter a list of those numbers in the box provided. Once you submit the form you will be presented with a summary of the records you are trying to delete.
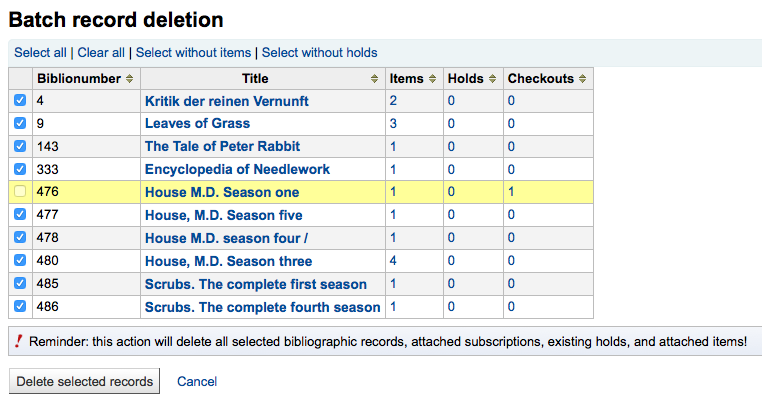
If a record you want to delete can't be deleted it will be highlighted.
Check the records you want to delete and click the 'Delete selected records' button to finish the process.
-
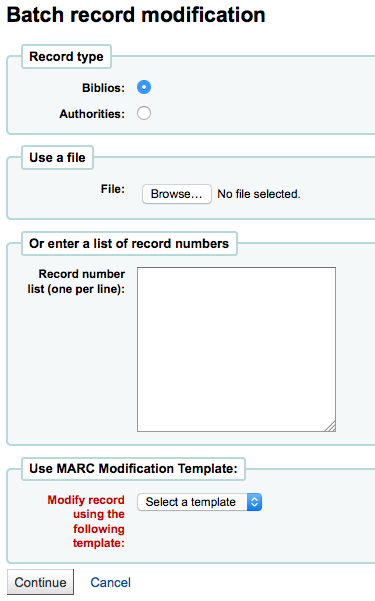
Get there: More > Tools > Catalog > Batch record modification
This tool will allow you to edit batches of bibliographic and/or authority records using MARC Modification Templates. Before visiting this tool you will want to set up at least one MARC modification template.
When you visit the tool it will ask you:
-
Choose whether you're editing bibliographic or authority records
-
Enter the biblionumbers or authids
-
You can upload a file of these numbers or
-
Enter the numbers (one per line) in the box provided
-
-
Finally choose the MARC Modification Template you'd like to use to edit these records.
Once you've entered your critera click 'Continue'
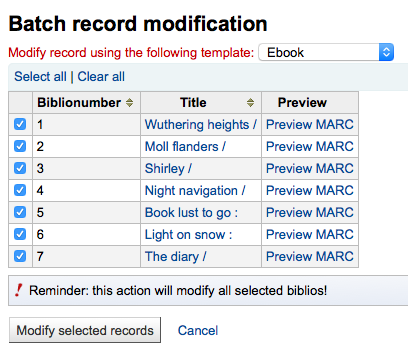
You will be presented with a list of records that will be edited. Next to each one is a checkbox so you can uncheck any items you would rather not edit at this time.
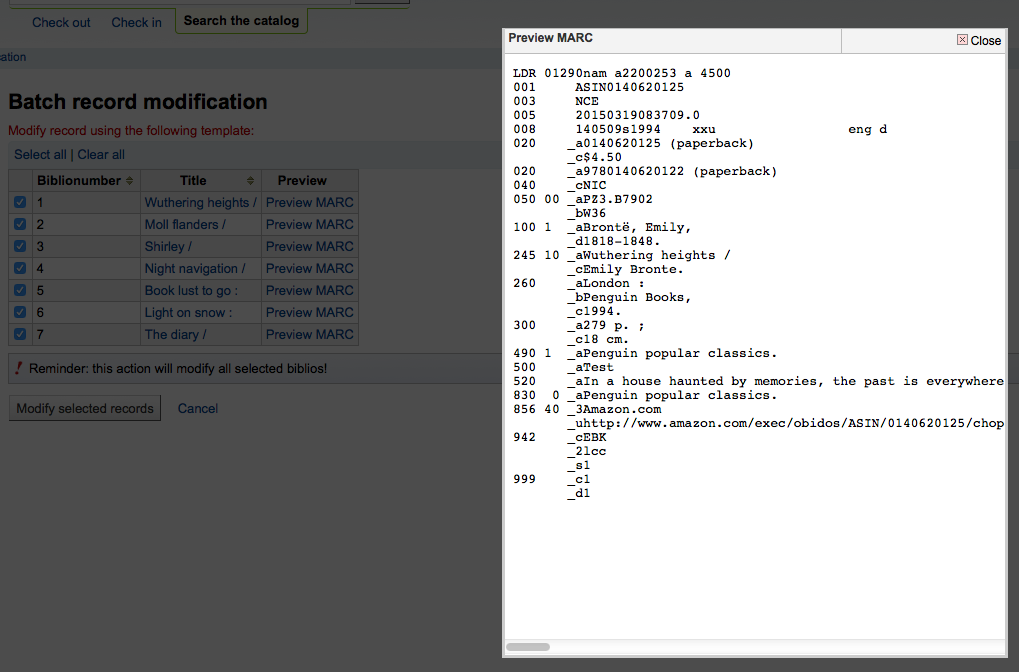
Clicking Preview MARC will allow you to see what edits will be made when you finalize the edit.
Once you're sure everything is the way you want you can click the 'Modify selected records' button and your records will be modified.
-
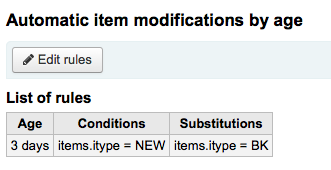
Get there: More > Tools > Catalog > Automatic item modifications by age
This tool allows librarians to update item specific fields when an item reaches a certain age.
Note
Staff need the items_batchmod permission to access this tool
Important
The settings in this tool will be acted upon by the corresponding cron job
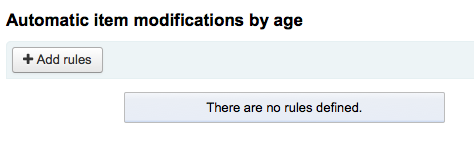
If you haven't created any rules you will see the option to 'Add rules' on the Tool page. Click this button to create rules.
If you have rules already there will be a button that reads 'Edit rules'. To create a new rule click the 'Edit rules' button at the top of the page
You will be brought to a page where you can edit exisitng rules or create a new rule

In the form that appears you can set :
-
the age in days at which the item will update (Age)
-
what criteria is needed to trigger the update (Conditions)
-
what changes are made when the script runs (Substitutions)
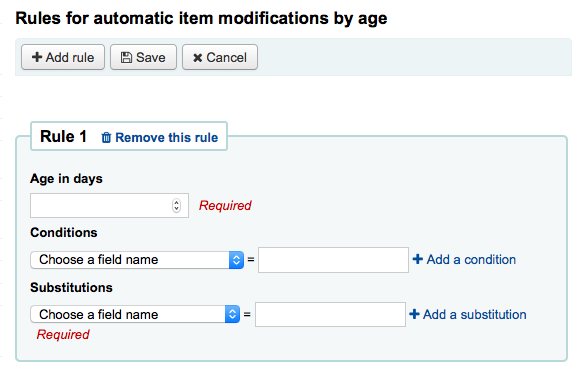
Once you're done you can click the 'Add this rule' link and then add additional rules or you can click the 'Submit these rules' button to save your changes.
-
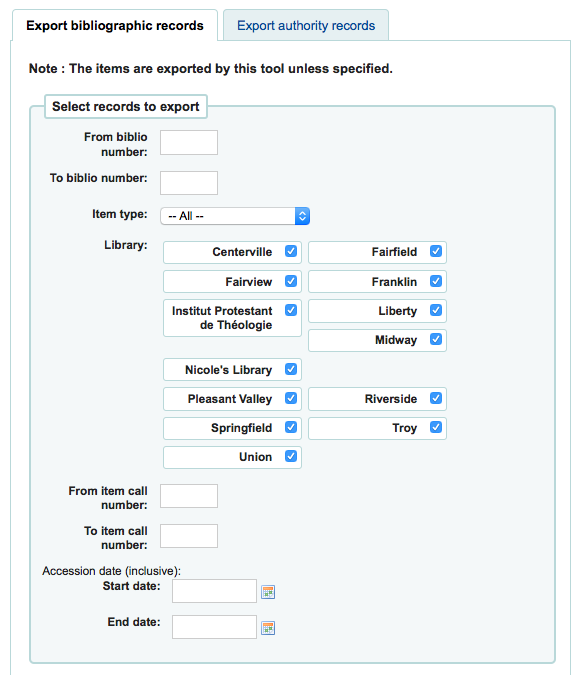
Get there: More > Tools > Catalog > Export Data
Koha comes with a tool that will allow you to export your bibliographic, holdings and/or authority data in bulk. This can be used to send your records to fellow libraries, organizations or services; or simply for backup purposes.
At the top of the screen you need to pick what data you're exporting. If you're exporting bibliographic records with or without the holdings information you want to click the 'Export bibliographic records' tab.
-
Fill in the form in order to limit your export to a specific range (all fields are optional)
-
Choose to limit your export by any one or more of the following options
-
Limit to a bib number range
-
Limit to a specific item type
-
Important
This limit will use the type you have defined in the item-level_itypes preference. If you have the item-level_itypes preference set to 'specific item' and you have no items attached to a bib record it will not be exported. To get all bib records of a specific type you will need your item-level_itypes preference set to 'biblio record'.
-
-
Limit to a specific library or group of libraries
-
Limit to a call number range
-
Limit to an acquisition date range
-
-
If you'd like you can load a file of biblionumbers for the records you would like to export

-
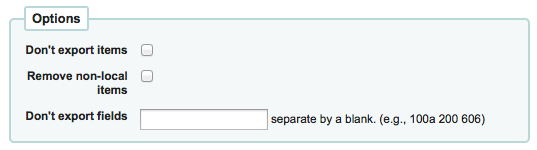
Next choose what to skip when exporting
-
By default items will be exported, if you would like to only export bibliographic data, check the 'Don't export items' box
-
To limit your export only to items from the library you're logged in as (if you leave the 'Library' field set to 'All') or to the library you selected above check the 'Remove non-local items' box
-
You can also choose what fields you don't want to export. This can be handy if you're sharing your data, you can remove all local fields before sending your data to another library
-
-
Finally choose the file type and file name
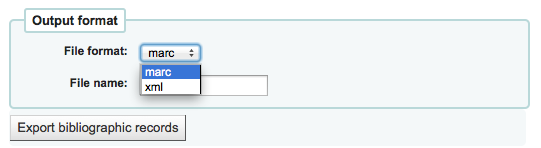
-
Choose to export your data in marc or marcxml format
-
Choose the name you want your file to save as
-
-
Click 'Export bibliographic records'
-
At the top of the screen you need to pick what data you're exporting. If you're exporting authority records you want to click the 'Export authority records' tab.
-
Fill in the form in order to limit your export to a specific range or type of authority record (all fields are optional)
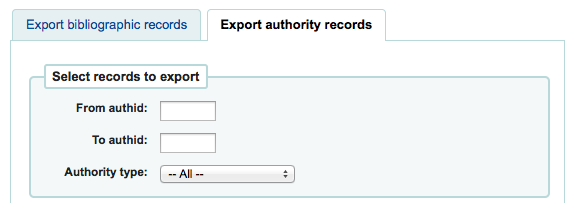
-
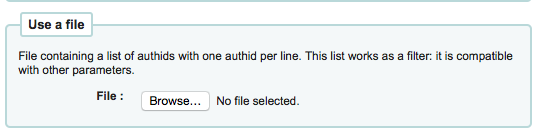
Or you can choose a file of authids to export
-
Next choose fields that you would like to exclude from the export separated by a space (no commas)

-
If you'd like to exclude all subfields of the 200 for example just enter 200
-
If you'd like to exclude a specific subfield enter it beside the field value 100a will exclude just the subfield 'a' of the 100
-
-
Finally choose the file type and file name
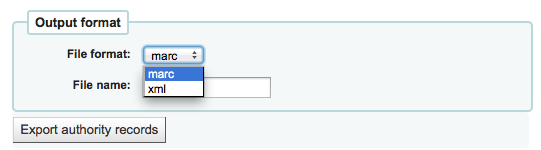
-
Choose to export your data in marc or marcxml format
-
Choose the name you want your file to save as
-
-
Click 'Export authority records'
-
Get there: More > Tools > Catalog > Inventory/Stocktaking
Koha's Inventory Tool can be used in one of two ways, the first is by printing out a shelf list that you can then mark items off on, or by uploading a text files of barcodes gathered by a portable scanner.
If you do not have the ability to use your barcode scanner on the floor of the library, the first option available to you is to generate a shelf list based on criteria you enter.
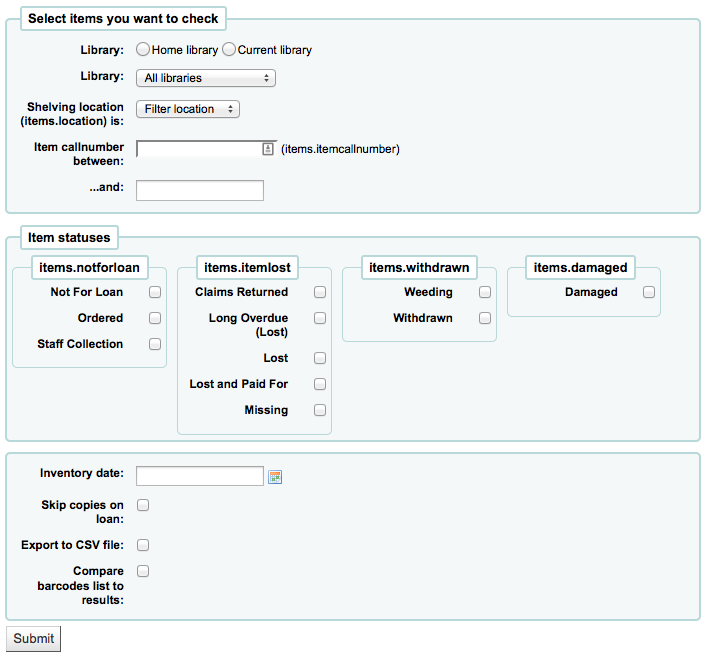
Choose which library, shelving location, call number range, item status and when the item was last seen to generate a shelf list that you can then print to use while walking around the library checking your collection
Alternatively you can export the list to a CSV file for altering in an application on your desktop. Simply check the box next to 'Export to csv file' to generate this file.
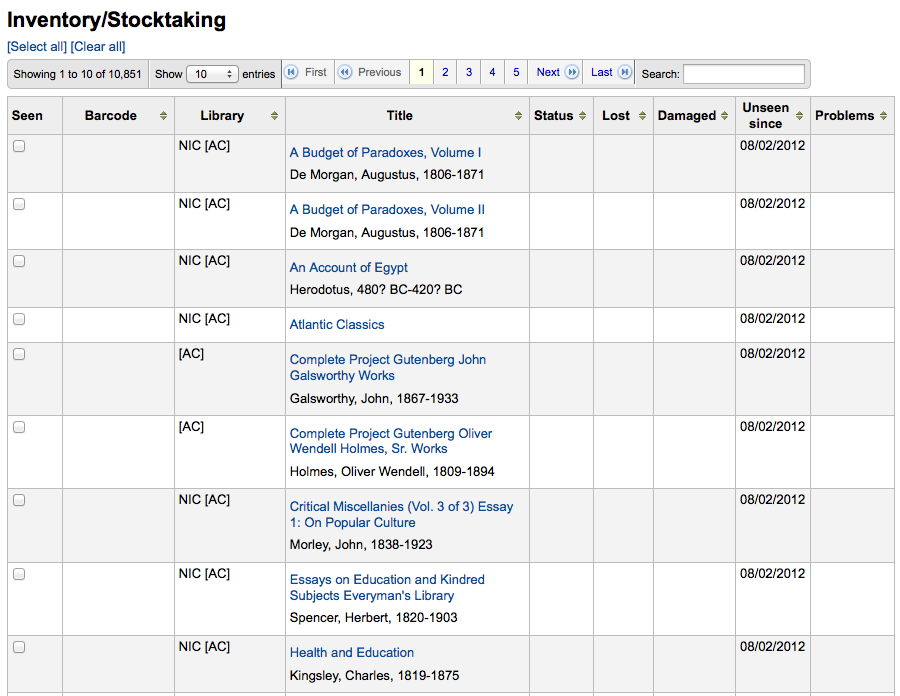
Once you have found the items on your shelves you can return to this list and check off the items you found to have the system update the last seen date to today.
If you have a portable scanner (or a laptop and USB scanner) you can walk through the library with the scanner in hand and scan barcodes as you come across them. Once finished you can then upload the text file generated by the scanner to Koha
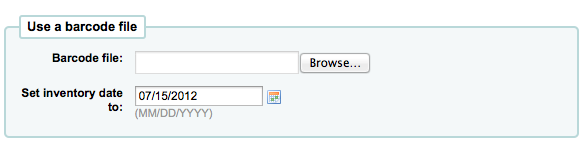
Choose the text file and the date you want to mark all items as seen and then scroll to the very bottom and click 'Submit.'
-
Get there: More > Tools > Catalog > Label Creator
The Label Creator allow you to use layouts and templates which you design to print a nearly unlimited variety of labels including barcodes. Here are some of the features of the Label Creator module:
-
Customize label layouts
-
Design custom label templates for printed labels
-
Build and manage batches of labels
-
Export single or multiple batches
-
Export single or multiple labels from within a batch
-
Export label data in one of three formats:
-
PDF - Readable by any standard PDF reader, making labels printable directly on a printer
-
CSV - Export label data after your chosen layout is applied allowing labels to be imported in to a variety of applications
-
XML - Included as an alternate export format
-
-
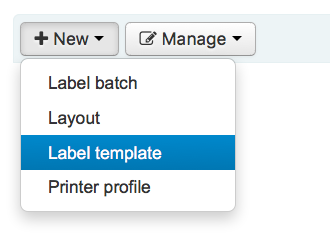
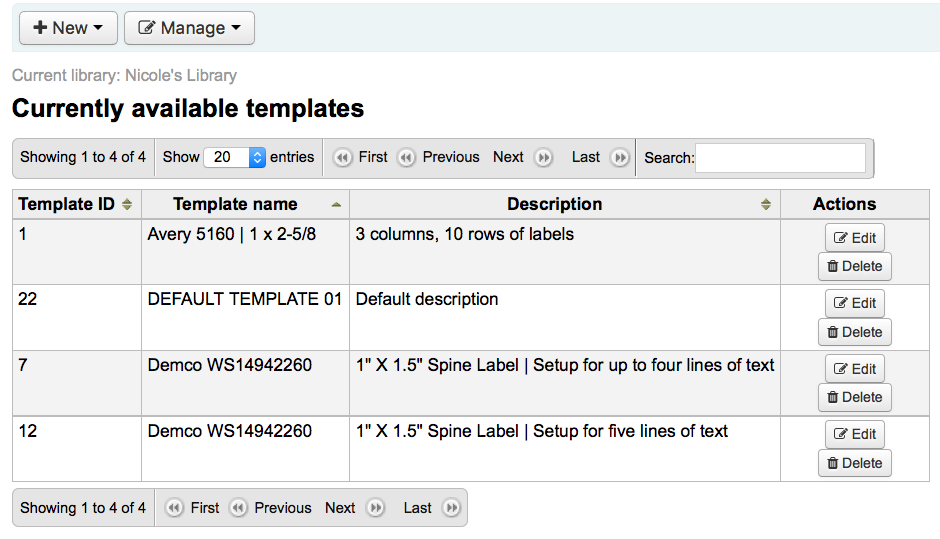
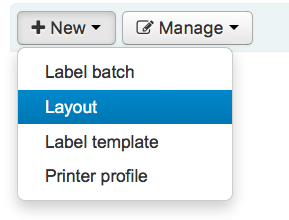
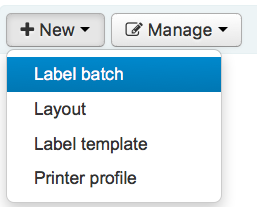
Get there: More > Tools > Label Creator > Manage > Label templates
A template is based on the label/card stock you are using. This might be Avery 5160 for address labels, Gaylord 47-284 for spine labels or Avery 28371 for your patron cards, just to give a couple of examples. These labels will include all of the information you will need for setting up a Koha, this information may be on the packaging, and if not it can usually be found on the vendor's website.
To add a new template, you want to click on the 'New' button at the top of the Label Creator and choosing 'Label template'.
Using the form that appears you can define the template for your sheet of labels or cards.

-
Template ID will be automatically generated after saving your template, this is simply a system generated unique id
-
Template Code should be something you can use to identify your template on a list of templates
-
You can use the Template Description to add additional information about the template
-
The Units pull down is used to define what measurement scale you're going to be using for the template. This should probably match the unit of measurement used on the template description provided by the product vendor.

-
The measurements, number of columns and number of rows can be found on the vendor product packaging or website.
-
Important
If you do not supply a left text margin in the template, a 3/16" (13.5 point) left text margin will apply by default.
-
-
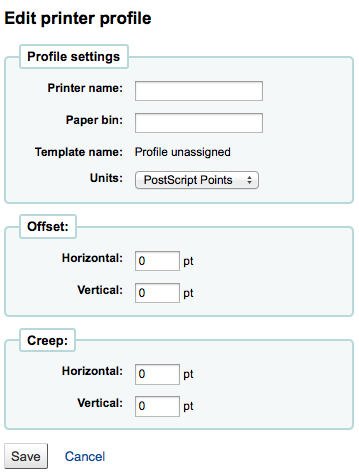
A profile is a set of "adjustments" applied to a given template just prior to printing which compensates for anomalies unique and peculiar to a given printer (to which the profile is assigned).
-
Before picking a profile try printing some sample labels so that you can easily define a profile that is right for your printer/template combination.
-
After finding any anomalies in the printed document, create a profile and assign it to the template.
-
After saving, your templates will appear on the 'Manage' area under 'Label templates'.
-
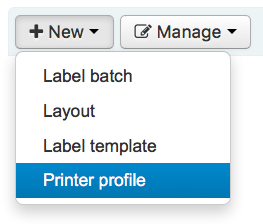
Get there: More > Tools > Label Creator > Manage > Printer Profiles
A profile is a set of "adjustments" applied to a given template just prior to printing which compensates for anomalies unique and peculiar to a given printer (to which the profile is assigned). This means if you set a template up and then print a sample set of data and find that the items are not all aligned the same on each label, you need to set up a profile for each printer to make up for the differences in printing styles, such as the shifting of text to the left, right, top or bottom.
If your labels are printing just the way you want, you will not need a profile.
To add a new profile, you want to click on the 'New' button at the top of the Label Creator tool and choose 'Printer profile'.
Using the form that appears you can create a profile to fix any problems with your template.
-
The Printer Name and Paper Bin do not have to match your printer exactly, they are for your reference so you can remember what printer you have set the profile for. So if you want to use the Printer model number in printer name or you can call it 'the printer on my desk'
-
Template will be filled in once you have chosen which template to apply the profile to on the template edit form
-
The Units pull down is used to define what measurement scale you're going to be using for your profile.
-
Offset describes what happens when the entire image is off center either vertically or horizontally and creep describes a condition where the distance between the labels changes across the page or up and down the page
-
For these values, negative numbers move the error up and to the left and positive numbers move the error down and to the right
-
Example: the text is .25" from the left edge of the first label, .28" from the left edge of the second label and .31" from the left edge of the third label. This means the horizontal creep should be set to .03" to make up for this difference.
-
After saving, your profiles will appear on the 'Manage' area under 'Printer profiles'.
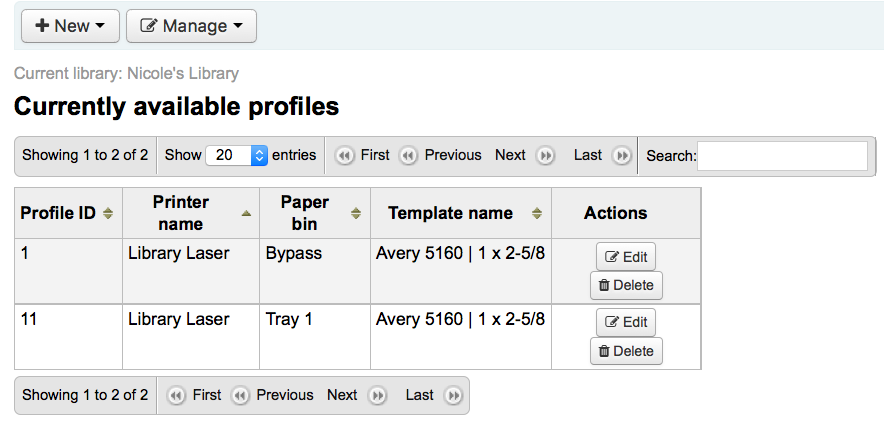
Once you have saved your new profile, you can return to the list of templates and choose to edit the template that this profile is for.
-
Get there: More > Tools > Label Creator > Manage > Layouts
A layout is used to define the fields you want to appear on your labels.
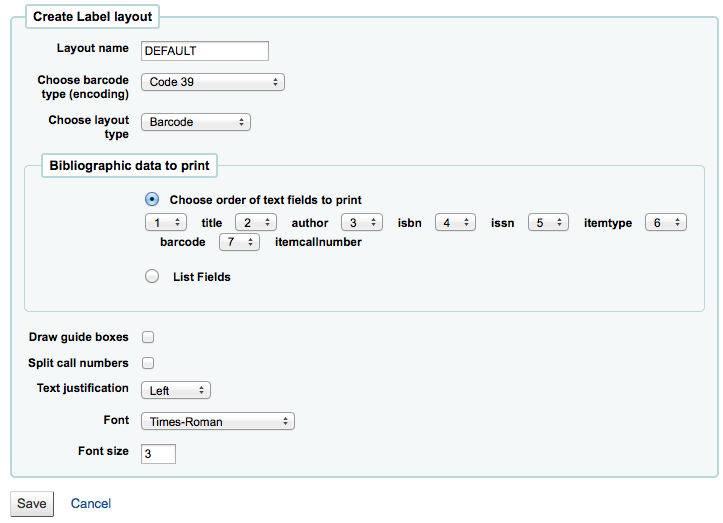
To add a new layout, you want to click on the 'New' button at the top of the Label Creator tool and choose 'Layout'.
Using the form that appears you can create a profile to fix any problems with your template.
-
The name of your layout can be anything you'd like to help you identify it later.
-
If this is a barcode label you'll want to choose the encoding (Code 39 is the most common)
-
The layout type can be any combination of bibliographic information and/or barcode. For example a spine label would just be Biblio whereas a label for your circulation staff to use to checkout the book would probably be Biblio/Barcode.
-
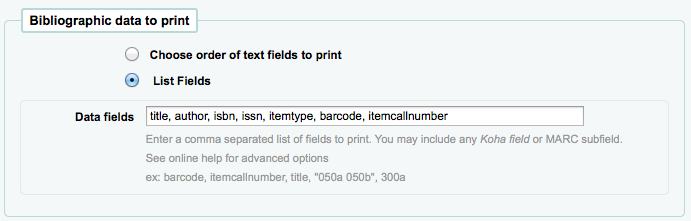
The Bibliographic Data to Print includes any of the data fields that may be mapped to your MARC frameworks. You can choose from the preset list of fields or you can click on 'List Fields' and enter your own data. In 'List Fields', you can specify MARC subfields as a 4-character tag-subfield string: (ie. 254a for the title field), You can also enclose a whitespace-separated list of fields to concatenate on one line in double quotes. (ie. "099a 099b" or "itemcallnumber barcode"). The fields available are from the database tables list below. Finally you could add in static text strings in single-quote (ie. 'Some static text here.')
-
You can use the schema viewer (http://schema.koha-community.org) with the following tables to find field names to use:
-
Currently all fields in the following tables are used: items, biblioitems, biblio, branches
-
-
-
Choose if the label maker should print out the guidelines around each label
-
Choose if you'd like Koha to try to split your call numbers (usually used on Spine Labels)
-
Finally choose your text settings such as alignment, font type and size.
After saving, your layouts will appear on the 'Manage Layouts' page.
-
Get there: More > Tools > Label Creator > Manage > Label batches
Batches are made up of the barcodes you would like to print. Once in this tool you can search for the item records you would like to print out labels for.
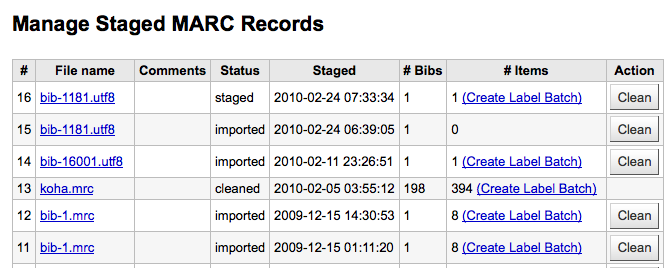
Batches can be created in one of two ways. The first is to click the 'Create Label Batch' link on the 'Staged MARC Management' page:
The other is to choose to create a new batch from the label creator tool
You will be brought to an empty batch with a box to scan barcodes or itemnumbers in to and an 'Add item(s)' button at the bottom of the page.
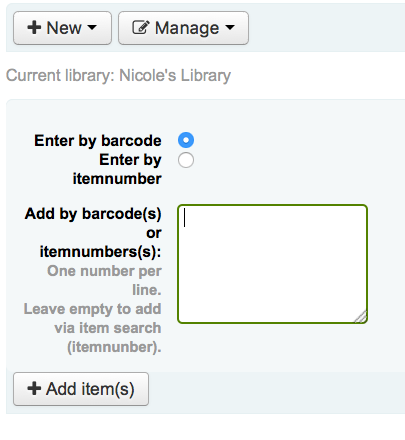
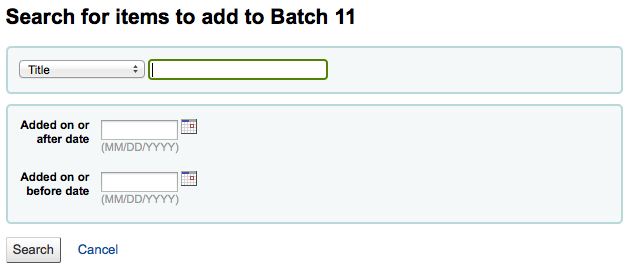
You can either scan barcodes in to the box provided and click the 'Add item(s)' button or you can click the 'Add item(s)' button with the barcodes box empty. Clicking 'Add item(s)' with nothing in the barcodes box will open a search window for you to find the items you want to add to the batch.
From the search results, click the check box next to the items you want to add to the batch and click the 'Add checked' button. You can also add items one by one by clicking the 'Add' link to the left of each item.
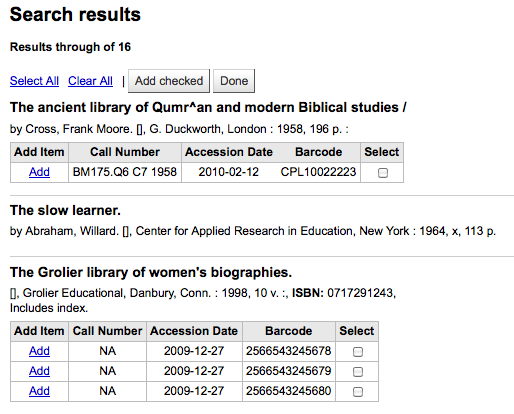
Once you have added all of the items click the 'Done' button. The resulting page will list the items you have selected.
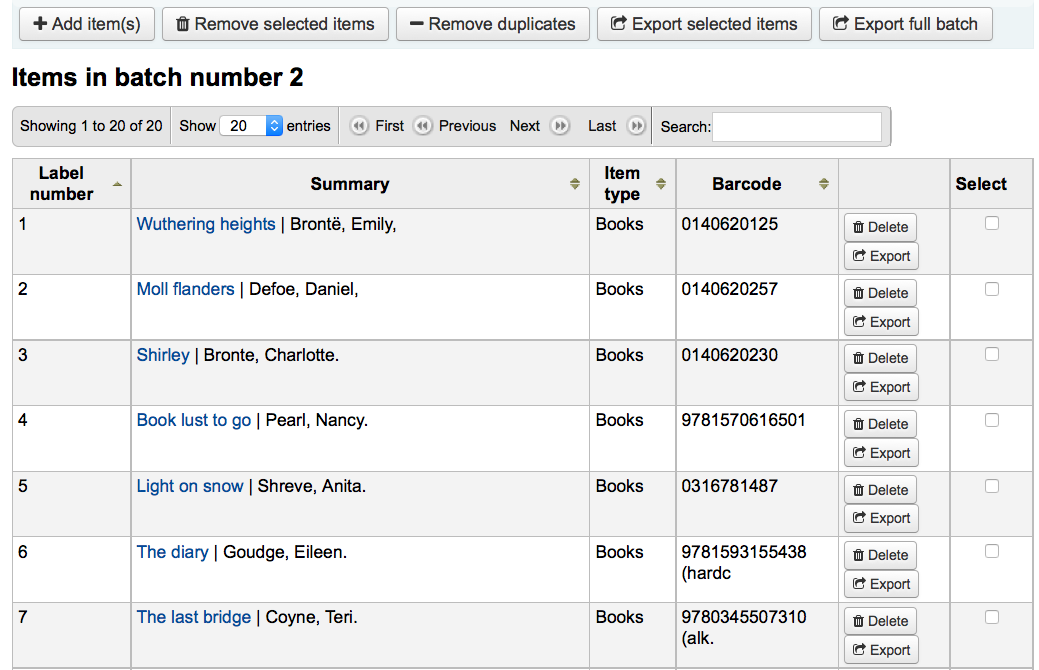
To print your labels, click the 'Export full batch' button. To print only some of the labels, click the 'Export selected item(s)' button. Either way you will be presented with a confirmation screen where you can choose your template and layout.

You will then be presented with three download options: PDF, Excel, and CSV.
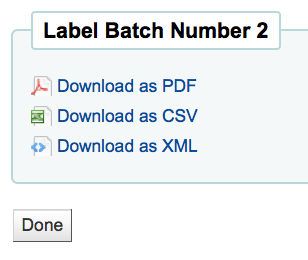
After saving your file, simply print to the blank labels you have in your library.
-
Get there: More > Tools > Catalog > Quick Spine Label Creator
Note
This tool does not use the label layouts or templates, it simply prints a spine label in the first spot on the label sheet.
-
Define the fields you want to print on the spine label in the SpineLabelFormat system preference
-
Format your label printing by editing spinelabel.css found in koha-tmpl/intranet-tmpl/prog/en/css/
To use this tool you simply need the barcode for the book you'd like to print the spine label for.

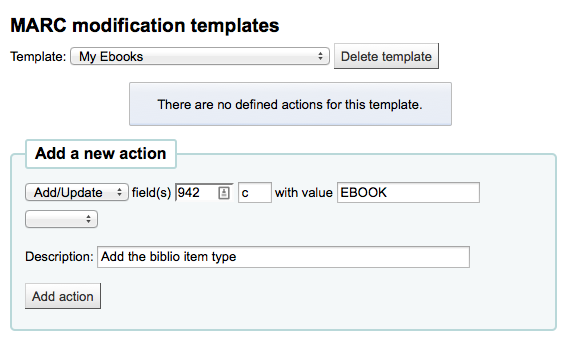
The MARC Modification Templates system gives Koha users the power to make alterations to MARC records automatically while staging MARC records for import.
This tool is useful for altering MARC records from various venders/sources work with your MARC framework. The system essentially allows one to create a basic script using actions to Copy, Move, Add, Update and Delete fields.
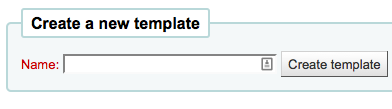
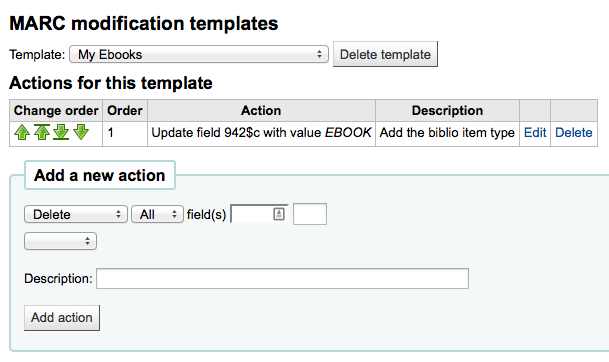
Start by adding a new template (a template can be made up of one or more actions) by entering a name and clicking 'Create template'.
Next you can add actions to the template by filling in the Action box. For example if you're loading in a batch of files from your EBook vendor you might want to add the biblio item type of EBOOK to the 942$c.
-
Choose 'Add/Update'
-
Enter the field 942 and subfield c
-
Enter the value of 'EBOOK' (or whatever your ebook item type code is)
-
Provide a description so you can identify this action later
-
Click 'Add action'
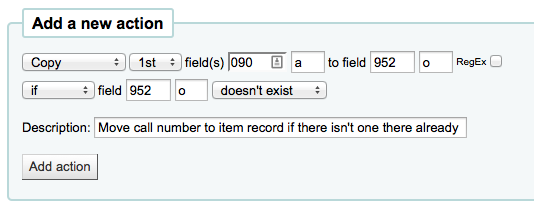
Each action can also have an optional condition to check the value or existance of another field. For example you might want to add the call number to the item record if it's not already there.
-
Choose 'Copy'
-
Decide if you want to copy the first occurance or all occurances of the field
-
Enter the field 090 (or other biblio call number field) and subfield a to copy
-
Enter the 952 field and o subfield to copy to
-
Choose 'if'
-
Enter the 952 field and o subfield
-
Choose "doesn't exist"
-
Provide a description so you can identify this action later
-
Click 'Add action'
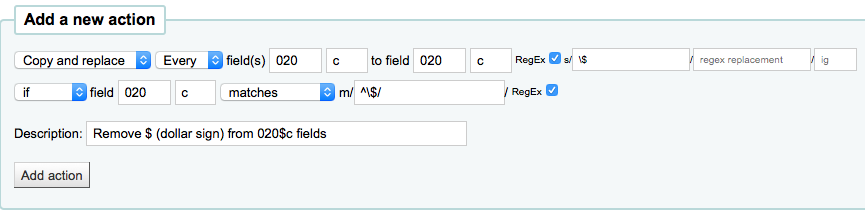
The Copy & Move actions also support Regular Expressions, which can be used to automatically modify field values during the copy/move. An example would be to strip out the '$' character in field 020$c.
-
Choose 'Copy and replace'
-
Decide if you want to copy the first occurance or all occurances of the field
-
Enter the field 020 and subfield c to copy
-
Enter the 020 field and c subfield to copy to
-
Check the 'RegEx' box and enter your regular expression (in this case s/\$// )
-
Choose 'if'
-
Enter the 020 field and c subfield
-
Choose "matches"
-
Check the 'RegEx' box and enter your regular expression (in this case m/^\$/ )
-
Provide a description so you can identify this action later
-
Click 'Add action'
Note
The value for an update can include variables that change each time the template is used. Currently, the system supports two variables, __BRANCHCODE__ which is replaced with the branchcode of the library currently using the template, and __CURRENTDATE__ which is replaced with the current date in ISO format ( YYYY-MM-DD ).
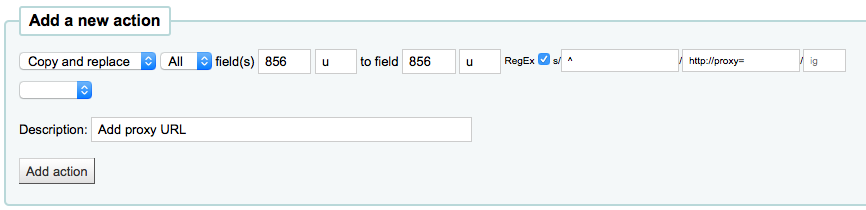
You could also use regular expressions to add your library's proxy URL in front of links in your MARC record.
-
Choose 'Copy and replace'
-
Decide if you want to copy the first occurance or all occurances of the field
-
Enter the field 856 and subfield u to copy
-
Enter the 856 field and u subfield to copy to
-
Check the 'RegEx' box and enter your regular expression (in this case s/^/PROXY_URL/ )
-
Provide a description so you can identify this action later
-
Click 'Add action'
When choosing between 'Copy' and 'Copy and replace' keep the following example in mind:
245 _aThe art of computer programming _cDonald E. Knuth.
300 _aA_exists _bB_exists
If we apply action (a) Copy the whole field 245 to 300, we get:
245 _aThe art of computer programming _cDonald E. Knuth.
300 _aA_exists _bB_exists
300 _aThe art of computer programming _cDonald E. Knuth.
If we apply action (b) Copy the subfield 245$a to 300$a, we get:
245 _aThe art of computer programming _cDonald E. Knuth.
300 _aThe art of computer programming _bB_exists
Once your actions are saved you can view them at the top of the screen. Actions can be moved around using the arrows to the left of them.
Depending on your actions the order may be very important. For example you don't want to delete a field before you copy it to another field.
To add another template you can either start fresh or click the 'Duplicate current template' checkbox to create a copy of an existing template to start with.

Once your template is saved you will be able to pick it when using the Stage MARC Records for Import tool.
-
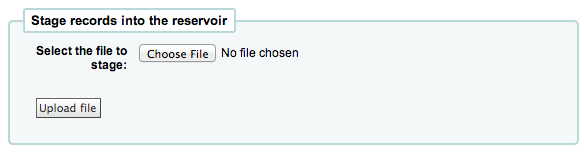
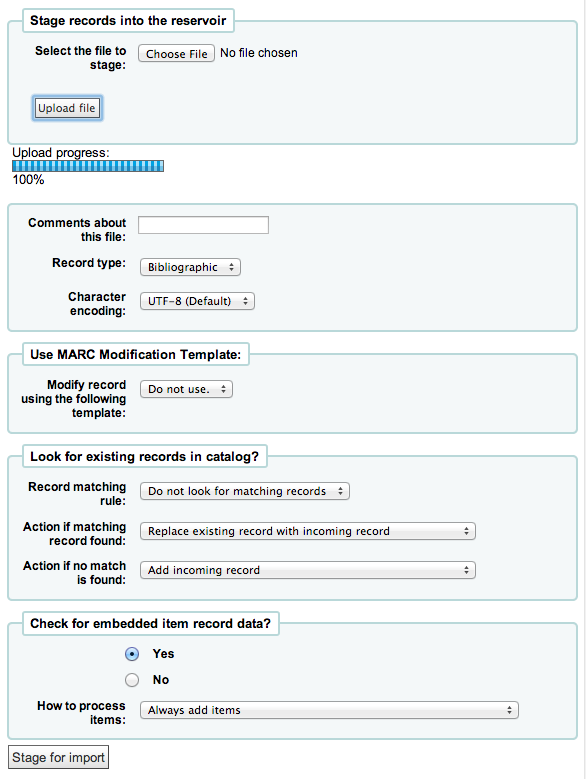
Get there: More > Tools > Catalog > Stage MARC records for import
This tool can be used to import both bibliographic and authority records that are saved in MARC format. Importing records into Koha includes two steps. The first is to stage records for import.
-
First find the MARC file on your computer
-
Next you will be presented with options for record matching and item imports
-
Enter 'Comments about this file' to identify your upload when going to the 'Manage Staged MARC Records' tool
-
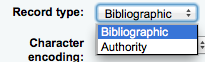
Tell Koha which type of file this is, bibliographic or authority
-
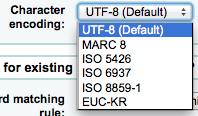
Choose the character encoding
-
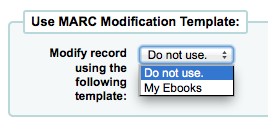
Choose if you would like to use a MARC Modification Template to alter the data you're about to import

-
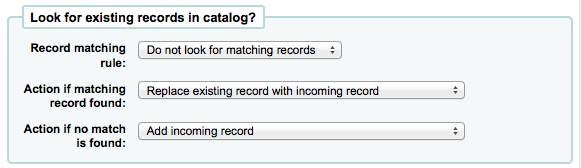
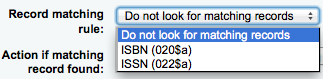
Choose whether or not you want to look for matching records
-
You can set up record matching rules through the administration area
-
When using the ISBN matching rule Koha will find only exact matches. If you find that the ISBN match is not working to your satisfaction you can change the AggressiveMatchOnISBN preference to 'Do' and then run your import again.
-
-
-
Next choose what to do with matching records if they are found
-
Finally choose what to do with records that are unique
-
Next you can choose whether or not to import the item data found in the MARC records (if the file you're loading is a bibliographic file)
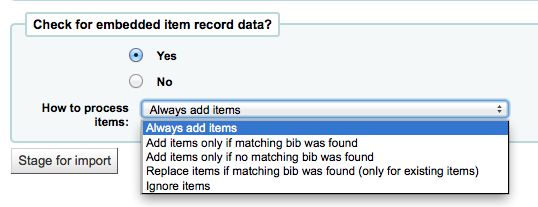
From here you can choose to always add items regardless of matching status, add them only if a matching bib was found, add items only if there was no matching bib record, replace items if a matching bib was found (The match will look at the itemnumbers and barcodes to match on for items. Itemnumbers take precendence over barcodes), or Ignore items and not add them.
-
-
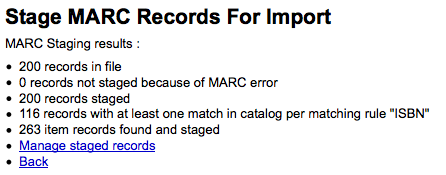
Click 'Stage for import'
-
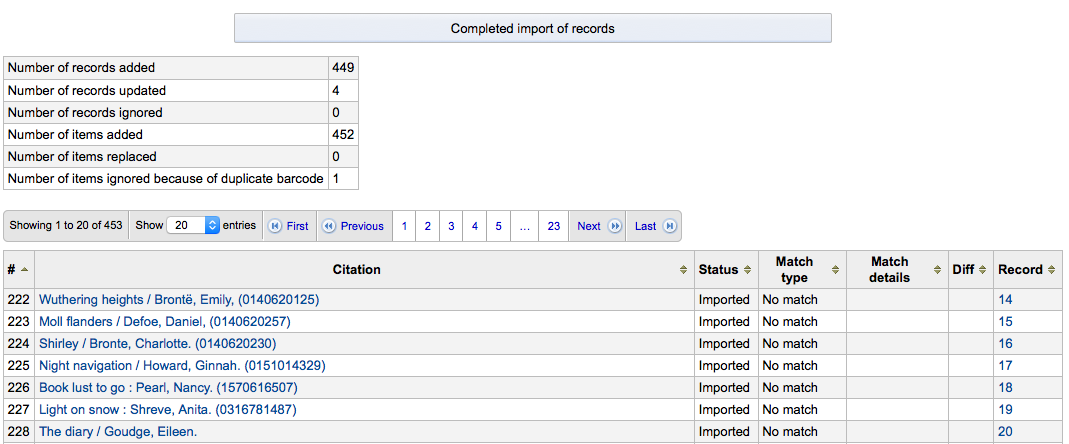
You will be presented with a confirmation of your MARC import
-
To complete the process continue to the Manage Staged MARC Records Tool
-
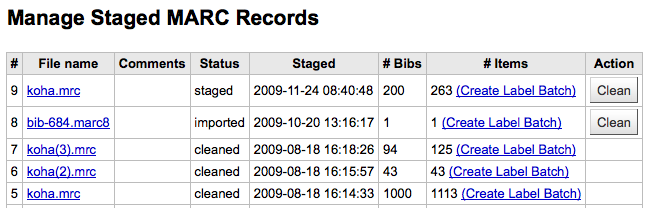
Get there: More > Tools > Catalog > Staged MARC Record Management
Once you have staged your records for import you can complete the import using this tool.
-
From the list of staged records, click on the file name that you want to finish importing
-
You will note that records that have already been imported will say so under 'Status'
-
-
A summary of your import will appear along with the option to change your matching rules
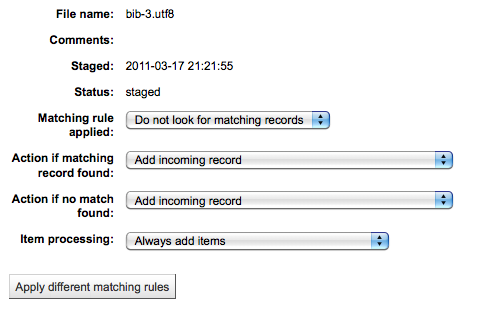
-
Below the summary is the option to import the batch of bib records using a specific framework

-
Choosing a framework other than 'Default' isn't necessary, but it's helpful for running reports and having the right bib level item type selected on import.
-
-
Below the framework selection there will be a list of the records that will be imported

-
Review your summary before completing your import to make sure that your matching rule worked and that the records appear as you expect them to
-
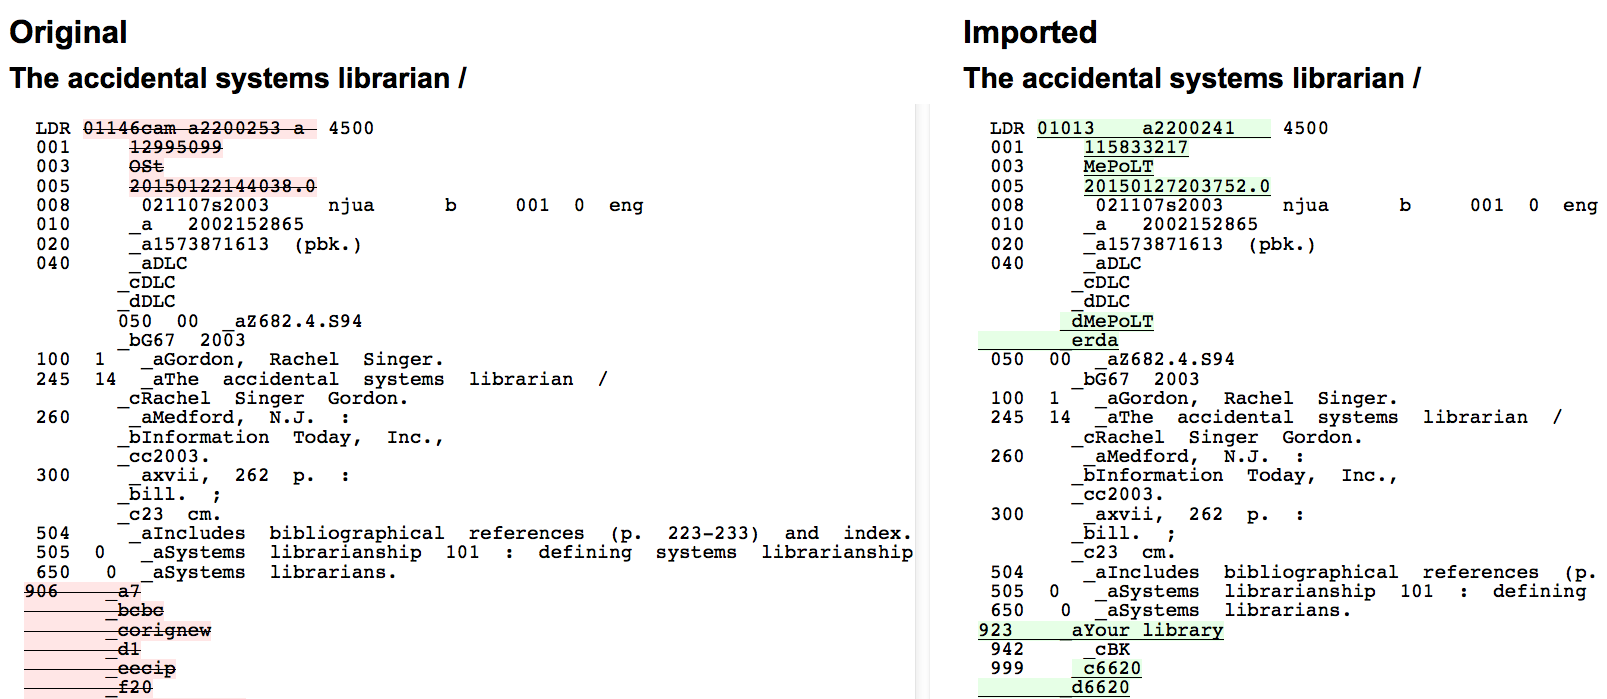
Matches will appear with info under the 'Match details column'

and when clicking the 'View' link under 'Diff' you can see the difference between versions.
-
-
Click 'Import into catalog' to complete the import
-
Once your import is complete a link to the new bib records will appear to the right of each title that was imported
-
You can also undo your import by clicking the 'Undo import into catalog' button
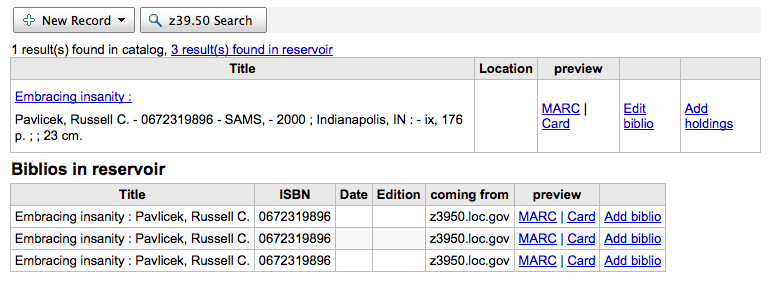
Records imported using this tool remain in the 'reservoir' until they are cleaned. These items will appear when searching the catalog from the Cataloging tool:
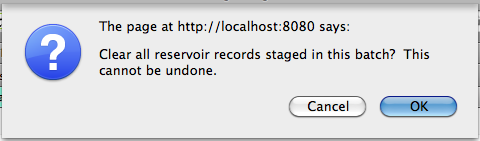
To clean items out of the 'reservoir':
-
Visit the main screen of the Manage Staged MARC Records tool
-
To clean a batch, click the 'Clean' button to the right
-
You will be presented with a confirmation message
-
Accept the deletion and the records will be removed from the reservoir and the status will be changed to 'cleaned'
-
-
Get there: More > Tools > Catalog > Upload Local Cover Image
This tool will allow you to upload cover images for the materials in your catalog. To access this tool, staff will need the upload_local_cover_images permission. In order for images to show in the staff client and/or OPAC you will need to set your LocalCoverImages and/or OPACLocalCoverImages preferences to 'Display.' Images can be uploaded in batches or one by one.
Note
Koha does not have a maximum file size limit for this tool, but Apache may limit the maximum size of uploads (talk to your sys admin).
Note
When you want to upload multiple images onto a bib record, they will display left to right (then top to bottom, depending on screen real estate) in order of uploading, and the one on the left (the first one uploaded) will be the one used as a thumbnail cover in search results and on the detail page. There is no way to reorder cover images uploaded in this way, so be sure to upload them in the order you'd like them to appear.
If uploading a single image:
-
Visit the tool and click the 'Browse' button to browse to the image on your local machine.
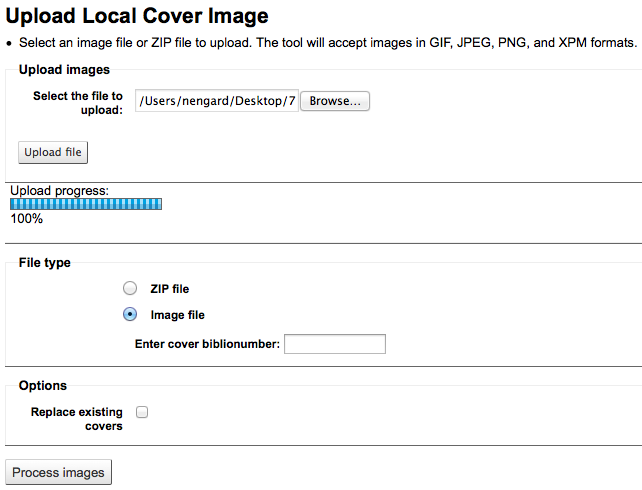
-
Click 'Upload file'
-
Choose 'Image file' under the 'File type' section
-
Enter the biblionumber for the record you're attaching this image to. This is not the same as the barcode, this is the system generated number assigned by Koha.
-
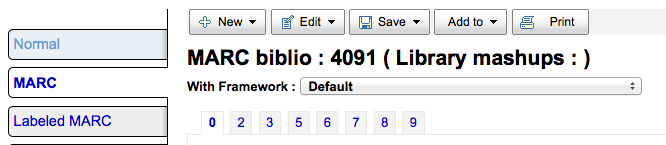
Find the biblionumber by looking at the end of the URL in the address bar when on the detail page

-
or by clicking on the MARC tab on the detail page in the staff client
-
-
If you would like to replace any other cover images you may have uploaded in the past, check the 'Replace existing covers' box under the 'Options' section
-
Click 'Process images'
-
You will be presented with a summary of the upload and a link to the record you have just added the image to
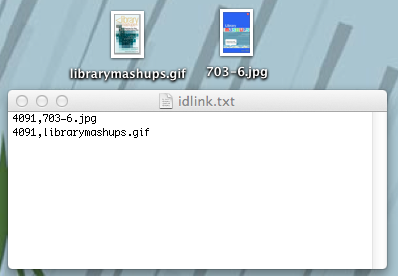
If uploading a batch of images at once you will need to prepare a ZIP file first.
-
Enter in to the ZIP file all the images you are uploading
-
Also include a text file (*.TXT) named either datalink.txt or idlink.txt listing the biblionumber followed by the image name for each image one per line
-
ex. 4091,image4091.jpg
-
-
Browse your local computer to the ZIP file
-
Click 'Upload file'
-
Choose 'Zip file' under the 'File type' section
-
If you would like to replace any other cover images you may have uploaded in the past, check the 'Replace existing covers' box under the 'Options' section
-
Click 'Process images'
-
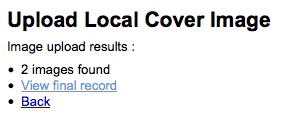
You will be presented with a summary of the upload
Important
The source image is used to generate a 140 x 200 px thumbnail image and a 600 x 800 px full-size image. The original sized image uploaded will not be stored by Koha
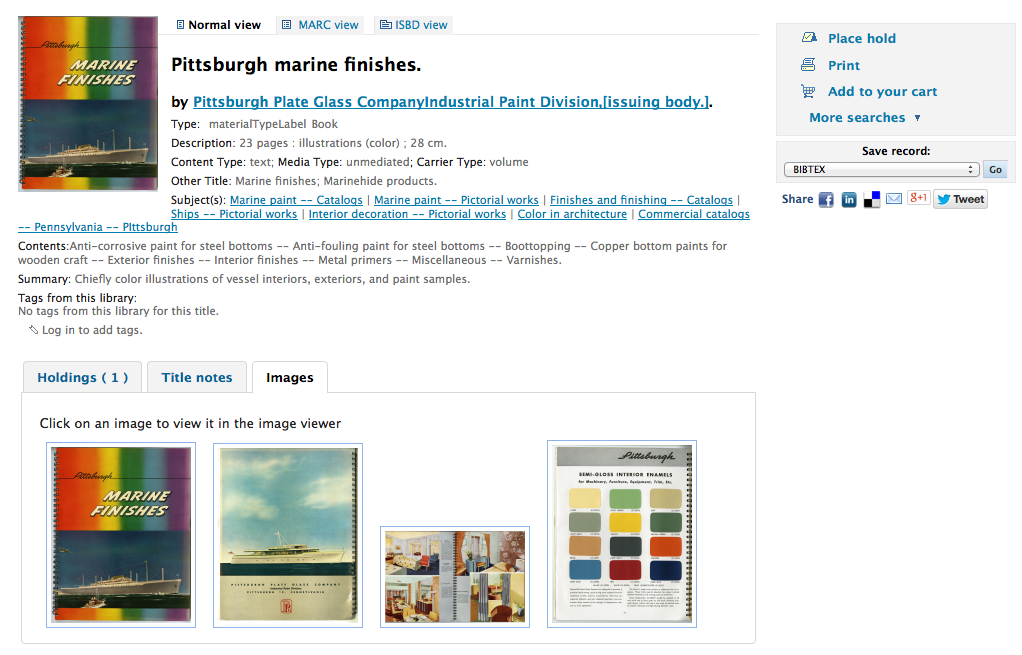
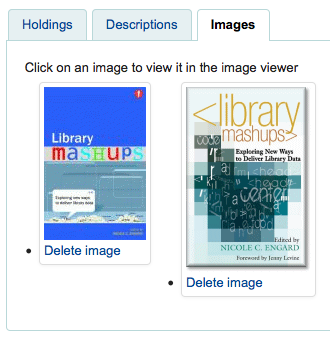
You will be able to see your cover images in the staff client on the detail page under the 'Image' tab in the holdings table at the bottom
In the OPAC the cover images will also appear in the images tab, as well as next to the title and on the search results.
If you would like to remove a cover image you can click 'Delete image' below the image if you have the upload_local_cover_images permission.