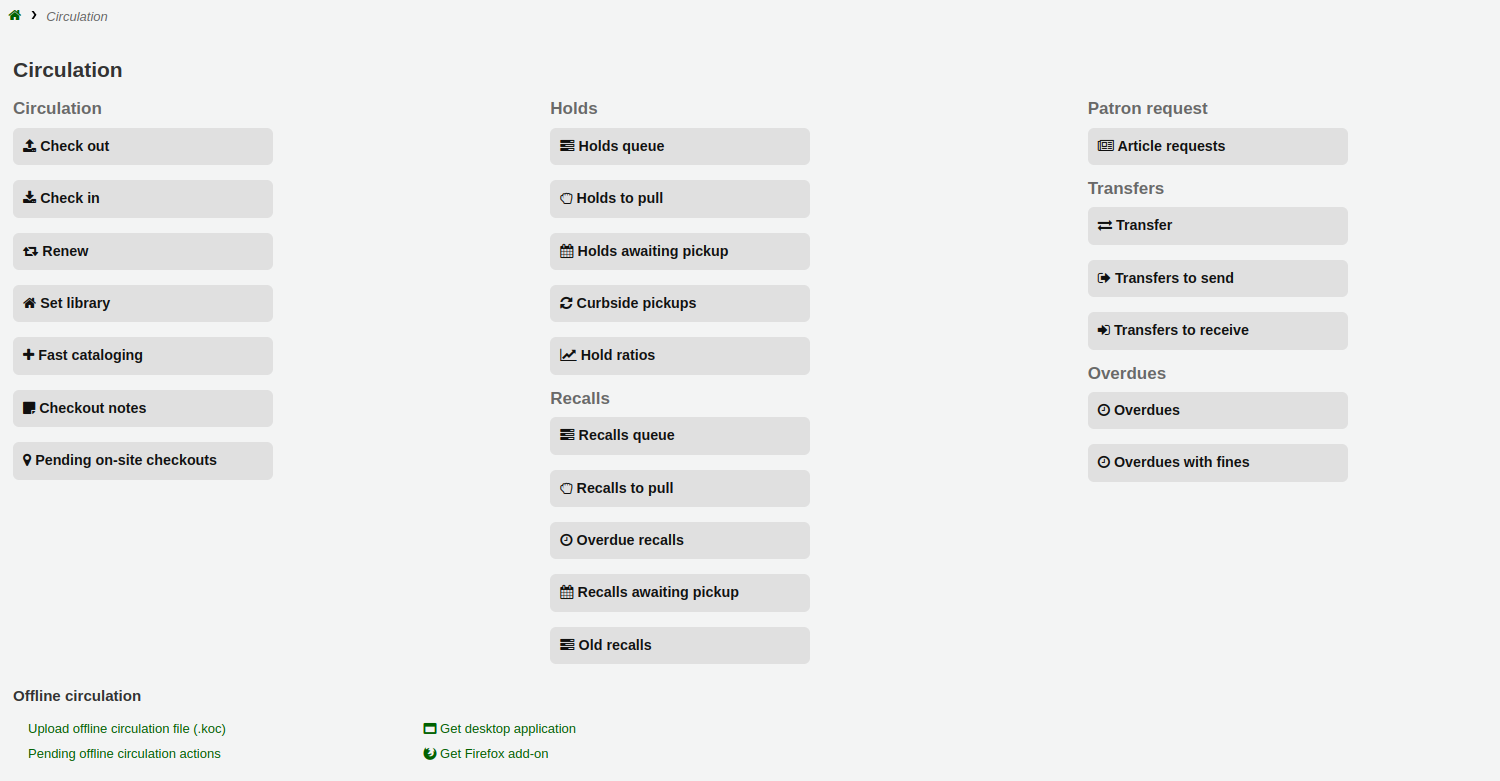
Circulation
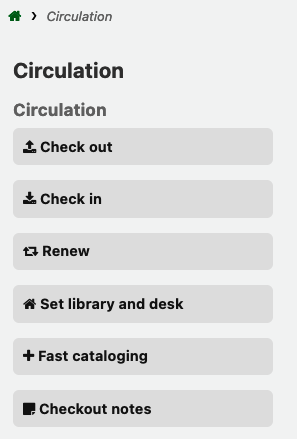
Les fonctionnalités de circulation sont accessibles de différentes manières. Au centre de la page principale de l’interface professionnelle se trouvent quelques raccourcis pour enregistrer les prêts, les retours ou les transferts. La liste complète des fonctionnalités est disponible sur la page du module Circulation, accessible depuis toutes les pages de l’interface professionnelle (lien en haut à gauche), et depuis la page d’accueil.
Avant de procéder à la circulation de votre collection, il vous faudra paramétrer vos Préférences systèmes globales, Paramètres de base et Règles d’utilisateurs et circulation.
Quand vous êtes en Circulation, vous pouvez rapidement basculer d’un onglet à l’autre de la barre supérieure de recherche en utilisant les raccourcis claviers suivants :
activer l’onglet de recherche dans le catalogue avec Alt+Q
activer l’onglet de prêt avec Alt+U
cela ne fonctionne pas pour les utilisateurs de Mac
activer l’onglet de prêt avec Alt+R
Note
Les utilisateurs de Mac utilisent le bouton OPTION à la place du ALT
Prêt
Avant d’enregistrer un prêt, il faut rechercher l’utilisateur par son nom ou son numéro de carte. La fonction qui permet d’enregistrer un prêt apparaît à trois endroits :
Check out option in the search bar at the top of the staff interface’s main page

Check out option in the search bar at the top of the main circulation page

Ces deux options sont essentiellement une recherche d’adhérent. Si vous n’obtenez qu’un résultat, Koha vous fera accéder directement à son dossier, dans l’onglet “Prêter”.

If your search gives you more than one result, it will ask you to choose which patron to check out to.
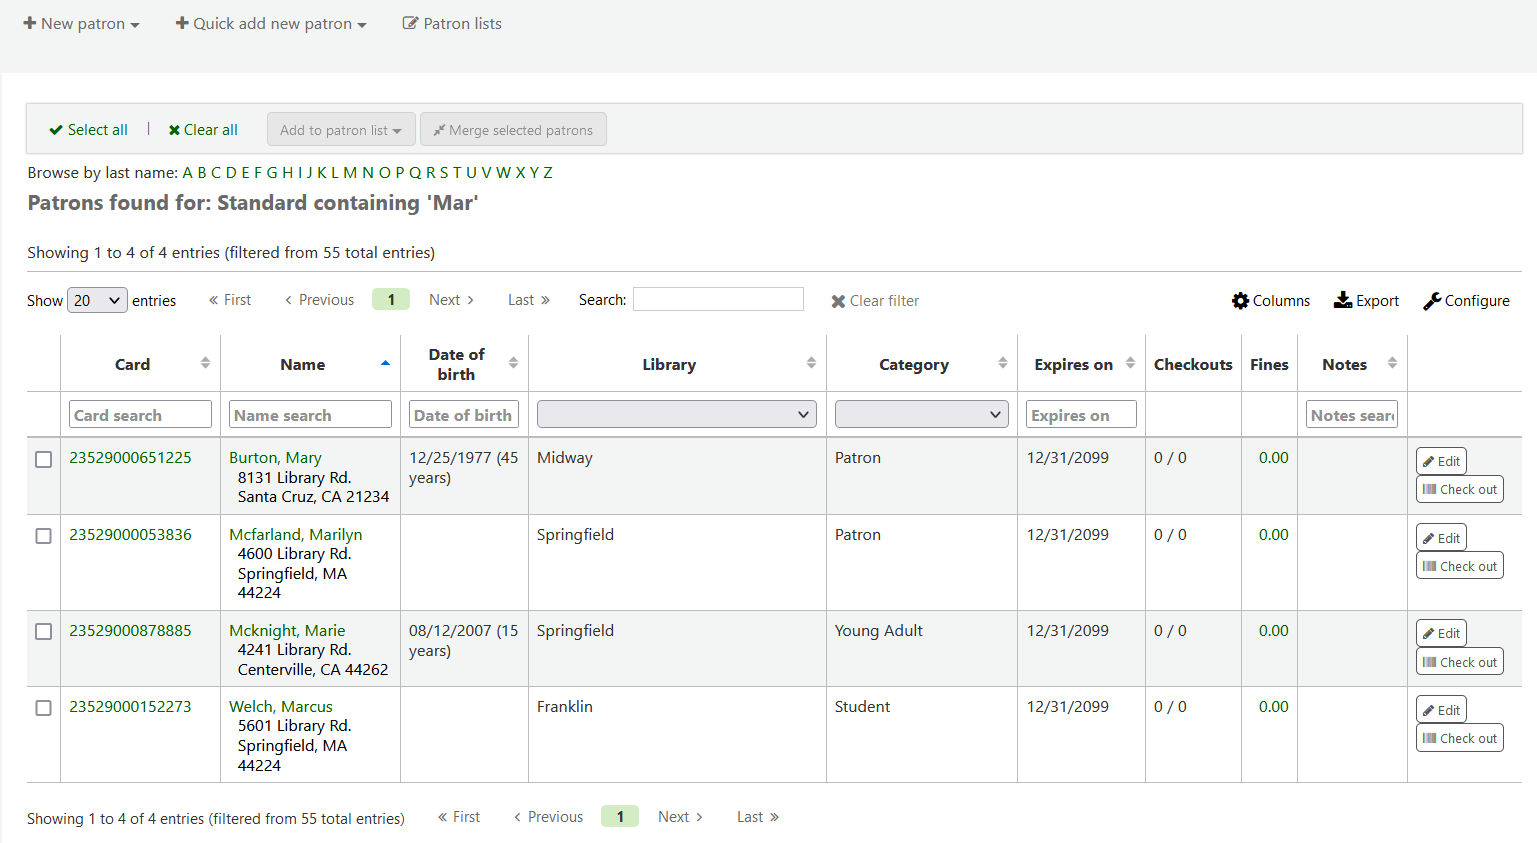
Note
You can customize the columns of this table in the “Table settings” section of the Administration module, under the patrons tab (table id: memberresultst).
Clicking on a patron search result will bring you to the patron’s file, on the “Details” tab. Click the “Check out” tab to access the check out screen.
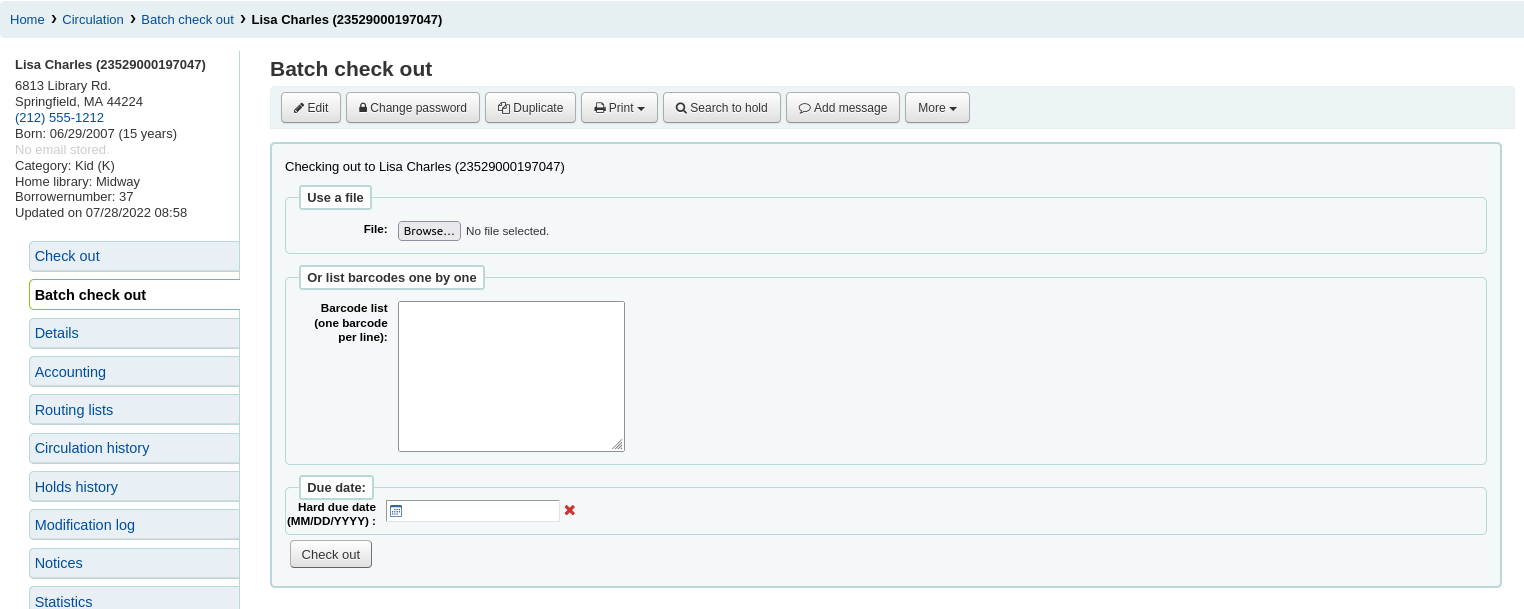
If you have enabled batch checkouts, click the batch check out tab on the patron record
Retour d’exemplaires prêtés
Pour prêter un exemplaire à un utilisateur, recherchez d’abord cet utilisateur en employant une des options listées ci-dessus. L’écran de prêt s’affichera alors.
If “Always show checkouts automatically” is checked, you will see the list of current checkouts below the check out box.
Note
La préférence système previousIssuesDefaultSortOrder contrôle l’ordre dans lequel vous souhaitez voir apparaître les prêts précédents (du plus ancien au plus récent, ou du plus récent au plus ancien).
Note
You can customize the columns of this table in the “Table settings” section of the Administration module, under the circulation tab (table id: issues-table).
Note
To prevent too many service queries when checking out a number of items in a row, you can use the LoadCheckoutsTableDelay system preference to delay the loading of the table and lighten the load on resources.
At the top of the check out screen is a field to type or scan the item’s barcode into.
Note
Many modern barcode scanners will send a “return” to the browser, making it so that the “Check out” button is automatically clicked.
Si le code-barre n’est pas trouvé, vous serez invité à faire un catalogage rapide afin de créer l’exemplaire. Consulter la section Catalogage rapide du manuel.
Si la préférence système itemBarcodeFallbackSearch est réglée sur “Activer”, vous pouvez entrer un mot-clef dans la barre de recherche à la place d’un code à barres (ceci permettra l’enregistrement du prêt à partir du titre et/ou de la cote).
Si vous avez activé la préférence système AutoSwitchPatron, scanner un code à barres lecteur vous redirigera sur le compte de l’adhérent.
Pour obtenir plus d’options du prêt, cliquez sur le lien “Paramétrages du prêt”.
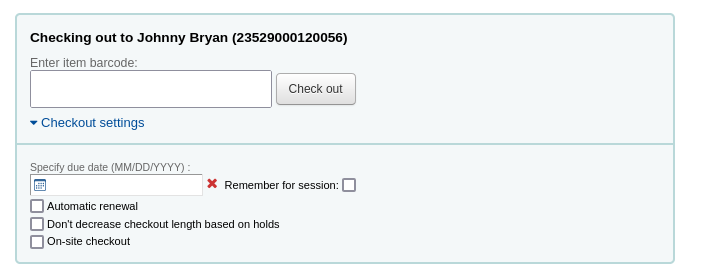
Specify due date: this option can be used to override the default due date for the item, as defined in the circulation and fines rules.
Note
Cette option apparaîtra seulement si vous avez activé la préférence système SpecifyDueDate pour permettre au personnel d’outrepasser la date de retour.
The red “X” is used to clear the date. If the “specify due date” field is empty, the default due date, as defined in the circulation and fines rules is used.
Remember for this session: check this box to use the same date for all checkouts. This will not only keep the specified due date for this patron but for all patrons, until you log out of the staff interface.
Automatic renewal: this option will allow this item to automatically be renewed
To use automatic renewals,
the automatic_renewals cron job must be running
the circulation and fines rules regarding automatic renewals must be defined
Just like regular renewals, the checkouts will not be automatically renewed if there is a hold on the item.
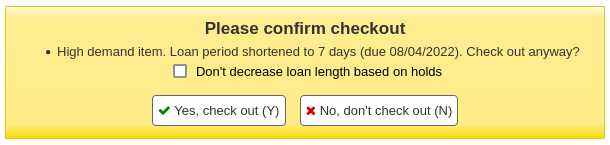
Don’t decrease checkout length based on holds: this option overrides the decreaseLoanHighHolds system preference.
Note
Cette option s’affiche uniquement lorsque la préférence système decreaseLoanHighHolds est activée.
On-site checkout: this option indicates that this checkout is an on-site checkout.
Note
Cette option s’affiche uniquement lorsque les prêts sur place sont autorisés. Elle est surtout utilisée pour les exemplaires exclus du prêt afin d’offrir des prêts de consultation sur place.
At the bottom of the page there is a summary of the patron’s current checked out items along with the due date (and time if the item is an hourly loan). Items checked out today will appear at the top, previously checked out items will be underneath.
Note
La préférence système todaysIssuesDefaultSortOrder contrôle l’ordre dans lequel vous souhaitez voir apparaître ces nouveaux prêts (du plus ancien au plus récent, ou du plus récent au plus ancien).
Note
Les exemplaires qui sont des exemplaires de prêt horaires incluront l’heure avec la date de retour.
If an item is checked out for on-site use, that information will be highlighted in red in the checkout summary.

S’il y a des notes dans la fiche adhérent elles s’affichent sur la droite de la zone de prêt
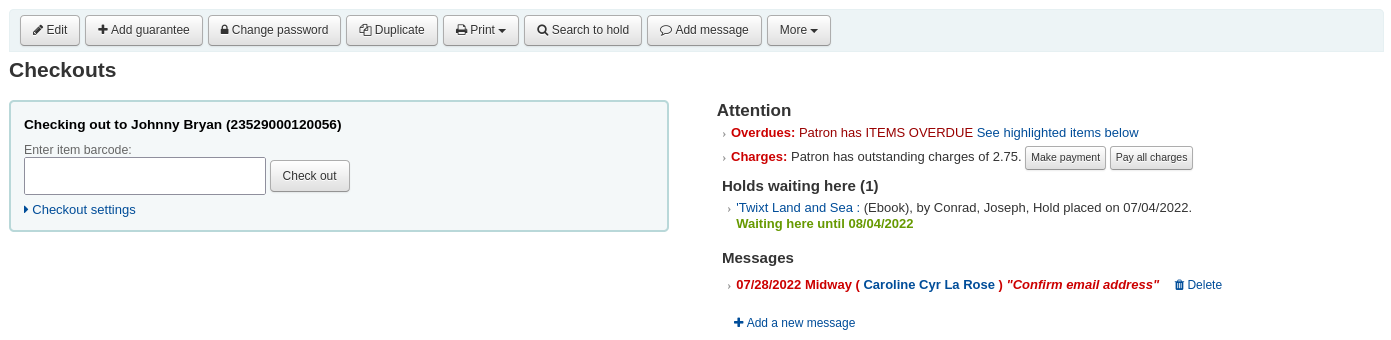
Si l’adhérent a une réservation mise de côté à la bibliothèque, elle apparaît aussi sur la droite de la zone de prêt, et le bibliothécaire voit facilement qu’il y a un autre document à donner à l’adhérent.
If you would like a more assertive hold warning, you can enable the WaitingNotifyAtCheckout system preference, which will generate a pop-up after each checkout to the patron who has waiting holds.
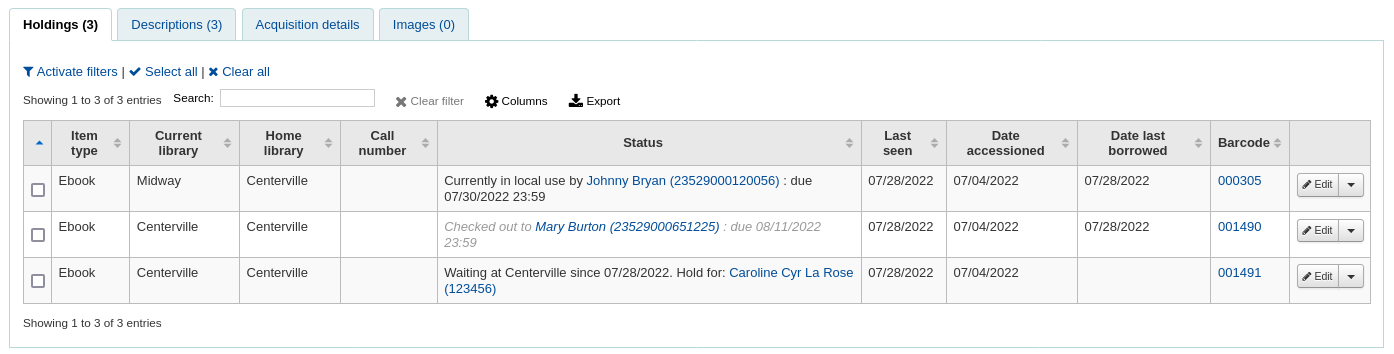
The details of the checkouts will appear on the record detail page in the staff interface as well.
Imprimer des reçus
Une fois que vous avez prêté tous les document à l’adhérent vous pouvez les imprimer sur un ticket en choisissant une des deux méthodes suivantes :
Si vous avez paramétré la préférence système `CircAutoPrintQuickSlip sur “ouvrir une fenêtre pour imprimer un ticket rapide”, tapez simplement entrée sur votre clavier ou scannez un bout de papier blanc avec la douchette. L’idée est que vous enregistriez le prêt avec un code à barres vierge qui déclenchera l’impression du “Ticket rapide”.
If you have the DisplayClearScreenButton system preference set to “Show print quick slip and clear buttons” or “Show print slip and clear buttons”, there will be a small printer button in the top right of the checkout box, which can be used to print the slip or quick slip.

Une fois que vous avez prêté tous les document à l’adhérent vous pouvez les imprimer sur un ticket en cliquant le bouton Imprimer en haut de l’écran et en choisissant “Imprimer ticket” ou “Ticket rapide”
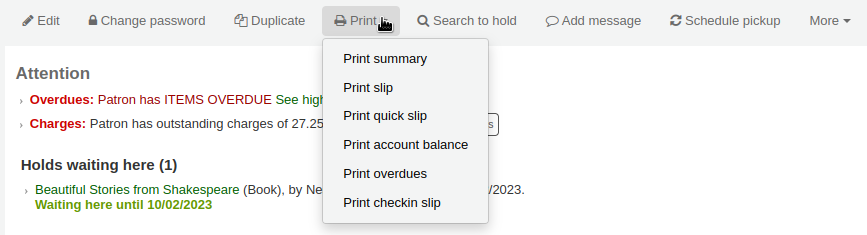
If you choose “Print slip” it will print all of the items the patron has checked out, including those they checked out at an earlier date.
Note
The slip uses the ISSUESLIP notice. You can customize the notice in the Notices and slips tool.
Choosing “Print quick slip” will print only the items that were checked out today.
Note
The quick slip uses the ISSUEQSLIP notice. You can customize the notice in the Notices and slips tool.
“Print summary” will generate a full page summary for the patron’s circulation information.
Note
The summary cannot be customized.
However, the tables for the checkouts, holds, and charges are customizable in the “Table settings” section of the Administration module (table id: print-summary-checkouts, print-summary-holds, and print-summary-fines).
“Print account balance” will generate a summary of outstanding charges and unused credits in the patron’s account.
Note
The quick slip uses the ACCOUNTS_SUMMARY notice. You can customize the notice in the Notices and slips tool.
Note
This option will only appear if the patron has charges in their Accounting tab.
“Print overdues” will print out a slip that lists all items that are overdue.
Note
The overdue slip uses the OVERDUE_SLIP notice. You can customize the notice in the Notices and slips tool.
“Print checkin slip” will print out a slip that lists items that were checked in today.
Note
The checkin slip uses the CHECKINSLIP notice. You can customize the notice in the Notices and slips tool.
Astuce
You can add custom slips in this menu by adding a new notice in the notices and slips tool in the “Patrons (custom slip)” module.
For example, to have a slip with all the patron’s current holds,
Click “New notice”, and choose “Patrons (custom slip)”
Fill out the code and name for the slip. The name will be what appears in the “Print” menu.
In the “Print” template section, paste the code:
Patron has [% borrower.holds.count %] holds

List of holds:
[% FOREACH hold IN borrower.holds %]
===============================
Reserve id: [% hold.reserve_id %]
Title [% hold.biblio.title %]
[% END %]
Click “Save”
Now, in a patron account, when you click on “Print” the new custom slip should be available.
Exporting checkouts
Other than printing a receipt, there are several ways to export a patron’s checkouts.
Le bouton “Exporter” au sommet du tableau vous permet d’exporter les prêts en cours de l’adhérent, aux formats Microsoft Excel ou CSV, ou même de les copier ou les imprimer.
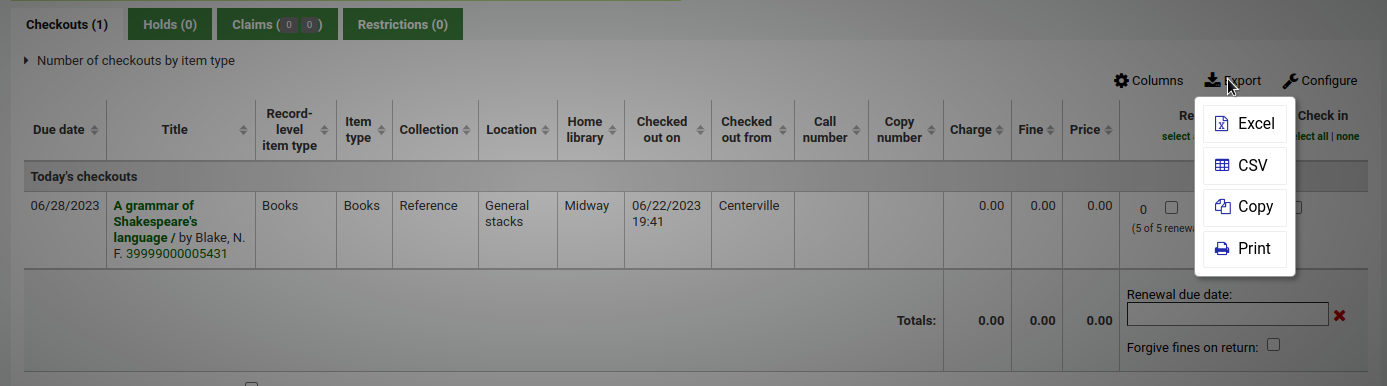
The CSV file exported this way will contain the columns of the table that are visible. You can click on the “Columns” button and remove some columns first, if needed.
If the ExportCircHistory system preference is enabled, there will be an “Export” column in the checkouts table. This is used to export the patron’s current checkouts in either MARC or CSV format.
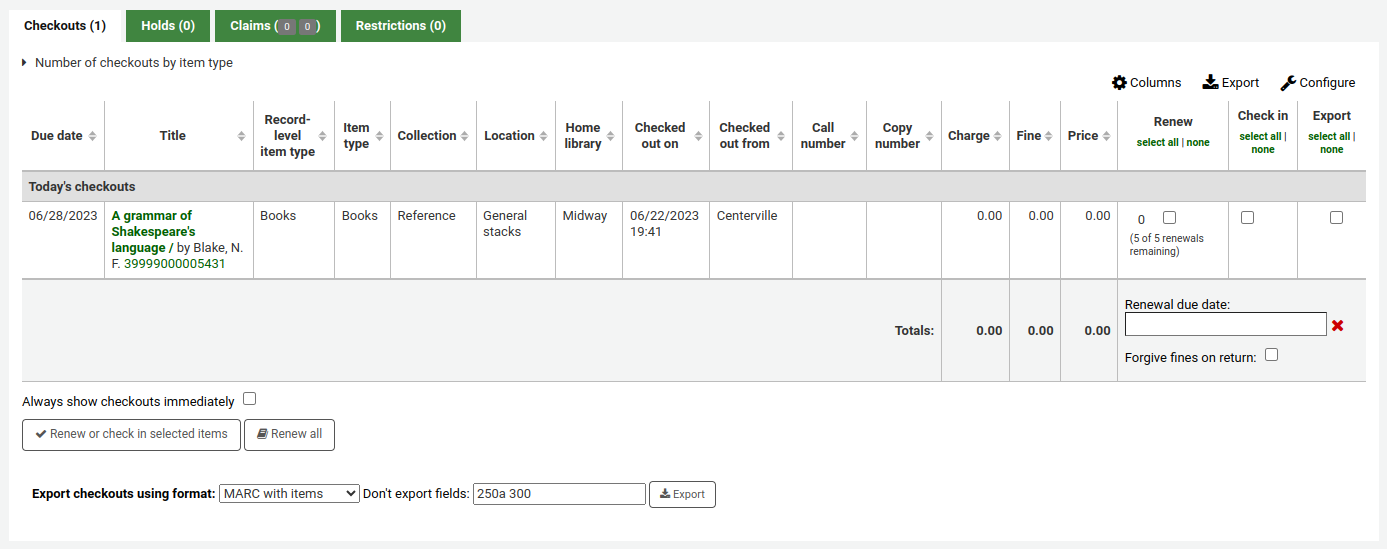
To export checkouts this way,
Select the checkouts to be exported using the checkboxes in the “Export” column.
At the bottom of the table, choose the options for the export
Export checkouts using format
MARC with items: this will export the MARC records of the checked out titles, including the item information.
MARC without items: this will export the MARC records of the checked out titles.
CSV: this will export a CSV file of checked out titles. When this option is selected, a new dropdown menu will appear to choose a CSV profile.
Export bundle contents: if the patron checked out a bundle, this option will export the parent record as well as all the child records.
Don’t export fields: optionally, you can enter MARC fields that are not to be exported.
Note
The default values in the « Don’t export field » field are set in the ExportRemoveFields system preference.
Effacer les informations de l’adhérent
Après l’enregistrement de prêt d’un document, si vous avez paramétré la préférence système DisplayClearScreenButton sur “Montrer”, vous pouvez fermer l’affichage de l’adhérent sur lequel vous êtes en cliquant sur le X en haut à droite du nom et réinitialiser l’écran.
Si vous avez paramétré la préférence système CircAutoPrintQuickSlip sur “réinitialiser l’écran”, il vous suffit simplement de taper entrée ou de scanner un code à barres vierge et l’écran se réinitialisera.
Prêts par lot
Si vous souhaitez faire des prêts par lots, vous devez activer la préférence système BatchCheckouts et déclarer les catégories d’adhérents concernées dans la préférence système BatchCheckoutsValidCategories . Cela vous permettra d’utiliser une platine RFID capable de lire plusieurs code à barres ou de faire des prêts par lots pour un usage interne.
From this screen you can scan several barcodes or load a file of barcodes.
Si vous avez réglé la préférence système SpecifyDueDate sur “Permettre”, vous pourrez définir une date de retour spécifique pour les prêts.
If the items cannot be checked out, a warning will be provided on the following screen, with the option to uncheck the items that are not to be checked out.
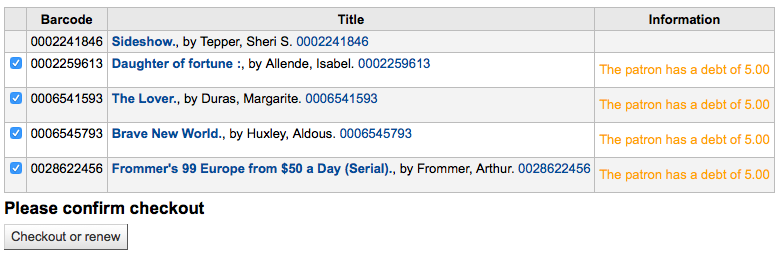
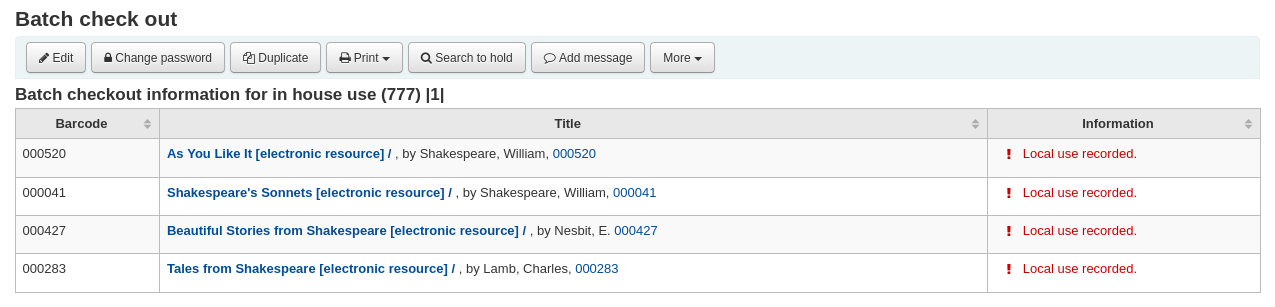
Si vous utilisez un type d’adhérent pour les statistiques vous verrez qu’un usage local est enregistré pour chaque exemplaire scanné.
Messages de prêt
Si vous prêtez un exemplaire qui a plusieurs éléments et que vous avez saisi cette information dans le sous-champ 3 de l’exemplaire (en MARC21), une popup s’affiche lors du prêt, vous indiquant le nombre d’éléments attendus.

Dans certains cas Koha empêche le prêt pour un adhérent. Quand ceci se produit une alerte s’affiche, indiquant au bibliothécaire pourquoi l’adhérent ne peut pas emprunter de documents.
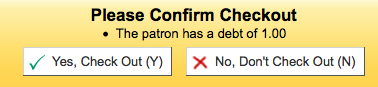
L’adhérent a accumulé trop d’amendes
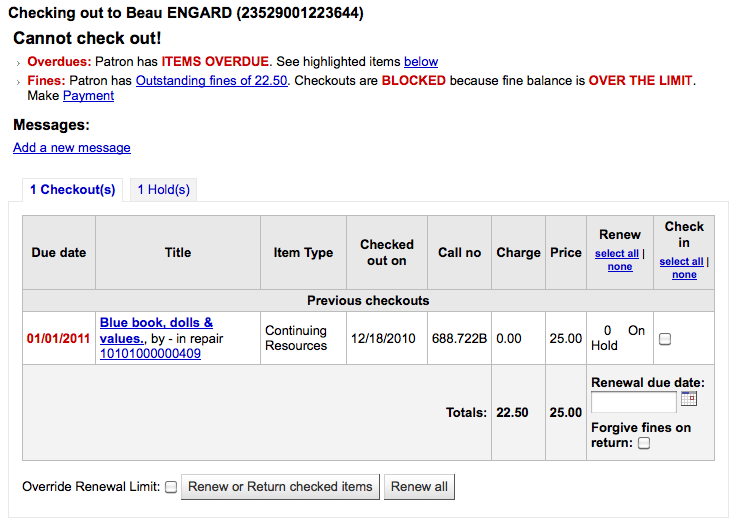
Vous pouvez définir le montant au bout duquel les prêts de l’adhérent sont bloqués grâce à la préférence système noissuescharge
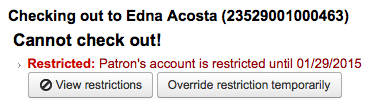
L’adhérent a son compte suspendu

This can be set by the librarian editing a patron record and adding a restriction or by the Overdue/Notice Status Triggers
Si les membres du personnel a les bonnes permissions, ils pourront outrepasser les restrictions temporairement
L’adhérent doit confirmer son adresse

This can be set by the staff editing a patron record and adding a flag.
L’adhérent a perdu sa carte de bibliothèque

This can be set by the staff editing a patron record and adding a flag.
Alertes de prêt
Parfois les retours vont générer des messages d’alerte qui s’afficheront dans un encart jaune au-dessus du champ retour. Ces alertes doivent être confirmées avant que vous puissiez continuer à enregistrer des retours.
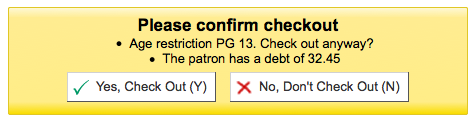
L’adhérent a des amendes
Exemplaire mis de côté pour un autre adhérent
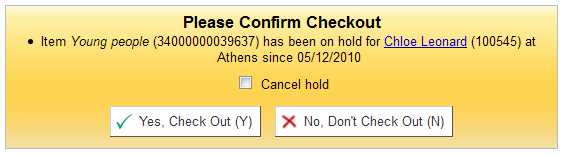
L’exemplaire devrait se trouver sur l’étagère des réservations en attente de retrait par une autre personne
Document actuellement prêté à cet adhérent

Document prêté à un autre adhérent
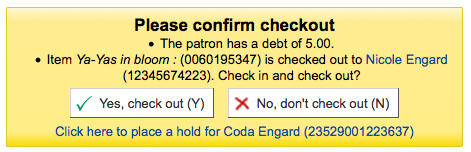
Cette alerte vous permettra de faire une réservation pour le lecteur sur le document que vous essayez de lui prêter.
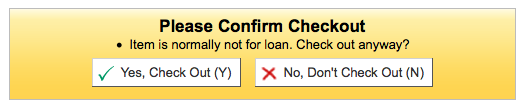
Exemplaire exclu du prêt
L’adhérent a atteint le seuil maximum des prêts autorisés et AllowTooManyOverride est paramétré sur “Permettre”

L’adhérent a atteint le seuil maximum des prêts autorisés et AllowTooManyOverride est paramétré sur « Ne pas permettre »

L’exemplaire ne peut pas être renouvelé

Cela peut être outrepasser avec la préférence système AllowRenewalLimitOverride
Code-barres non trouvé

Des explications plus détaillées sur le catalogage rapide sont disponibles plus loin dans ce manuel.
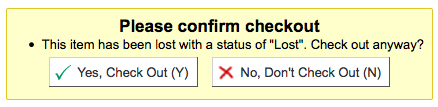
L’exemplaire prêté est marqué comme “perdu”
Selon la valeur paramétrée dans votre préférence système IssueLostItem, vous verrez peut-être simplement un avertissement

ou un cadre jaune de confirmation
L’exemplaire prêté n’est pas recommandé pour un adhérent de cet âge
L’exemplaire emprunté prend en compte les critères de la préférence système decreaseLoanHighHolds
Item has accompanying material (field 952$3, “Materials specified”, is filled)

If CircConfirmItemParts is set to “Require”, the staff member will have to confirm the checkout

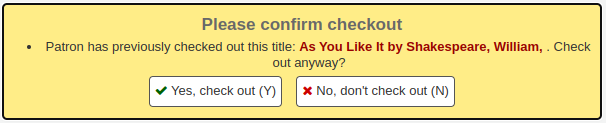
If the CheckPrevCheckout system preference says to check the patron’s circulation history, a warning will show to indicate that the patron has already checked out the item
Checkout notes
Checkout notes are notes that patrons can add from the OPAC about a particular item they have checked out (for example: missing first page, or DVD is scratched, etc.).
To enable checkout notes, set the AllowCheckoutNotes system preference to “Allow”.
Once the system preference is activated, a new column titled “Report a problem” will appear in the list of checkouts in the patron’s summary in the OPAC.
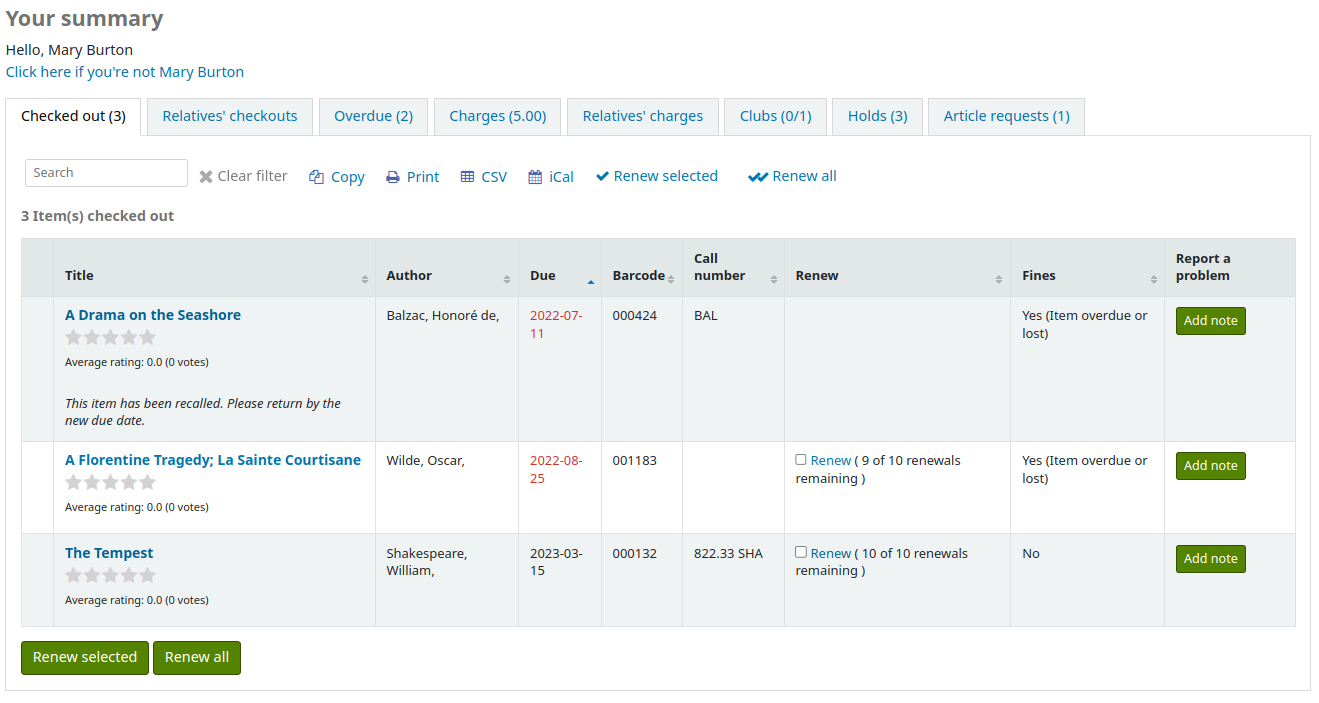
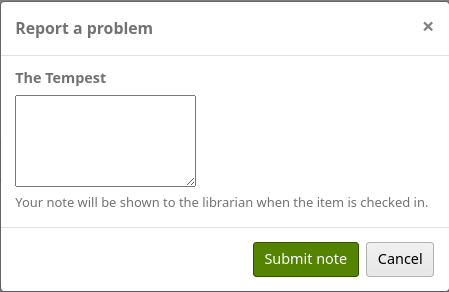
When the patron clicks on “Add note”, they will be able to write a note about this checkout.
Staff will be alerted of new checkout notes in the section at the bottom of the staff interface’s home page, with other pending requests.
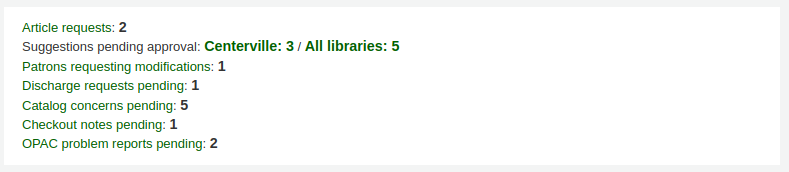
An email will also be sent to the email address in KohaAdminEmailAddress to alert the system administrator that a checkout note was added.
Note
You can customize this message in the Notices and slips tool. The letter code is CHECKOUT_NOTE.
Checkout notes can be managed from the circulation module home page, under Circulation > Checkout notes, or by clicking on the message in the pending requests section of the staff interface home page.
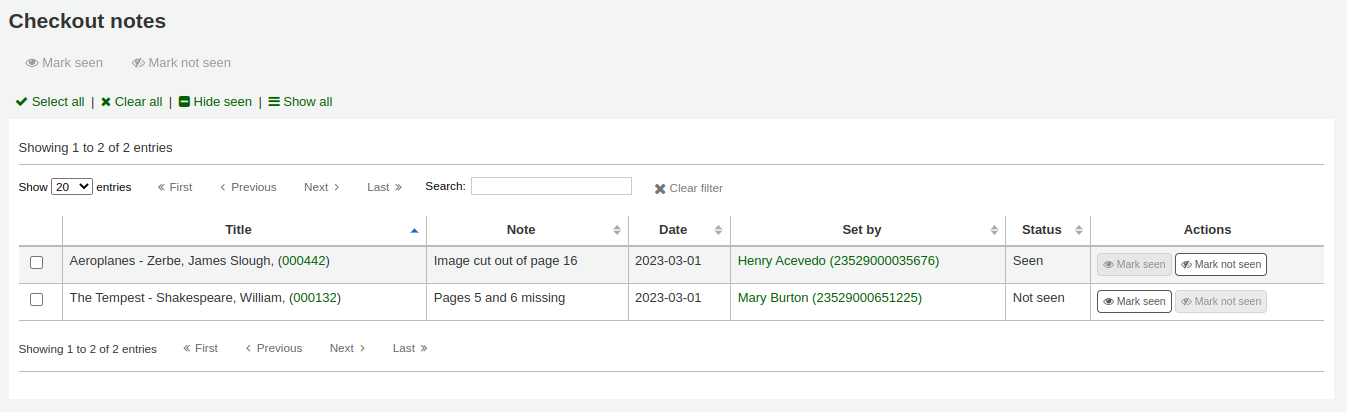
From this page, staff can mark notes as seen, either individually by clicking the “Mark seen” button on the right, or in a batch by selecting the notes and clicking “Mark seen” at the top of the page. Marking the notes as seen will remove them from the pending requests section of the staff interface homepage.
Seen notes can be filtered out with the “Hide seen” link at the top of the table.
Checkout notes will also appear upon checkin.
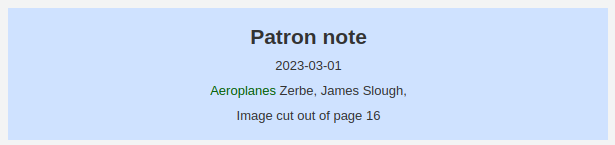
Once the item is checked in, the note will be removed permanently from this page.
Renewing checkouts
Les exemplaires en prêt peuvent être renouvelés (empruntés pour une nouvelle période de temps) selon vos règles de circulation et préférences de renouvellement.
If you allow it, patrons can renew their own items via the OPAC, but sometimes you’ll need to help them by renewing their items via the staff interface.
To renew items checked out to a patron, you can do one of three things: renew from the patron’s checkout summary, renew from the search bar at the top of the page, or renew from the “Renew” section of the circulation module.
Renewing from the patron’s checkout summary
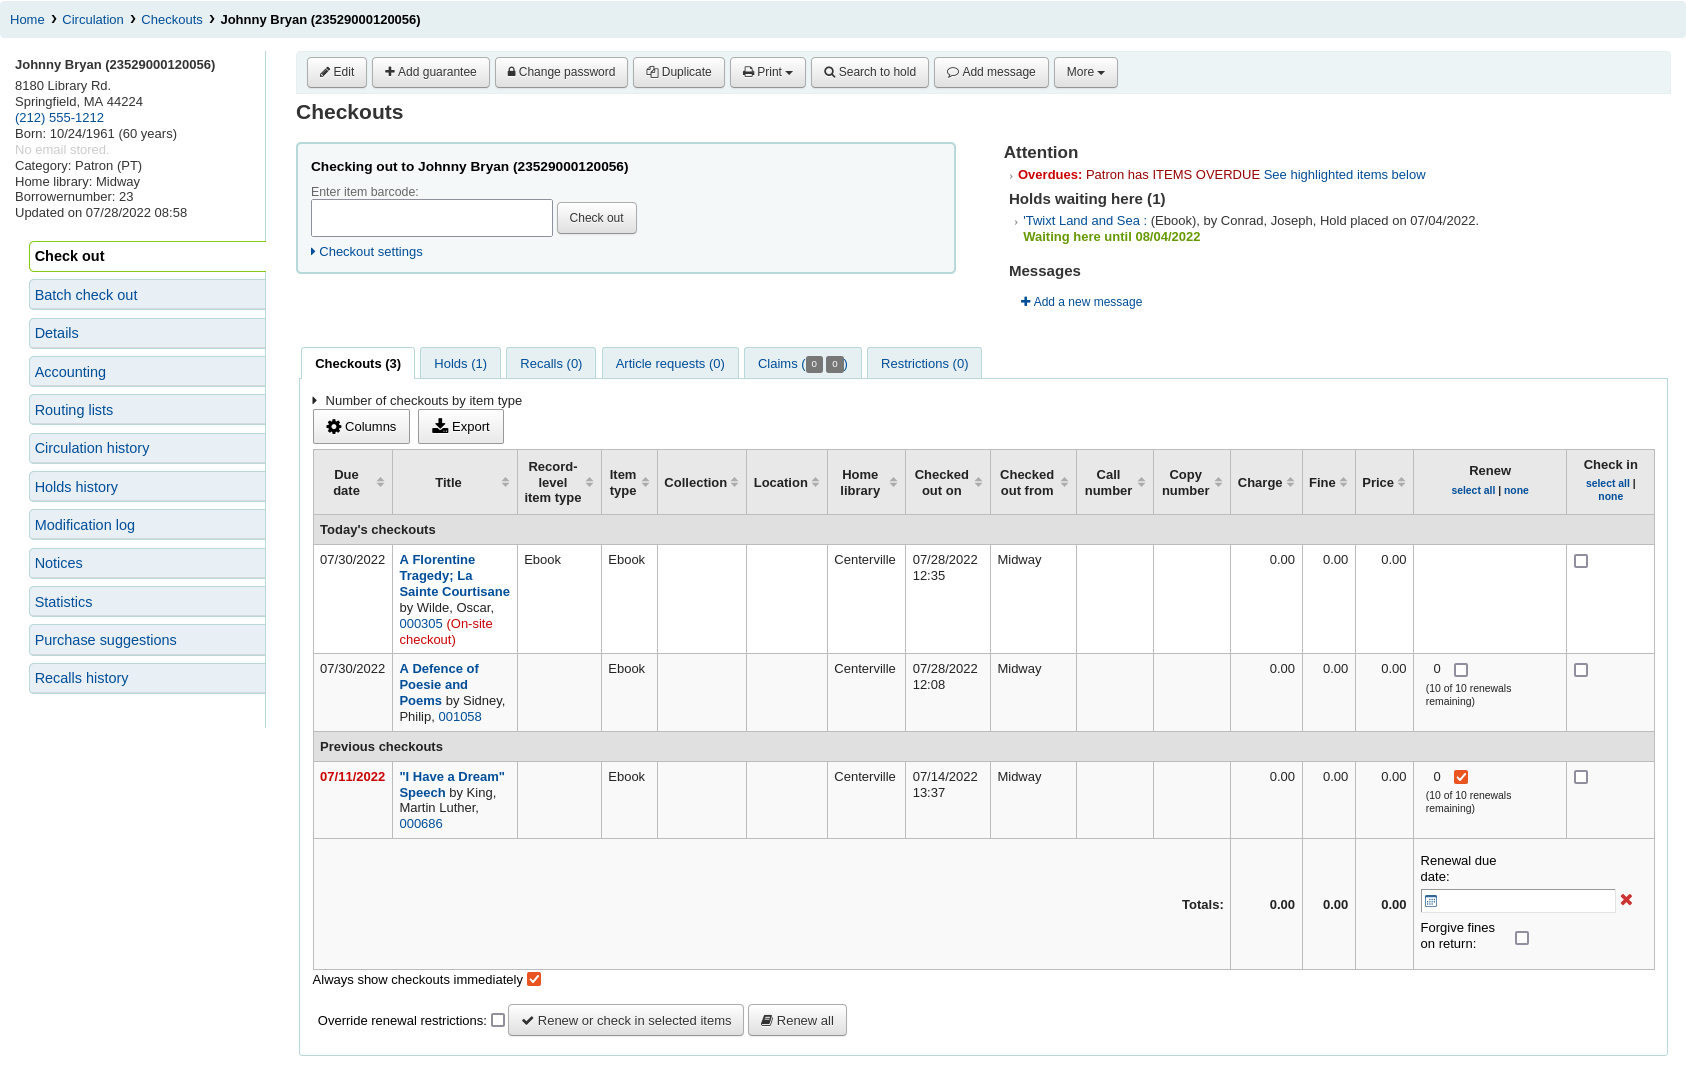
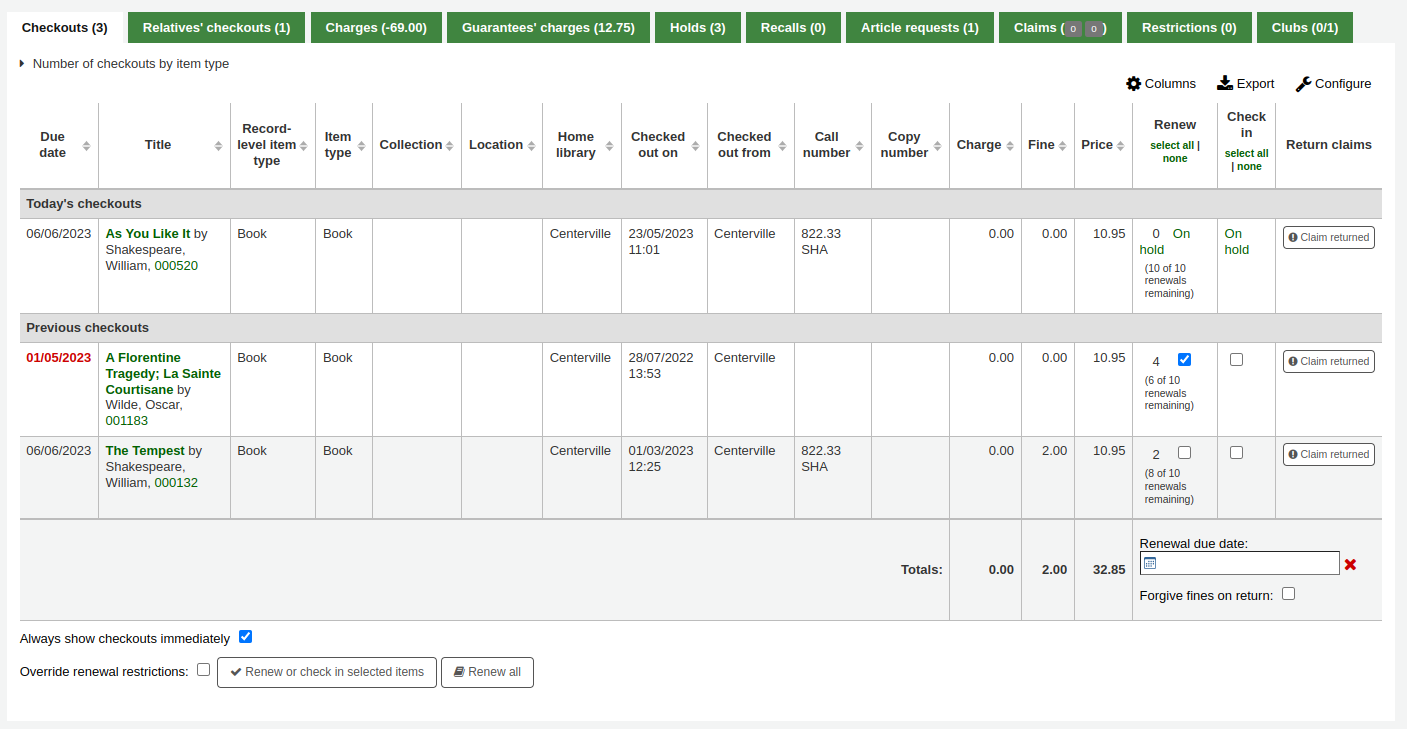
The first way to renew checkouts is to visit the patron’s details page or checkout page and view their checkout summary at the bottom.
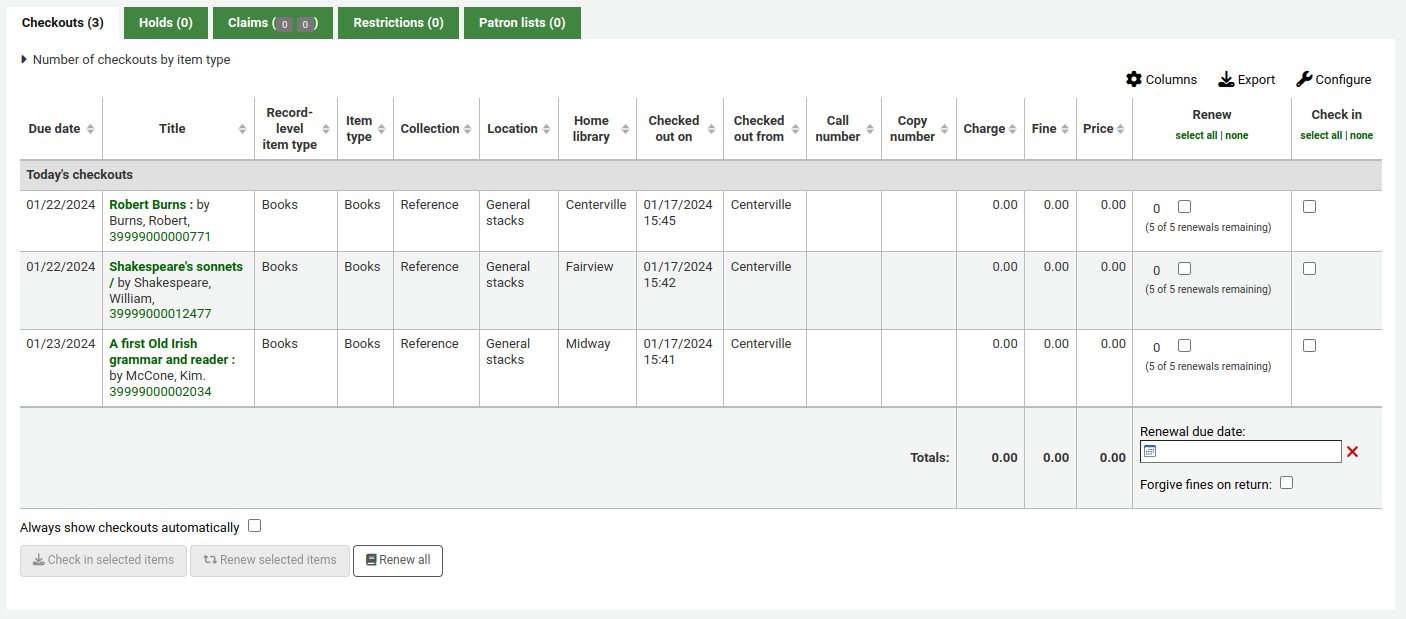
In the “Renew” column, you will see how many times each item has been renewed and a checkbox to renew the item for the patron. Check the box of the items you would like to renew and click the “Renew selected items” button. Alternatively, click the “Renew all” button to renew all items checked out to the patron.

Attention
Prior to Koha version 23.11, the button was called “Renew or check in selected items” and served both for renewing and for checking in depending on which box was checked.
Sometimes renewals will be blocked based on your circulation rules. To override this block, the AllowRenewalLimitOverride system preference must be set to “Allow”. If you allow renewal limit overrides, you will see a checkbox at the bottom left of the circulation summary. Checking that box will add checkboxes in the renew column above where before the item was not renewable.

Check that box, choose the items you would like to renew, and then click “Renew selected items”.
You can also mark a renewal as “unseen”, to differentiate between renewals where staff has actually seen the item, versus renewals where they didn’t see it (over the phone, for example). To do this, you must first enable the UnseenRenewals system preference. Once enabled, a checkbox will appear at the bottom left of the circulation summary. Check that box to mark the renewals as “unseen”. Then click either “Renew selected items” or “Renew all”.

If you need to renew the checkout for a period different than the standard renewal period, you can pick a due date in the “Renewal due date” box at the bottom of the “Renewal” column. Make sure to enter the date before clicking the “Renew selected items” button or the “Renew all button”.
Renewing from the search bar
If you have the items in hand, you can select the “Renew” option in the search bar at the top of the page (or press Alt + w, or Option + w on Mac computers), and scan the barcode in the search field.

If renewing is permitted, the checkout will be renewed for the period specified in the circulation rules.
Note
There is no way to specify a different renewal period or to override renewal limits from here. You need to use one of the other methods.
Renewing from the “Renew” page
Get there: Circulation > Renew
The last option to renew checkouts is to visit the “Renew” page found under the Circulation menu.
Scan the barcodes of the items you would like to renew.

If you need to renew the checkout for a period different than the standard renewal period, you can pick a due date in the “Renewal due date” box under the barcode field. Make sure to enter the date before scanning the barcode.
If the item is renewed, you will receive a confirmation message.

If the barcode is not found, you will be presented with an error.

If the item is not actually checked out, you will also receive an error.

Checking items in (returning)
Checking items in can be performed from various locations: the search bar at the top of the staff interface, the “Check in” column in the patron’s checkout summary, or the dedicated “Check in” page of the Circulation module.
Koha also offers an automatic check-in feature, which can be set in item types and requires the automatic_checkin.pl cron job.
Checking in from the search bar
To quickly check in an item, you can select the “Check in” option in the search bar at the top of the page (or press Alt + r, or Option + r on Mac computers), and scan the barcode in the search field.

This will check in the item and bring you to the “Check in” section of the Circulation module to check in more items.
Note
There is no way to specify a return date, use the book drop mode, or forgive fines from the search bar. You need to go to Circulation > Check in to have access to those options.
Checking in from the patron’s checkout summary
Another way to check in items is to visit the patron’s details page or checkout page and view their checkout summary at the bottom.
Check the box in the “Check in” column of the items you would like to check in and click the “Check in selected items” button.

Attention
Prior to Koha version 23.11, the button was called “Renew or check in selected items” and served both for renewing and for checking in depending on which box was checked.
Avertissement
This method doesn’t require staff to scan the barcode, which can lead to errors when selecting the items to check in. Be careful when using this method.
Checking in from the “Check in” page
Get there: Circulation > Check in
You can also check items in from the “Check in” section in the Circulation module.
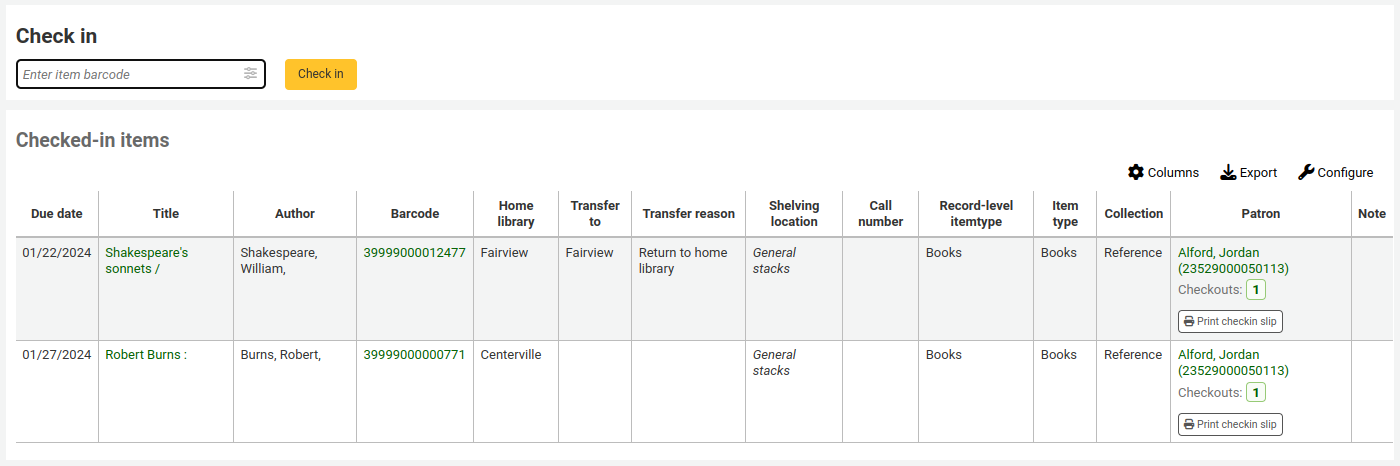
To check an item in, scan the barcode of the item into the box provided.
A summary of all items checked in will appear below the check-in box.
Note
Vous pouvez personnaliser les colonnes de ce tableau dans la section :ref:”Configurer les colonnes <column-settings-label>” du module Administration (référence du tableau : checkedintable).
Check-in settings are available by clicking on the settings icon in the barcode field. These are used for non-standard check-ins, for example, if you need to specify a different return date, or if you need to forgive all fines.

If the SpecifyReturnDate system preference is set to “Allow” you will be able to arbitrarily set the return date from below the check in box.
If you are checking items in that were put in the book drop while the library was closed, you can check the “Book drop mode” box before scanning items. This will effectively roll back the return date to the last date the library was open.

Note
This requires that the closed days are added to the calendar tool.
Vous pouvez également choisir ici de ne pas appliquer les amenders aux documents dont vous effectuez le retour en cliquant sur l’option Effacer les amendes.
Note
This checkbox will only appear if you charge overdue fines, i.e., if the finesMode system preference is set to “Calculate and charge”.
Messages de retour
Plusieurs alertes peuvent s’afficher quand vous rendez des documents :
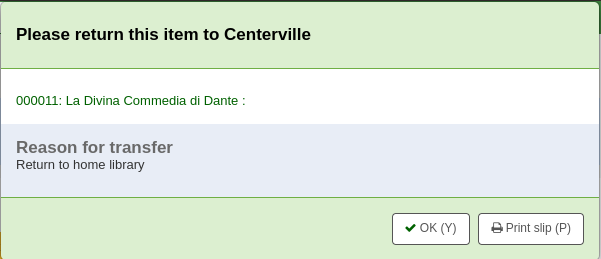
If the return policy dictates items need to be returned back to their home or holding library, a message will appear asking staff to transfer the item.
Note
When set to “Block”, the TransfersBlockCirc system preference will block all actions until the pop-up is confirmed.
When set to « Don’t block », the AutomaticConfirmTransfer system preference determines what happens if the pop-up is dismissed without confirming the transfer.
After this item is checked in and the transfer is confirmed, the status of the item will be changed in the catalog to “in transit”.

To mark an item as back at the home or holding library, check the item in at that library.

A message will appear to tell you that the item is not checked out, but the status will now say available in the catalog. This step is necessary to mark items as received by the library.
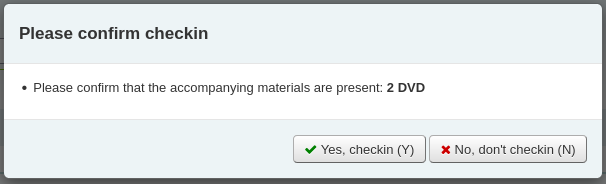
Si vous retournez un document comprenant plusieurs éléments ou parties, un message vous alertera sur le nombre d””éléments que vous devriez avoir entre vos mains.
If CircConfirmItemParts is set to “Require”, the staff member will have to confirm the checkin
Si vous retournez un exemplaire ayant fait l’objet d’une réservation, vous aurez ce genre d’avertissement vous invitant à confirmer la réservation
Cliquer sur le bouton “Confirmer la réservation” marque l’exemplaire dans la liste des réservations en attente de retrait sur le site

En cliquant sur le bouton d’impression de ticket et de confirmation, vous placerez l’exemplaire dans la liste des réservations en attente de retrait à la bibliothèque et vous imprimerez un ticket que vous pourrez placer dans le livre
Si vous ignorez la réservation, le document restera réservé mais son statut passera à Disponible. La réservation ne sera pas annulée
Si vous retournez un document ayant fait l’objet d’une réservation depuis un autre site, vous devrez confirmer et transférer le document
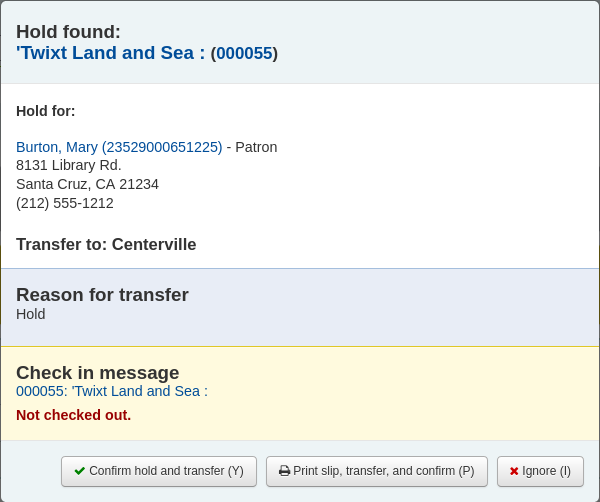
Cliquer sur le bouton “Confirmer réservation et Transférer” marque l’exemplaire comme étant en transit vers le site où la réservation a été faite

En cliquant sur le bouton de confirmation, transfert et impression, vous marquerez l’exemplaire comme étant en transit vers le site où la réservation a été faite et vous imprimerez un ticket contenant des informations sur l’adhérent qui a fait la demande
Si vous ignorez la réservation, le document restera réservé mais son statut passera à Disponible. La réservation ne sera pas annulée
Si vous avez activé le système qui vous montre les amendes à payer au moment du retour sur (FineNotifyAtCheckin) vous verrez un message vous avertissant que l’adhérent a une amende à payer avec un lien direct sur la page de paiement pour cet adhérent

Claiming an item as returned
If the patron claims they returned something, you can mark that item as “Claimed returned” and track those claims.
In order to use this feature,
Add a new authorized value to the LOST category to represent items claimed as returned.
Enter the authorized value in the ClaimReturnedLostValue system preference (this enables the return claims feature).
Choose if a lost fee should be charged to the patron who claims an item as returned. Set a value in the ClaimReturnedChargeFee system preference (the default is to ask if a lost fee should be charged).
Optionally set a number of return claims a patron can make before a warning appears in their record in the ClaimReturnedWarningThreshold system preference.
Once the feature is enabled, a button to “Claim returned” will appear in the patron’s checkouts tab.
To claim an item as returned,
Click the “Claim returned” button next to the checkout.
In the pop-up, enter any notes about this claim.
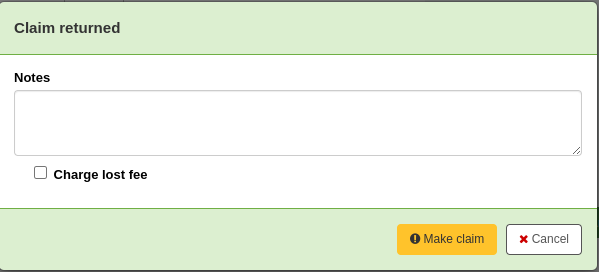
If the ClaimReturnedChargeFee system preference is set to ask whether or not the lost fee should be charged to the patron, there will be a checkbox to charge the fee.
Click “Make claim”.
The claimed returned item will stay in the patron’s checkouts, and its lost status will be updated. The claim will also appear in the “Claims” tab.
Resolving a return claim
To resolve a claim,
Go to the patron’s record in the “Claims” tab.

Click “Actions” next to the item and choose “Resolve”.
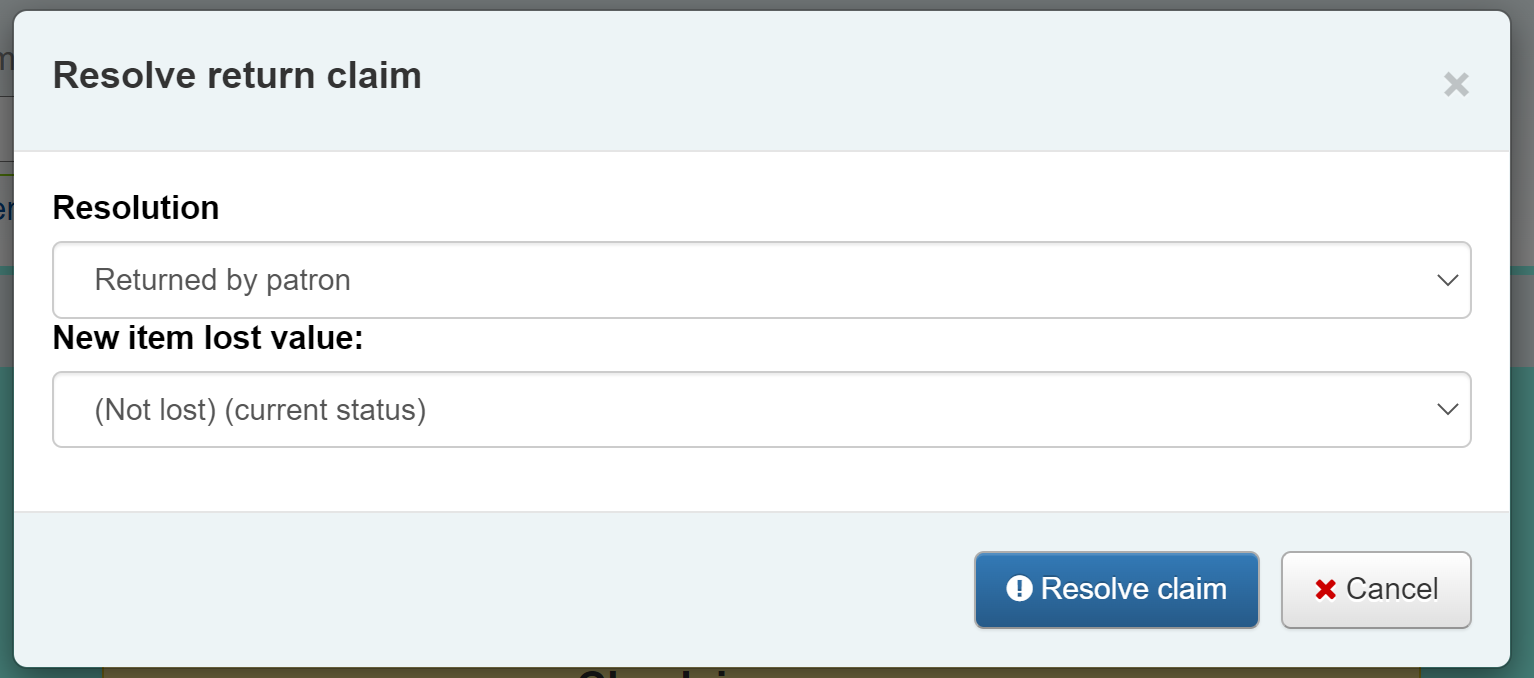
In the pop-up, choose a resolution and new lost status.
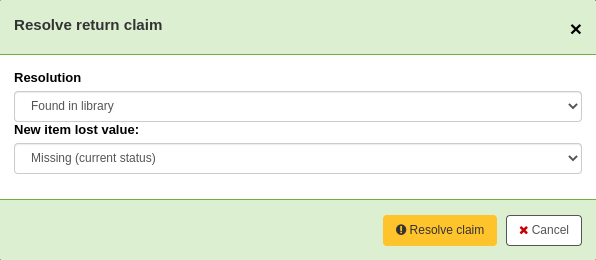
Resolution: the resolution is the reason this claim is being closed.
Note
The values are managed in the RETURN_CLAIM_RESOLUTION authorized value category.
New item lost value: this is the new lost status for this item.
Note
The values are managed in the LOST authorized value category.
Click “Resolve claim”.
The resolved claim will stay in the patron’s record, unless they are purged by the cleanup_database.pl cron job after the number of days specified in the CleanUpDatabaseReturnClaims system preference.
Circulating bundles
This feature adds the ability to create bundles of items that can be checked out as a single entity. A bundle could for example be a box of related items from your library or a collection of musical scores which need to be circulated together.
You create a collection level bibliographic record and add items to it in the usual way. Those items can then be converted to a bundle by adding existing item records to them using their barcodes. The items will remain attached to their original records and be marked as ‘not for loan’.
Configuration
First you need to make some configuration choices.
Item types - you may want to create a separate item type to identify your bundles.
Circulation rules - you can optionally create circulation rules for your bundle item type.
There are two system preferences which control the status values used with bundles:
Creating bundles
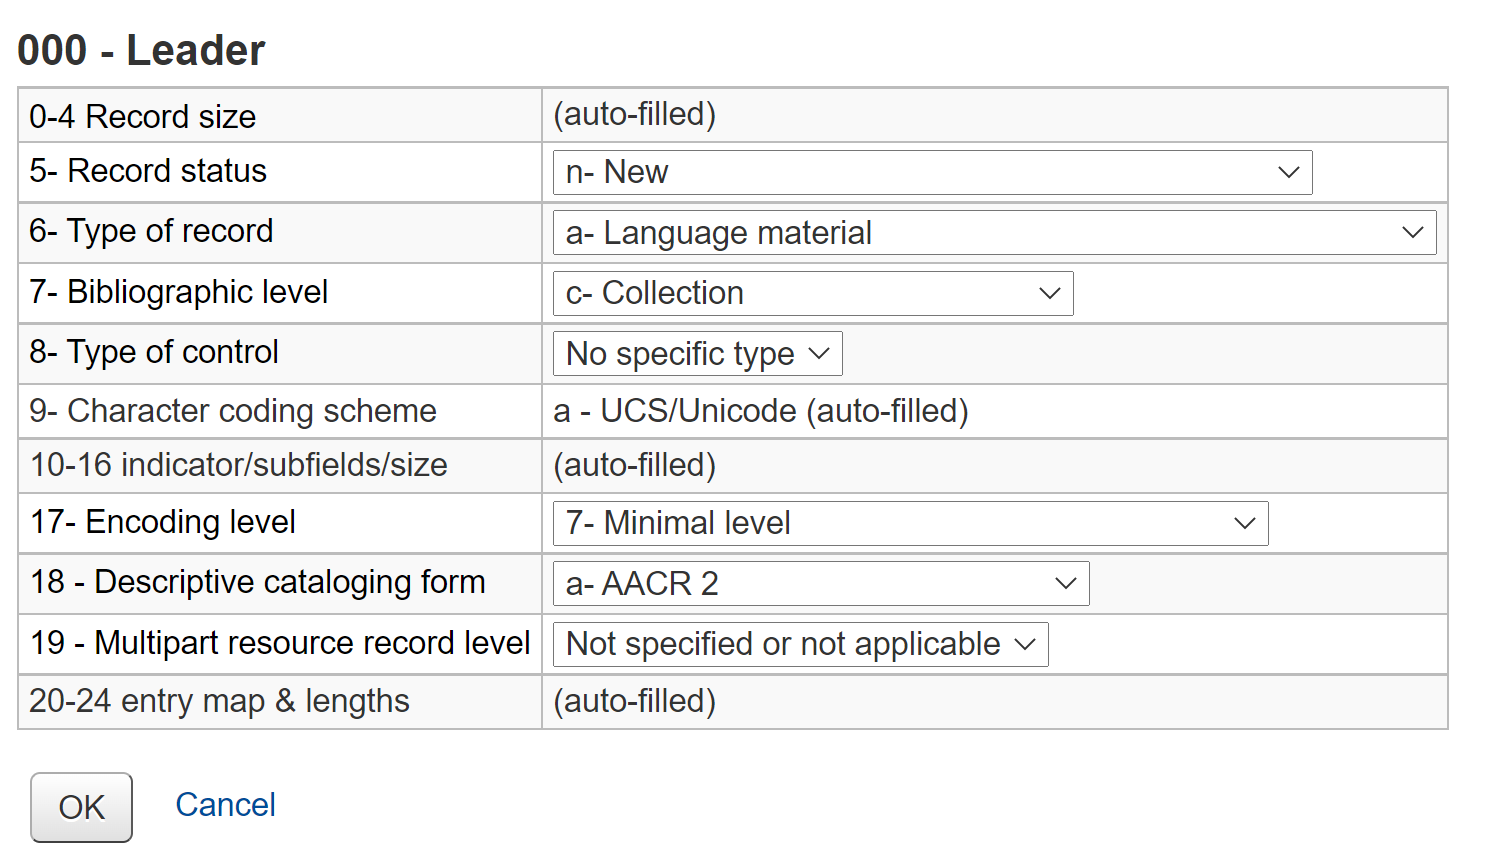
The bundle functionality will only be displayed if you create a catalogue record with the Leader, (000 MARC tag) position 7 set to ‘c’ for Collection.
Note
It might be useful to have a separate MARC bibliographic framework for bundles with the ‘c’ set as a default value if you will use bundles regularly. You can also add any custom fields to the template that might be unique to bundles such as size or weight.
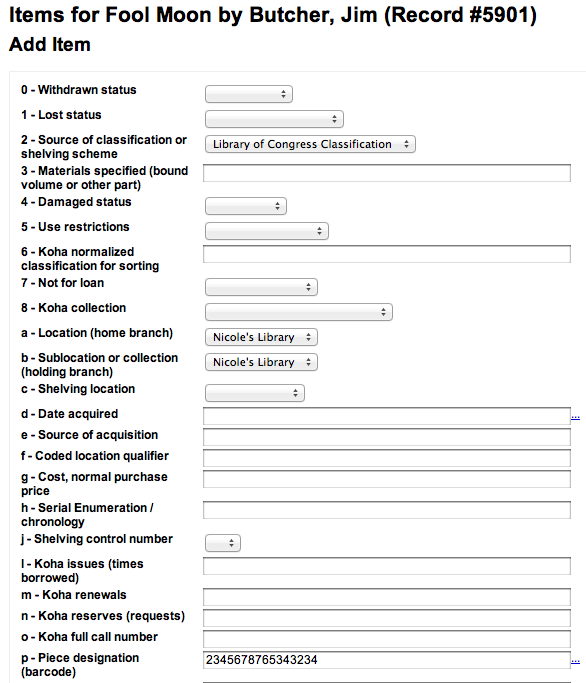
Your catalogue record will contain information to identify the content of the bundle.
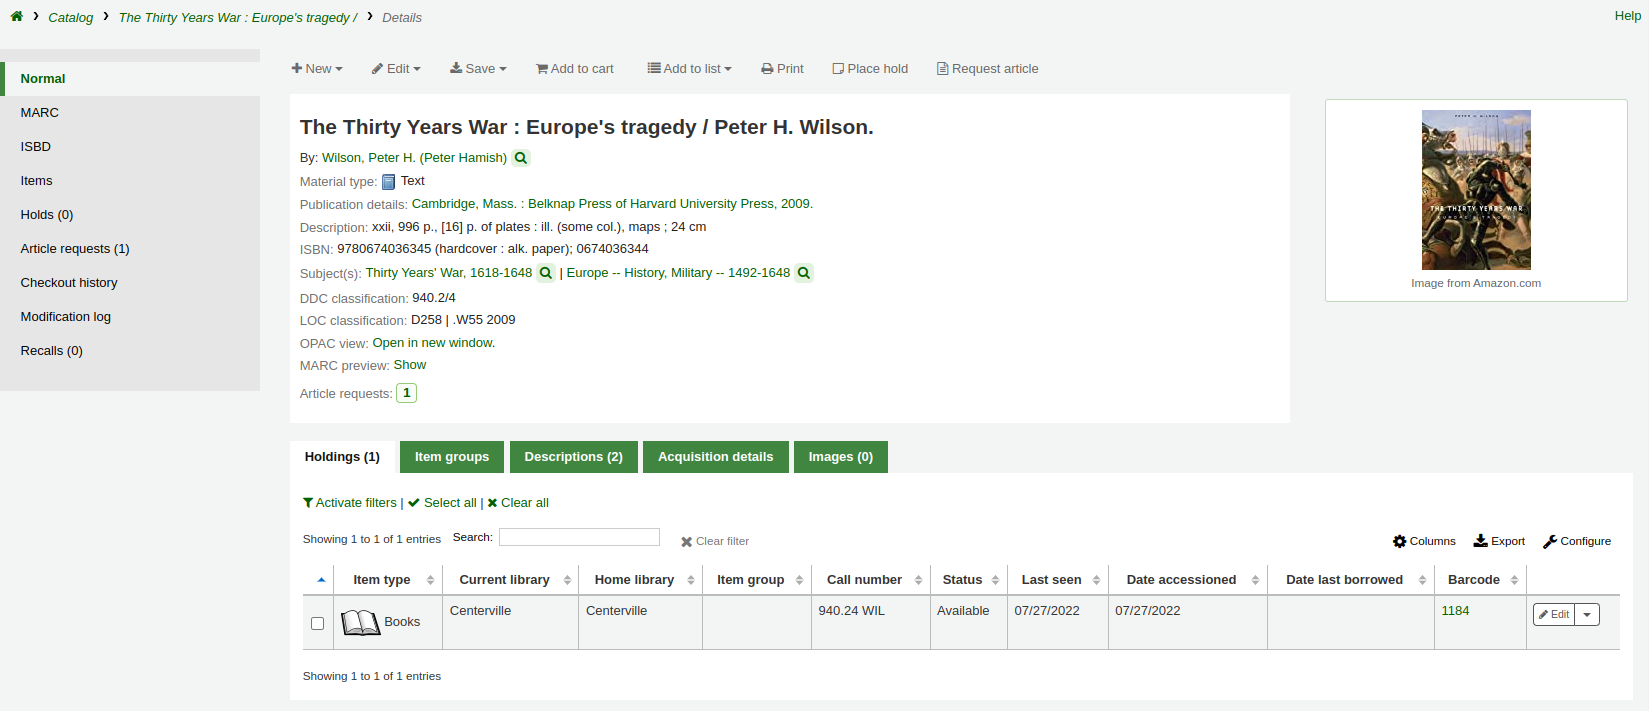
For example, if the bundle is a box of resources for school children on the topic of oceans, the catalogue record might look something like the one shown below.
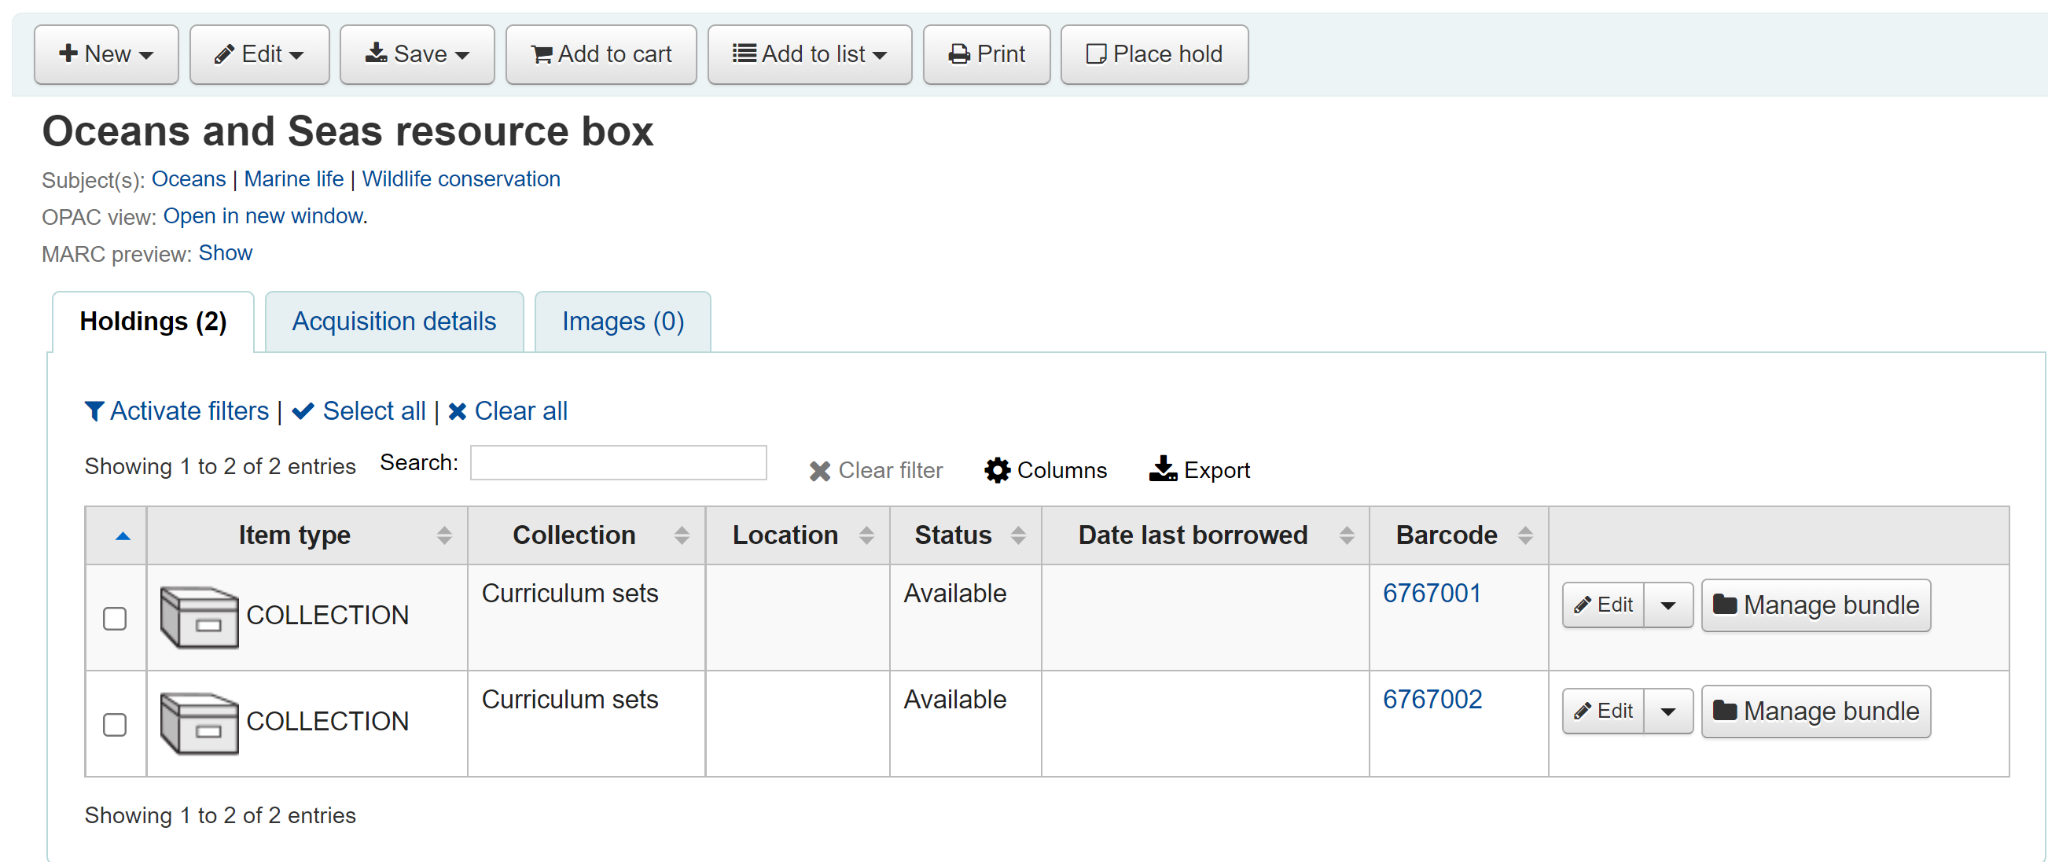
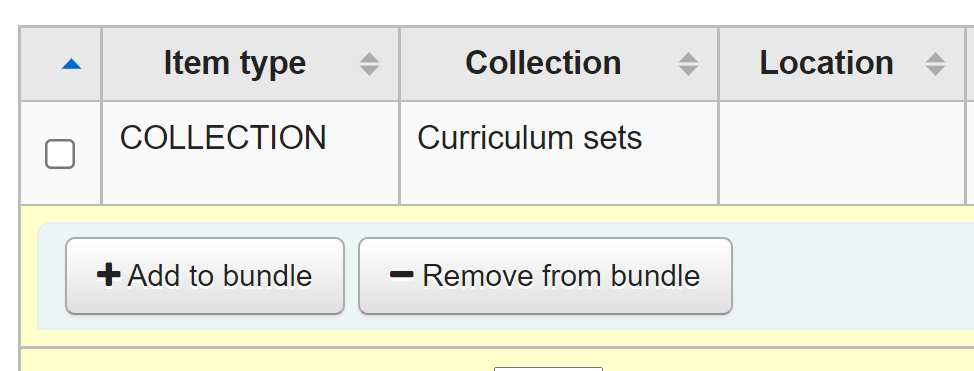
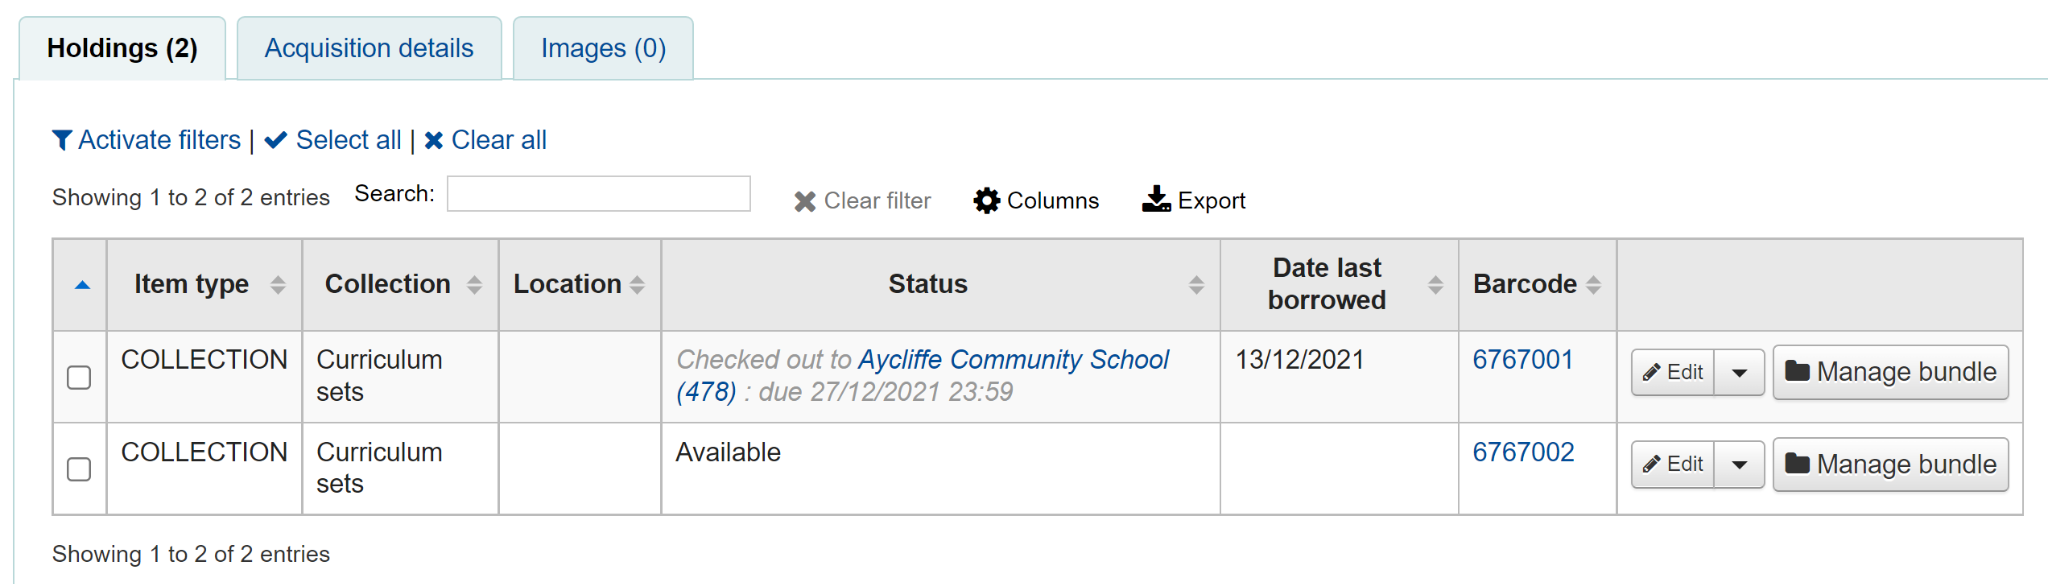
Add an item record for each physical bundle. It is likely that you will want a specific item type for bundles so that you can identify them easily and create circulation rules for them. In this case the bundle has the item type COLLECTION.
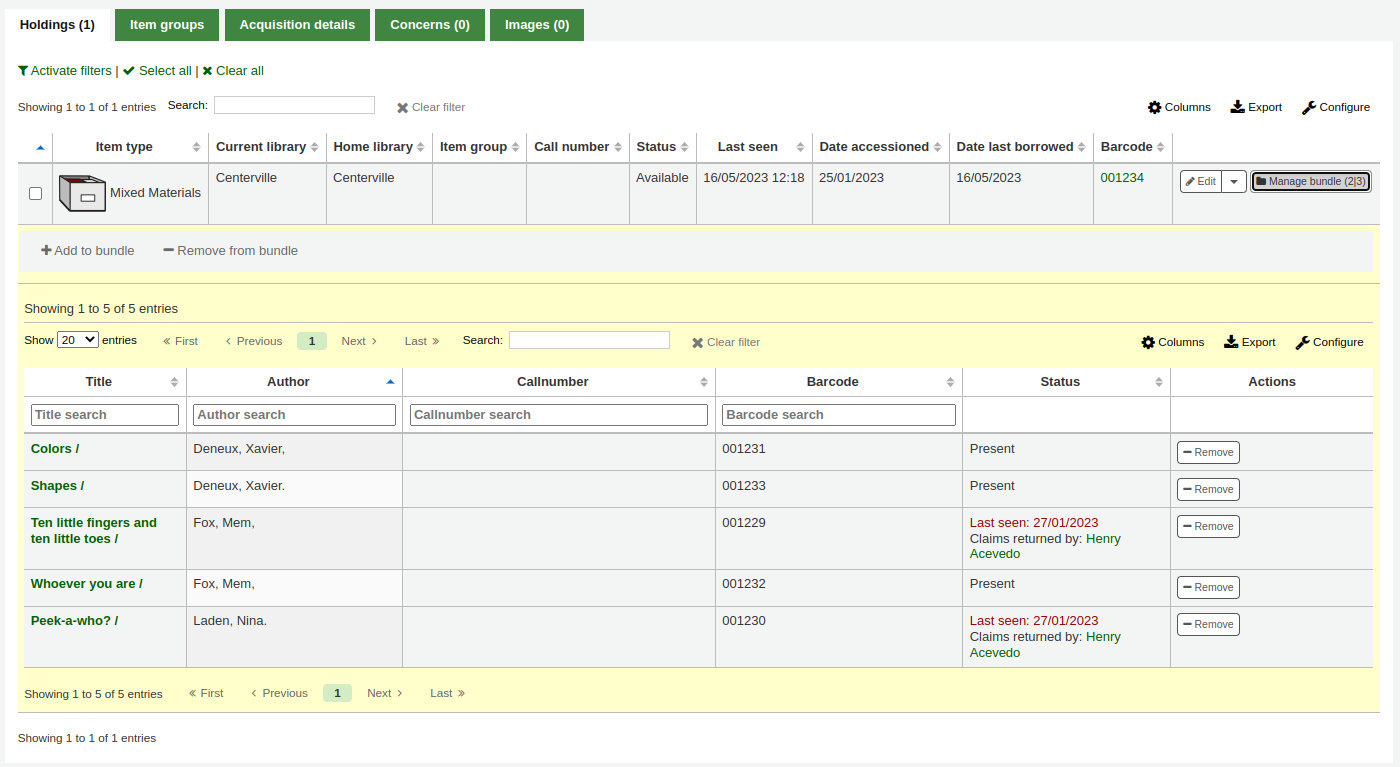
An item record attached to this type of catalogue record can be converted into a bundle via the Manage bundle button on the far right-hand side of the holdings table for each item as shown below.
Adding items to bundles
Click on Manage bundle and then the Add to bundle button to add items to the bundle using the barcode of the item.
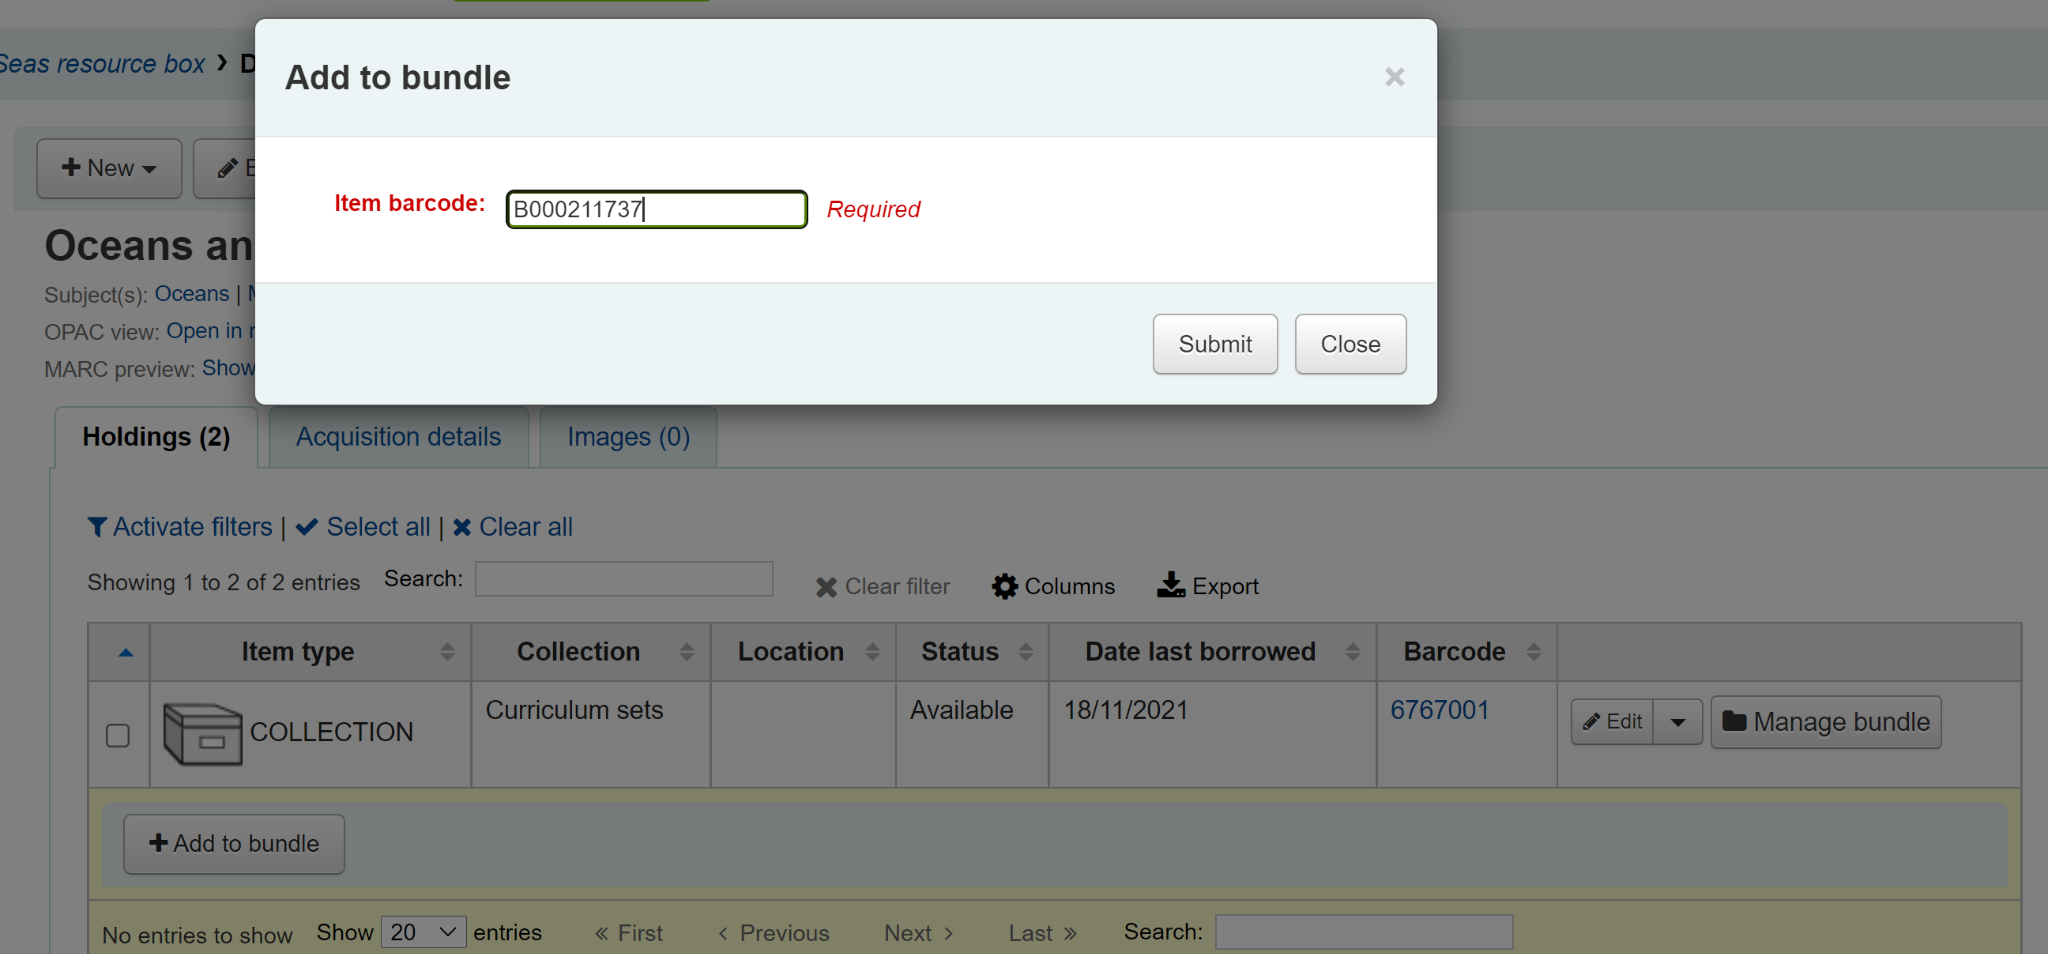
You will see a message telling you that the item has been added successfully.

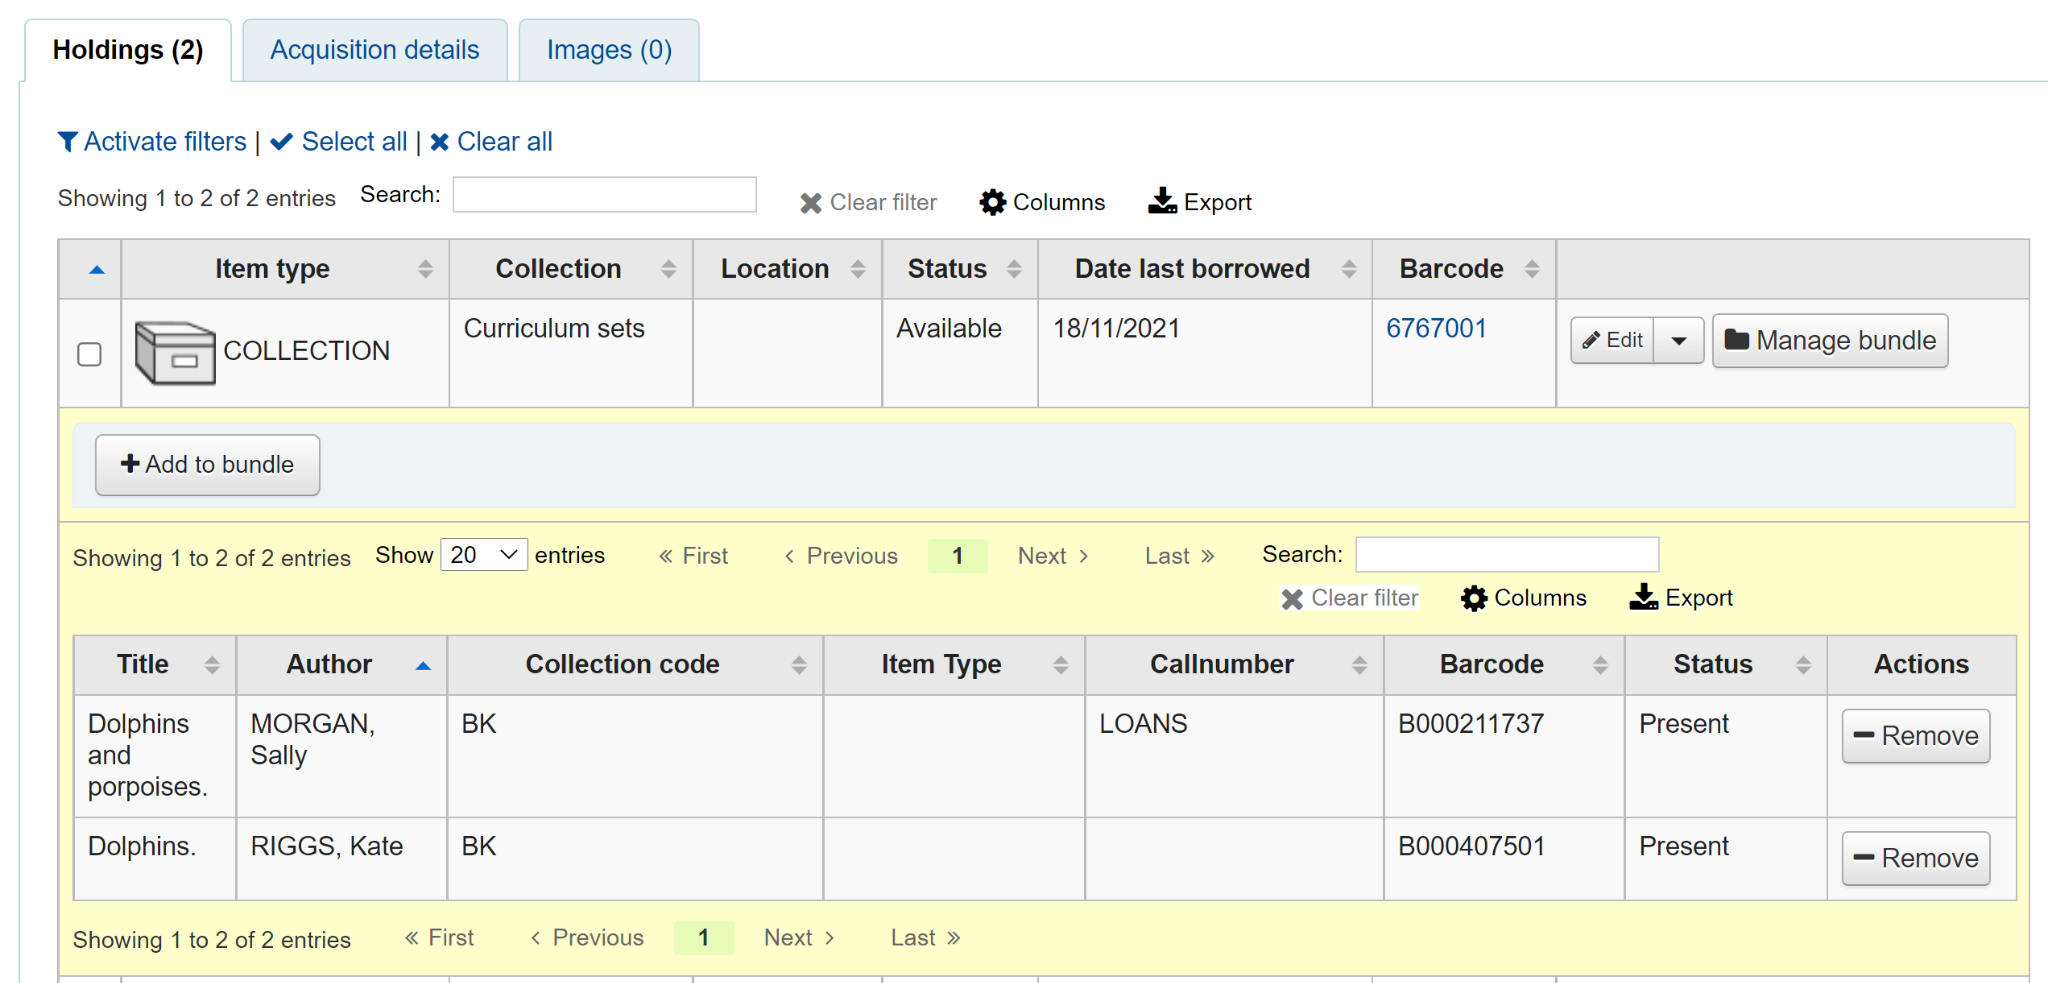
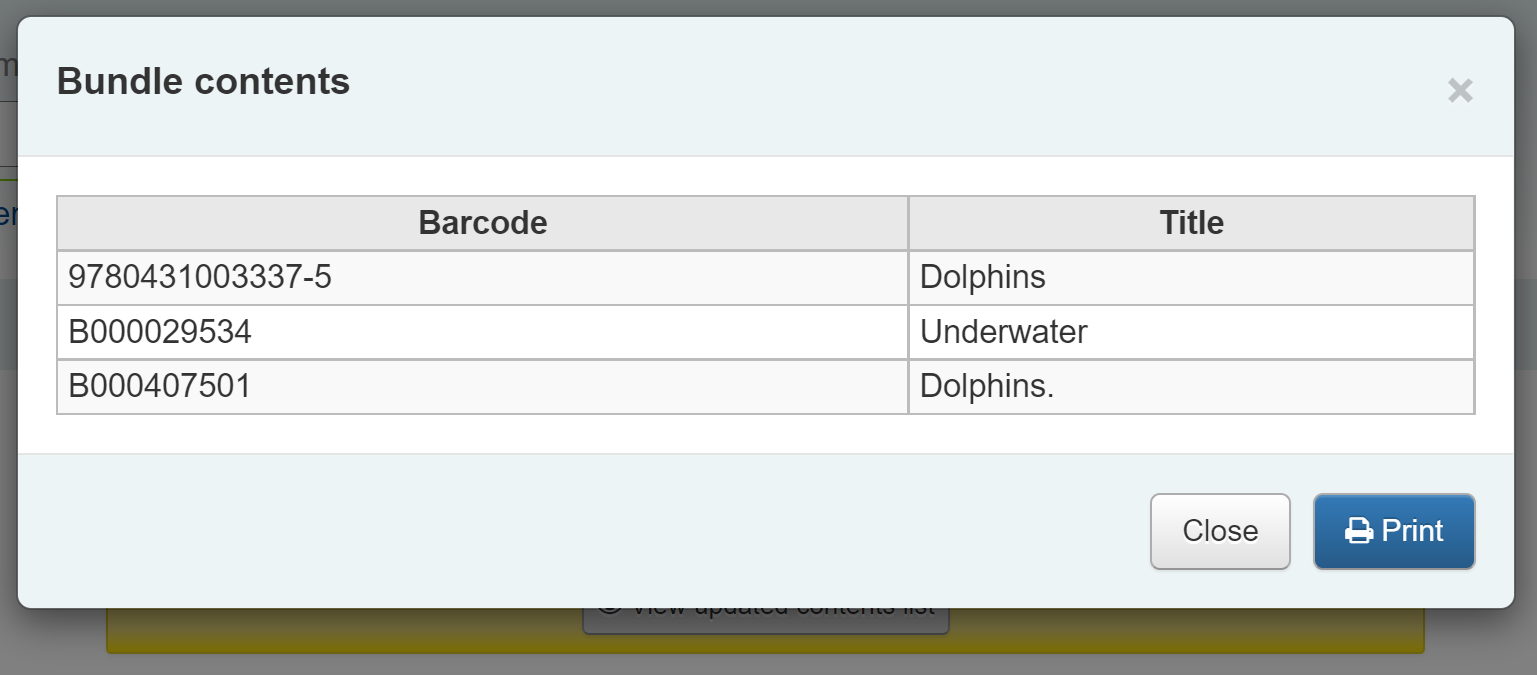
When you have finished scanning in items you can click on Close and view the bundle contents. The bundle contents list can be exported or printed if required.
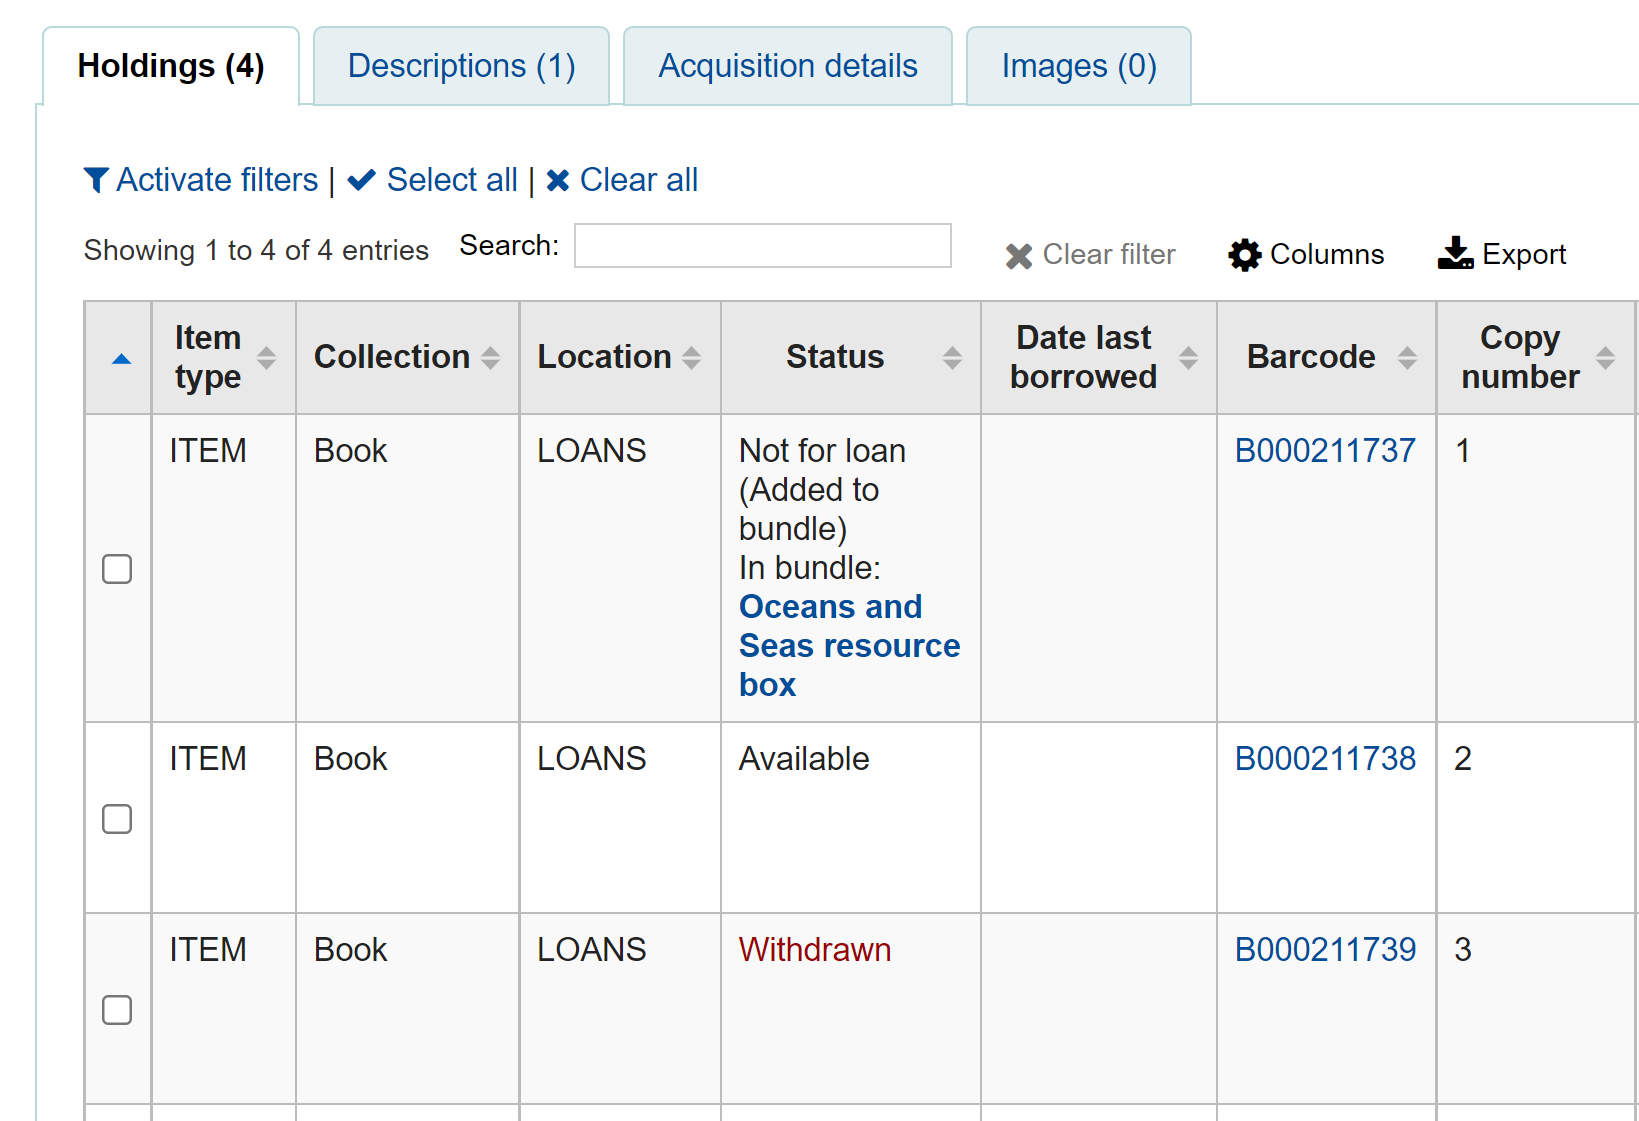
Avertissement
Items added to bundles are still attached to their permanent catalogue record, however, they cannot be checked out individually. When added to a bundle an item’s Not for Loan status is updated and can be viewed in the holdings table of the permanent record along with a link to the bundle. The Not for Loan status can be defined in the BundleNotLoanValue system preference.
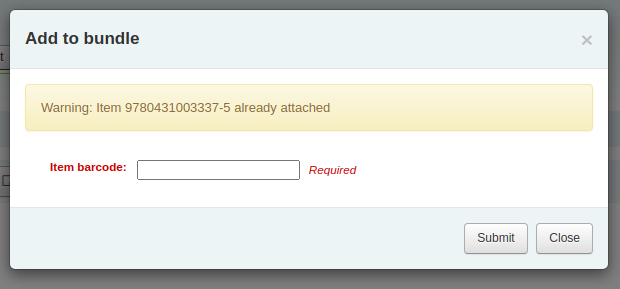
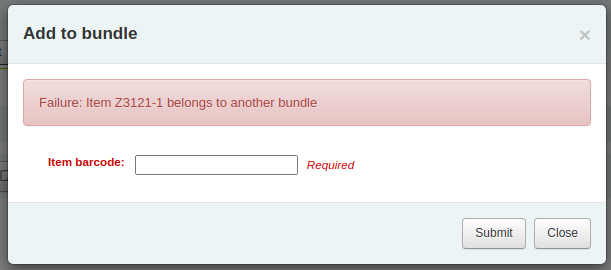
If an item is already found to be attached to the bundle, a warning message will be displayed.
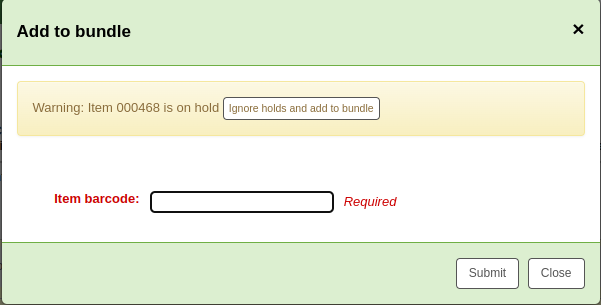
If an item has an item-level hold, a warning message will be displayed. To add the item to the bundle anyway, click “Ignore holds and add to bundle”. To cancel, click “Close”.
If an item cannot be added to the bundle for any other reason a failure message will display.
Removing items from bundles
To remove an individual item from a bundle you can click on the Remove button from the Actions column of the bundle contents list.
To remove multiple items from the bundle you have two options:
Use the ‘Remove from bundle’ button from within the Manage bundle display
Scan in barcodes in the same way as you add items to bundles. You will see a confirmation dialogue to let you know the item has been removed.

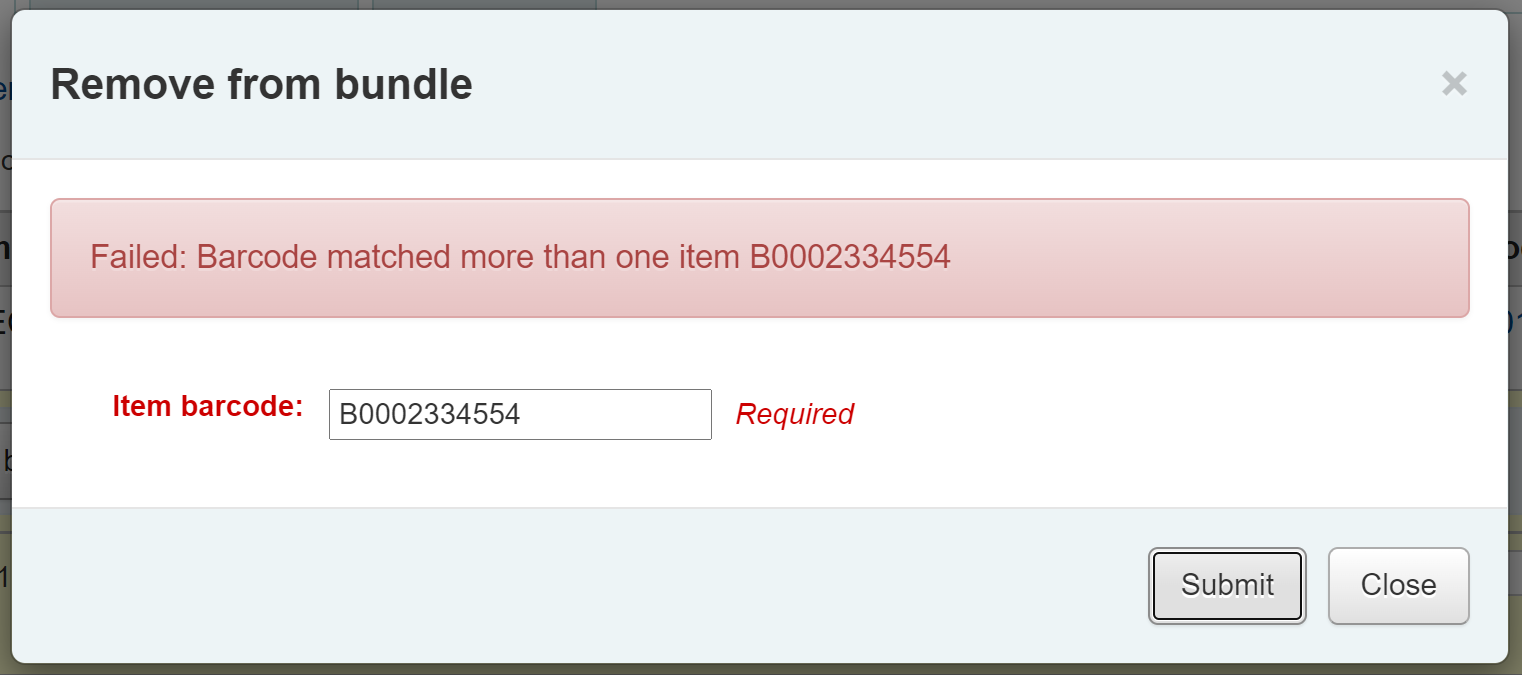
If the item couldn’t be removed you will see a Failure message.
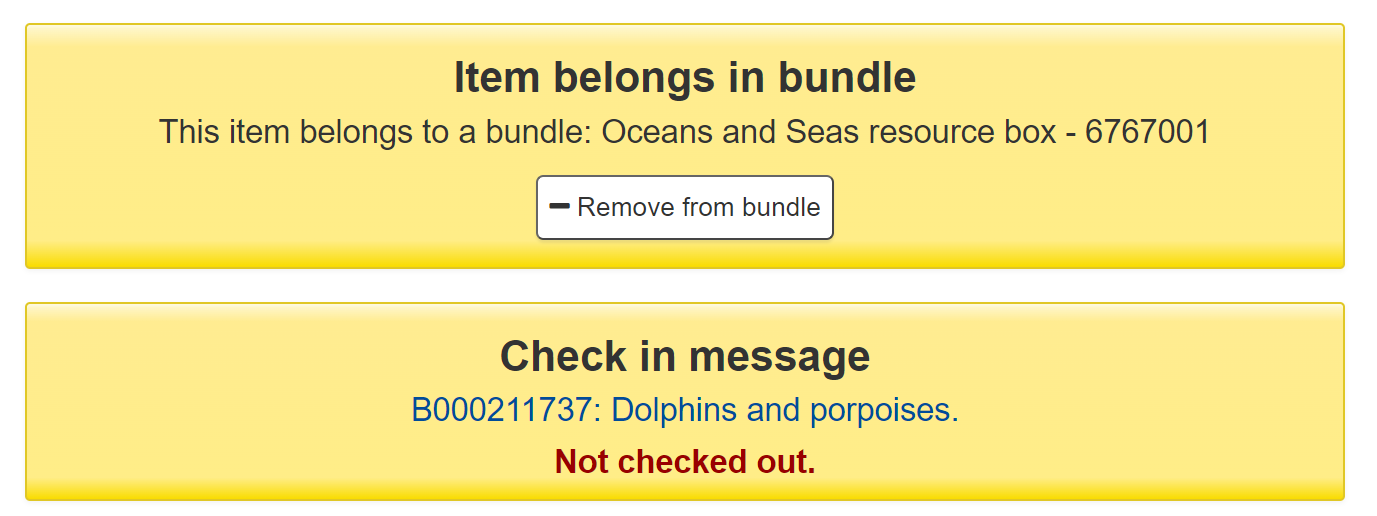
The second way to remove multiple items is to scan the barcode of the item into the checkin box and you will be given the option to remove the item from its bundle.
When you have finished working with a bundle you can close the contents list by clicking on the Manage bundle button again.
Circulating bundles
Prêter
You can checkout a bundle in the usual way from Circulation using the barcode of the bundle. If required you can create specific circulation rules for bundles based on their item type.
Remember, once an item is within a bundle it cannot be checked out individually. If you try to do this the following alert will be displayed.

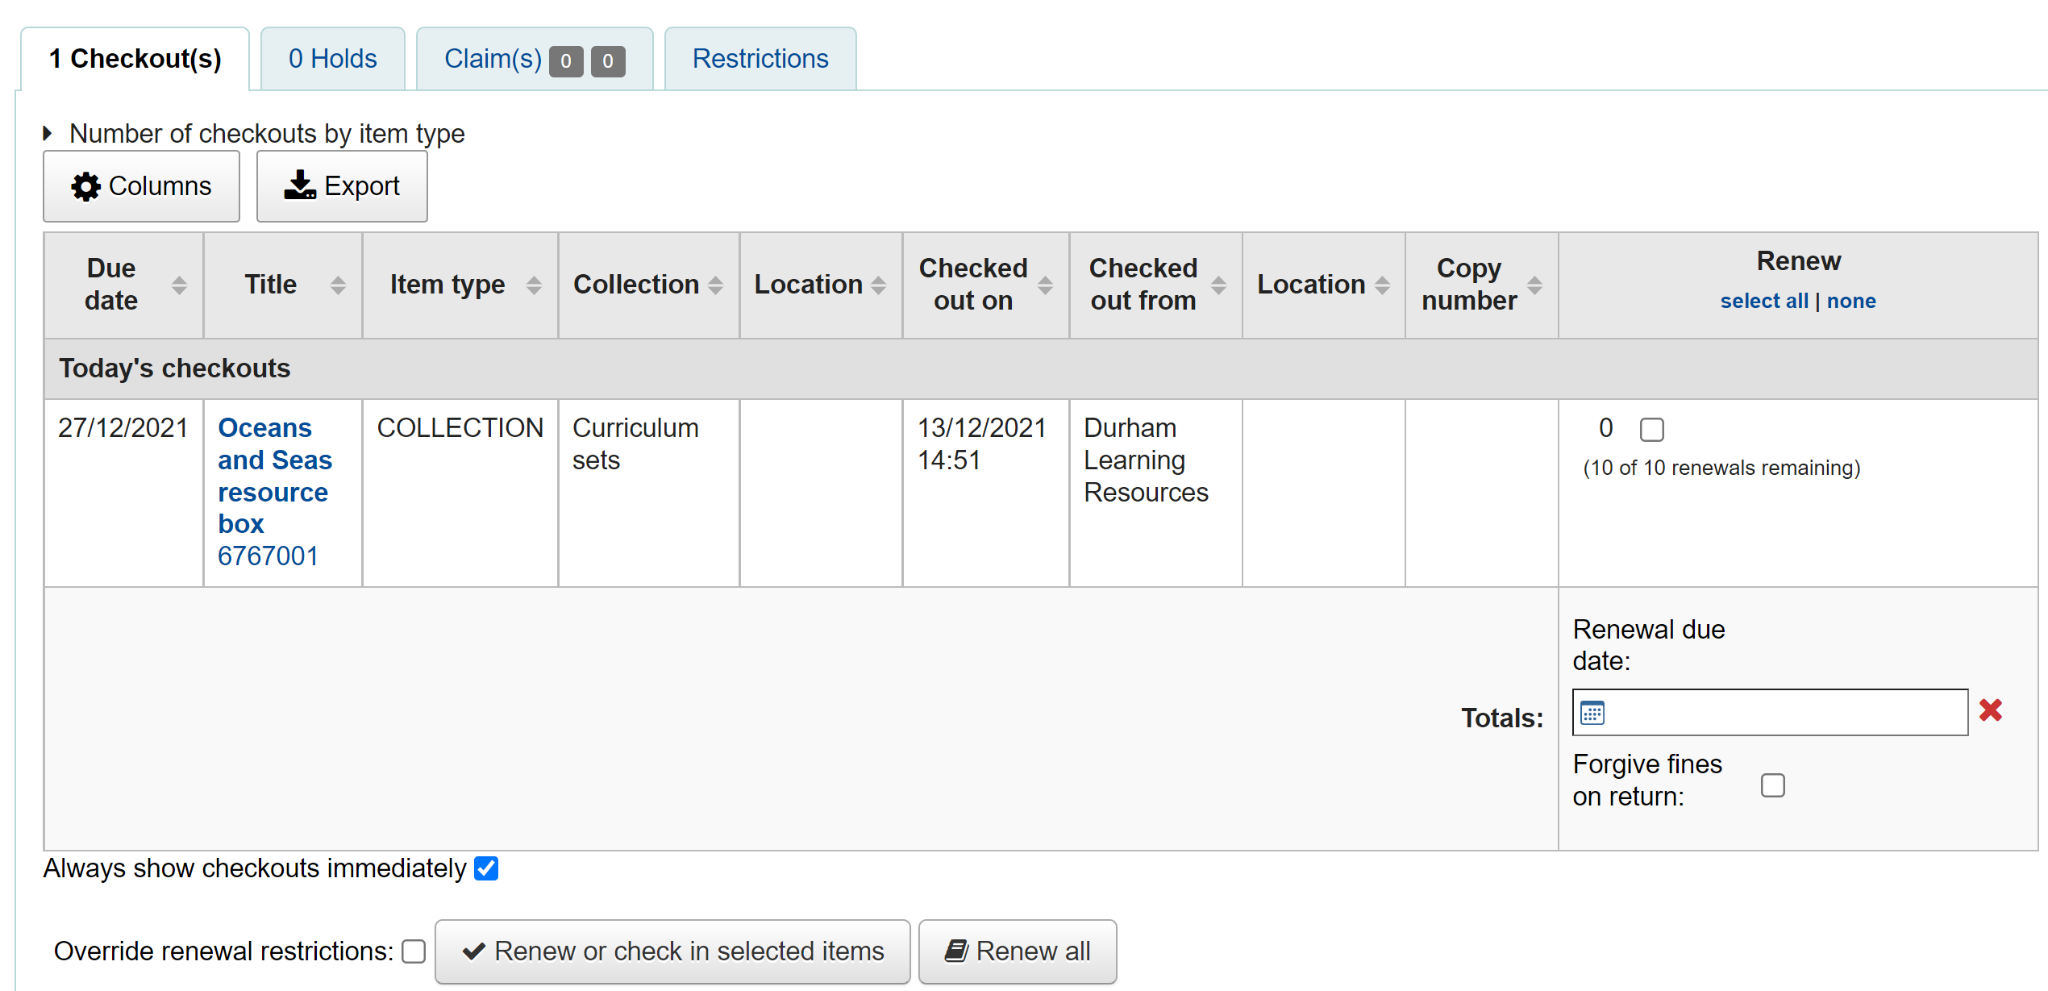
You can see the checkout from the patron’s list of checkouts.
You can also see that the bundle is checked out from the status column of the Holdings table of the catalogue record.from the catalogue record display.
Checkin
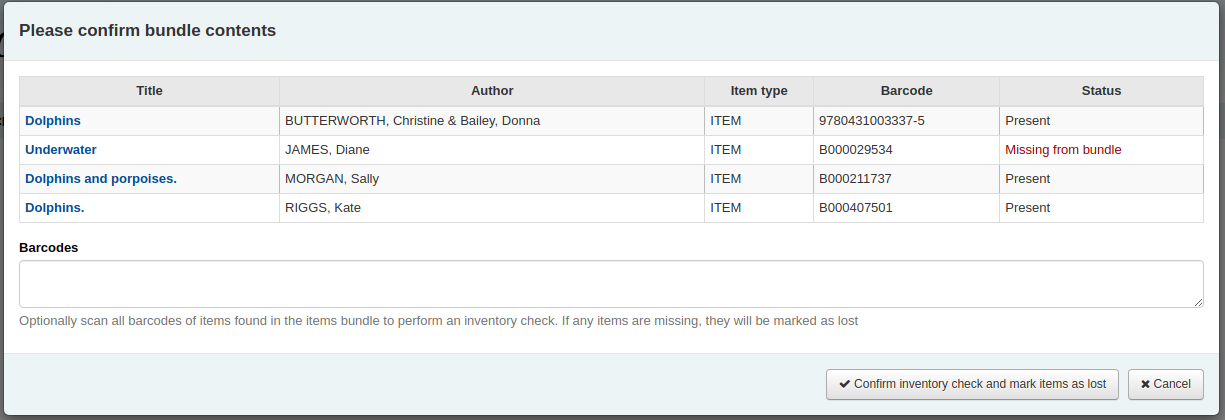
Check in bundles in the usual way from Circulation. You will then be prompted to verify the presence of each item that belongs in the bundle.
If you need to skip the verification process, click the “Confirm checkin without verifying bundle contents” button. You will be able to verify the contents later.
Une liste des exemplaires actuellement reliés au lot et en attente d’être rendus s’affichera en haut de la boîte de dialogue. Sous cette liste, il y aura un champ “Codes à barres” dans lequel vous saisirez un à un les codes à barres des documents rendus.
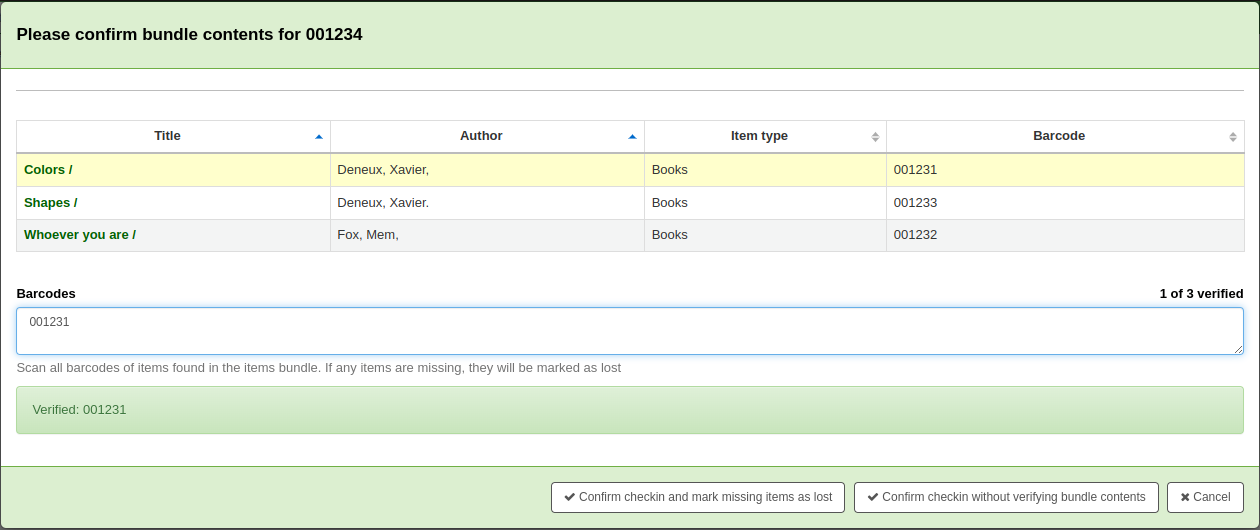
As you scan items, the matching row in the list will be highlighted to give some visual feedback. You also see a running total of items that have been checked in on the right hand side.
When you have finished scanning the returned items you can click on ‘Confirm checkin and mark missing items as lost’ or you can cancel the checkin.
If all the bundle items were marked as found you will be presented with a message to say the checkin is complete.

You can view and print a contents list.
Missing items
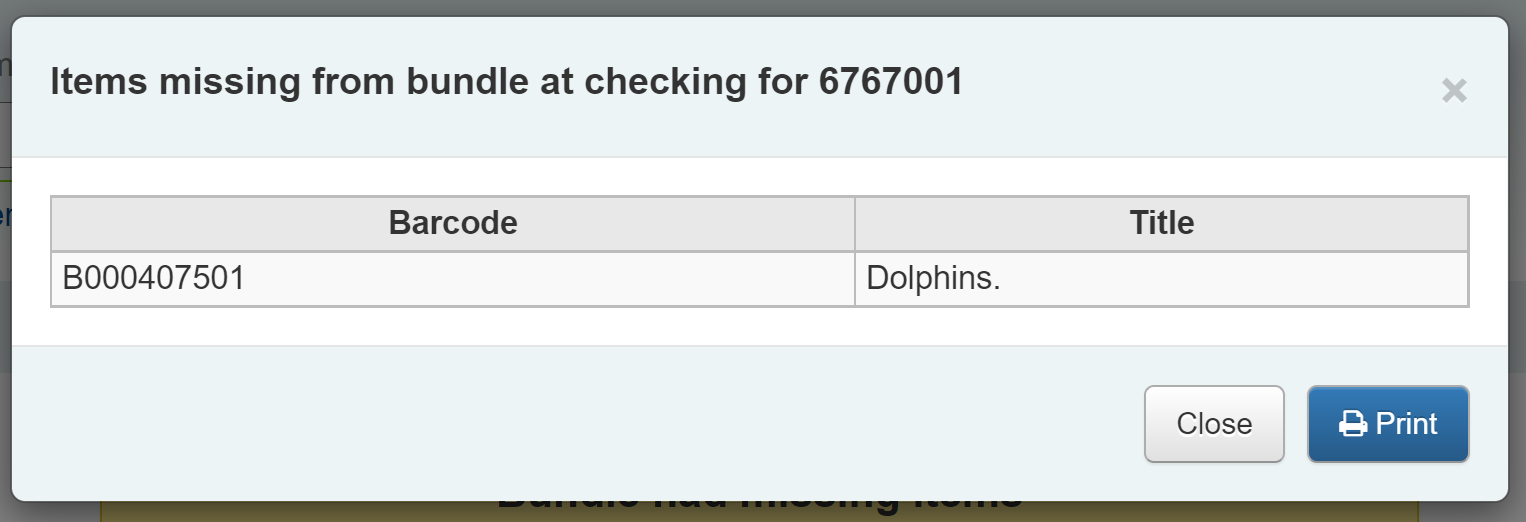
If some items were found to be missing during the verification stage the check in will proceed but you will be alerted to the fact that the bundle content has changed and you will be given the option to view and print an updated contents list.

You can also view a list of the missing items.
Any items that were missing during the verification stage will automatically be marked with an appropriate Lost status and a return claim added to track which checkout lost the contained item. You can add your own Lost statuses as authorized values and can control which lost status is used via the BundleLostValue system preference. For example a ‘Missing from bundle’ status as shown below.
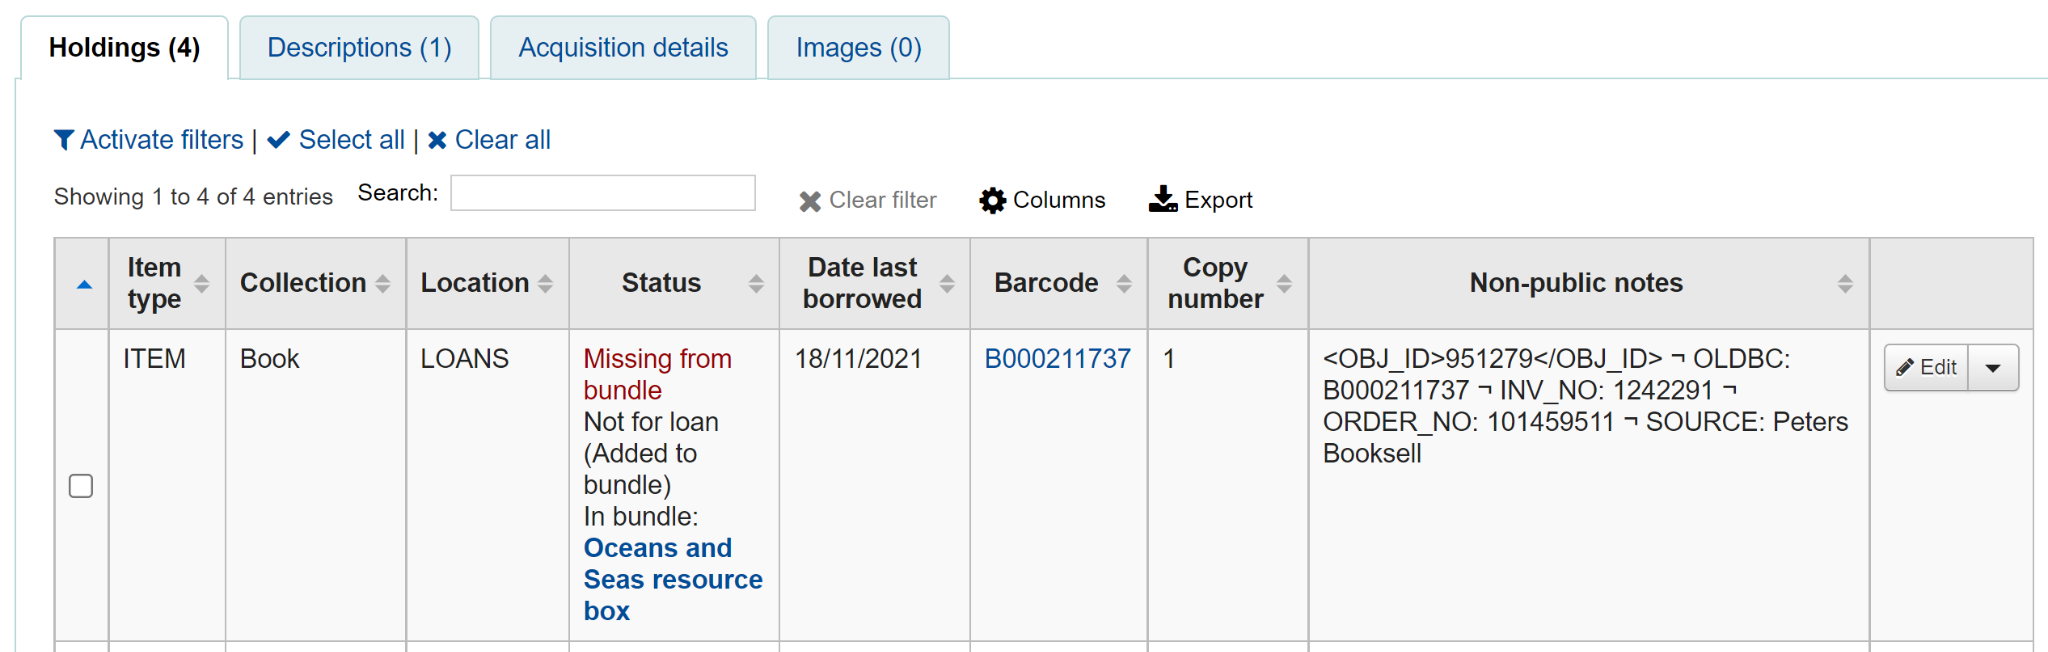
In the Manage bundle contents view, the missing item displays with the date last seen.
Claims returned process
Within the patron record the missing items are listed as claims returned and can be viewed from the Claim(s) tab in the Checkouts table.
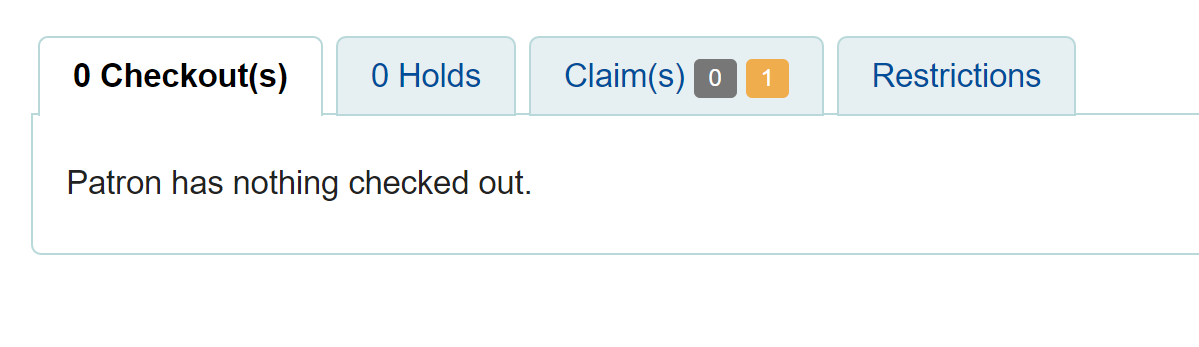
Click on the numbered square to view the missing items for the patron.
If an item is found it should be checked in. The checkin dialogue box will include a button to ‘Resolve’ the claim.

You are required to add a resolution reason and can optionally change the lost value of the item.
Inventory (checking bundle contents at any time)
A verification can be triggered at any time by checking the bundle in. If the system detects that the bundle was not checked out at this point, a modified confirmation dialogue is displayed which will include all items expected to be present in the bundle, even those currently marked as lost.
This allows for a quick view of what should be in the bundle and what’s currently marked as missing. You can optionally cancel the checkin or choose to rescan the items to perform the verification, marking items as found or subsequently missing. As this is a checkin that is not associated with a checkout, if new items are found to be missing, we will mark them as lost but cannot associate them with a checkout and returns claim.
Réservations
Koha allows patrons to put things on hold. A “Hold” is a way to reserve an item. Depending on your circulation and fines rules and hold system preference settings, patrons will be able to place items on hold for pickup at the library at a later date and time.
Placing holds in the staff interface
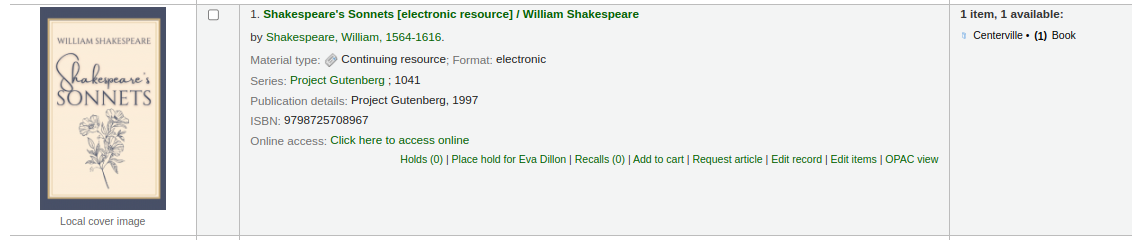
There are several ways to place holds from the staff interface. The most obvious is using the “Place hold” button at the top of any bibliographic record.
Sur la page de résultats d’une recherche, vous pouvez également utiliser le lien Réserver qui se trouve en haut de la page ou bien celui qui se trouve sous chaque notice.

To place holds on multiple titles at the same time, check the boxes next to the titles in the search results, and click the “Place hold” button at the top of the search results.
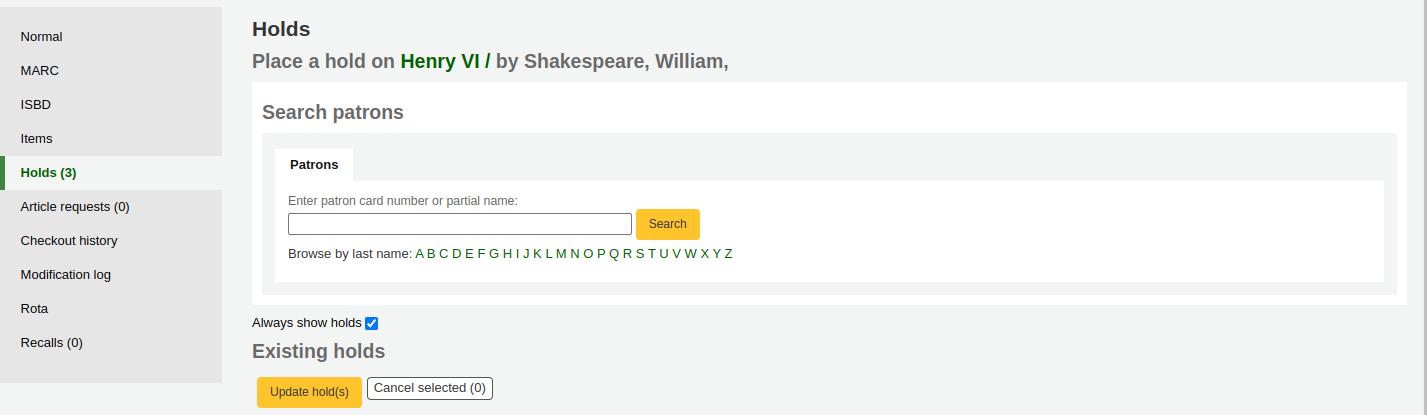
Vous recherchez d’abord un adhérent à partir de son code à barres ou de tout ou partie de son nom.

If you’d like to search for the patron first and then the bibliographic record for the hold, you can open the patron record and click on the “Search to Hold” button at the top of the patron record.

After clicking the button you will be brought to the catalog search page where you can find the title or titles you need to place a hold on. Under each title on the results you’ll see an option to “Place hold for (patron name).”
If you want to place a hold on multiple titles for this patron, check the boxes to the left of the titles, click the arrow to the right of the “Place Hold” button and choose “Place hold for (patron name)”.
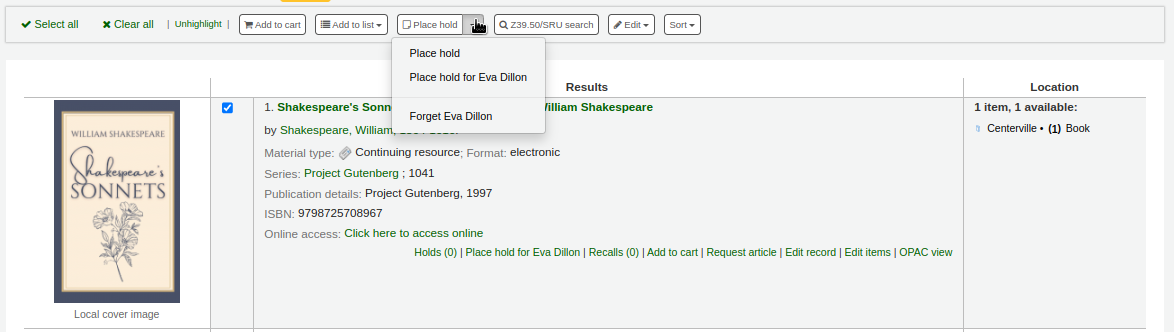
Note
Once the holds are placed, you can choose to have Koha “forget” the patron’s name by clicking the arrow to the right of the “Place hold” button on the search results and choosing the “Forget (patron name)” option.
Selon le nombre d’exemplaires que vous réservez à la fois, vous obtenez un formulaire de réservation différent. Si vous réservez une notice unique, vous avez une liste de tous ses exemplaires que vous pouvez réserver.
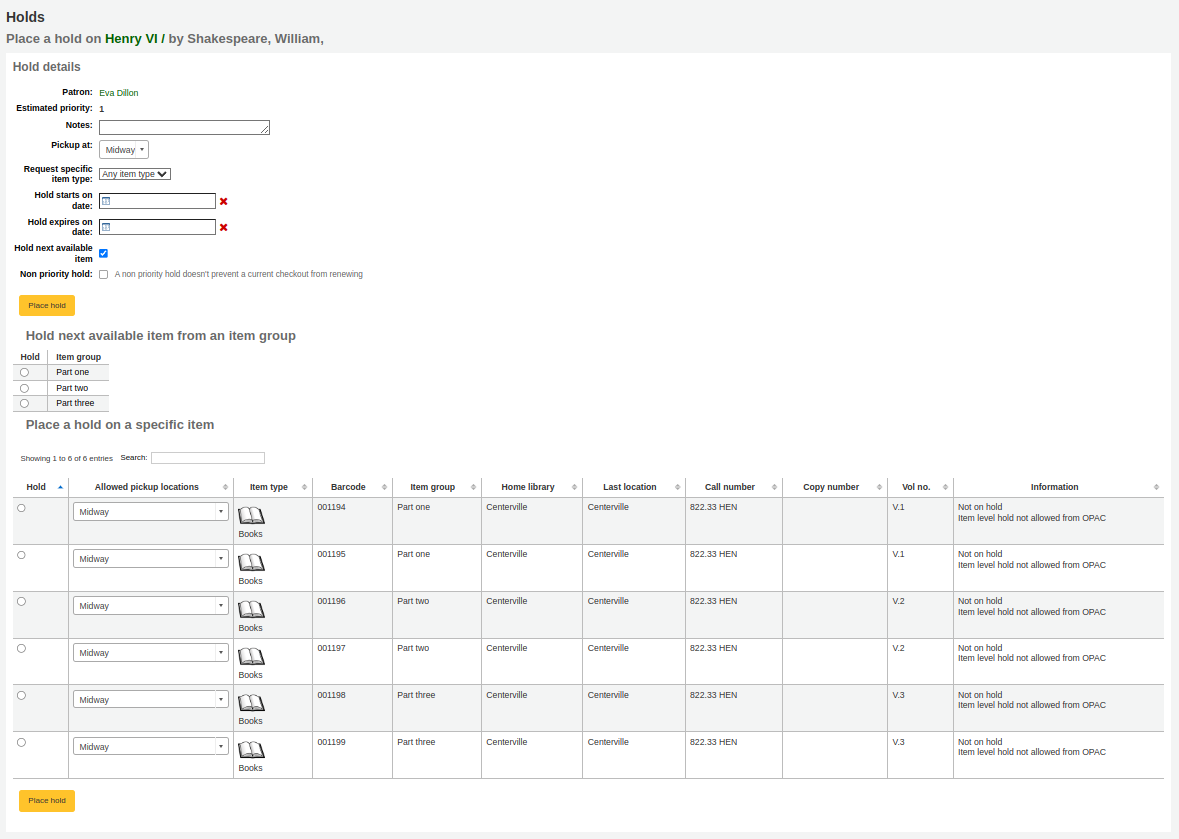
Patron: the patron’s name for whom this hold is
Estimated priority: this takes into account holds that are already placed on this title
Note: enter any notes that might apply to this hold
Pickup at: choose the library where the patron will pick up the item
Si la préférence système AllowHoldItemTypeSelection est paramétrée sur “Permettre” et que la notice a plus d’un type de document attaché, vous verrez une option pour choisir de limiter la réservation à un type de document spécifique
Hold starts on date: if the AllowHoldDateInFuture system preference is set to “Allow”, and the patron wants the hold to start on a date other than today, enter the date here
Hold expires on: if the patron has specified that they don’t want the item after a certain date, or if you have limits on hold lengths, you can enter an expiration date for the hold in the “Hold expires on date”
Note
Pour annuler automatique les réservations expirées, il faut s’assurer que le cron job réservations expirées fonctionne régulièrement.
Hold next available item: check if the hold should be on the next available item, if not, choose an item group in the “Hold next available item from an item group” section or a specific item in the “Place hold on a specific item” section below
Holds to place (count): If “Hold next available item” is checked and multiple holds per record are allowed, you can enter a number in the “Holds to place (count)” text box to place that number of holds for the selected patron.
Note
The “Holds to place (count)” text box will only appear if the Circulation and Fines rules are set to allow a “Holds per record” limit that is greater than 1, but not Unlimited, for this combination of item type and patron category.
Non-priority hold: if you are placing a hold for internal purposes, such as checking for missing pages or needing to add a label, check the “Non-priority hold” box. This type of hold will not prevent the patron who currently has the item to renew their checkout.
Hold next available item from an item group: if the EnableItemGroupHolds system preference is set to “Enable” and the record has item groups, you can choose to place a hold on the next available item of a group, rather than the next available item on the whole record or a specific item.
Place hold on a specific item: if the hold should be on a specific item rather than the next available item of the record or the group, select the item that should be placed on hold
Note
The default pickup library for item-level holds is determined by the DefaultHoldPickupLocation system preference.
If you’re placing holds on multiple records you will be presented with the next available option for all titles. If no items are available for hold it will say so on the confirmation screen.

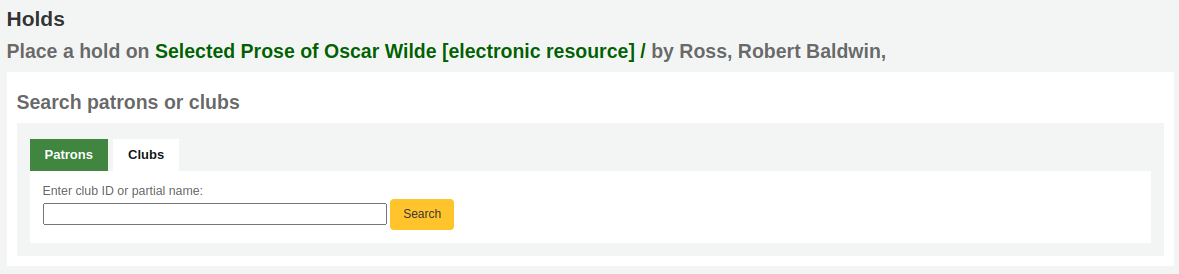
Si votre bibliothèque utilise la fonctionnalité :ref:”Clubs d’adhérent <patron-clubs-label>”, utilisez l’onglet Clubs pour réserver pour un club. Pour ce faire, cliquez sur l’onglet Clubs, cherchez et sélectionnez le nom du club et cliquez sur le bouton “Réserver”.
Pour réserver pour un club, cliquez sur l’onglet Clubs, cherchez et sélectionnez le nom du club et cliquez sur le bouton “Réserver”.
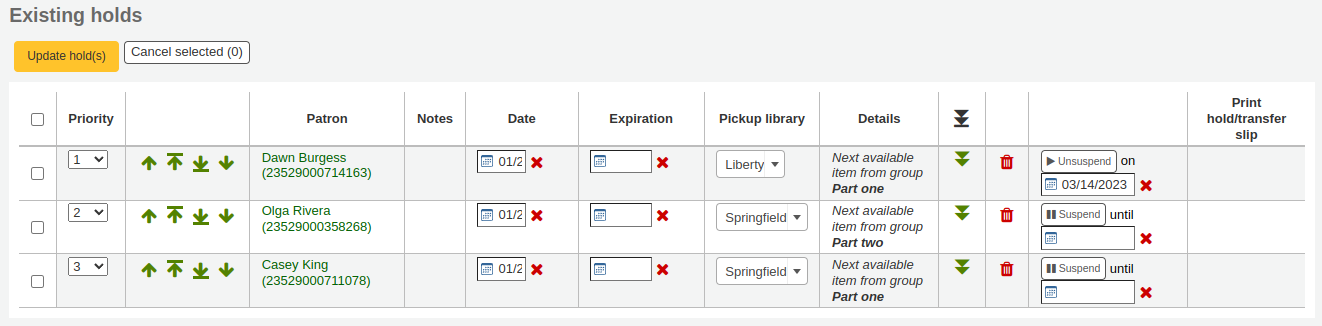
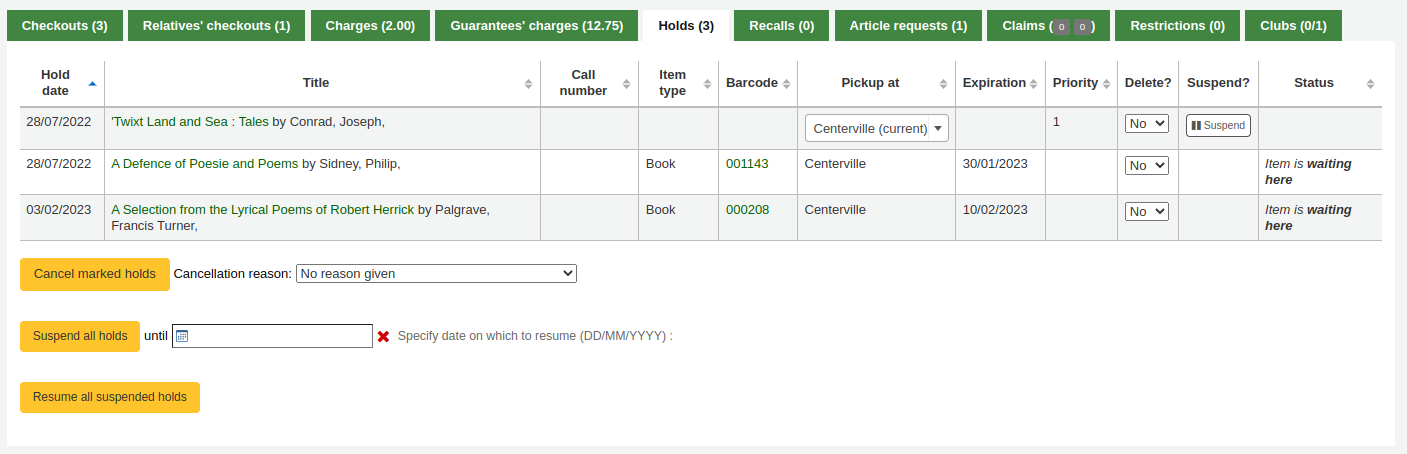
Gestion des réservations
Les réservations peuvent être modifiées et annulées depuis l’onglet Réservations qui se trouve sur la gauche de la notice.
From the list of holds you can change the order of the holds, the pickup location, whether the hold is on a specific item or for the next available item, suspend, or cancel the hold.

Note
Si la préférence système HoldsSplitQueue est active, vous verrez la liste des réservation divisée en différents tableaux selon la bibliothèque de retrait, le type de document ou ces deux critères.
Note
Si vous avez paramétré la préférence système AllowHoldDateInFuture sur « Ne pas autoriser », vous n’aurez pas la possibilité de modifier la date de la réservation (la colonne nommée Date).
Note
Selon la façon dont vous avez paramétré la préférence système HidePatronName, la liste peut afficher les numéros de cartes des adhérents au lieu des noms dans la colonne Adhérent comme dans l’image ci-dessus.
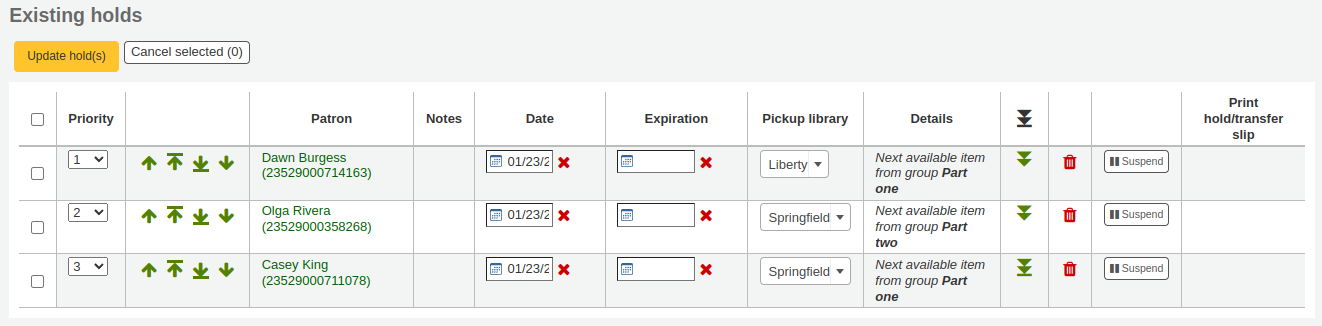
Changing the order of the holds
To rearrange holds, make a selection from the “Priority” drop-down or click the arrows to the right of the priority pull down.
Avertissement
Clicking the double down arrow to the right of the hold will stick the hold at the bottom of the list even if more requests are made.
For example, if your library has home-bound patrons that are allowed to keep items out for months at a time, it would not be fair to other patrons if a home-bound patron were able to check out a brand new book and keep it for months. For this reason, the home-bound patron’s hold request would stay at the bottom of the queue until everyone else who wanted to read that book has already done so.
In the list of existing holds, lowest priority holds are indicated by the double down arrow with a line underneath.
Clicking the double arrow again will put the hold back in regular priority, in last place.
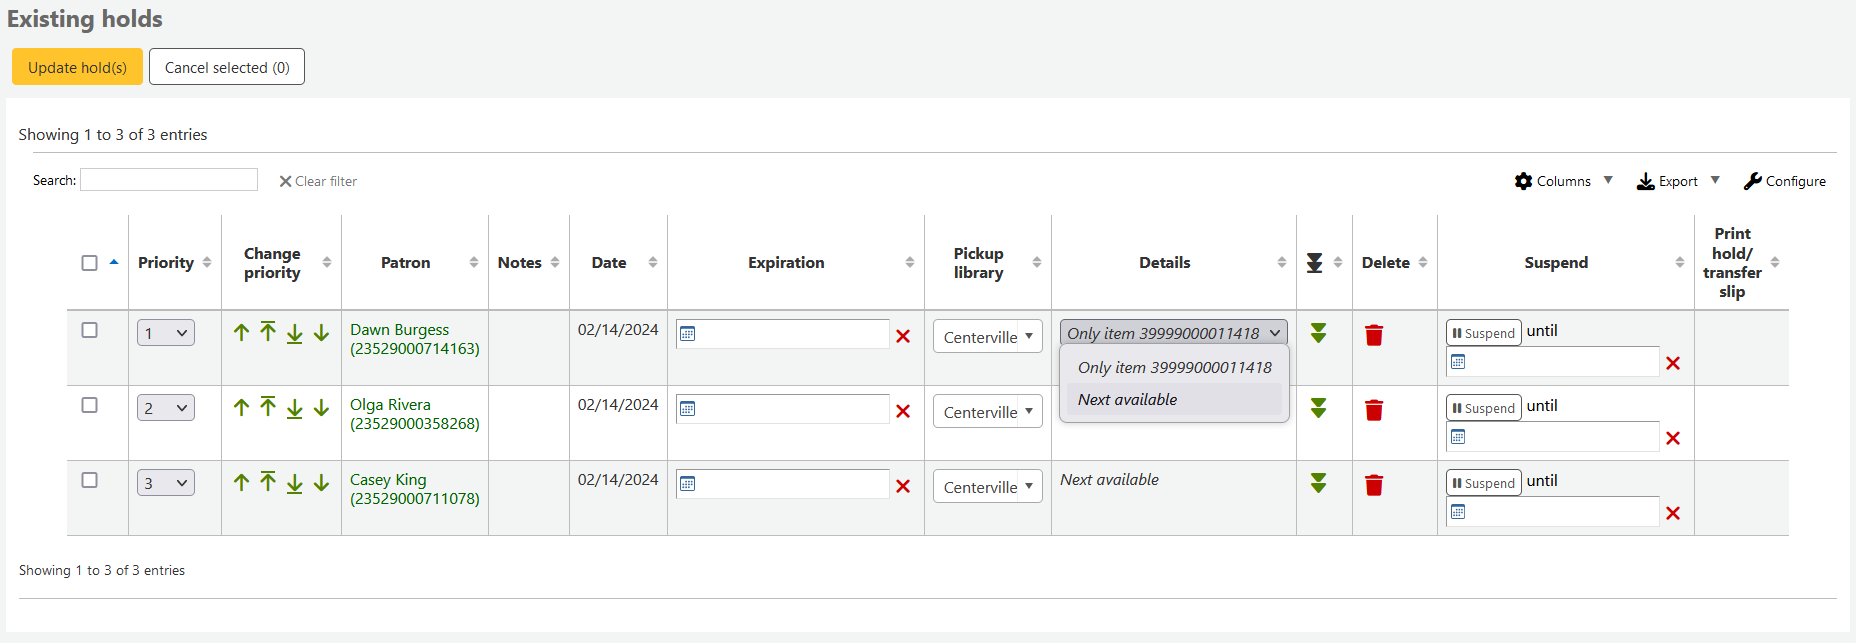
Changing the level of a hold
Version
This feature was added in version 23.11 of Koha.
Sometimes it can be necessary to change a hold that has been made on a specific item (known as an item level hold) to a hold that is not specific to an item and will be filled as soon as the next item is returned (often referred to as a record level hold). To change the level of a hold, make a selection from the “Details” dropdown and confirm the change by clicking the “Update hold(s)” button above.
Suspending holds
Si un adhérent demande la suspension de ses réservations et que vous avez paramétré la préférence système SuspendHoldsIntranet sur “Permettre”, vous pouvez cliquer sur le bouton “Suspendre” tout à droite.
If the patron gives you a date for the holds to resume, you can enter that in the date box and click the “Update hold(s)” button to save your changes.
Note
Si vous avez paramétré la préférence système AutoResumeSuspendedHolds sur « Ne pas autoriser », alors vous n’aurez pas la possibilité de définir une date de fin pour la suspension des réservations.
Note
The auto_unsuspend_holds.pl cron job is required to automatically resume suspended holds.
You can also unsuspend holds manually by clicking the “Unsuspend” button.
If the SuspendHoldsOpac system preference is set to “Allow”, patrons will be able to suspend and unsuspend their own holds from their online account.
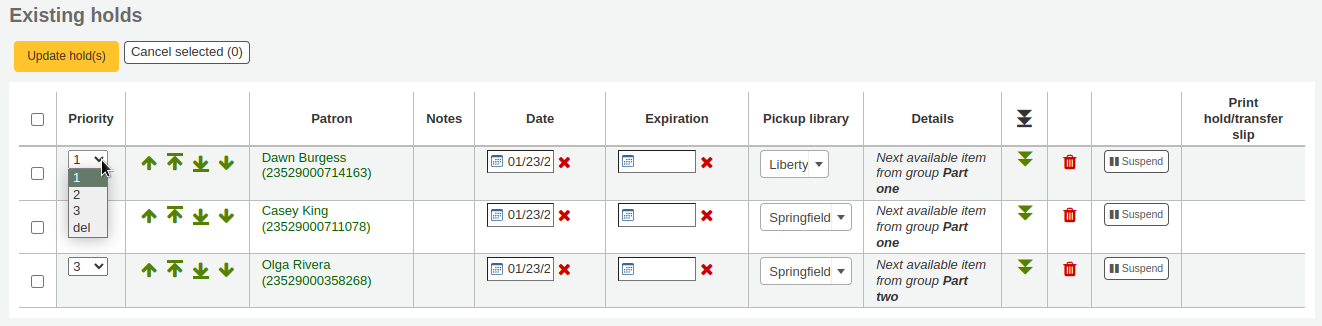
Deleting holds
To delete or cancel a hold, click the red trash can to the right of the hold line.
To delete/cancel a bunch of holds you can choose “del” from the drop-down menu on the left of each line and then click “Update hold(s)” at the bottom of the list.
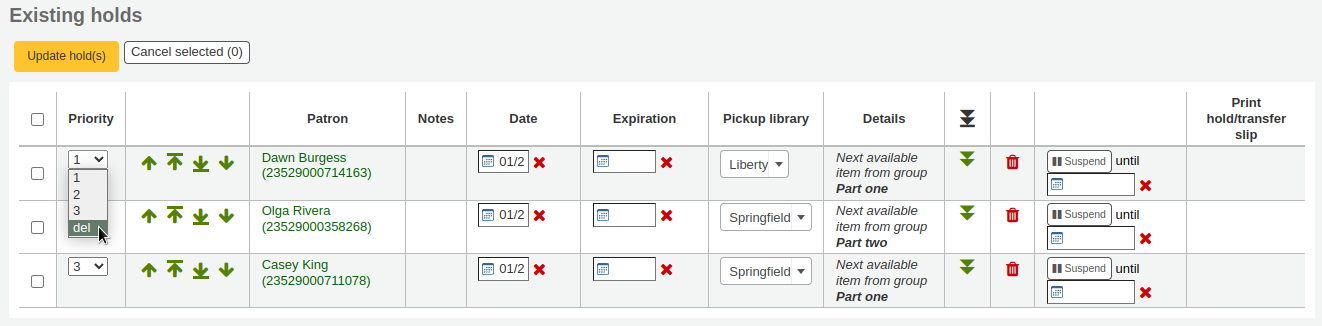
Alternatively, you can select the holds to be cancelled and click the “Cancel selected” button.
Réception des réservations
When items that are on hold are checked in or out the system will remind the circulation staff that the item is on hold and offer them options for managing the hold.
Lorsque vous retournez un exemplaire réservé, Koha vous demandera de confirmer et de transférer l’exemplaire
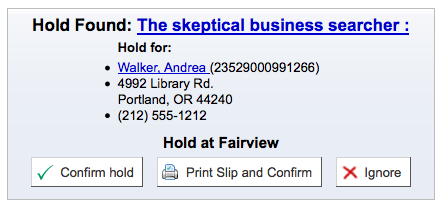
ou juste confirmer la réservation
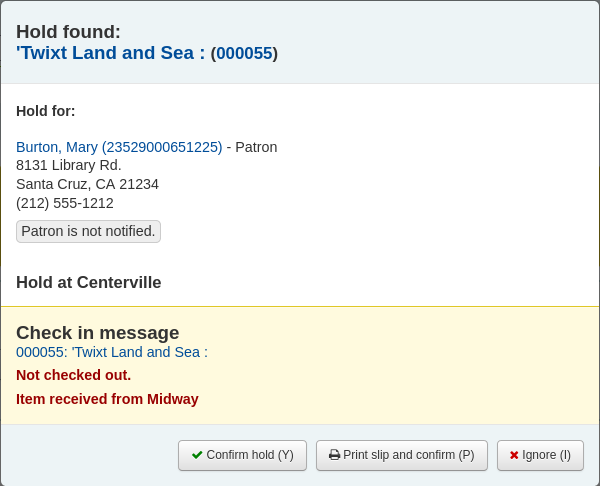
If the item needs to be transferred, clicking “Confirm and transfer” or “Print slip, transfer, and confirm” will mark the item as in transit to the proper library.
If the item is already at the pickup library, clicking the “Confirm” or the “Print slip and confirm” button will mark the item as ready for pickup by the patron.
Clicking “Ignore” will retain the hold, but allow the item to be checked out to another patron or change the status of the item (if it was returned damaged, for example).
The “Print slip and confirm” or “Print slip, transfer, and confirm” options will open a printable page that you can attach to the item with the necessary hold or transfer information.
Note
The slip that is printed is the HOLD_SLIP notice. It can be modified with the Notices and slips tool.
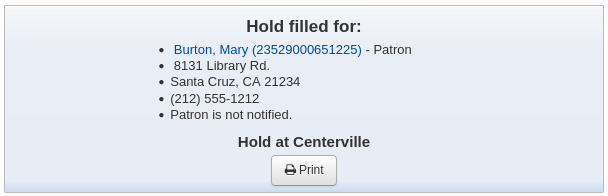
When the hold is confirmed, if the patron is notified, the “hold filled” notice will be sent to them.
Note
The notice that is sent is the HOLD notice. It can be modified with the Notices and slips tool.
Note
If the HoldsAutoFill system preference is enabled, the circulation staff will not have to confirm the hold, but they will have the option to print the hold or transfer slip.
If the HoldsAutoFillPrintSlip system preference is enabled, the print window to print the hold or transfer slip will open automatically.
Une fois la mise de côté confirmée, la réservation sera identifiée comme étant « En attente » dans le dossier et dans l’onglet “Réservations” tab de la section prêts.
La notice d’exemplaire montrera aussi que l’exemplaire est réservé.

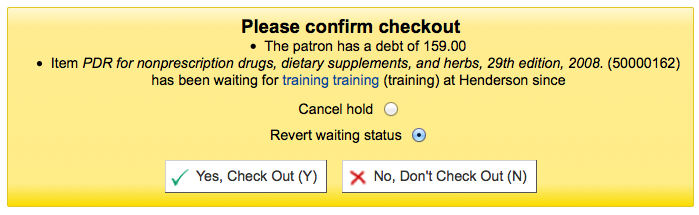
In some cases, a patron may come in to pick up a hold on behalf of someone else. In this case, make sure that the hold is cancelled when you check the item out to someone else. Alternatively, a check out might be attempted in error for an item that is already waiting for someone else. In this case you will be presented with a warning message.
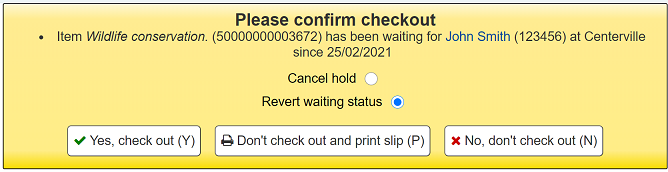
Cancel hold: in combination with “Yes, check out”, this option will cancel the current hold and check the item out to the new patron.
Revert waiting status: in combination with “Yes, check out”, this option will revert the waiting status of the hold (the patron who placed the hold will be back in first position in the queue) and check the item out to the new patron.
Yes, check out: this option will check the item out to the current patron.
Don’t check out and print slip: this option will open the print window to print the hold slip, the check out will be cancelled and the hold will remain.
No, don’t check out: this option will cancel the check out, the hold will remain.
If you check in an item that is already waiting to be picked up, a pop up indicating that a hold was found and the item is already waiting will appear. In addition to this, there is an option to allow staff to cancel the hold and choose a hold cancellation reason.
Note
Hold cancellation reasons are connected to the authorized values.
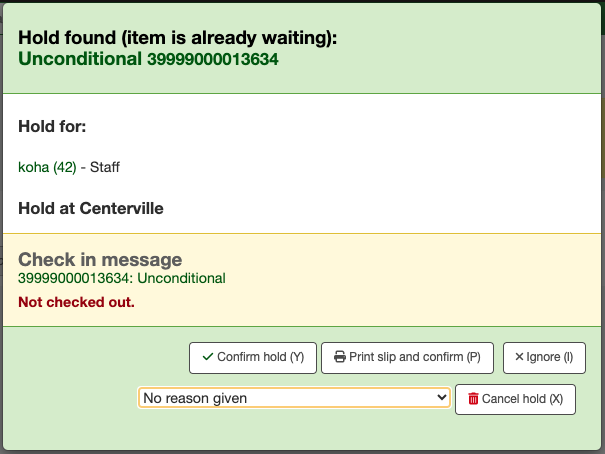
Confirm hold: this option will keep the existing hold.
Print slip and confirm: this option will open the print window to print the hold slip and keep the existing hold.
Cancel hold: this option will remove the hold.
If you cancel the hold and further holds exist for the item you will be presented with a new option to confirm the hold for the next patron.
A reason can be allocated to the cancellation of the hold. A notice can be sent to the patron explaining why this hold was cancelled.
Avertissement
If you want to send a notice with the cancellation reason, you will need to add a new notice with code « HOLD_CANCELLATION » if you do not have one already.
Curbside pickups
Koha has an integrated curbside pickup module that can be used to schedule hold pickups by patrons.
Get there: Circulation > Curbside pickups
See the curbside pickup configuration section to learn how to set up curbside pickup.
Note
Staff needs the manage_curbside_pickups permission (under circulate) in order to schedule and manage pickups.
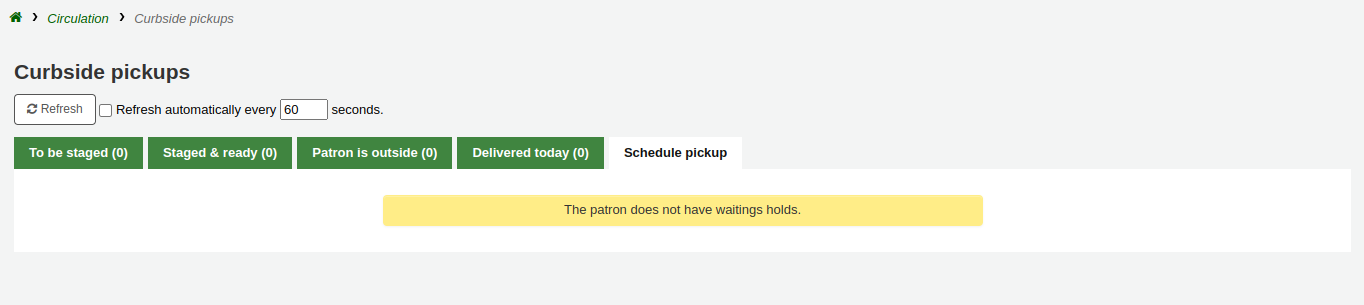
Scheduling a pickup
Get there: Circulation > Curbside pickups > Schedule pickup
To schedule a pickup,
Click the “Schedule pickup” tab
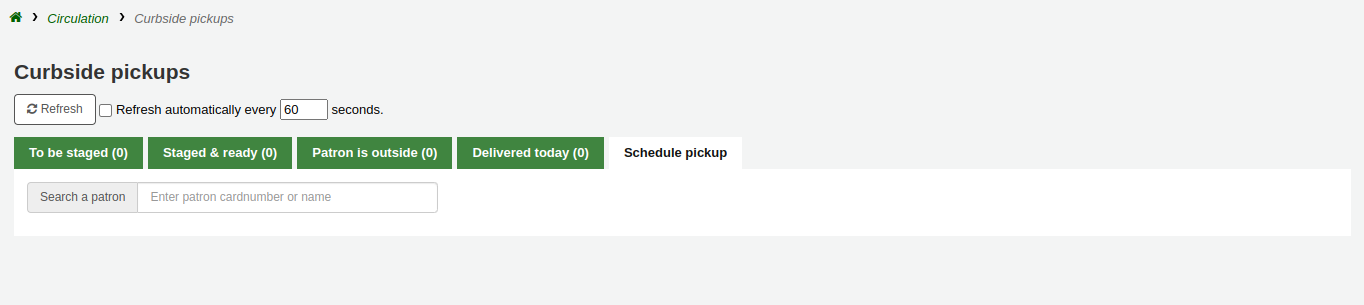
Search for the patron for whom to schedule a pickup, with either their name or their card number
Avertissement
If “Enable for waiting holds only” is set in the curbside pickup configuration for your library, and the patron has no waiting holds, there will be an error message.
Enter a date for the pickup
Note
Only dates with available time slots will be displayed.
The possible pickup times will be displayed, depending on the day of the week
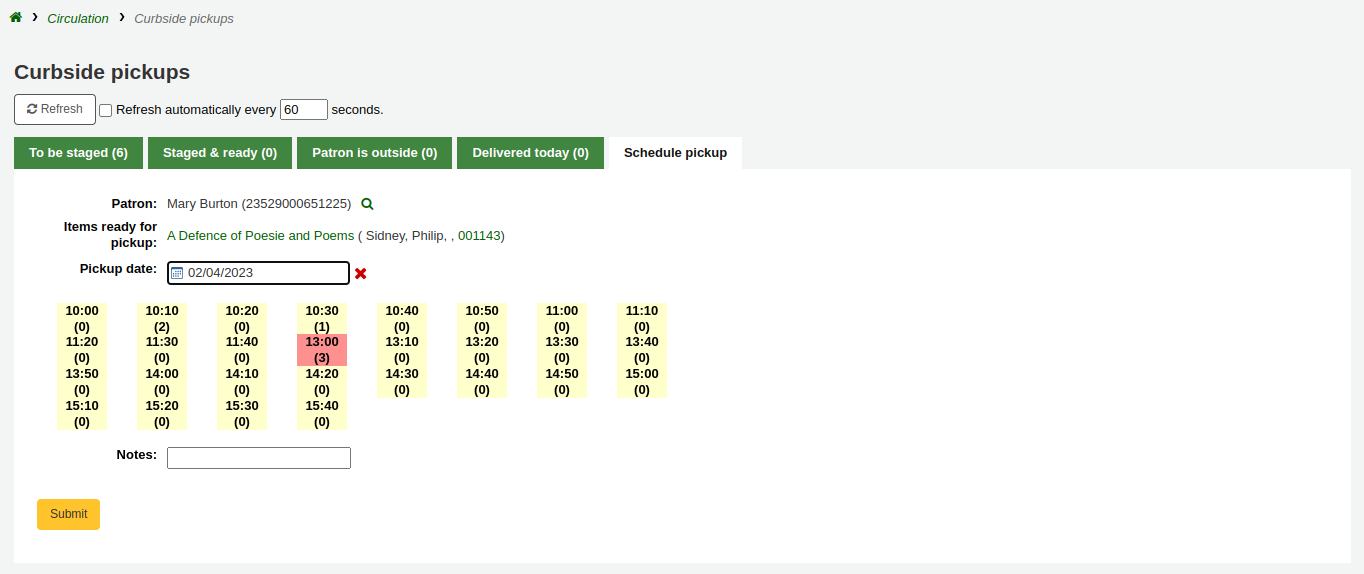
Note
The number in parentheses under each time slot is the number of patrons who are currently scheduled for a pickup at that time. If the maximum number of appointments has been reached, based on the “Maximum patrons per interval” setting in the curbside pickup configuration, the time slot will be displayed in red and you will not be able to select it.
If needed, you can add a note concerning this pickup
Cliquez sur “Valider”
Alternatively, you can schedule a pickup from the patron’s account.
Click “Schedule pickup” at the top of the patron’s detail page
Note
If the patron has chosen to receive the “Hold filled” notice by email, they will also get a notification when a curbside pickup is scheduled.
You can customize the notice by editing the NEW_CURBSIDE_PICKUP template in the Notices and slips tool.
Preparing for curbside pickups
Get there: Circulation > Curbside pickups > To be staged
The “To be staged” tab contains all the curbside pickups still waiting to be prepared.
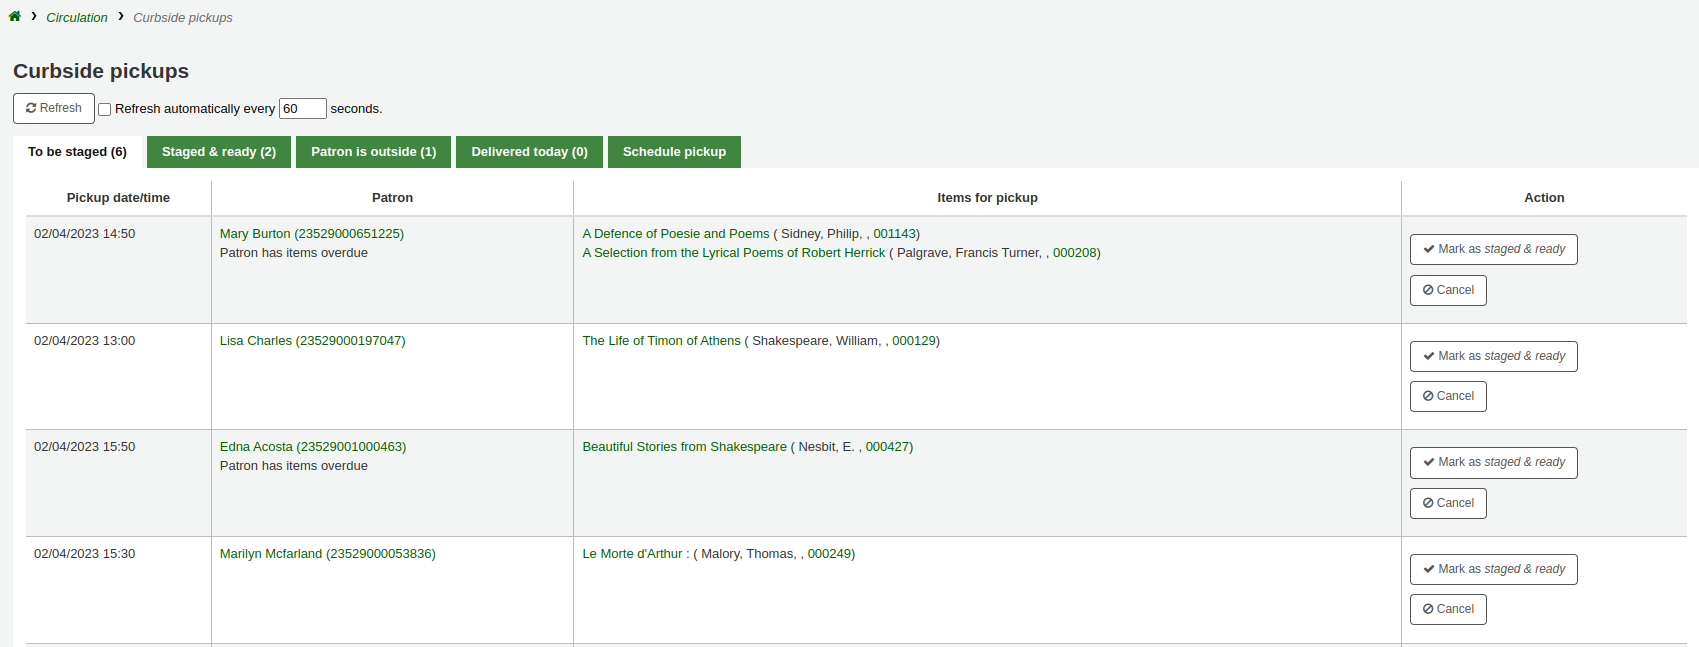
Note
If the patron has overdues or restrictions, it will be shown here, under their name.
Once the items are prepared and ready to be picked up, click “Mark as staged & ready”. This will transfer the scheduled pickup appointment in the “Staged & ready” tab.
Note
There is no need to checkout the item or items to the patron at this point. When delivering curbside pickups, the module will automatically check the items out.
You have the option to refresh the list manually by clicking the “Refresh” button. You can also set up your session to refresh every X seconds. Check the box next to “Refresh automatically every X seconds” and enter the number of seconds.
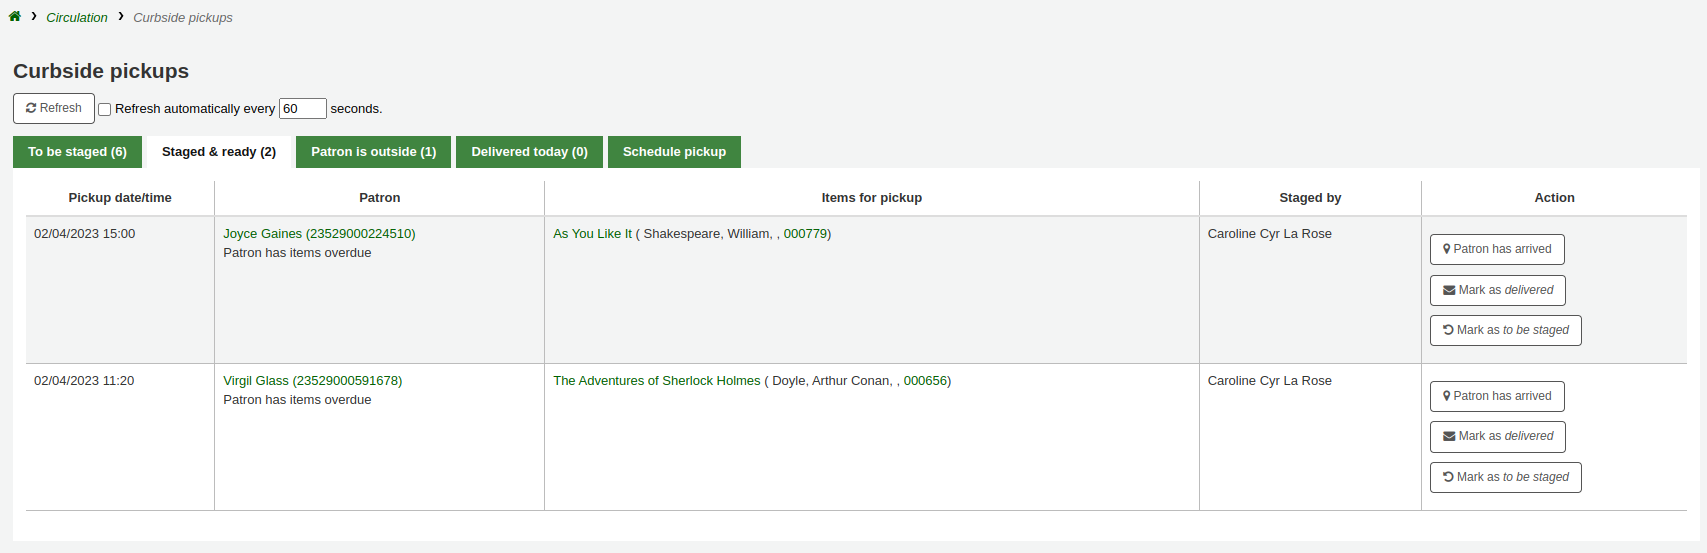
Delivering curbside pickups
Get there: Circulation > Curbside pickups > Patron is outside
From the OPAC, the patron can alert that they are outside. Staff can also indicate that the patron has arrived by clicking on the “Patron has arrived” button from the “Staged & ready” tab.
At the designated time, meet the patron to give them their items. Then, click “Mark as delivered”. This will check out the item or items to the patron and transfer the curbside pickup appointment to the “Delivered today” tab.
Cancelling curbside pickups
Get there: Circulation > Curbside pickups > To be staged
If, for any reason, you need to cancel a curbside pickup appointment, click the “Cancel” button from the “To be staged” tab.
If the appointment has already progressed beyond the “To be staged” status, click “Mark as To be staged” to bring it back there in order to cancel it.
Recalls
The recalls feature allows users to recall items that are currently checked out. Once the recall is confirmed, the borrower who currently has the item checked out will be notified that their due date has been adjusted and they need to return their item. Once recalled items are returned, the recall requester will be notified that their item is awaiting pickup at their specified pickup location.
See the requesting recalls section to learn how to place a recall in the OPAC.
Setting up recalls in Koha
To use this feature:
Enable the UseRecalls system preference
Set the RecallsMaxPickUpDelay system preference
Optionally, enable the RecallsLog system preference
Modify the following sections in the relevant circulation rules
Recalls allowed (count)
Recalls per record (count)
On shelf recalls allowed
Recall due date interval (day)
Recall overdue fine amount
Recall pickup period
Make sure all the staff member who will be managing recalls have the superlibrarian or manage_recalls permission
Schedule the recalls cronjobs
Review the recalls notices and slips to make sure they have all the information needed
Managing recalls
The recalls feature is relatively automated. Staff do not have a lot of manipulations to do to manage recalls.
Recall statuses
The possible statuses for recalls are the following:
Requested
A new recall request has been made and the item must be returned by the patron who currently has it
Requested recalls appear in
the recalls queue
the recalls to pull list, if an available item can fulfill the recall
the “Recalls” tab of the bibliographic record
the “Recalls” tab of the patron’s file (and its equivalent in the OPAC)
l’onglet :ref:””Historique des rappels” du dossier d’un adhérent<patron-recall-history-label>” (et :ref:”son équivalent à l’OPAC<your-recalls-history-label>”)
Waiting
A recalled item is awaiting pickup at the requester’s chosen branch
Waiting recalls appear in
the recalls queue
the “Recalls” tab of the patron’s file (and its equivalent in the OPAC)
l’onglet :ref:””Historique des rappels” du dossier d’un adhérent<patron-recall-history-label>” (et :ref:”son équivalent à l’OPAC<your-recalls-history-label>”)
In transit
An item has been assigned to a recall and is in transit to the requester’s chosen pickup branch
In transit recalls appear in
the recalls queue
the “Recalls” tab of the patron’s file (and its equivalent in the OPAC)
l’onglet :ref:””Historique des rappels” du dossier d’un adhérent<patron-recall-history-label>” (et :ref:”son équivalent à l’OPAC<your-recalls-history-label>”)
Overdue
A recalled item is overdue to be returned by the patron who currently has it
Overdue recalls appear in
the recalls queue
the “Recalls” tab of the patron’s file (and its equivalent in the OPAC)
l’onglet :ref:””Historique des rappels” du dossier d’un adhérent<patron-recall-history-label>” (et :ref:”son équivalent à l’OPAC<your-recalls-history-label>”)
Fulfilled
A recalled item has been checked out to the recall requester, and the recall is complete
Fulfilled recalls appear in
the old recalls list
l’onglet :ref:””Historique des rappels” du dossier d’un adhérent<patron-recall-history-label>” (et :ref:”son équivalent à l’OPAC<your-recalls-history-label>”)
Expired
The recall was not completed before a defined expiration date or the recall requester failed to pick up their waiting recall within the pickup period defined in RecallsMaxPickUpDelay
Expired recalls appear in
the old recalls list
l’onglet :ref:””Historique des rappels” du dossier d’un adhérent<patron-recall-history-label>” (et :ref:”son équivalent à l’OPAC<your-recalls-history-label>”)
Cancelled
The recall request was cancelled.
Cancelled recalls appear in
the old recalls list
l’onglet :ref:””Historique des rappels” du dossier d’un adhérent<patron-recall-history-label>” (et :ref:”son équivalent à l’OPAC<your-recalls-history-label>”)
Receiving recalled items
Upon checkin in an item that has been recalled, a pop up will appear asking the staff member to confirm or ignore the recall.
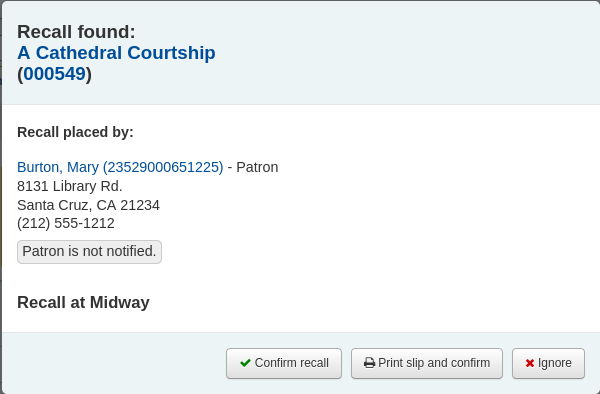
Confirm recall: this option will put the recall in “Waiting” status and, if the patron has an email address in their file, will notify them that their recalled item is now ready for pickup.
Note
The notice sent is PICKUP_RECALLED_ITEM. You can modify it’s content in the notices and slips tool
Print slip and confirm: this option will print a slip you can attach to the item (similar to a hold slip) in addition to everything the “confirm recall” does (change the status and send the notice).
Note
The slip is RECALL_REQUESTER_DET. You can modify it’s content in the notices and slips tool
Ignore: this option will check in the item, but the recall will not be set as awaiting pickup and the patron will not be notified.
If the patron asked to pick up their recalled item at a different library, a transfer will be triggered.
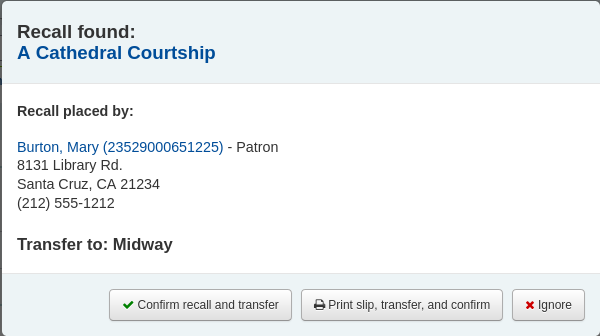
Confirm recall and transfer: this option will put the recall “In transit”.
Print slip, transfer, and confirm: this option will print a slip you can attach to the item (similar to a hold slip) in addition to setting the recall as “In transit”.
Ignore: this option will check in the item, but the recall will not be set as “In transit”
Note
The patron will not be notified that their recall is ready for them with any of the above options.
Cancelling recalls
Note
Only requested or overdue recalls can be cancelled.
It is not possible to cancel a recall that is currently awaiting pickup
Staff can cancel recalls from various screen in the staff interface.
Cancel from the recalls queue either individually by clicking the “Actions” button and selecting the “Cancel” option.
Or by selecting several recalls and clicking the “Cancel selected recalls” button at the bottom of the screen.
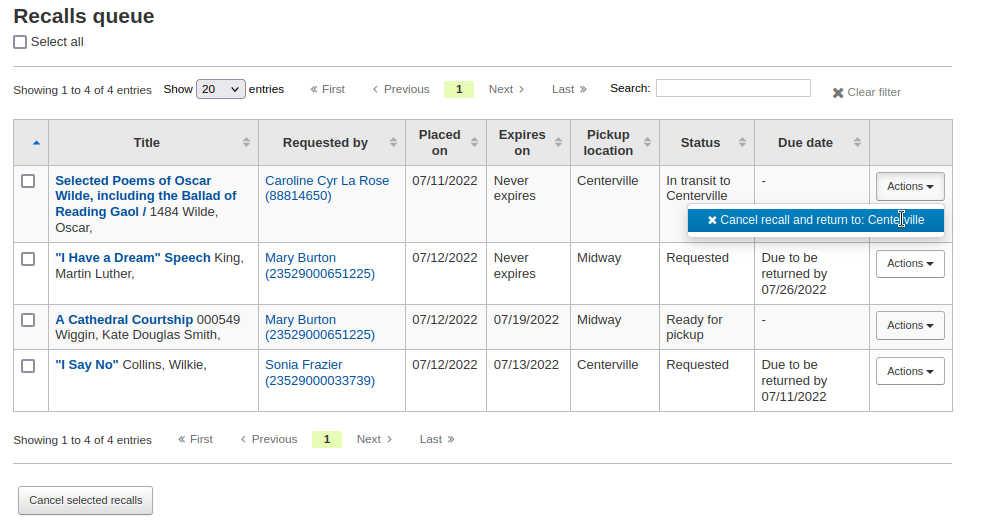
If the recalled item is currently in transit, the cancel option will also trigger a transfer back to the item’s home library.
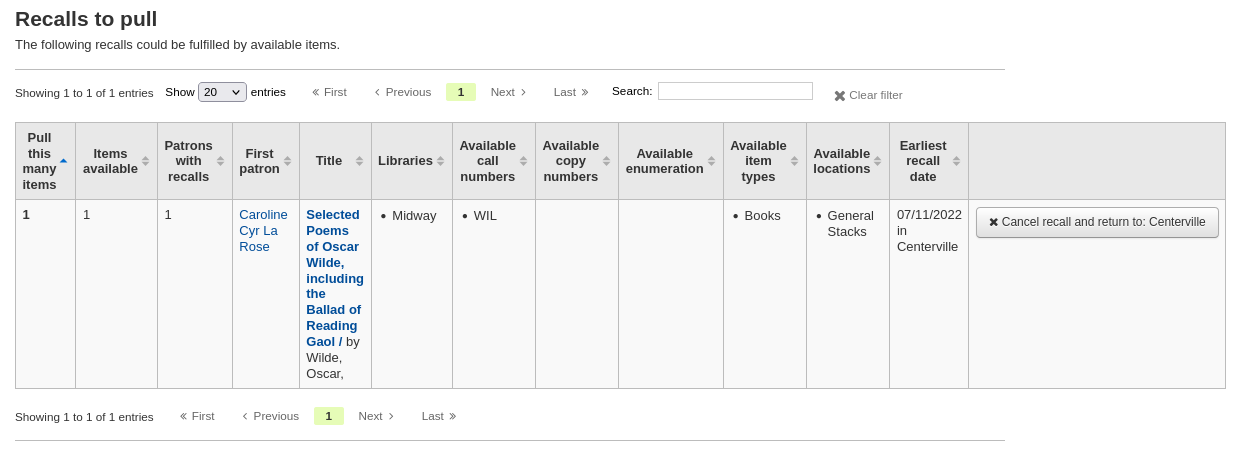
Cancel from the recalls to pull by clicking the “Cancel recall” button on the right
If the recalled item is currently in transit, the cancel option will also trigger a transfer back to the item’s home library.
Cancel from the overdue recalls list either individually by clicking the “Actions” button and selecting the “Cancel” option.
Or by selecting several recalls and clicking the “Cancel selected recalls” button at the bottom of the screen.
Cancel from the “Recalls” tab of a bibliographic record by clicking the “Actions” button and selecting the “Cancel” option.
Or by selecting several recalls and clicking the “Cancel selected recalls” button at the bottom of the screen.
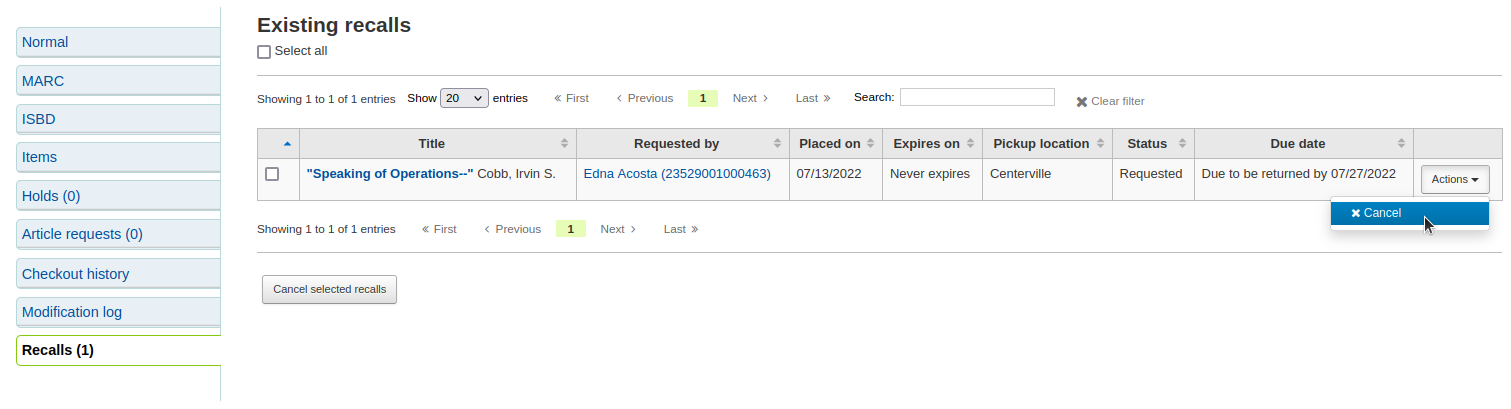
Cancel from the “Recalls” tab of a patron’s details page by clicking the “Actions” button and selecting the “Cancel” option.

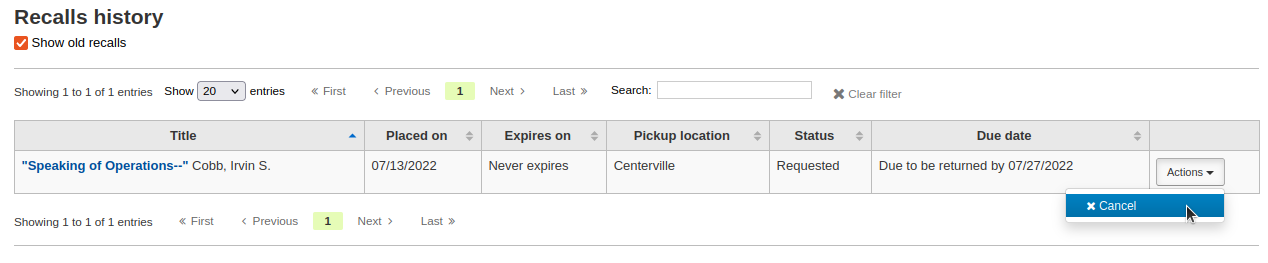
Annuler à partir de l’onglet “Historique des rappels” du dossier d’un adhérent en cliquant sur le bouton “Actions” et sélectionnant l’option “Annuler”.
Changing waiting recalls” status
If a recall is currently awaiting pickup and for some reason the staff needs to change this status (for example, the requesting patron called and they won’t be picking up the recall), it is possible to revert the waiting status.
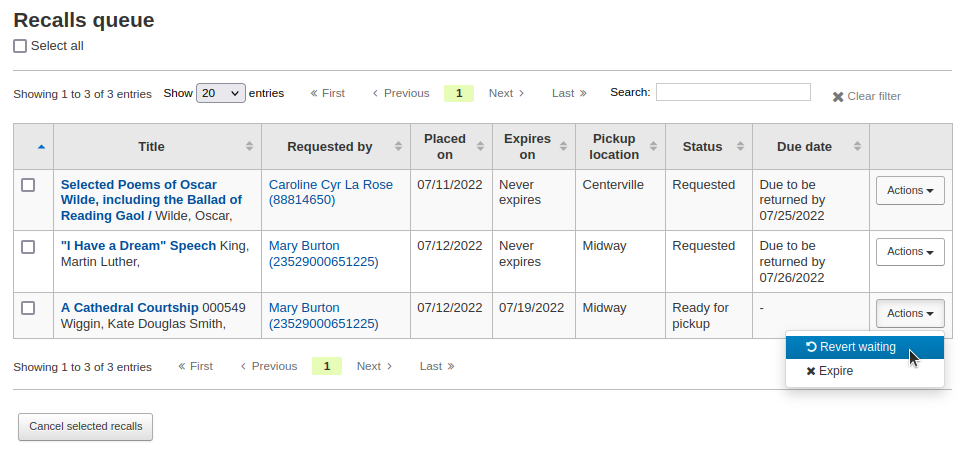
Revert the status from the recalls queue by clicking the “Actions” button and selecting the “Revert waiting” option.
Revert the status from the Recalls awaiting pickup list by clicking the “Revert waiting status” button on the right.
Marking recalls as overdue
If a recall is not checked in by the new due date, it should be marked as overdue by the overdue_recalls cronjob. However, it is possible to mark recalls as overdue manually.
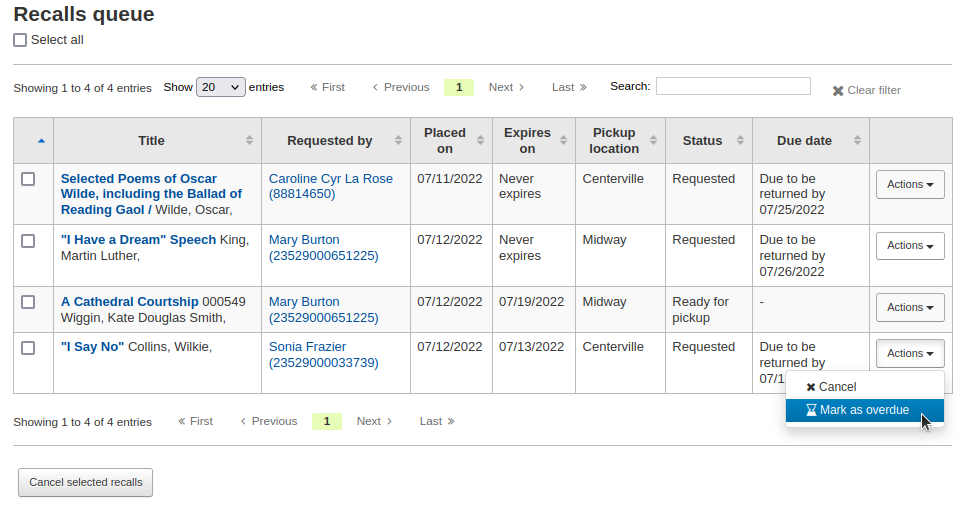
From the recalls queue, click the “Actions” button and selecting the “Mark as overdue” option.
Overdue recalls appear in the Overdue recalls list.
Expiring recalls
If a recall as been awaiting pickup for longer than the allowed period defined in RecallsMaxPickUpDelay, it should be expired automatically by the expire_recalls cronjob. However, it is possible to expire recalls manually.
From the recalls awaiting pickup list, click the “Expire recall” button on the right.
Recalls reports
Once recalls are set up, new sections will appear in the circulation module.
Get there: Circulation > Recalls
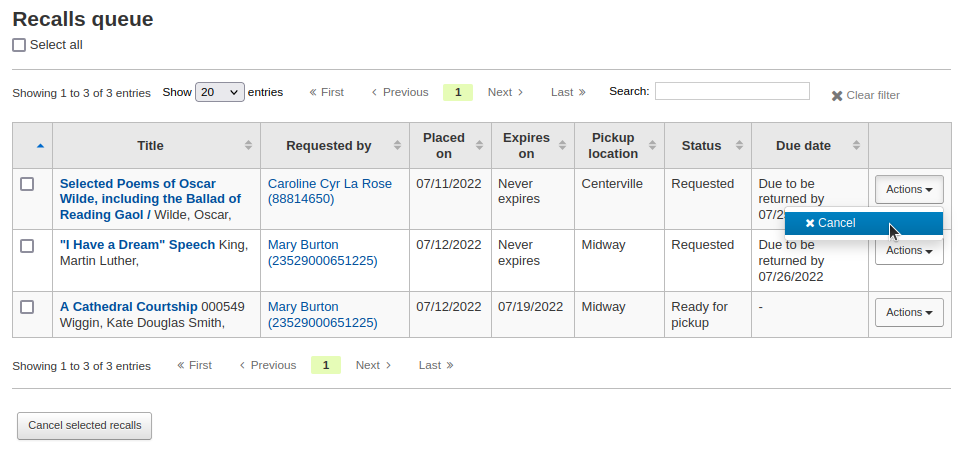
Recalls queue
The recalls queue shows all the current active recalls with their statuses.
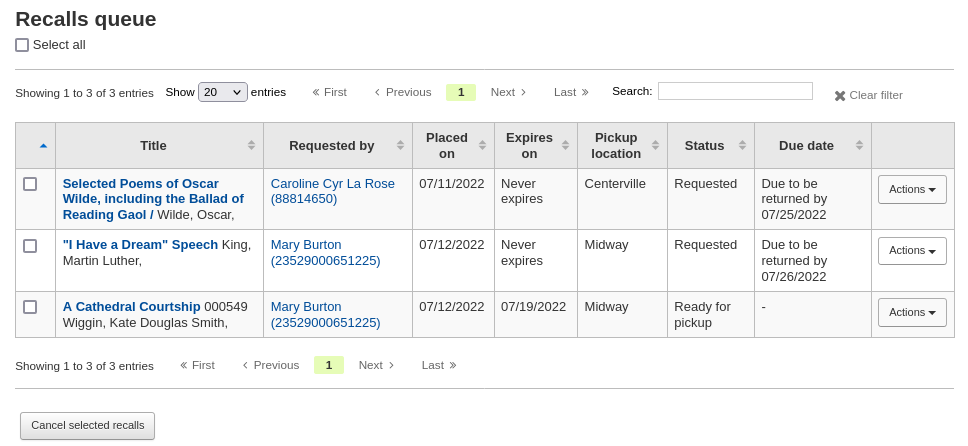
From the recalls queue, staff can cancel active recalls either individually by clicking the “Actions” button and selecting the “Cancel” option.
Or by selecting several recalls and clicking the “Cancel selected recalls” button at the bottom of the screen.
For recalls that are in transit, it is possible to cancel them and this will trigger a transfer back to their home library.
For recalls that are currently awaiting pickup, it is possible to revert the waiting status by clicking the “Actions” button and selecting the “Revert waiting” option.
For recalls that are overdue, it is possible to mark them as such from the recalls queue by clicking the “Actions” button and selecting the “Mark as overdue” option.
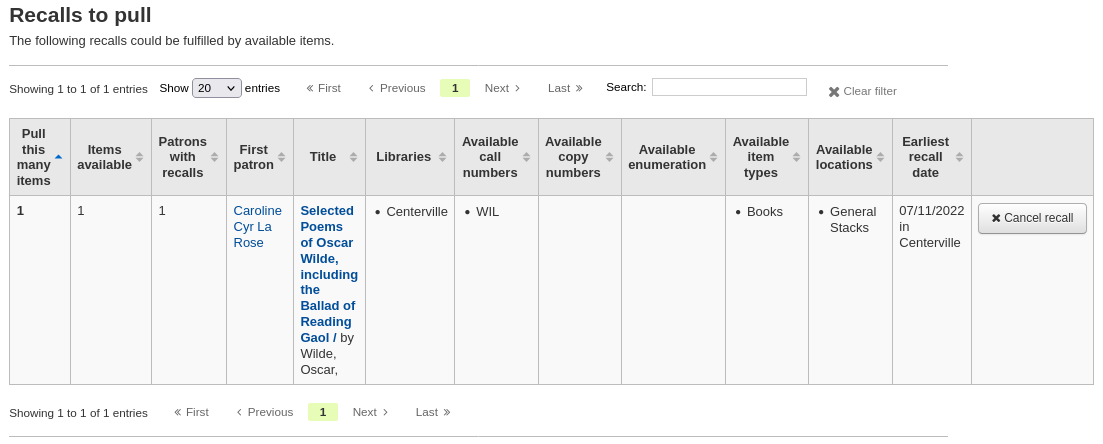
Recalls to pull
The recalls to pull list shows all the records that have been recalled but that have available items that could fulfill the request.
Staff can pick up these items from the shelves and check them in to fulfill the requests.
From the recalls to pull list, staff can cancel recalls if needed, by clicking the “Cancel recall” button on the right.
If the item is currently in transit, cancelling the recall will also trigger a transfer back the the item’s home library.
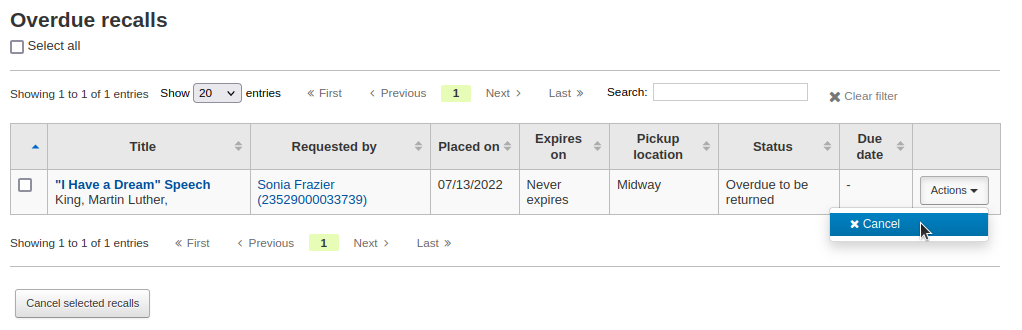
Overdue recalls
This list shows the items that have been recalled but have not been returned by the new due date.
Recalls can be marked as overdue automatically through the overdue_recalls cronjob or manually.
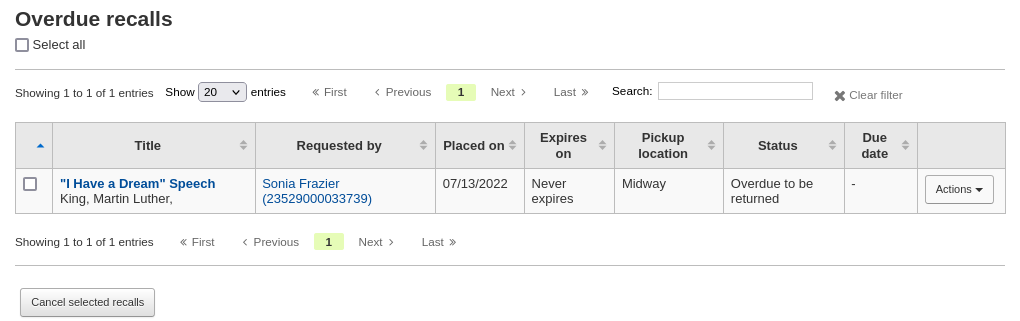
From this list, staff can cancel active recalls either individually by clicking the “Actions” button and selecting the “Cancel” option.
Or by selecting several recalls and clicking the “Cancel selected recalls” button at the bottom of the screen.
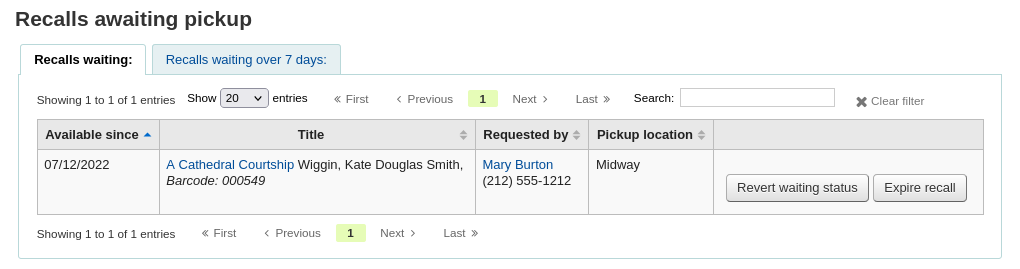
Recalls awaiting pickup
The recalls awaiting pickup list shows all the recalls that are currently waiting for the patron to come and get them.
This list is divided in two tabs:
Recalls waiting: shows all the recalls currently awaiting pickup.
Recalls waiting over x days: shows the recalls that have been waiting for more than the number of days specified in the RecallsMaxPickUpDelay system preference.
From this list, staff can revert waiting recalls by clicking on the “Revert waiting status” button on the right.
Staff can also manually expire recalls by clicking on the “Expire recall” button on the far right.
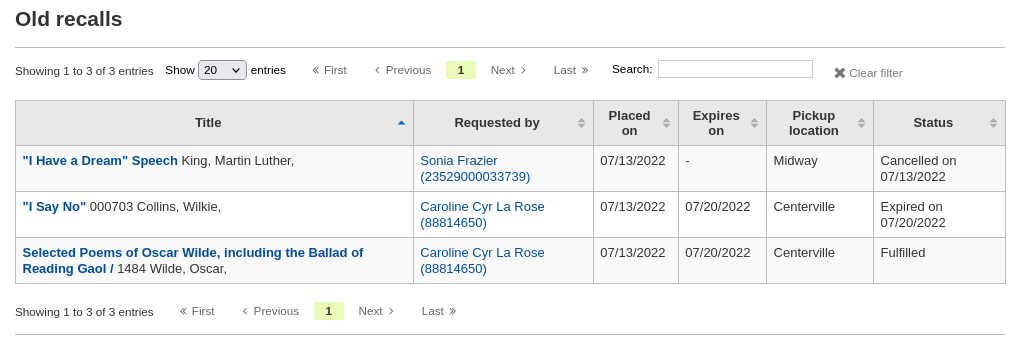
Old recalls
The old recalls list shows all the inactive recalls (completed, cancelled and expired).
Transferts
If you work in a multi-branch system, you can transfer items from one library to another by using the Transfer tool.
Aller à : Circulation > Transferts
To transfer an item,
Click “Transfer” on the Circulation page.

Select the library to transfer the item to.
Scan or type the barcode on the item to transfer.
Cliquez sur “Valider”.
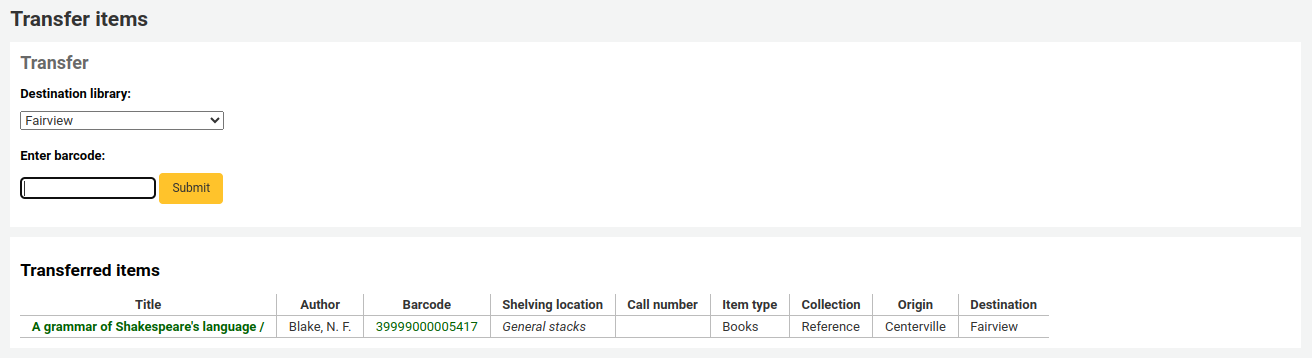
The item will now say that it is in transit in the “Status” column of the holdings table in the staff interface and in the OPAC.
When the item arrives at the other library, the staff member must check the item in to acknowledge that it has arrived and is no longer in transit.
The item will not be permanently moved to the new library. The item will keep the same “Home library” and the “Current location” is updated to note where it resides at this time.
Staff can check the status of items in transit in the Transfers to receive report.
If you are using the stock rotation automation tool, you can check which items from your library are requested by the stock rotation tool for transfer to another library using the Transfers to send report.
Choisir un site
By default, you will enter the staff interface as if you are at your home library. This library will appear in the top right of the staff interface.

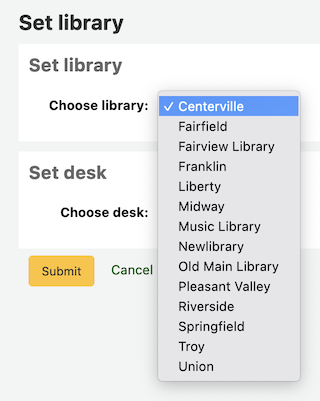
This is the library where all circulation transactions will take place. If you are at another library (or on a bookmobile) you will need to set the library before you start circulating items. To do this, click on your username and logged in library at the top right and choose “Set library” or click “Set library” on the main circulation page.
This will bring you to a page where you can choose at which library you are.
Once you save your changes, your new library will appear in the top right.
Note
Only staff with the loggedinlibrary (or superlibrarian) permission will be able to change the library where they are logged in.
Staff members who do not have this permission will only be able to log into their home library.
Catalogage rapide
Parfois, les bibliothécaires doivent ajouter rapidement une notice dans le système afin de prêter l’exemplaire. Cette fonction est appelée “Ajout rapide”. Pour utiliser l’outil d’Ajout Rapide de catalogage, les dossiers des bibliothécaires devront avoir les permissions__ de catalogage_rapide <#fastaddpermissions>. On retrouve deux options de création de notice dans la fonction d’ajout rapide. Si vous savez que l’exemplaire à prêter n’est pas dans le catalogue, allez dans le module Circulation et cliquez sur l’option de “Catalogage Rapide.”
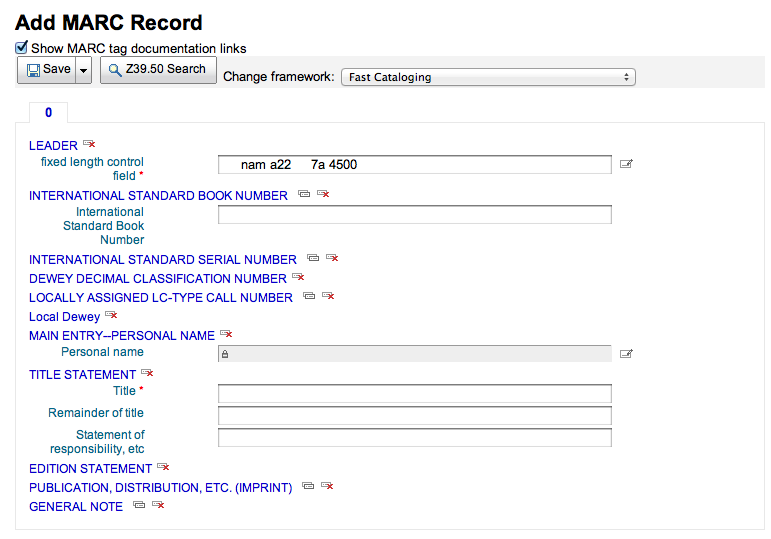
L’interface de catalogage s’ouvre sur une petite grille de catalogage:
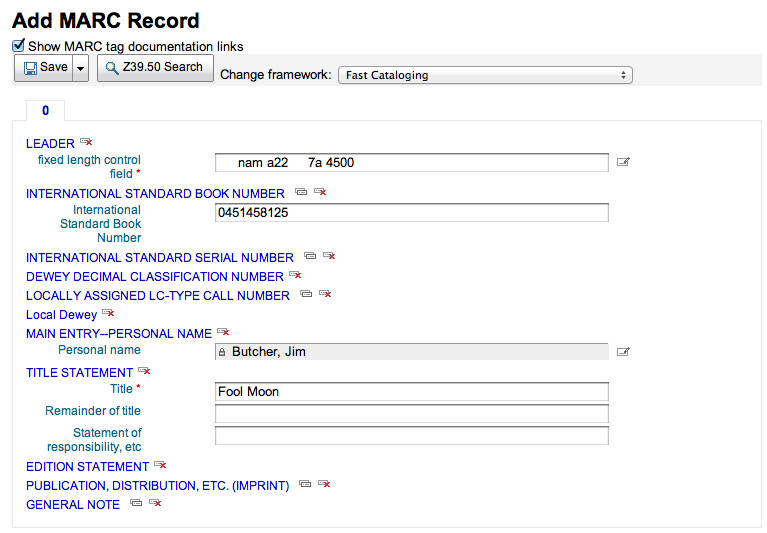
Après avoir ajouté vos données de catalogage, vous devrez saisir les données d’exemplaire. Saisir le code à barres de l’exemplaire, le code de collection etc, puis enregistrer avant de quitter la page.
Vous pouvez également accéder au catalogage rapide à partir du module de prêt. Lors du prêt, si Koha ne trouve pas un code à barres que vous avez saisi, un message vous proposera d’utiliser le catalogage rapide pour ajouter l’exemplaire dans Koha et enregistrer le prêt.
Cliquer sur “Catalogage rapide” vous amène au formulaire de catalogage rapide où vous pouvez saisir le titre
Après avoir cliqué sur “Enregistrer”, vous arrivez sur la notice d’exemplaire où le champ code à barres est déjà rempli avec le code à barres que vous avez scanné.
Après avoir cliqué sur le bouton “Ajouter exemplaire”, l’exemplaire sera automatiquement prêté à l’adhérent auquel vous étiez en train d’essayer de faire le prêt.

Rapports de circulation
La plupart des rapports se trouvent dans le module Rapports, mais les plus communs se trouvent dans le module Circulation.
Aller à : Circulation > Rapports de Circulation
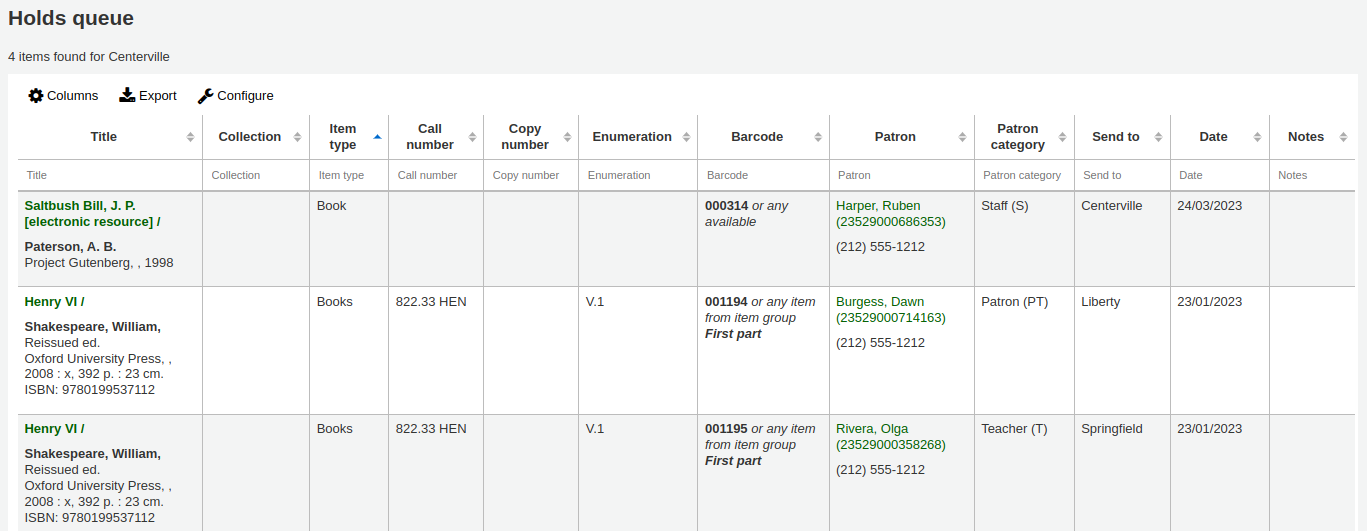
File des réservations
Ce rapport liste toutes les réservations disponibles à retirer des étagères de votre bibliothèque.
First, choose some filters for the report.
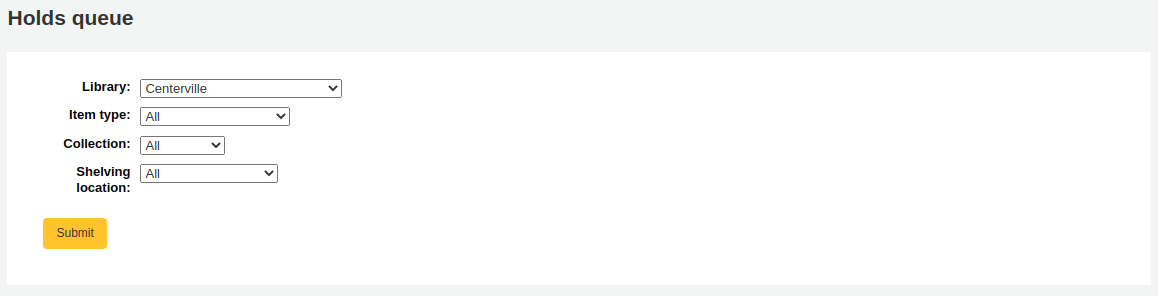
Then, the report will be displayed.
Note
Vous pouvez personnaliser les colonnes de ce tableau dans la section :ref:”Configurer les colonnes <column-settings-label>” du module Administration (référence du tableau : holds-table).
To generate this report, you must either have the Build holds queue cron job running, or the RealTimeHoldsQueue system preference must be set to “Enable”. Either of these will run a script that decides which library should be responsible for fulfilling a given hold request. This should be enabled if your library system allows borrowers to place on-shelf holds.
The holds queue behavior is controlled by the system preferences StaticHoldsQueueWeight, RandomizeHoldsQueueWeight and UseTransportCostMatrix.
If you do not want all of your libraries to participate in the on-shelf holds fulfillment process, you should list the libraries that *do* participate in the process here by inputting all the participating library’s branchcodes, separated by commas (e.g. « MPL,CPL,SPL,BML » etc.).
By default, the holds queue will be generated such that the system will first attempt to hold fulfillment using items already at the pickup library if possible. If there are no items available at the pickup library to fill a hold, the system will then use the list of libraries defined in StaticHoldsQueueWeight. If RandomizeHoldsQueueWeight is disabled (which it is by default), the script will assign fulfillment requests in the order the libraries are placed in the StaticHoldsQueueWeight system preference.
For example, if your system has three libraries, of varying sizes (small, medium and large) and you want the burden of holds fulfillment to be on larger libraries before smaller libraries, you would want StaticHoldsQueueWeight to look something like « LRG,MED,SML ».
If you want the burden of holds fulfillment to be spread out equally throughout your library system, simply enable RandomizeHoldsQueueWeight. When this system preference is enabled, the order in which libraries will be requested to fulfill an on-shelf hold will be randomized each time the list is regenerated.
Une alternative aux modes “fixes” et aléatoires est l’utilisation de la :ref:”Matrice de coût de transport <transport-cost-matrix-label>. Elle a la priorité pour définir d’où viennent les réservations et vous permet de définir le “coût” du transport entre deux sites. Pour utiliser la matrice des coûts de transport, configurez simplement la préférence UseTransportCostMatrix sur “Utiliser”.
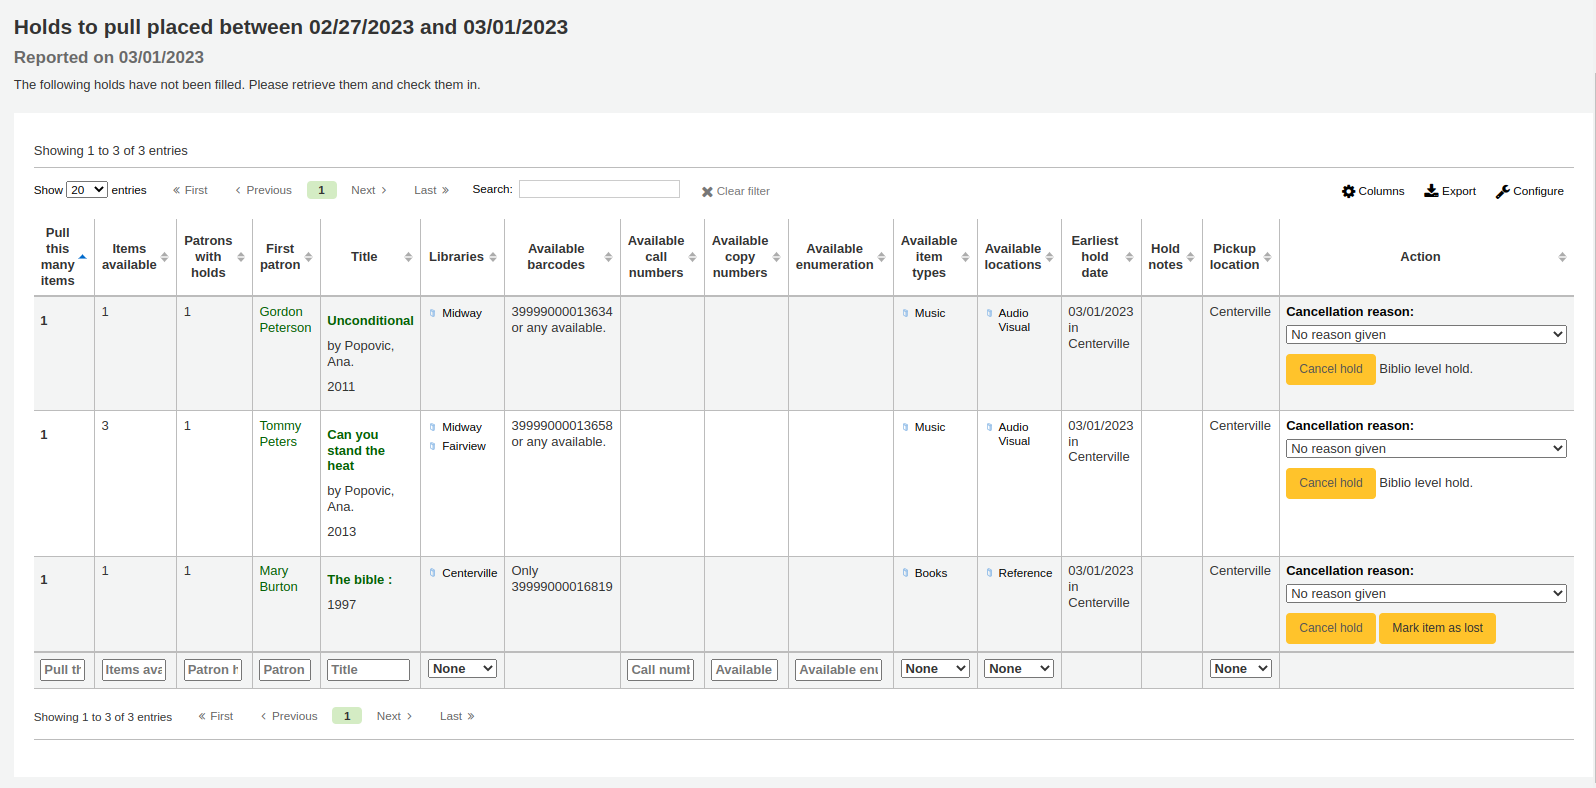
Réservations à traiter
This report will show you all of the items that have holds on them that are available at the library for pulling. If the items are available at multiple libraries then all libraries with that item available will see the hold to pull until one library triggers the hold.
Note
Vous pouvez personnaliser les colonnes de ce tableau dans la section :ref:”Configurer les colonnes <column-settings-label>” du module Administration (référence du tableau : holds-to-pull).
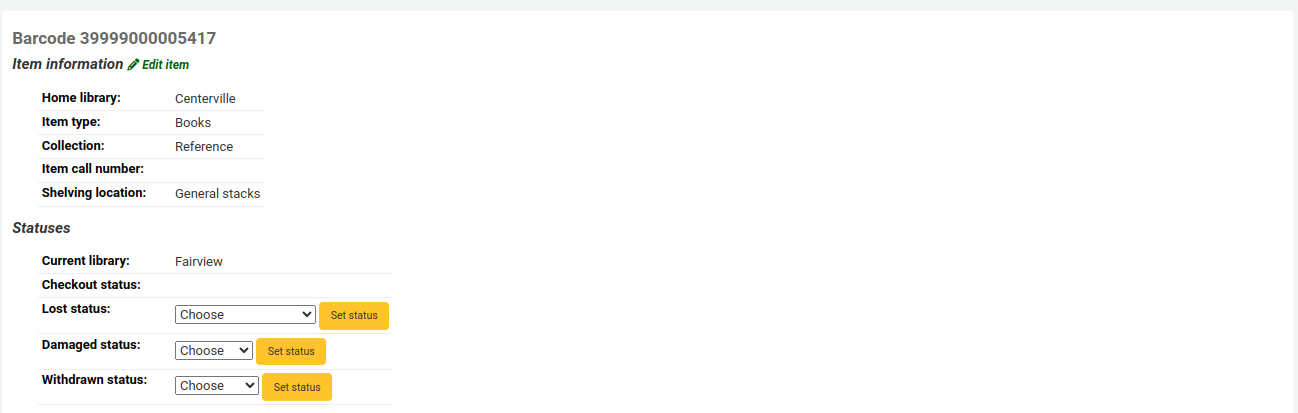
Depending on the value of the CanMarkHoldsToPullAsLost system preference, clicking the « Mark item as lost » button or « Mark item as lost and notify patron » button will mark item as lost and notify the requesting patron.
Vous pouvez choisir quelle :ref:”valeur LOST <existing-values-label>” affecter à l’exemplaire avec la préférence système UpdateItemWhenLostFromHoldList.
Avertissement
These buttons will only appear on item-level holds.
Note
The notification sent to the patron will use the CANCEL_HOLD_ON_LOST template. It can be customized in the Notices and slips tool.
You can limit the results you see by using the Refine box on the left side of the page.
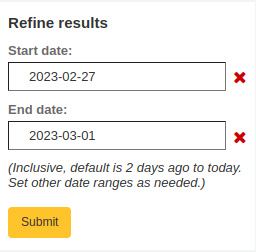
Note
The default dates in the filters are determined by the HoldsToPullStartDate and ConfirmFutureHolds system preferences.
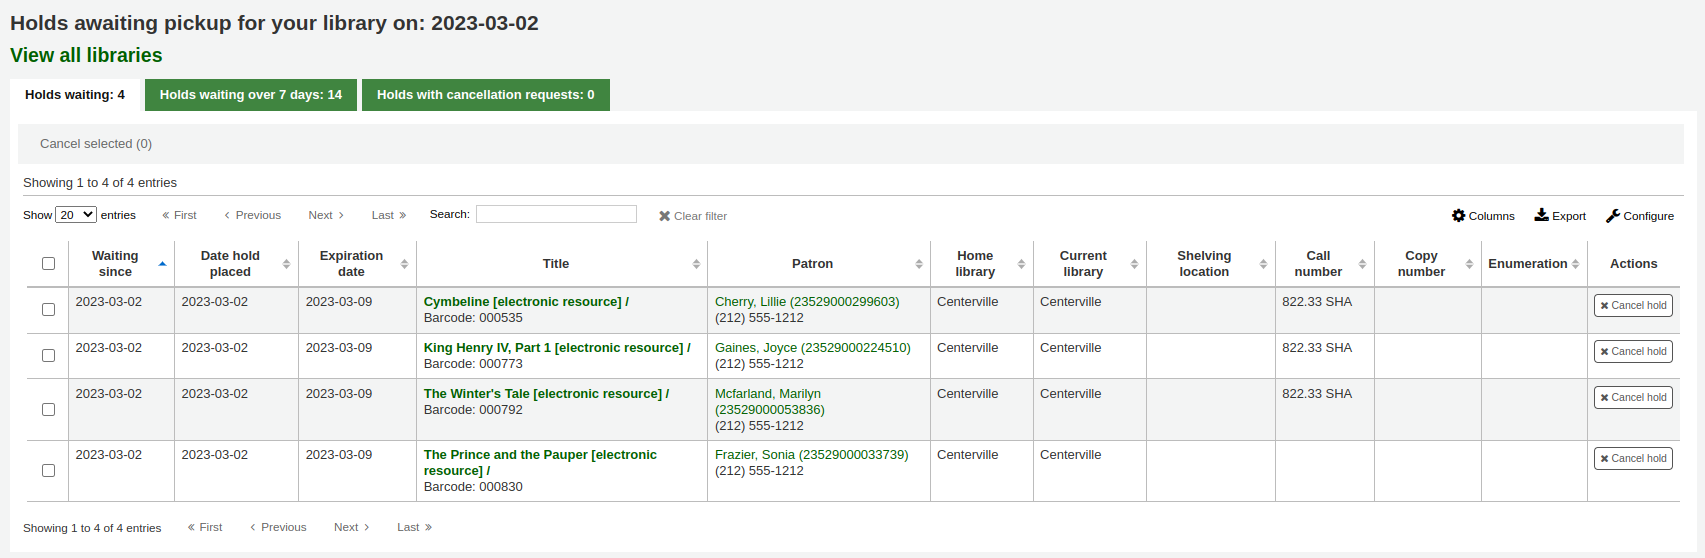
Réservations en attente de retrait
Ce rapport affiche toutes les réclamations qui sont en atttente de retrait par des adhérents.
Note
Vous pouvez personnaliser les colonnes de ce tableau dans la section :ref:”Configurer les colonnes <column-settings-label>” du module Administration (référence du tableau : holdst).
You can cancel individual holds manually by clicking the “Cancel hold” button to the right of each hold, or you can cancel selected holds using the button at the top of the list.
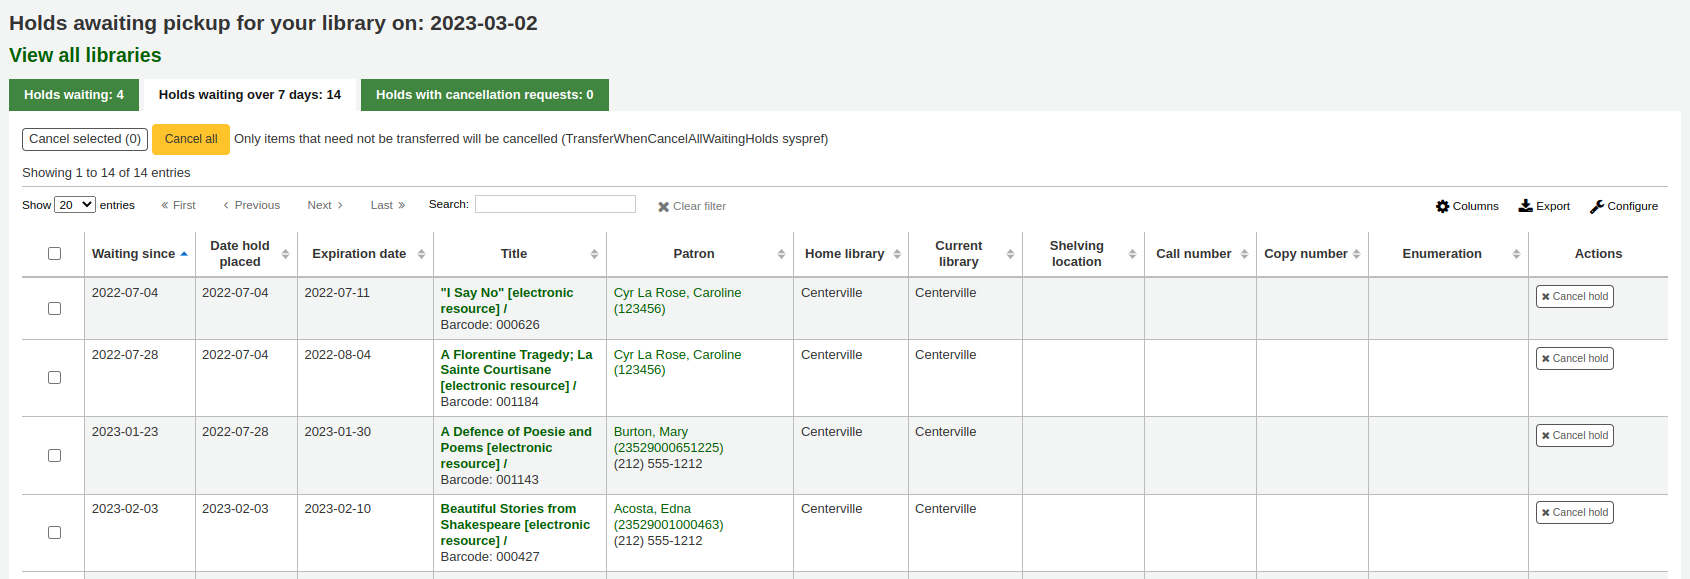
Items that have been on the hold shelf longer than you normally allow (based on the ReservesMaxPickUpDelay system preference value) will appear on the “Holds waiting over X days” tab.
Note
Vous pouvez personnaliser les colonnes de ce tableau dans la section :ref:”Configurer les colonnes <column-settings-label>” du module Administration (référence du tableau : holdso).
These holds will not automatically be canceled unless the ExpireReservesMaxPickUpDelay system preference is set to “Allow” and the cancel_expired_holds.pl cron job is scheduled to run regularly.
You can cancel individual holds manually by clicking the “Cancel hold” button to the right of each hold, or you can cancel selected holds using the button at the top of the list, or even cancel all holds.
The “Holds with cancellation requests” tab contains waiting holds that have been canceled by patrons through their account on the OPAC, if that is allowed by the waiting hold cancellation policy.
From this tab, staff can cancel the holds, and transfer them back to their home library, if that is the case.
Note
Checking in the items will also cancel the holds with cancellation requests.
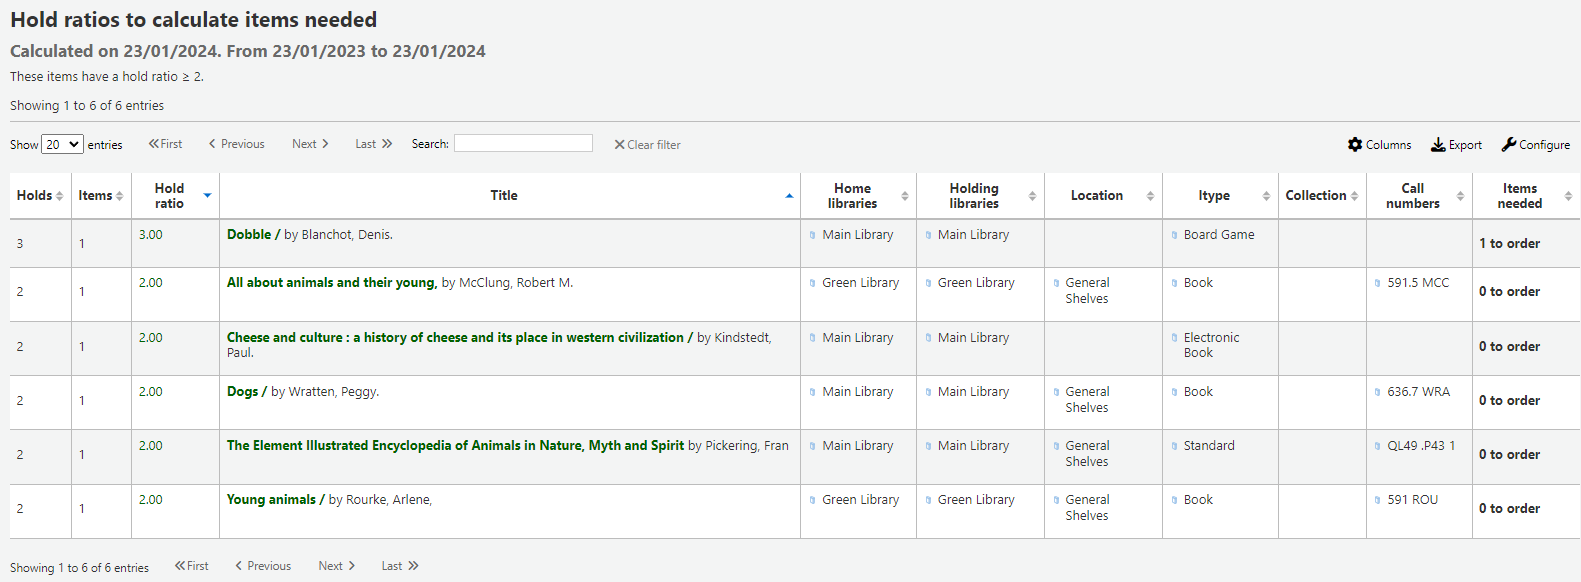
Ratios de réservation
Les ratios de réservations sont un outil de gestion des collections. Vous obtiendrez le nombre d’exemplaires nécessaires pour maintenir le ratio de réservations par exemplaire visé. Par défaut, la bibliothèque doit avoir trois exemplaires par réservation. Ce rapport signalera le nombre d’exemplaire à racheter pour respecter ce ratio.
Note
Vous pouvez personnaliser les colonnes de ce tableau dans la section :ref:”Configurer les colonnes <column-settings-label>” du module Administration (référence du tableau : holds-ratios).
Transferts à recevoir
This report lists all the items that are in transit to your library.

If your transfers are late in arriving, you will see a message stating how late your items are.
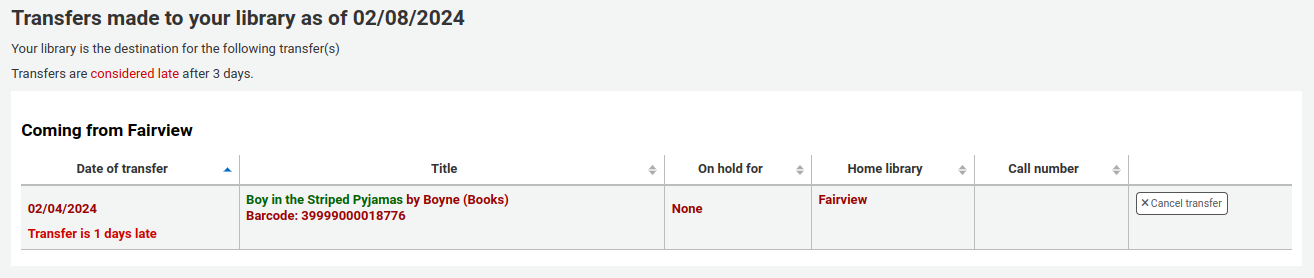
Note
A transfer is considered late based on the number of days entered in the TransfersMaxDaysWarning system preference.
Transfers to send
This report lists all the items that are requested from your library by the stock rotation tool.
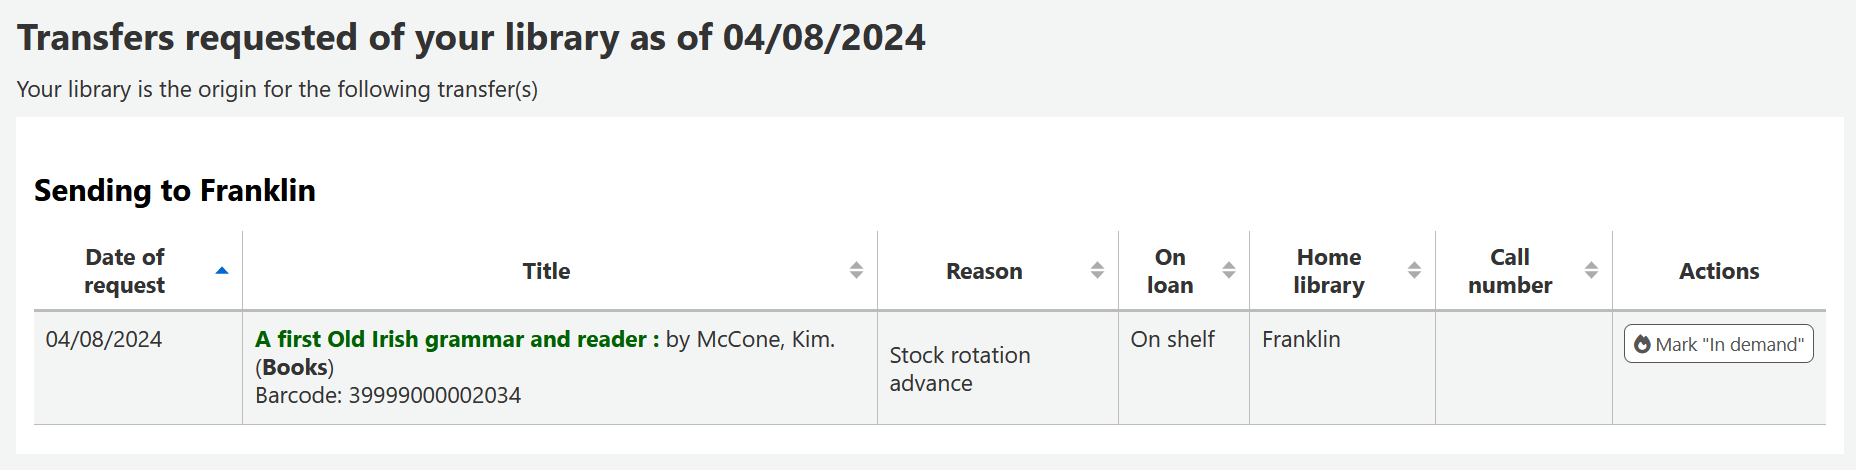
Note
This report will only be shown and filled if you are using the stock rotation automation tool.
Demandes d’article
Les demandes d’articles sont à peu près semblables à des réservations, mais ne sont pas des demandes qui visent à emprunter un exemplaire. Au lieu de cela, les demandes d’articles sont des demandes pour obtenir une photocopie d’une partie d’un livre ou d’un article d’une revue. C’est une pratique très courante dans les bibliothèques universitaires où les chercheurs peuvent avoir besoin d’une copie d’un article trouvé dans une revue.
Paramétrage des demandes d’article
Tout d’abord, activez la préférence système ArticleRequests.
Mettez-là à « Activer » pour permettre aux adhérents de faire des demandes d’article.
Ensuite, il faudra définir le mode de la demande : seulement sur le titre, seulement sur l’exemplaire ou bien à la fois sur le titre et l’exemplaire.
Vous pouvez paramétrer 3 préférences systèmes différentes pour déterminer les champs obligatoires à renseigner selon la manière dont vos documents sont demandés.
ArticleRequestsMandatoryFields: détermine les champs obligatoires pour les notices pour lesquelles la demande peut être posée au niveau de la notice ou de l’exemplaire
ArticleRequestsMandatoryFieldsItemOnly rend les champs suivants obligatoires pour les notices pour lesquelles la demande peut être posée sur l’exemplaire uniquement
ArticleRequestsMandatoryFieldsRecordOnly : détermine les champs obligatoires pour les notices pour lesquelles la demande peut être posée au niveau de la notice uniquement
The ArticleRequestsOpacHostRedirection system preference is used if you create analytical records. If enabled, it will redirect the patron from the child record to the host record in the OPAC.
The ArticleRequestsSupportedFormats system preference determines the various formats patrons can request their articles in (either photocopy or scan).
Ensuite, vous devrez aller dans votre :ref:”tableau des règles de circulation et d’amendes <circulation-and-fines-rules-label>” et sélectionner chaque règle pour laquelle vous souhaitez autoriser des demandes.
Vous pouvez autoriser que les demandes faites soit au niveau de la notice, soit au niveau de l’exemplaire, soit Oui (ce qui signifie les deux), soit Non (ce qui signifie qu’aucune demande d’article ne pourra être posée).
You can also limit the number of open article requests a patron can have at one time by patron category in the Default open article requests limit section of the circulation rules page.
Vous pouvez paramétrer des charges pour chaque demande d’article dans la section :ref:”Frais de demandes d’article par défaut<default-article-request-fees-label> des règles de circulation.
Faire des demandes d’article
Maintenant vous pouvez déposer des demandes à la fois depuis l’interface professionnelle et l’OPAC.
Dans l’interface professionnelle, sur la page de détail de la notice, vous pouvez voir un bouton “Demande un article” en haut et un onglet “Demandes d’article” sur la gauche. Les deux options renvoient vers la même page.
Comme pour une réservation, vous serez invité à saisir le numéro de la carte de l’adhérent ou son nom.

If there is a fee, a message will appear to inform the staff member.

Remplissez le formulaire.
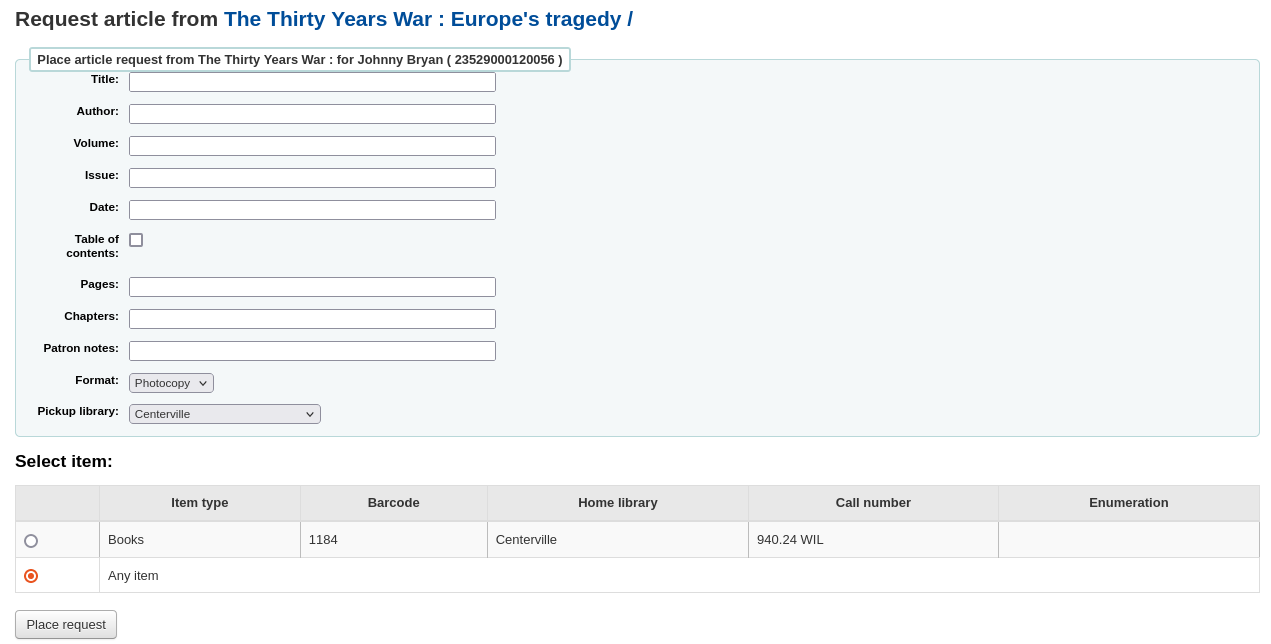
Note
Les champs obligatoires sont paramétrés via trois préférences systèmes ArticleRequestsMandatoryFields, ArticleRequestsMandatoryFieldsItemsOnly, and ArticleRequestsMandatoryFieldsRecordOnly.
Title: enter the title of the requested article or chapter
Author: enter the author of the requested article or chapter
Volume: enter the volume in which this article or chapter is found
Issue: enter the issue in which this article is found
Date: enter the date of the issue in which this article is found
Table of contents: check to indicate the patron wants a copy of the table of contents
Pages: enter the pages to photocopy or scan
Chapters: enter the chapters to photocopy or scan
Patron notes: enter any relevant notes
Format: choose the format in which the patron wishes to receive this article or chapter
Note
The possible formats are defined in the ArticleRequestsSupportedFormats system preference.
Pickup library: choose the library at which the patron wishes to pick up their photocopy
Si cela est autorisé, choisissez un exemplaire spécifique.
Cliquez ensuite sur « Faire une demande ».
A l’OPAC, les adhérents peuvent déposer eux-mêmes une demande soit depuis les listes des résultats
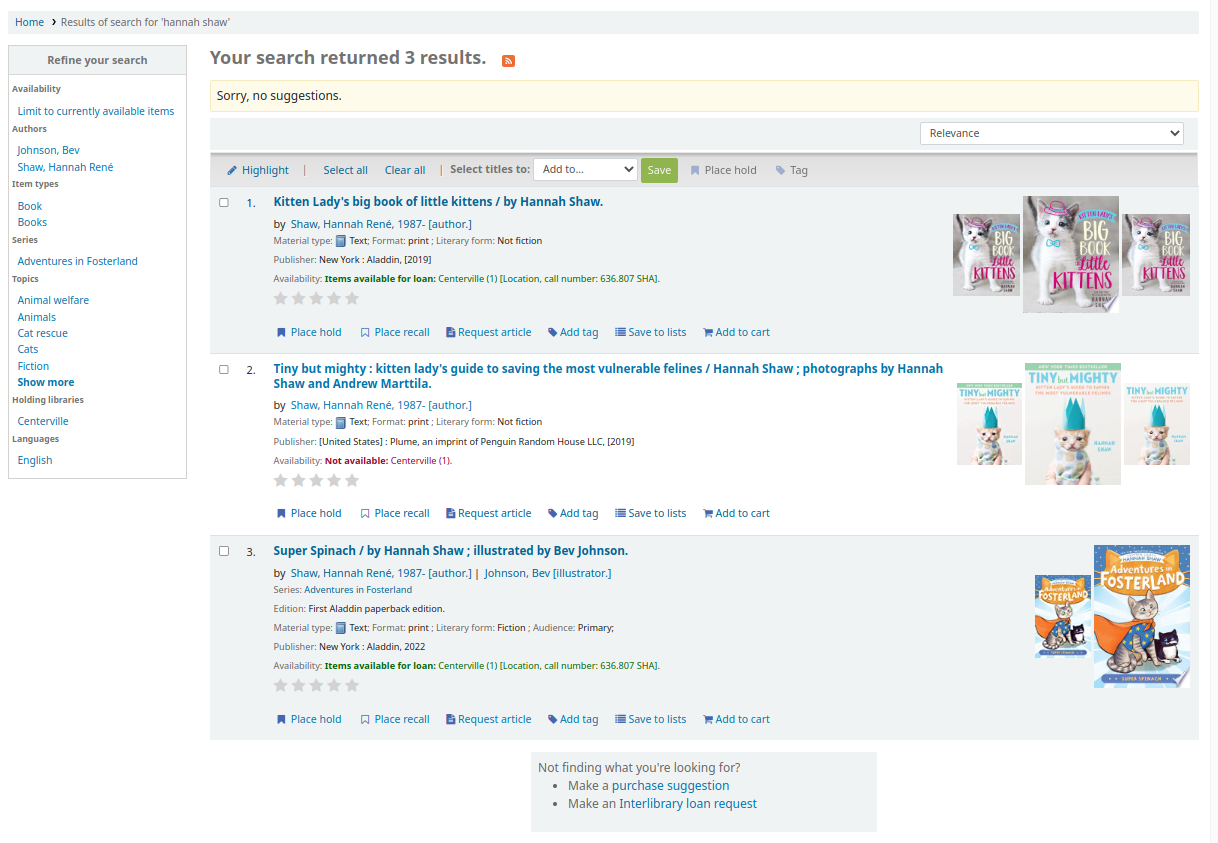
soit depuis l’affichage détaillé d’une notice.
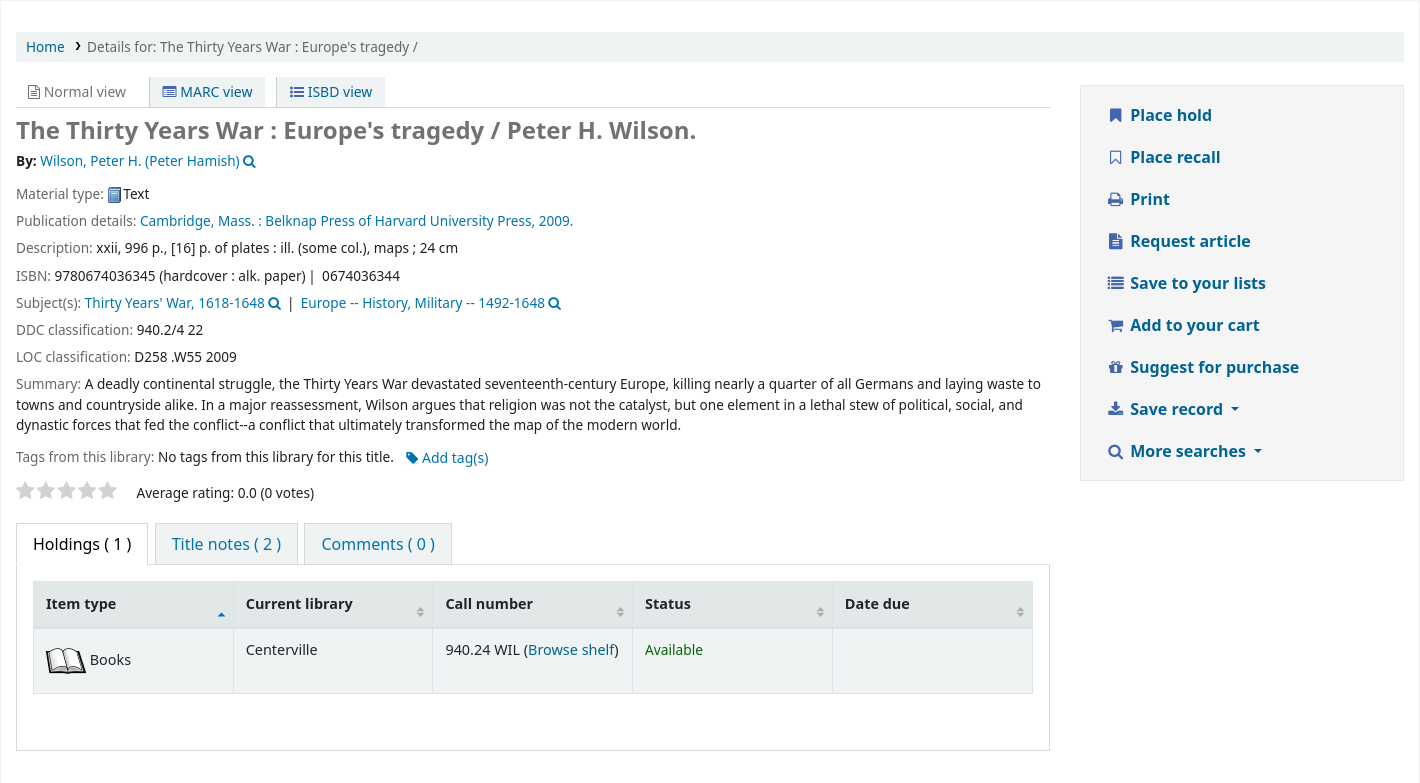
Comme pour une réservation, si l’adhérent n’est pas connecté, il lui sera demandé de le faire.
Le formulaire est le même que dans l’interface professionnelle.
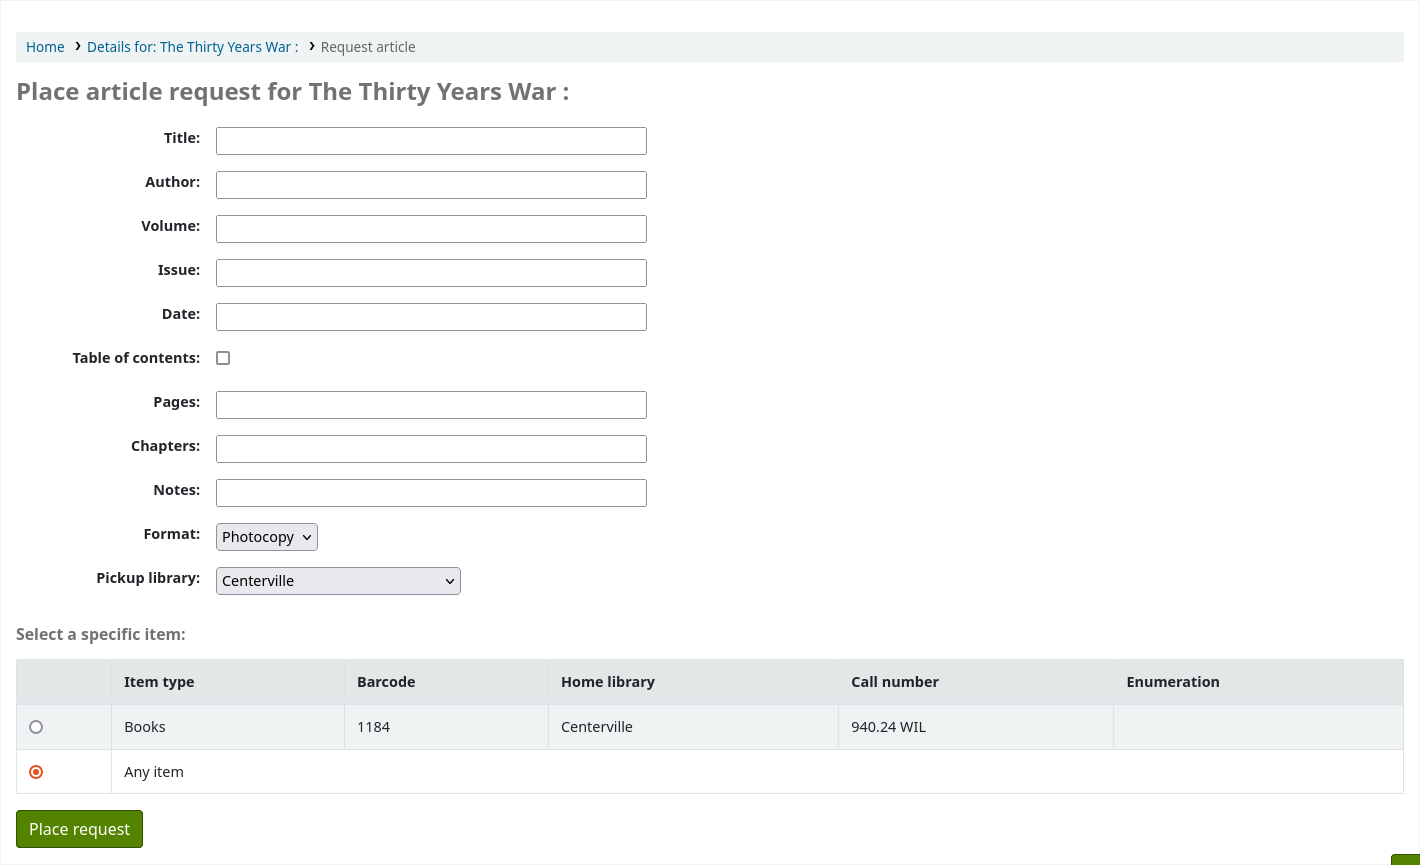
If there is a fee, a message will appear to inform the patron.

Si cela est autorisé, l’adhérent peut choisir un exemplaire spécifique.
From their account, the patron will be able to follow the progress of their request from “new”

to “pending”, if necessary,

jusqu’au statut « en traitement ».

The patron will receive an email notification after placing the request to confirm it as well as when the status of the request changes.
Note
When placing an article request, the patron will receive a notification. The notice sent is based on the AR_REQUESTED template.
Each status is also linked to a notification. See below, under Managing article requests for the letter code for each status.
The content of any notification can be customized in the Notices and slips tool.
Lorsque la demande est terminée, les adhérents reçoivent un mail de notification et la demande d’article n’apparaît plus sur leur compte.
Note
When staff marks the article request as “Completed”, the patron will receive a notification. The notice sent is based on the AR_COMPLETED template. The content of this notification can be customized in the Notices and slips tool.
Gérer les demandes d’article
Lorsqu’une demande d’article a été déposée, le bibliothécaire voit les nouvelles demandes en bas de la page d’accueil de l’interface professionnelle (au même endroit que les tags, commentaires et modifications).
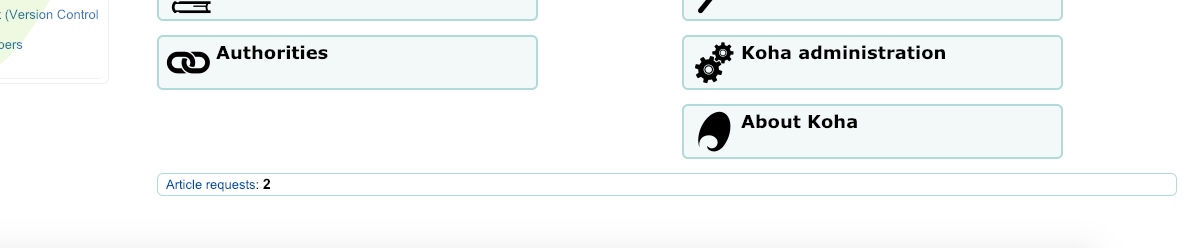
A partir de là, le bibliothécaire peut sélectionner les demandes à traiter.
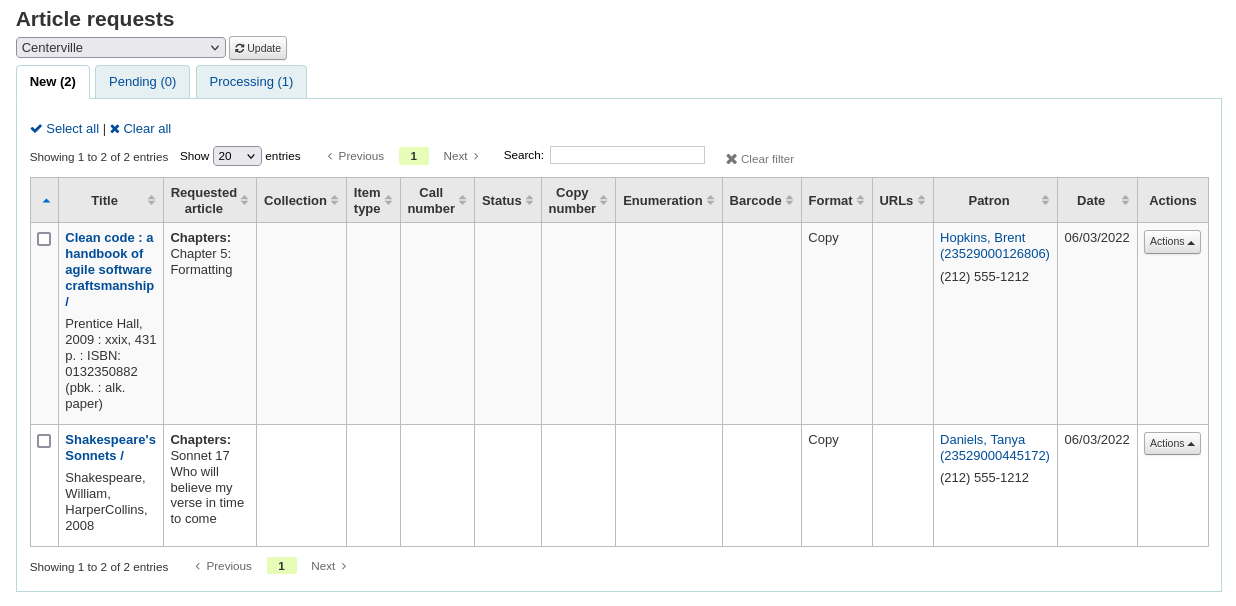
New requests are in the “New” tab.
La première étape pour le bibliothécaire est de prendre en charge la demande, ce qui déplace la demande à l’onglet correspondant à son traitement et alerte les autres bibliothécaires que la demande est prise en charge. Dans la colonne « Actions », cliquer sur le menu déroulant et sélectionner le traitement de la demande. Cela déplacera la demande à l’onglet correspondant au traitement.
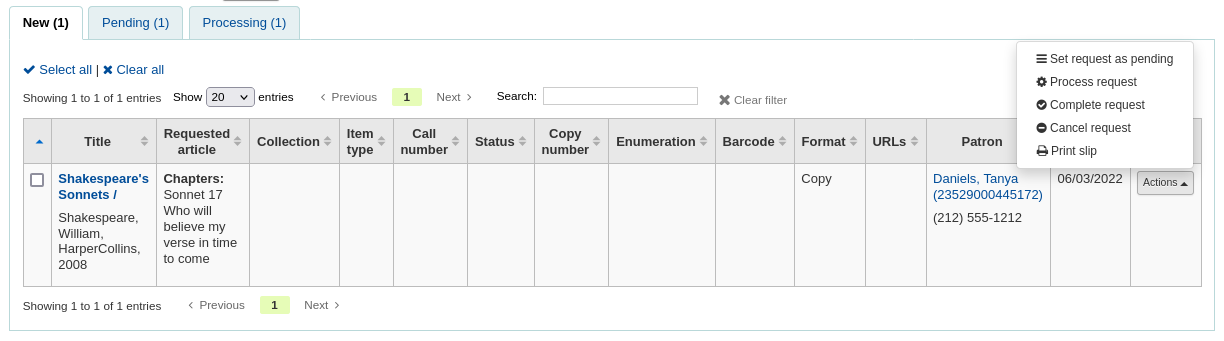
Note
Setting an article request to “Processing” will send a notification to the patron. The notice sent is based on the AR_PROCESSING template. The content of this notification can be customized in the Notices and slips tool.
If for any reason, a request cannot be processed right away (for example, if the title is currently checked out), the status can be changed to “Pending”. This will send a notice to the patron indicating the request has been received and seen, but has yet to be processed.
Note
Setting an article request to “Pending” will send a notification to the patron. The notice sent is based on the AR_PENDING template. The content of this notification can be customized in the Notices and slips tool.
Ensuite le bibliothécaire récupère le document sur l’étagère et fait la copie de l’article demandé.
Once that is complete, staff can print the article request slip and staple or paper clip it to the article. In the actions column, you can select the dropdown and select print slip.
Note
The slip used is based on the AR_SLIP template. The content of this slip can be customized in the Notices and slips tool.
Pour finir, le bibliothécaire sélectionne « Demande complète » dans le menu déroulant de la colonne « Actions » et cela envoie un message à l’adhérent qui a fait la demande pour lui faire savoir que sa demande est prête à être retirée.
Cela efface la demande d’article de l’onglet correspondant au traitement de la demande.
Note
Completing an article request will send a notification to the patron. The notice sent is based on the AR_COMPLETED template. The content of this notification can be customized in the Notices and slips tool.
If, for any reason, an article request must be cancelled, staff can choose the “Cancel request” option from the “Actions” button.
Note
Cancelling an article request will send a notification to the patron. The notice sent is based on the AR_CANCELED template. The content of this notification can be customized in the Notices and slips tool.
Note
Les traitements peuvent également être appliqués par lot, en cochant chaque demande à modifier ou en cliquant sur « Tout sélectionner », et en choisissant le nouveau statut dans le menu « Actions » en haut du tableau.
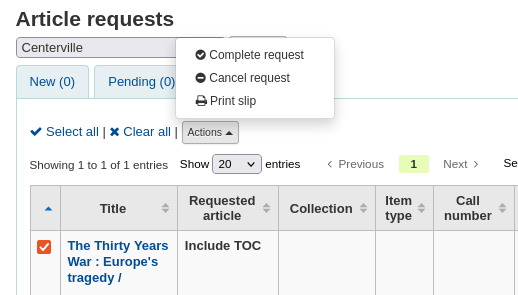
Retards
Ce rapport liste tous les exemplaires qui n’ont pas été rendus à temps à votre site.
Avertissement
Le rapport peut mettre du temps à remonter les résultats si la base des adhérents est relativement conséquente.
Les bibliothèques importantes peuvent choisir de filtrer le rapport avant de le lancer en activant la préférence système FilterBeforeOverdueReport à “Demander de choisir”.
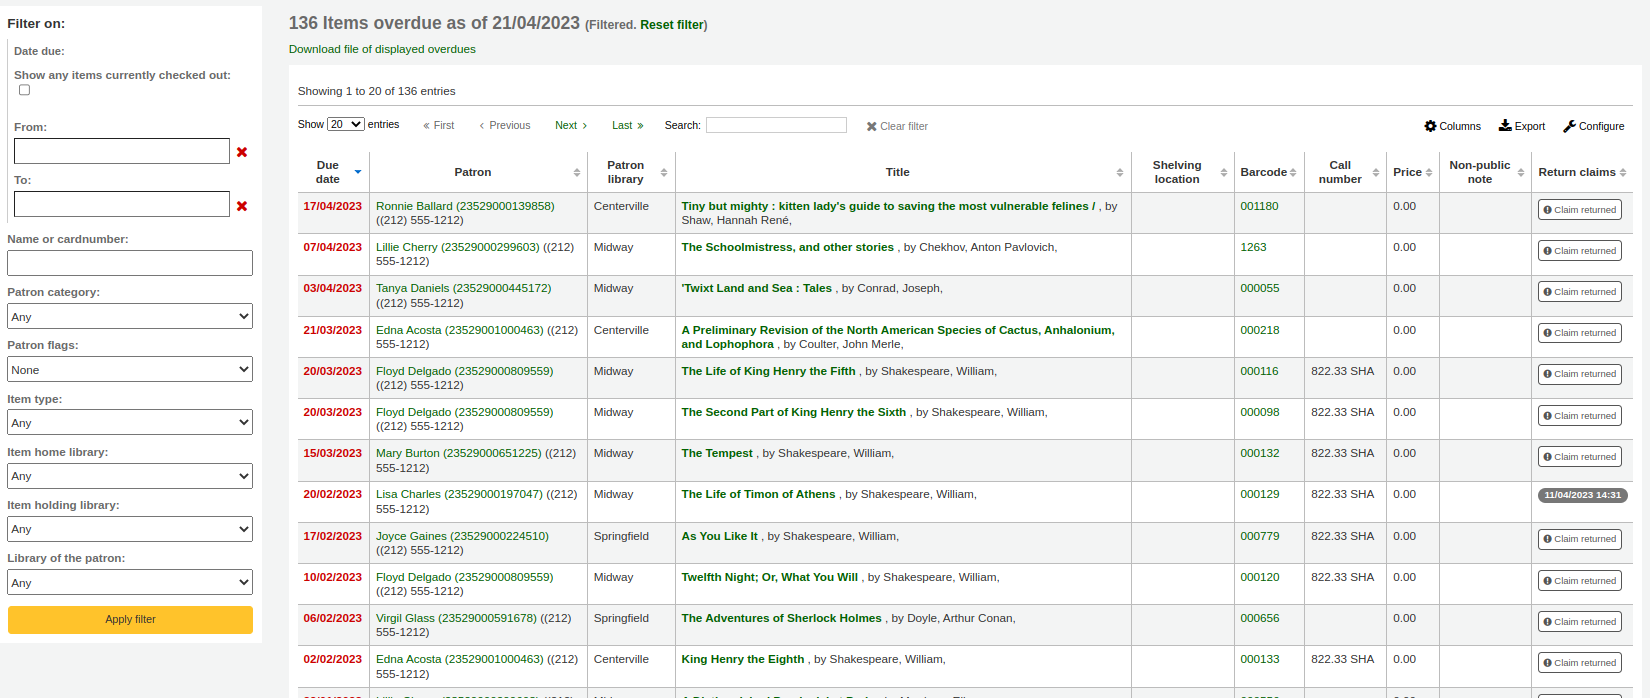
Note
Vous pouvez personnaliser les colonnes de ce tableau dans la section :ref:”Configurer les colonnes <column-settings-label>” du module Administration (référence du tableau : circ-overdues).
Il est possible de filtrer ce rapport en utilisant les options du menu qui se trouve sur la gauche.
Note
La case à cocher “Afficher les exemplaires actuellement en prêt” bascule d’un rapport des retards à un rapport de prêts. Tous les titres en prêt s’afficheront indépendamment de la date de retour.
The report result can be downloaded via the “Download file of displayed overdues” link or the “Export” button at the top of the table.
Retards avec amendes
Ce rapport vous montrera les documents en retards qui ont généré des amendes ou suspensions.
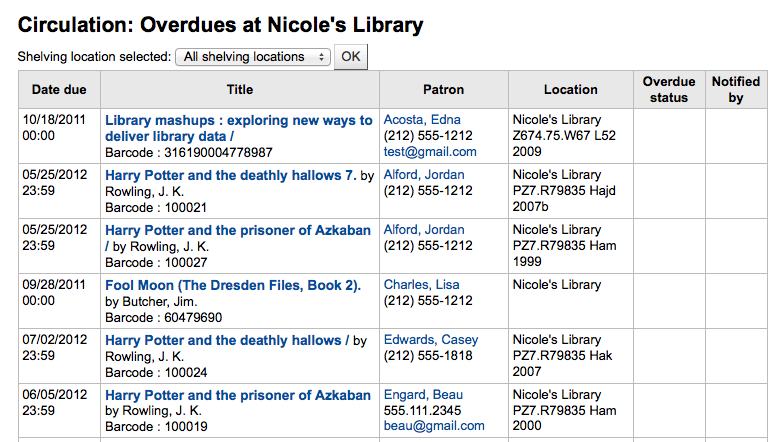
Si vous souhaitez limiter le rapport vous pouvez utiliser le menu déroulant en haut afin de limiter à une localisation spécifique de votre site. Pour voir les retards avec amendes des autres sites, il vous faudra changer de site ou vous connecter sur ce site.
Important
Si vous ne facturez pas les amendes et/ou si vous n’avez pas exécuté le :ref:`cron job fines <cron-fines-label>`__ vous ne verrez pas les données dans ce rapport.
Prêts sur place en attente
Si vous utilisez la fonctionnalité des prêts sur place (OnSiteCheckouts) alors vous aurez un rapport pour voir tous les exemplaires qui sont actuellement en prêt sur place.
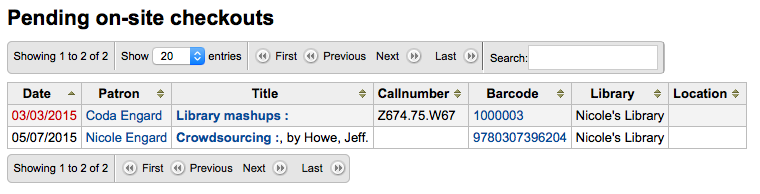
Ceci listera la date de retour prévue (retards en rouge), l’emprunteur, les informations d’exemplaire et la bibliothèque où se trouve l’exemplaire.
Suivi des consultations sur place
De nombreuses bibliothèques tracent l’utilisation sur place des documents.
Note
C’est différent du suivi du prêt sur place. La consultation sur place est l’utilisation de documents dans la bibliothèque par des adhérents, sans emprunt. Le prêt sur place est l’utilisation d’exemplaires sur site après un prêt préalable. Pour en savoir davantage sur le prêt sur place, reportez vous à la préférence système OnSiteCheckouts.
Le suivi des consultations sur place dans la bibliothèque peut être fait de deux manières dans koha. La première est de créer un ou plusieurs comptes adhérents de type statistiques. Lorsque vous collectez les documents consultés dans la bibliothèque, vous les passerez en prêt sur ce compte statistique adhérent :
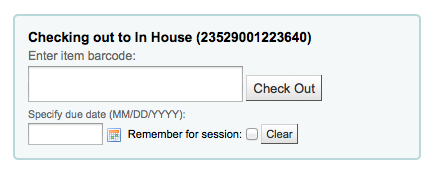
Au lieu de marqué le document comme “en prêt”, Koha enregistrera que celui-ci a été consulté sur place:

Répétez ces étapes pour tous les documents qui ont été consultés sur place. Vous disposerez ainsi de statistiques précises concernant l’utilisation des documents.
L’autre manière de suivre les consultations sur place est de paramétrer la préférence système RecordLocalUseOnReturn sur “Enregistrer”. A chaque fois que vous retournerez un document qui n’a pas été emprunté, ni réservé, son usage interne sera enregistré.

Note
Si vous avez paramétré la préférence RecordLocalUseOnReturn sur “Enregistrer”, vous pouvez aussi utiliser votre compte statistique adhérent pour enregistrer les consultations sur place.
Prêt en libre service
Koha inclut un module basique de prêt en libre-service. Pour activer ce module, vous devez paramétrer la préférence système WebBasedSelfCheck sur “Activer”. Pour utiliser le module, vous devez vous connecter en tant que membre du personnel avec :ref:` les permissions self_check <patron-permissions-label>`.
Note
Créez un adhérent bibliothécaire spécialement pour cette action, afin de ne pas laisser un vrai adhérent bibliothécaire connecté sur l’ordinateur toute la journée
Il n’y a pas de lien vers le module de Prêt en libre service mais on peut l’ajouter facilement dans la préférence système OPACUserJS.
$(document).ready(function(){
    $("#login .btn").parent().after("<p><a href=\"http://YOUR_KOHA_OPAC_URL/cgi-bin/koha/sco/sco-main.pl\" target=\"_blank\">Self-Checkout</a></p>");
});

**Important**

The code above has line breaks added to make it more readable,
please be sure to enter the above as one line in when putting it in
the system preference.
Le lien apparaîtra en bas de la page de connexion:
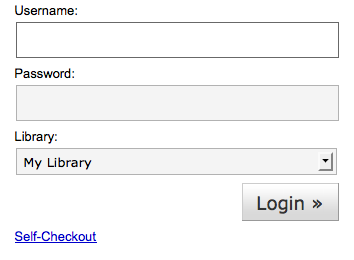
Vous pouvez également accéder à ce module en allant au : http://URL_DE_VOTRE_OPAC/cgi-bin/koha/sco/sco-main.pl
Une fois sur la page de prêt en libre-service, selon la valeur paramétrée dans la préférence système SelfCheckoutByLogin, vous devez saisir votre numéro de carte
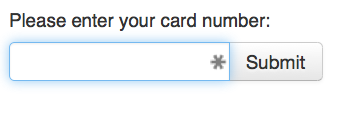
ou vos nom d’utilisateur et mot de passe
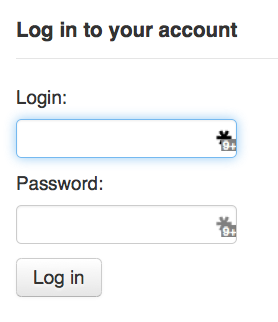
Une fois connecté sur le module de prêt en libre-service, il vous sera demandé de scanner les documents que cous empruntez

Au fur et à mesure que vous scannez les documents, ceux-ci apparaîtront sous la barre de saisie de codes à barres

Lorsque vous avez fini de scanner vos documents, n’oubliez pas de cliquer sur le bouton “Finir”. Cela vous imprimera un reçu et vous déconnectera du module Prêt en libre-service.
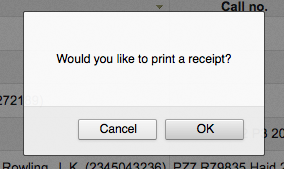
Lorsque vous essayez de prêter des exemplaires, il y a certains cas où des messages d’erreur s’affichent et où l’adhérent devra directement aller voir un bibliothécaire. Cela arrive même si vous avez autorisé le forçage des fonctions de circulation. Il n’y a qu’un bibliothécaire qui puisse forcer une interdiction donc les adhérents doivent aller voir un bibliothécaire dans ce cas-là.

You can add content, like instructions on how to use the self check-out system for example, by using the SCOMainUserBlock display location in the HTML customizations tool.
Retour en libre service
Pour utiliser le module de retour en libre service, vous devez d’abord activer la préférence système :ref: SelfCheckInModule <selfscheckinmodule-label> sur “Activer”.
Vous devez ensuite créer un adhérent.
Note
Create a staff patron specifically for this action so that you don’t leave a real staff client logged into a computer all day. You can give this patron only the aforementioned permission so it cannot be used for anything else.
Une fois que cela est fait, vous pouvez vous rendre sur la page des retours en libre service : http://YOUR_KOHA_OPAC_URL/cgi-bin/koha/sci/sci-main.pl
Connectez vous sur l’interface professionnelle avec les permissions de retour en libre service
Une fois que l’ordinateur ou le poste est paramétré et que l’adhérent du retour en libre service est connecté, les adhérents peuvent rendre eux-mêmes leurs documents.
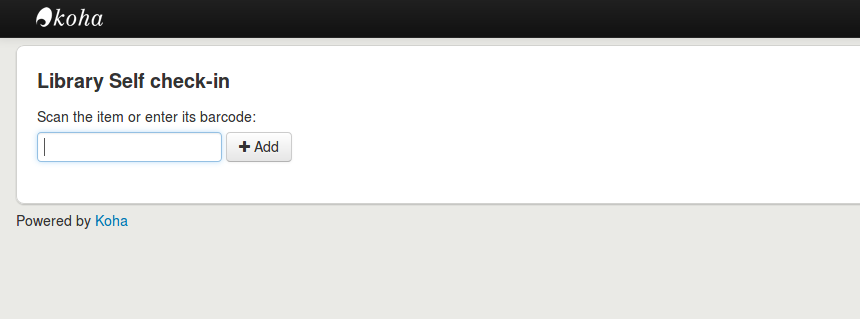
Les adhérents peuvent soit scanner le code à barres de l’exemplaire, si une douchette est connectée à l’ordinateur, ou taper leur code à barres dans la boîte et cliquer sur « Ajouter » ou appuyer sur Entrée.
Note
La plupart des douchettes font automatiquement le retour après le scan.
Une fois qu’ils ont scanné ou saisi tous leurs codes à barres, ils peuvent alors cliquer sur le bouton « Retour » pour rendre tous les exemplaires en une fois.
Important
Si les adhérents ne cliquent pas sur le bouton « Retour », les exemplaires ne sont pas rendus et restent sur leur compte.
Important
Le module de retour en libre service n’informe pas les lecteurs si l’exemplaire est en retard, s’ils ont des amendes, si l’exemplaire est réservé pour quelqu’un d’autre ou s’ils ont un message sur leur compte.
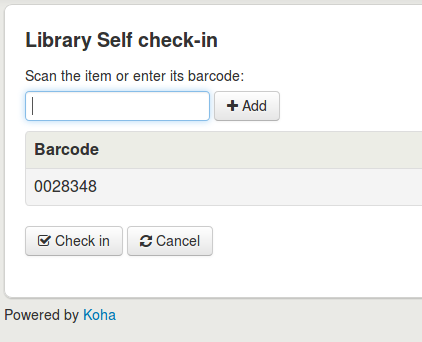
Ils peuvent alors cliquer sur « Finir » pour retourner à la page d’accueil du retour en libre service.
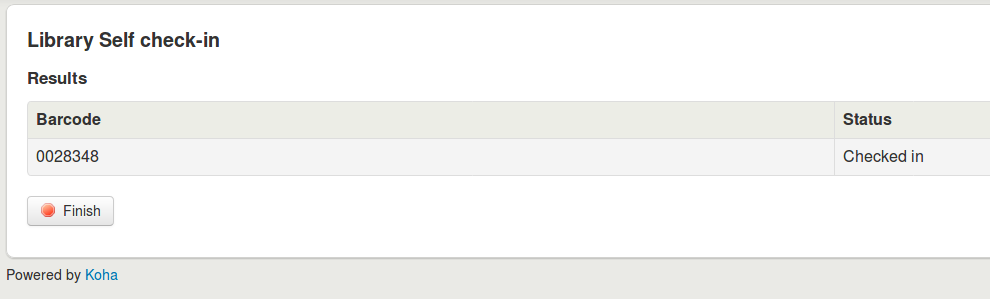
Note
Si l’adhérent ne clique pas sur “Finir”, l’affichage se rafraîchit après une période spécifiée dans la préférence système SelfCheckInTimeout.
Note
Même si les adhérents ne cliquent pas sur « Finir » l’exemplaire est bien rendu sur leur compte.
Vous pouvez personnaliser l’affichage des écrans de retour en libre service en utilisant les préférences système SelfCheckInUserCSS ou SelfCheckInUserJS.
You can add content, like instructions on how to use the self check-in system for example, by using the SelfCheckInMainUserBlock display location in the HTML customizations tool.
Les statistiques des transactions réalisées à travers le module de retour en libre service sont enregistrées dans la table action_logs de la base de données Koha. Vous pouvez cependant créer un rapport personnalisé pour obtenir les statistiques dont vous avez besoin.
Utilitaires du prêt secouru
Koha vous permet de continuer toutes les opérations de circulation pendant que vous êtes hors-ligne en utilisant une des trois solutions.
Prêt secouru dans Koha
Attention
The offline circulation module was deprecated in Koha version 23.11. Only the Firefox plugin and Windows tool are now supported.
Si la préférence AllowOfflineCirculation est positionnée sur “Activer”, le personnel peut continuer à réaliser des transactions de circulation même si le système est hors ligne. Vous devez consulter http://your-koha-staff-client-url/cgi-bin/koha/circ/offline.pl au moins une fois lorsque vous êtes en ligne et ajouter la page dans vos favoris. C’est la page où vous vous rendrez quand vous serez hors ligne.
Important
L’interface de prêt secouru utilise le code HTML LocalStorage, qui, fonction du navigateur et des réglages de l’utilisateur; est limité à 2.5MB or 5MB par domaine. Cela signifie que les systèmes plus importants ne pourront pas synchroniser leurs données. Il est recommandé d’utiliser soit l’application Firefox soit l’application Windows pour la circulation hors-ligne.
Configuration
Avant que le système ne soit pour la première fois hors ligne, allez dans le module Circulation est choisissez “Interface intégrée de circulation hors ligne”
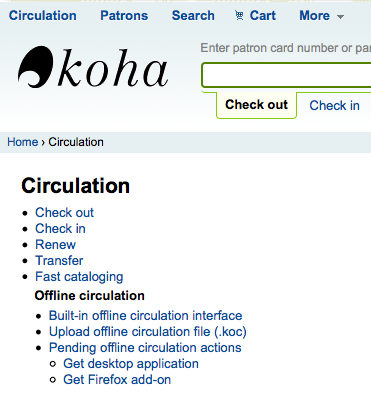
Et synchroniser vos données sur chaque poste de circulation en cliquant sur le lien “Synchroniser” sur la droite de l’écran.
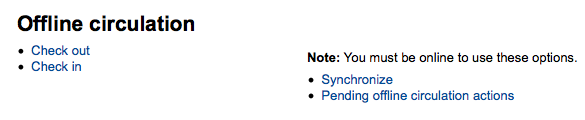
Important
L’interface de prêt secouru utilise le code HTML LocalStorage, qui, fonction du navigateur et des réglages de l’utilisateur; est limité à 2.5MB or 5MB par domaine. Cela signifie que les systèmes plus importants ne pourront pas synchroniser leurs données. Il est recommandé d’utiliser soit l’application Firefox soit l’application Windows pour la circulation hors-ligne.
Cela vous permet de charger une copie de vos adhérents et de vos données de circulation. Cliquez sur le lien “Télécharger les enregistrements” en haut de la page pour synchroniser vos données.
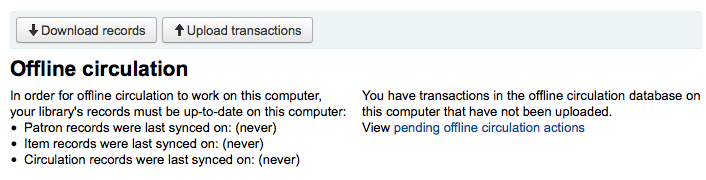
Une fois vos données chargées, vous verrez la date de dernière synchronisation à droite de chaque jeu de données.
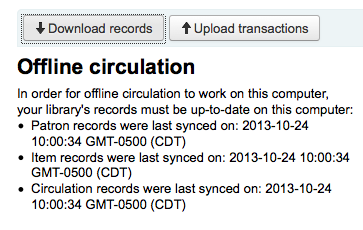
Cela devrait être réalisé régulièrement pour anticiper toute perte de connexion inattendue.
En circulation
Lorsque votre système se met hors-ligne, consultez la page de Prêt secouru (http://your-koha-staff-client-url/cgi-bin/koha/circ/offline.pl) dans Koha, et cliquez sur “Prêter” ou “Retourner” pour réaliser les transactions hors-ligne.
Le prêt est réalisé en cherchant l’utilisateur par le code à barre de sa carte ou son nom, en haut de l’écran “Prêt”. Après avoir sélectionné un utilisateur, les informations des utilisateurs qui sont synchronisées seront affichées, en incluant les amendes et les prêts.
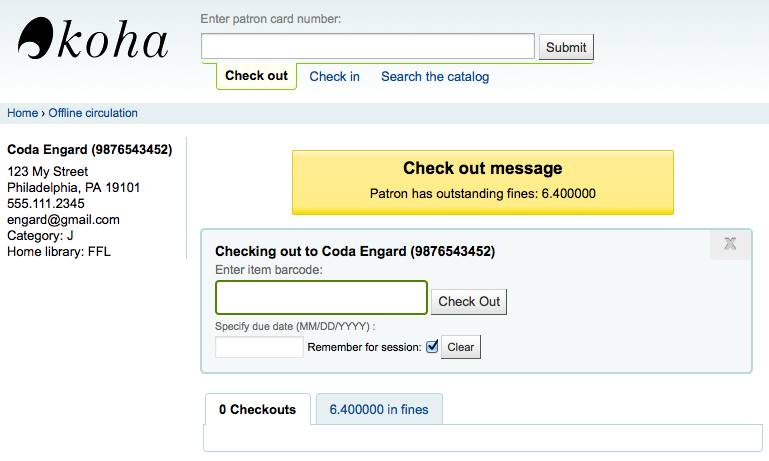
Scannez le code à barres de l’exemplaire que vous désirez prêter, et saisissez une date de retour. Si vous ne saisissez pas de date de retour, Koha en définira une pour vous.
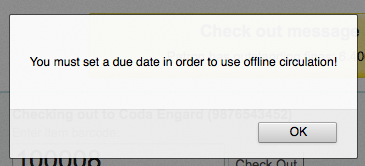
Une fois l’exemplaire prêté, il apparaîtra sous les informations de l’adhérent.
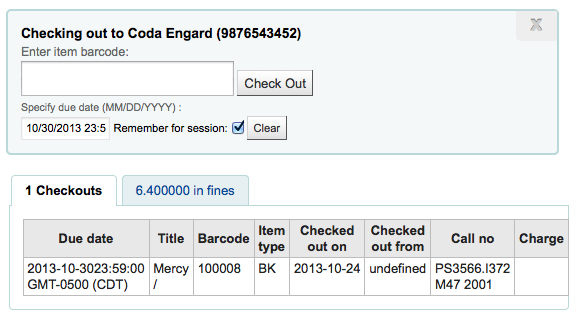
Prêts secourus de Koha
Une fois le système redevenu opérationnel, rendez-vous sur la page Synchronisation du module de Prêt secouru et cliquez sur “Mettre à jour les transactions”
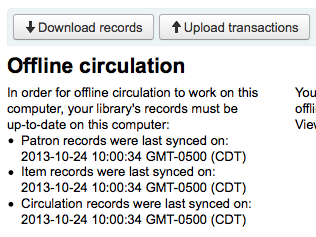
Une fois les fichiers téléchargés, cliquez sur “Voir actions de prêt secouru en attente” situé sur la droite.
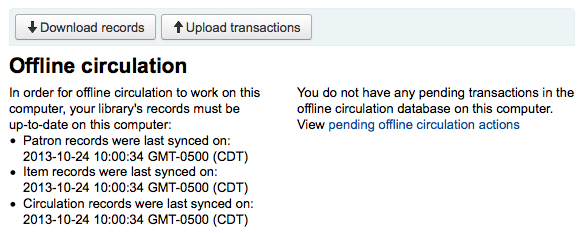
Après avoir cliqué sur « Voir les actions de prêt secouru en attente », vous serez basculé sur un résumé de toutes les actions que vous aurez chargées dans Koha depuis votre fichier *.koc.
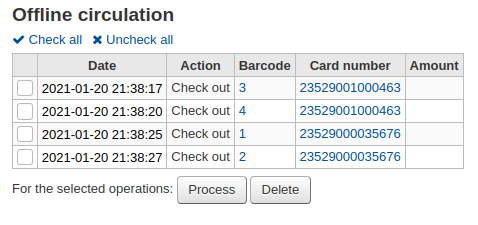
Une fois que tous les logs de tous les postes de circulation auront été chargés, vous serez en mesure de tous les consulter et de choisir ceux que vous souhaitez intégrer dans Koha.
Cliquez sur le bouton “Traitement”, et Koha va enregistrer une à une chaque les transaction stockée. Pour chaque transaction, le statut va changer en :
« Réussite. » si la transaction s’est correctement déroulée
« Utilisateur non trouvé. » Si le numéro de carte de l’utilisateur est incorrect
« Exemplaire non trouvé. » si le code à barres est erroné
« Exemplaire non prêté. » si vous retournez un exemplaire disponible
Une fois terminé, vous aurez un résumé de toutes vos teansactions.
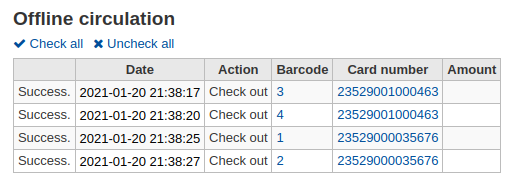
Plugin de Firefox
There is an offline circulation tool that you can add to your Firefox browser as an add-on. To do so, just go to https://addons.mozilla.org/en/firefox/addon/koct/ page and click on the « install now » button. You may have to confirm the installation, just click on « install now » and then restart Firefox to complete the installation.
Une fois que vous installé les plugins et redémarré Firefox, vous verrez le logo Koha dans la barre de téléchargement en bas à droite de Firefox.

Un clic sur le logo ouvrira l’outil dans une autre fenêtre.
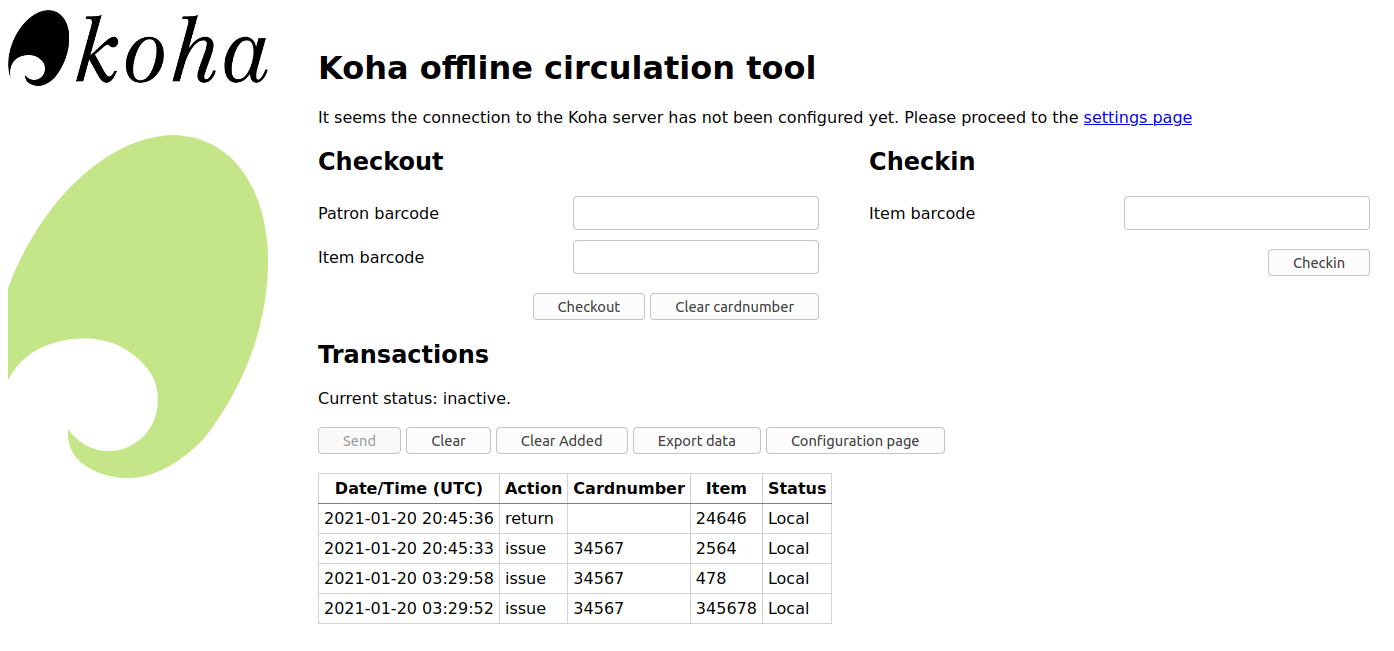
The plugin consists of three sections:
La partie « Prêter » pour prêter les exemplaires
La partie « Retourner » pour rendre les exemplaires
La partie « Transactions » pour garder la trace des transactions effectuées pendant le mode hors-ligne
Les informations de transactions resteront jusqu’à ce que vous les vidiez.
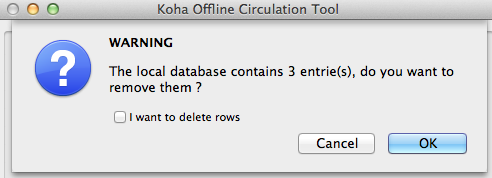
Si vous souhaitez effacer les transactions, cliquez sur le bouton « Effacer » avant de confirmer avec le bouton « OK ».
La première chose à faire est de paramétrer le plugin. Allez sur la page des paramétrages dont le lien figure en haut à droite de la page ou sous « Configuration » dans la partie Transactions.
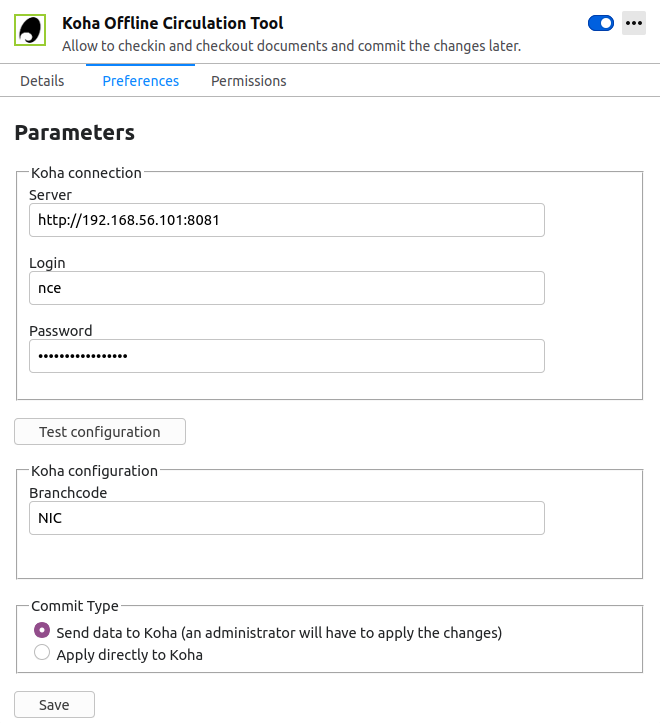
Répondez aux 5 questions présentes :
Serveur = l’URL de l’interface professionnelle
Nom d’utilisateur = l’identifiant du compte de votre personnel
Mot de passe = le mot de passe du compte de votre personnel
Code du site = le code de votre site de rattachement
Type d’envoi = Si vous sélectionnez « Envoyer les données à Koha », votre compte devra être validé par un administrateur. Si vous sélectionnez « Appliquer directement à Koha », votre compte n’aura pas à être validé.
Important
Pour enregistrer ces paramètres, vous devrez fermer la fenêtre du plugin et la ré-ouvrir en cliquant encore sur le logo de Koha dans la barre d’accessoires.
Note
Vous pouvez créer un compte pour le personnel consacré à la circulation hors-ligne; afin que tout le monde puisse utiliser la même connexion. Vous pouvez aussi utiliser une connexion de groupe pour la circulation simple.
Une fois que tout est en place, vous pouvez commencer à enregistrer les prêts et retours.
Prêt:
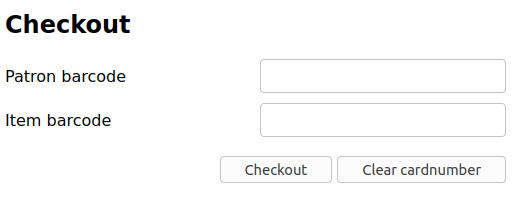
Sous le titre « Prêter »
Scannez le code à barres de la carte de l’adhérent
Scannez le code à barres du document
Cliquez sur « Prêter »
Retour:
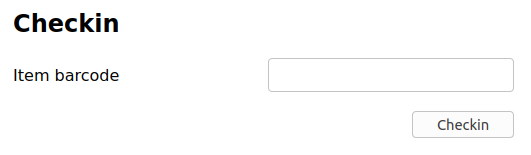
Sous le titre « Retourner »
Scannez le code à barres du document
Cliquez sur « Retourner »
Chaque fois que vous prêtez ou retournez un exemplaire, la transaction est enregistrée dans la base de données locale du plugin. Elle est enregistrée dans la partie Transactions dessous.
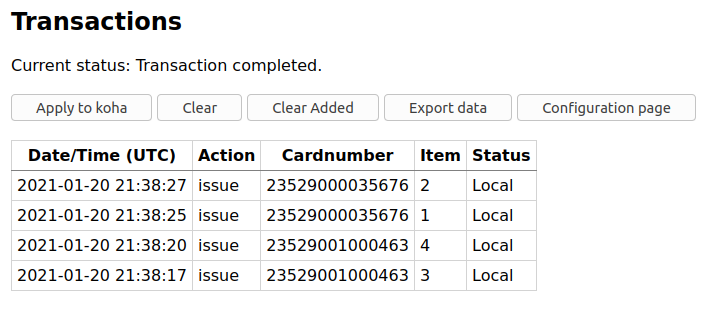
Note
Le statut sera « Local » tant que vous serez hors-ligne et et que vous n’effectuez pas de transactions dans Koha.
Lorsque votre connexion Internet revient, vous obtiendrez ces transactions dans Koha. Avant cela, vous devez être au courant de certains points.
Comme vous n’êtes pas connecté à votre base de données Koha pendant l’utilisation du plugin, les réservations nécessitent un traitement supplémentaire. Si un exemplaire que vous retournez hors-ligne a été réservé, la réservation reste sur le document. Puisque vous ne pouvez pas confirmer les réservations lors des retours, les réservations nécessitent d’être gérées plus tard. Si vous retournez quelques exemplaires, vous pouvez conserver une notice de tous. Si vous en retournez un grand nombre, vous pouvez utiliser la file d’attente des réservations et une fois que celle-ci se reconstruit, voir quelles réservations se sont effectuées de façon erronée.
De la même façon, si la carte d’un adhérent expire, l’outil de circulation hors-ligne ne le prendra pas en compte. Le prêt sera donc enregistré malgré le compte de l’adhérent qui sera bloqué normalement.
Vous avez deux options pour ajouter cette donnée à Koha
Envoyer à Koha
Si vous enregistrez les prêts/retours sur plus d’un poste informatique à la fois, cela nécessitera d’effectuer les transactions de manière cohérente. Supposons par exemple, qu’un adhérent emprunte un livre sur un poste informatique, et retourne le même livre sur un autre poste informatique. Pour que ce soit cohérent, vous devez d’abord enregistrer le prêt, puis le retour; et non le contraire! Vous devez donc regrouper toutes les transactions dans un même endroit, les trier puis les traiter. Vous devez alors utiliser l’option « Envoyer à Koha » depuis tous les plugin/poste informatique avec lesquels vous travaillez. De cette façon, le log ira dans Koha et sera accessible depuis la page de circulation hors-ligne.
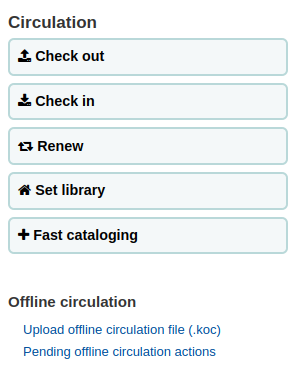
Aller à : Circulation > Actions de prêt secouru en attente
Une fois que tous les logs de tous les postes de circulation auront été chargés, vous serez en mesure de tous les consulter et de choisir ceux que vous souhaitez intégrer dans Koha.
Cliquez sur le bouton du processus, et Koha enregistrera toutes les transactions stockées une par une. Pour chaque transaction, le statut changera:
« Réussite. » si la transaction s’est correctement déroulée
« Utilisateur non trouvé. » Si le numéro de carte de l’utilisateur est incorrect
« Exemplaire non trouvé. » si le code à barres est erroné
« Exemplaire non prêté. » si vous retournez un exemplaire disponible
Une fois terminé, vous aurez un résumé de toutes vos teansactions.
Appliquer directement
Si vous effectuez toutes les actions de circulation sur un seul poste informatique et que tout est déjà trié, vous pouvez choisir d””Appliquer directement”
La colonne “Statut” sera mise à jour et vous fera savoir si les transactions ont été appliquées
« Réussite. » si la transaction s’est correctement déroulée
« Utilisateur non trouvé. » Si le numéro de carte de l’utilisateur est incorrect
« Exemplaire non trouvé. » si le code à barres est erroné
« Exemplaire non prêté. » si vous retournez un exemplaire disponible
Offline circulation tool for Windows
L’application de prêt secouru peut être téléchargée sur : https://github.com/bywatersolutions/koha-offline-circulation/releases
Pour générer un fichier borrowers.db et le charger dans l’outil Windows, vous devez exécuter le générateur de fichier via une tâche planifiée.
Upload offline circulation file
L’outil de prêt secours de Windows génère un fichier KOC que vous pourrez télécharger dans Koha une fois qu’Internet se sera reconnecté au système.
Dans le menu Circulation, cliquez su “Télécharger un fichier de prêt secouru (.koc)”
Parcourir votre ordinateur pour retrouver le fichier *.koc
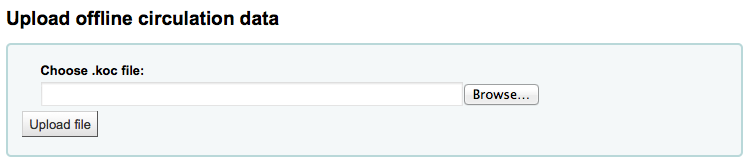
Once the file is uploaded, click the process the file
Quand cela sera terminé vous pourrez télécharger un autre fichier ou vous occuper des actions de prêt secouru en attente.
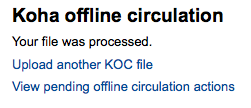
Après avoir cliqué sur « Voir les actions de prêt secouru en attente », vous serez basculé sur un résumé de toutes les actions que vous aurez chargées dans Koha depuis votre fichier *.koc.
Une fois que tous les logs de tous les postes de circulation auront été chargés, vous serez en mesure de tous les consulter et de choisir ceux que vous souhaitez intégrer dans Koha.
Cliquez sur le bouton du processus, et Koha enregistrera toutes les transactions stockées une par une. Pour chaque transaction, le statut changera:
« Réussite. » si la transaction s’est correctement déroulée
« Utilisateur non trouvé. » Si le numéro de carte de l’utilisateur est incorrect
« Exemplaire non trouvé. » si le code à barres est erroné
« Exemplaire non prêté. » si vous retournez un exemplaire disponible
Une fois terminé, vous aurez un résumé de toutes vos teansactions.