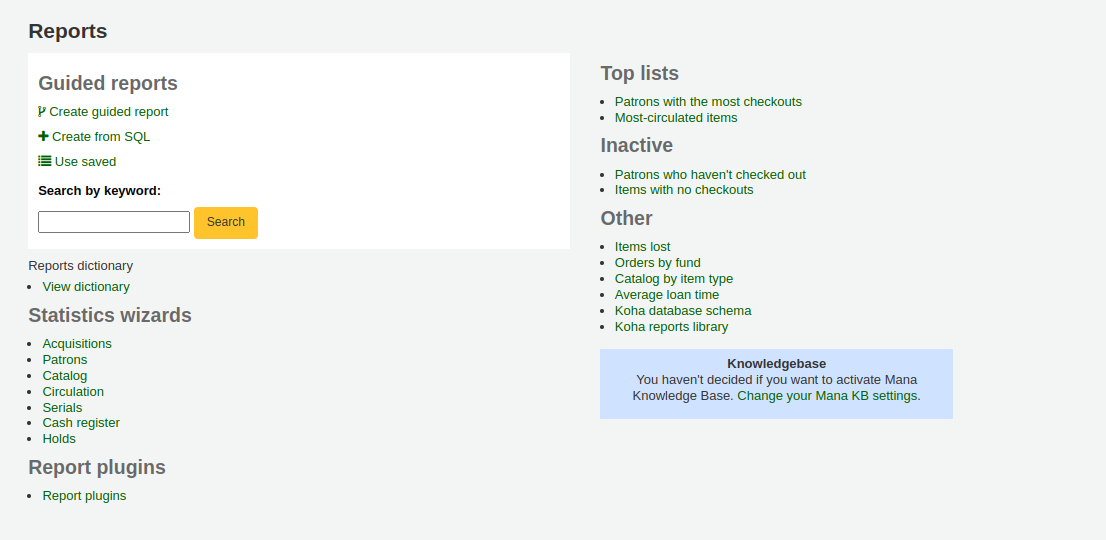
Relatórios
O módulo relatórios permite coletar os dados sobre o acervo e serviços. Os relatórios são usados para gerar estatísticas, lista de usuários, lista de exemplares (inventário) ou qualquer outro tipo de lista.
Get there: More > Reports
Custom reports
Koha’s data is stored in a MySQL database which means that librarians can generate nearly any report they would like by either using the guided reports wizard or writing their own SQL query.
Add custom report
Guided report wizard
O assistente de relatório irá guiá-lo através dos seis passos de geração de um relatório.
Step 1: Choose the module you want to report on. This will determine what tables and fields are available for you to query.
‘Report is public’ should be left to the default of ‘No’ in most cases especially if the report contains patron or other sensitive information. A public report can be accessed using the JSON reports services by anyone and without authentication.
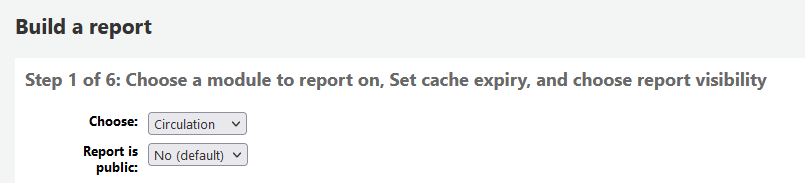
Note
If your system administrator has set up memcache on your server you might see one more option for the Cache expiry. This is related to your public reports. If you make the report public then it’s constantly running and will cause a large load on your system. Setting this value prevents that.

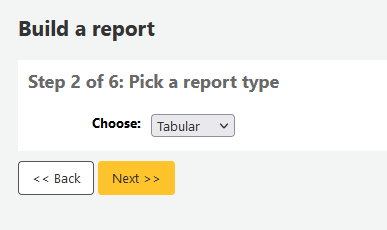
Selecione um tipo de relatório. No momento, Tabular é a única opção disponível
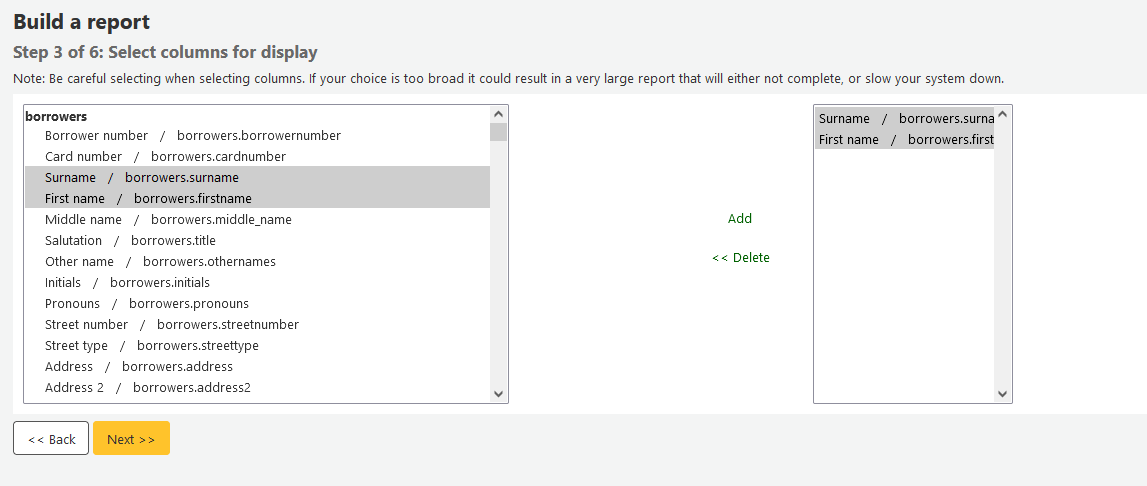
Step 3: Choose the fields you want in your report. You can select multiple fields and add them all at once by using CTRL+click on each item you want to add before clicking the Add button.
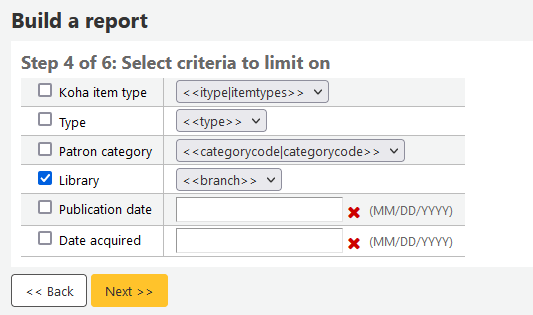
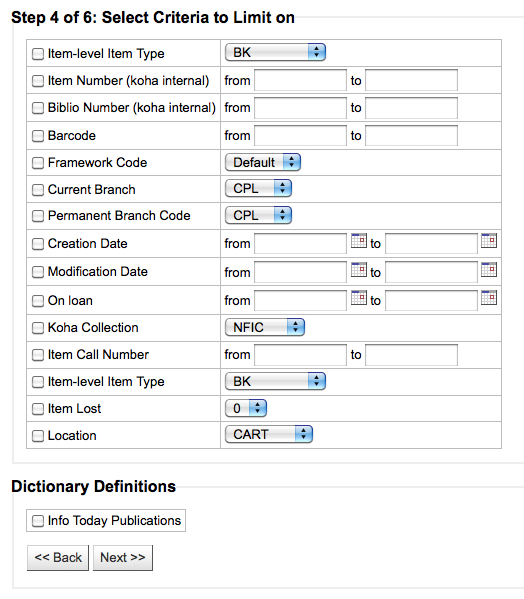
Step 4: Choose any limits you might want to apply to your report (such as item types or branches). If you don’t want to apply any limits, simply click ‘Next’ instead of choosing an option.
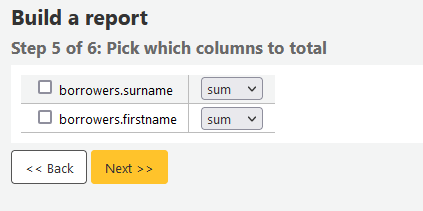
Step 5: Perform math functions. If you don’t want to do any calculations, simply click ‘Next’ instead of choosing an option.
Step 6: Choose data order. If you want the data to print out in the order it’s found in the database, simply click ‘Finish’.

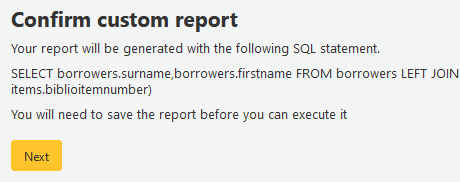
When you are finished you will be presented with the SQL generated by the report wizard. From here you can choose to save the report by clicking ‘Finish’ or copy the SQL and make edits to it by hand.
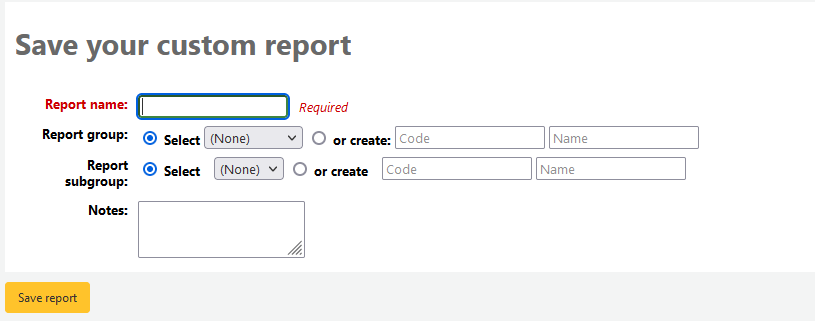
Se você optar por salvar o relatório, deverá nomeá-lo e indicar um grupo e subgrupo para inseri-lo. Você também pode acrescentar notas sobre ele.
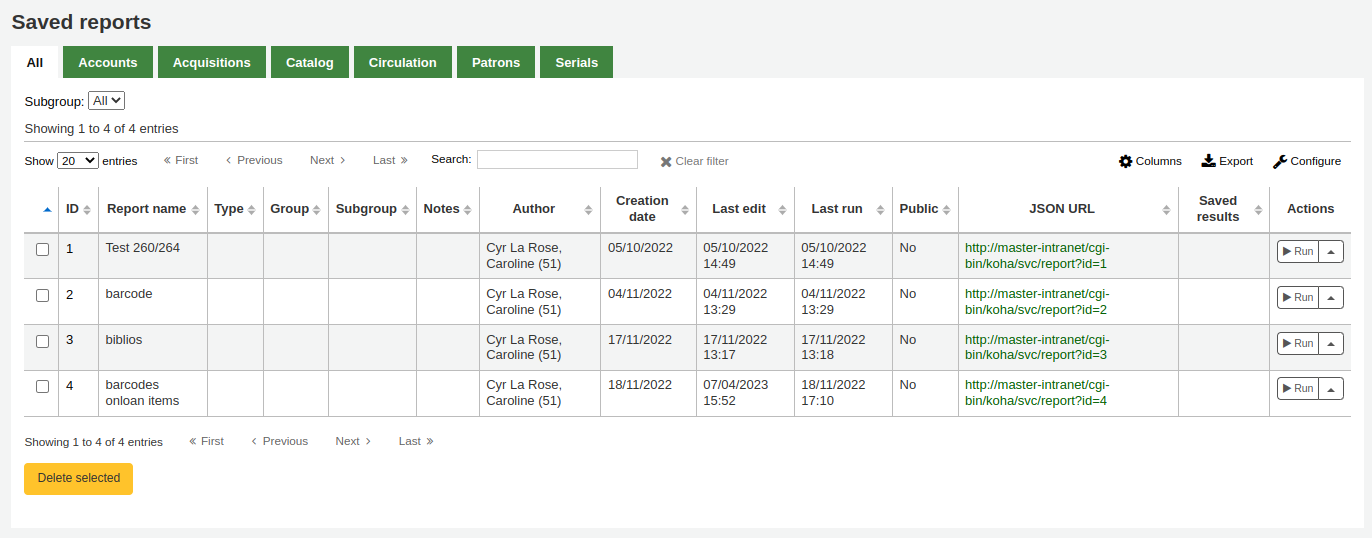
Once your report is saved it will appear on the ‘Use saved’ page with all other saved reports.
Note
You can customize the columns of this table in the ‘Table settings’ section of the Administration module (table id: table_reports).
A partir daí, você pode fazer alterações, gerar relatórios ou agendar a geração de relatórios. Para encontrar o relatório que você criou, você pode exibi-lo por qualquer coluna clicando no cabeçalho das colunas (data de criação é a melhor forma de localizar um relatório que você acabou de produzir). Você também pode filtrar os resultados utilizando o menu no lado esquerdo ou utilizando as tabelas para encontrar relatórios em seus grupos personalizados.
Criar relatório a partir de SQL
In addition to the report wizard, you have the option to write your own queries using SQL. To find reports written by other Koha users, visit the Koha wiki: http://wiki.koha-community.org/wiki/SQL_Reports_Library. You can also find your database structure in /installer/data/mysql/kohastructure.sql or online at: http://schema.koha-community.org.
To add your query, click the link to ‘Create from SQL’ on the main reports module
or the ‘New report’ button at the top of the ‘Saved reports’ page.

Preencha no formulário
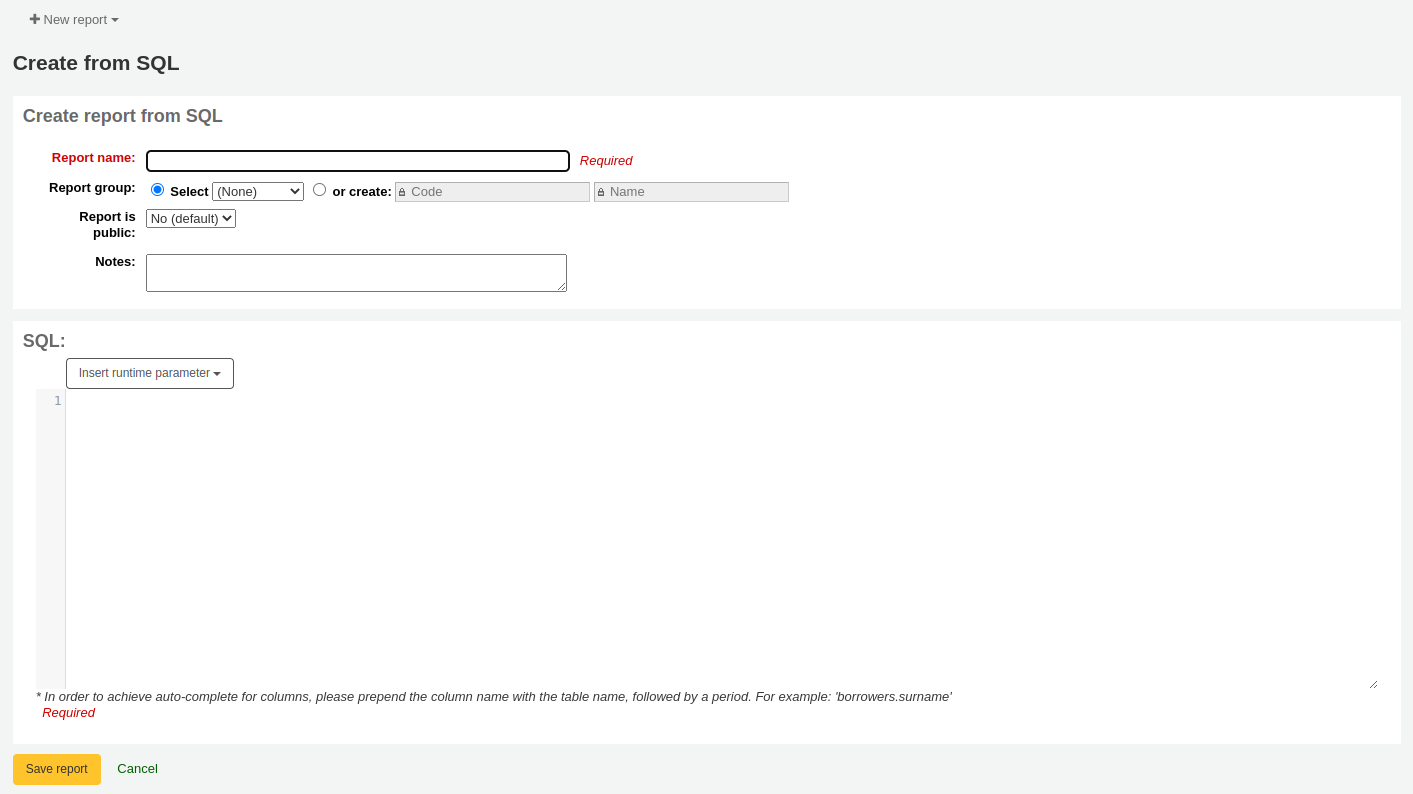
Report name: the name is what will appear on the ‘Saved reports’ page to help you identify the report later. It will also be searchable using the filters found on the left of the ‘Saved reports’ page.
Report group: you can use the ‘Report group’ to organize your reports in tabs on the ‘Saved reports’ page. You can choose from the list of existing groups, or create one on the fly by choosing the ‘or create’ radio button.

Report groups are set in the REPORT_GROUP authorized value category.
Aviso
If you’re adding a report group on the fly, the code should not include special characters or spaces.
Report subgroup: if you chose a report group, this field will appear to further organize your reports. Choose a subgroup from the list, or create one on the fly by choosing the ‘or create’ radio button.
Report subgroups are set in the REPORT_SUBGROUP authorized value category.
Nota
Report subgroups need to have unique values in ‘Authorized value’ and ‘Description’. The ‘Description (OPAC)’ field needs to contain the authorized value for the report group that the subgroup falls under.
Aviso
If you’re adding a report subgroup on the fly, the code should not include special characters or spaces.
Report is public: this should be left to the default of ‘No’ in most cases, especially if the report contains patron or other sensitive information. A public report can be accessed using the JSON reports services by anyone and without authentication.
Cache expiry: this field will only appear if your system administrator has set up memcache on your server. This is related to public reports. If you make the report public, it’s constantly running and will cause a large load on your system. Setting this value prevents that.
Notes: notes will appear on the ‘Saved reports’ page, and can be used to provide more details about the report or tips on how to enter values when it runs.
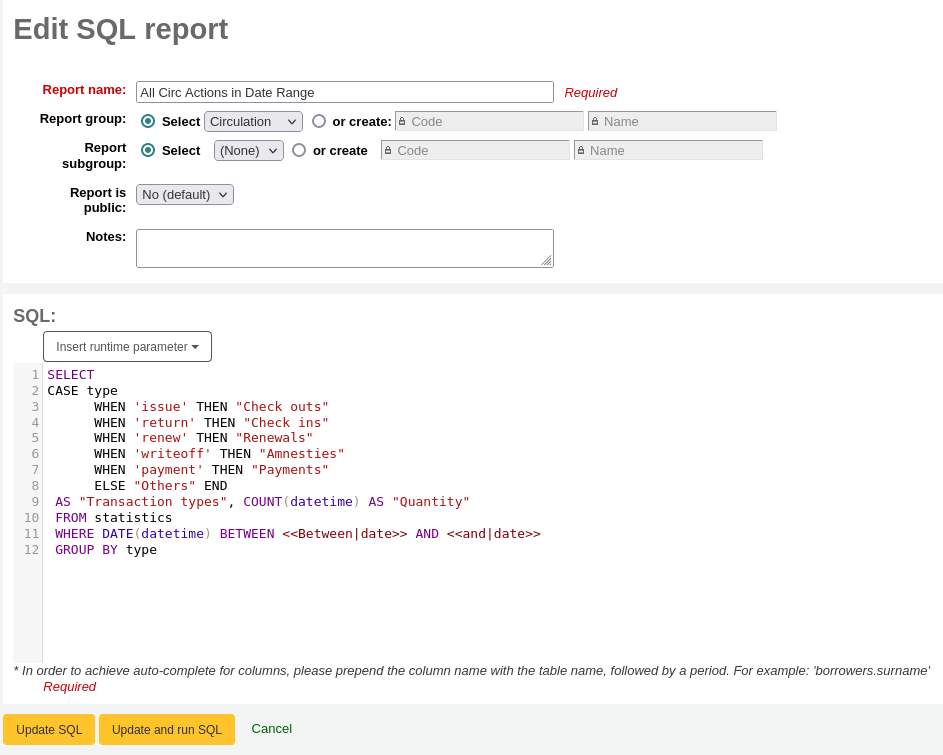
SQL: type or paste the SQL for the report (see report writing tips below).
Once everything is entered click the ‘Save report’ button and you’ll be presented with options to run it. From here, you can also edit it, duplicate it, or schedule it to be run later.
Once a report is saved, you do not have to recreate it, it will appear on the ‘Saved reports’ page with all other saved reports.
Nota
You can customize the columns of this table in the ‘Table settings’ section of the Administration module (table id: table_reports).
From the ‘Saved reports’ page, you can make edits, run the report, or schedule a time to run the report later. To find the report you created, you can sort by any of the columns by clicking on the column header (creation date is the best to find the report you just added). You can also filter your results using the filter menu on the left or use the tabs to find reports based on your custom groups.
Report writing tips
Autocomplete
When you start typing in the SQL field, autocomplete options will be displayed.
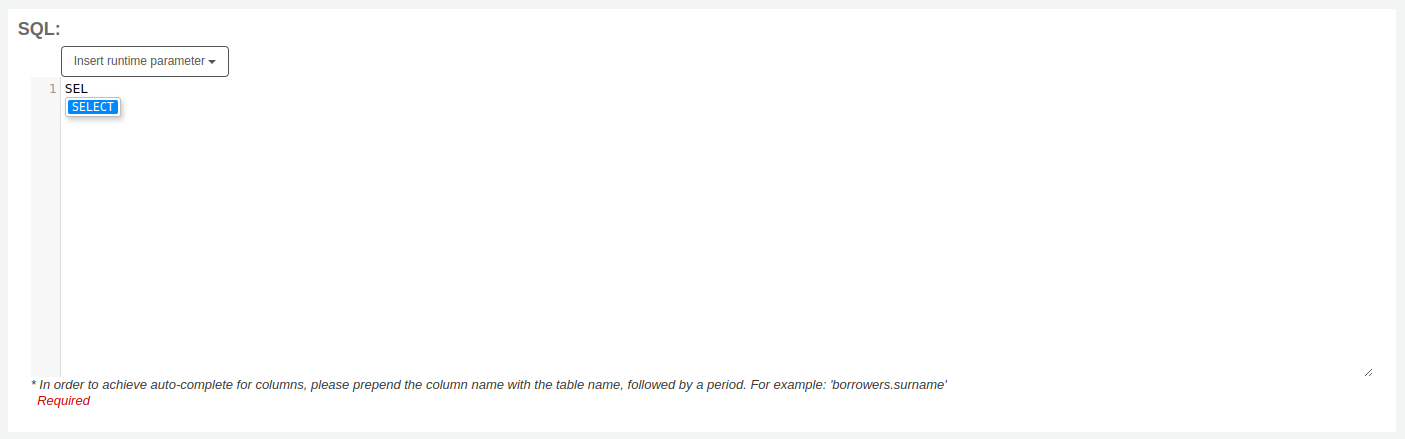
Use the arrows on your keyboard to choose the correct option and press ‘Enter’ or ‘Tab’ to insert it into your report, or simply click on the option to insert it.
Autocomplete options include:
SQL keywords such as SELECT, FROM, WHERE, etc.
table names
column names
Nota
To have suggestions for column names, you must type the table name first, followed by a period, then start typing the column name.
For example, to have the suggestion for
cardnumber, you must typeborrowers.ca.
Runtime parameters
Se você achar que o seu relatório pode consumir muitos recursos do sistema, você pode ajustar os parâmetros de tempo de execução de seu relatório. Parâmetros de tempo de execução, basicamente, fazem um filtro antes do relatório ser processado, para poupar os recursos do sistema.
Click the button ‘Insert runtime parameter’ and choose which parameter to add.
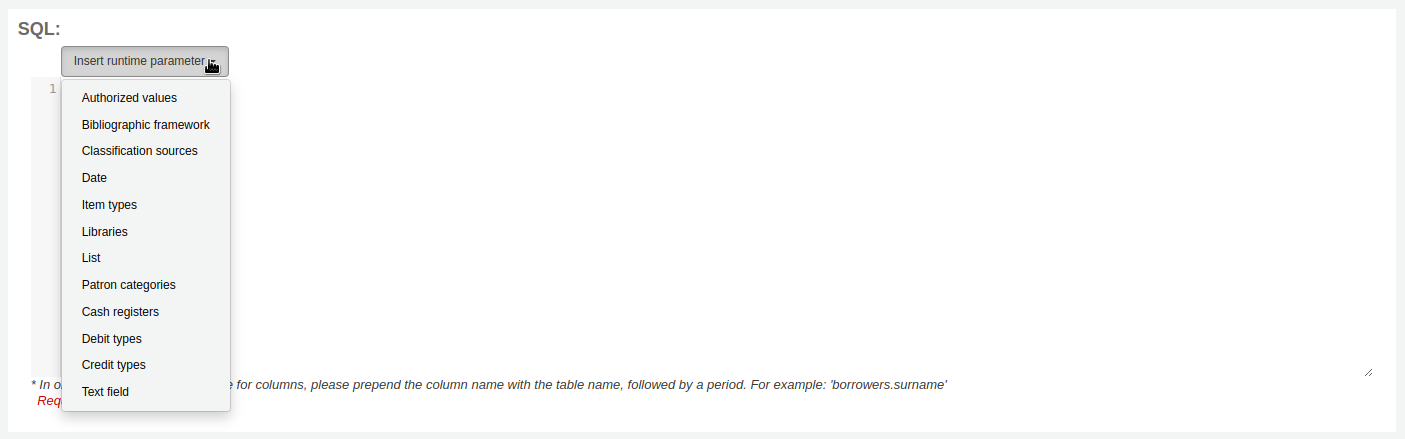
Authorized value: will display a drop down menu of the value descriptions from the chosen authorized value category. The authorized value code will be inserted in the report when it is run.
Bibliographic framework: will display a drop down menu of MARC bibliographic frameworks. The framework code will be inserted in the report when it is run.
Classification sources: will display a drop down menu of classification sources. The classification code will be inserted in the report when it is run.
Date: will display a calendar to pick a date. The date in YYYY-MM-DD format will be inserted in the report when it is run.
Item types: will display a drop down menu of item types. The item type code will be inserted in the report when it is run.
Libraries: will display a drop down menu of libraries. The library code (branchcode) will be inserted in the report when it is run.
List: will display a large text box in which the user can enter many values, one per line. Those values will be inserted in the report, separated by commas, when it is run.
Aviso
In the case of the list parameter, users must write one value per line.
Patron categories: will display a drop down menu of patron categories. The category code will be inserted in the report when it is run.
Cash registers: will display a drop down menu of cash registers. The cash register’s internal id will be inserted in the report when it is run.
Debit types: will display a drop down menu of debit types. The debit type code will be inserted in the report when it is run.
Credit types: will display a drop down menu of credit types. The credit type code will be inserted in the report when it is run.
Text field: will display an empty text field in which the user can enter any text.
Nota
You have to put “%” in a text box to ‘leave it blank’. Otherwise, it literally looks for “” (empty string) as the value for the field.
For example entering nothing for: “title=<<Enter title>>” will display results with title=’’ (no title).
If you want to have to have something not mandatory, use “title like <<Enter title>>” and enter a % at run time instead of nothing.
After you choose the type of runtime parameter, it will ask you for the parameter label. This is what the user will see as the label for the choice they have to make or text they have to enter.
The syntax inserted into the report is <<Label|authorized_value>>.
The << and >> are just delimiters to indicate the start and end of the runtime parameter.
The label will be displayed on the left of the choice or value to enter.
The authorized_value can be omitted if not applicable. If it is absent, a free text field will be displayed. If it contains an authorized code (see table below), a drop down of the values will be displayed.
Nota
You can write those in manually as well, you don’t have to go through the ‘Insert runtime parameter’ button. As long as the syntax is correct, Koha will interpret it as a runtime parameter.
List of parameters that can be used in runtime parameters
Parameter |
What the user sees |
What gets inserted in query |
|---|---|---|
date |
date picker |
validly formatted date |
branches |
drop down of branch names |
branch code |
itemtypes |
drop down of item type names |
item type |
categorycode |
drop down of patron category descriptions |
borrower category code |
biblio_framework |
drop down of MARC bibliographic frameworks |
framework code |
list |
large text box |
comma separated values |
(auth-value-category) |
drop down of auth-value descriptions in category |
authorized value |
(nothing) |
text box |
entered text |
Nota
You can have more than one runtime parameter in a given SQL query.
Example 1
SELECT surname,
       firstname
FROM borrowers
WHERE branchcode = <<Enter patrons library|branches>>
    AND surname LIKE <<Enter filter for patron surname (% if none)>>

Example 2
SELECT *
FROM items
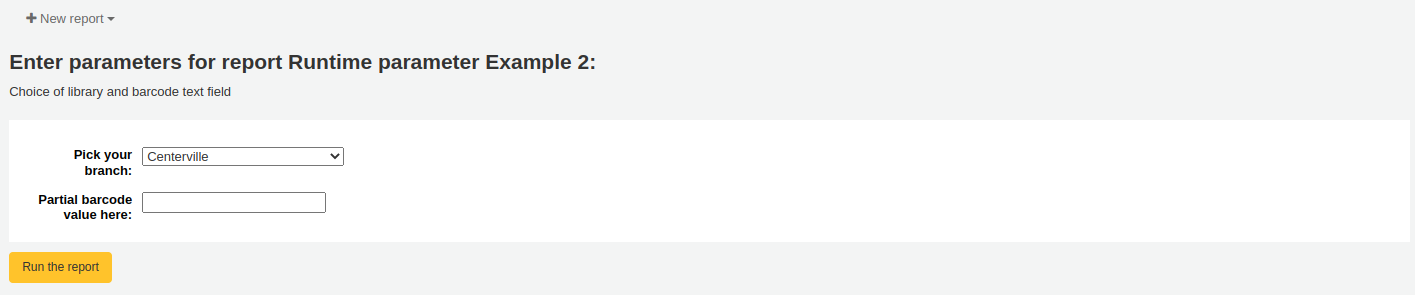
WHERE homebranch = <<Pick your branch|branches>>
AND barcode LIKE <<Partial barcode value here>>
Example 3
SELECT title,
       author
FROM biblio
WHERE frameworkcode = <<Enter the frameworkcode|biblio_framework>>

Example 4
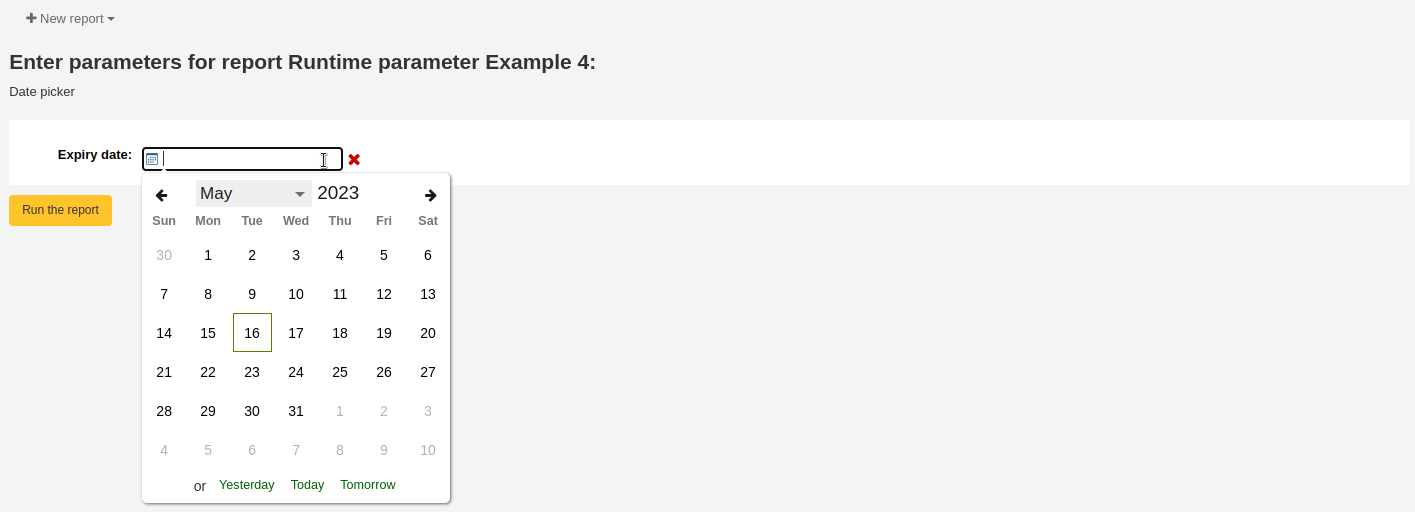
SELECT cardnumber,
       surname,
       firstname
FROM borrowers
WHERE dateexpiry <= <<Expiry date|date>>
Example 5
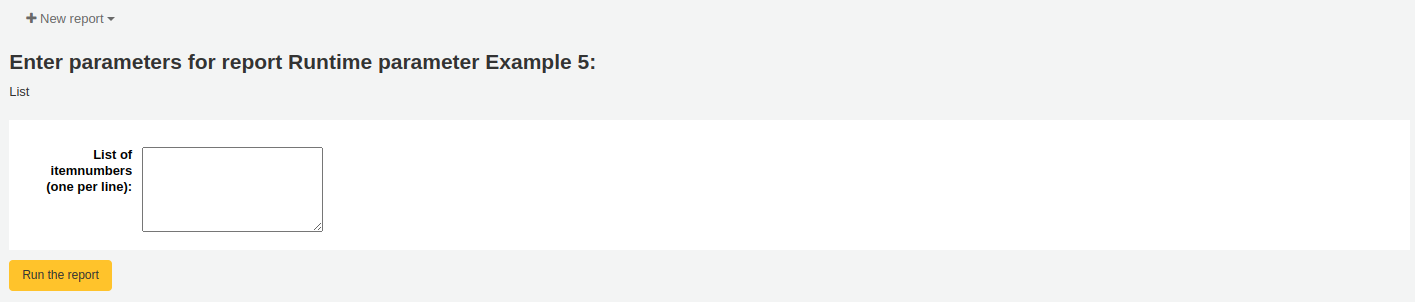
SELECT *
FROM items
WHERE itemnumber IN <<List of itemnumbers (one per line)|list>>
Aviso
In the case of the list parameter, users must write one value per line.
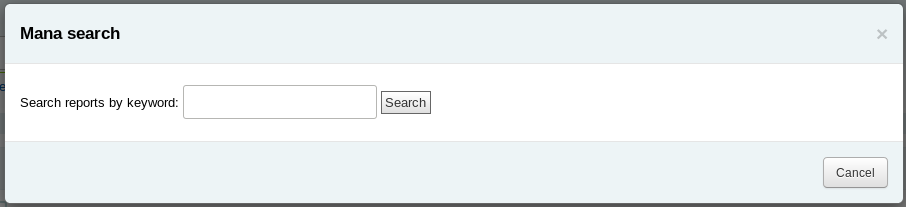
SQL report from Mana
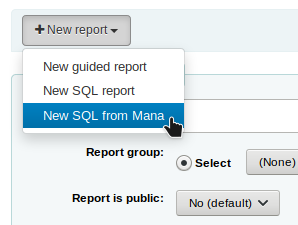
In the “Create report from SQL”, you can search Mana KB for pre-made reports by clicking on “New report” and choosing “New SQL from Mana”.
Note
This option will only appear if you’ve configured Mana KB in the administration module.
You will be prompted to enter keywords to search the knowledge base.
In the search results, you will see
the details of the report (name, notes and type)
how many people have used this entry (# of users)
when it was used for the last time (last import)
additional comments made by other Koha users (comments)
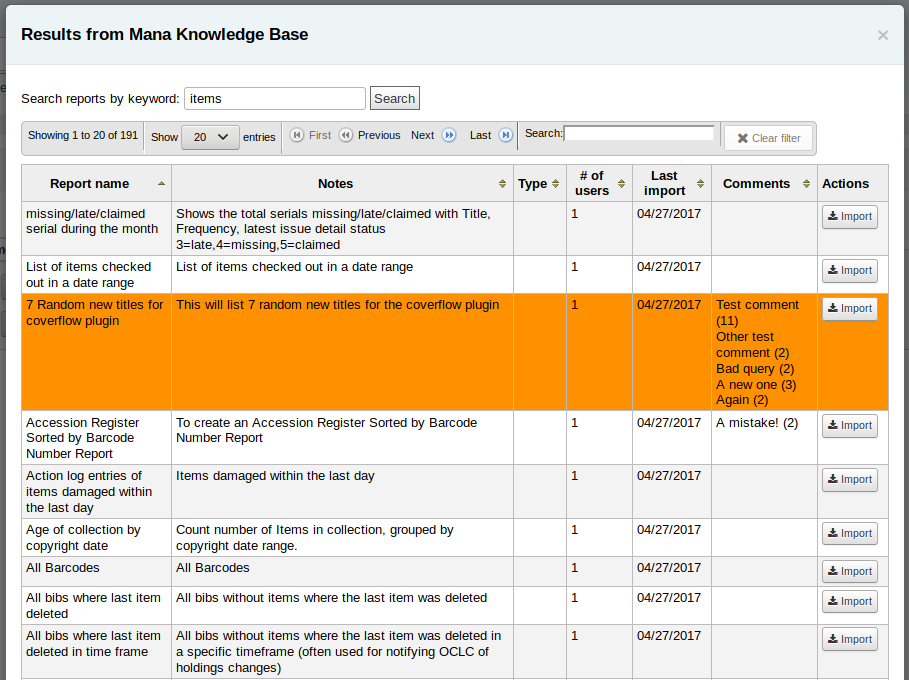
Click on “Import” to import a copy of the report in your own saved reports.
You can then edit it, duplicate it, delete it, run it as you would any of your own reports.
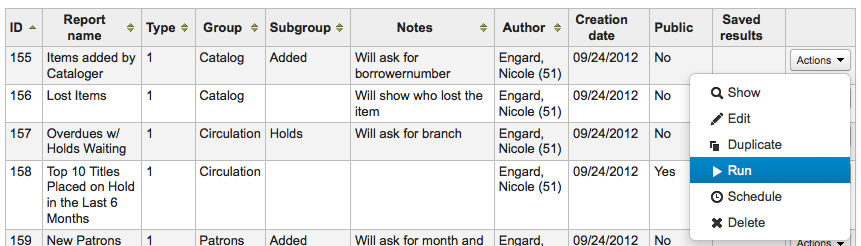
Duplicate report
Reports can also be added by duplicating an existing report. Visit the ‘Saved reports’ page to see all of the reports listed on your system already.
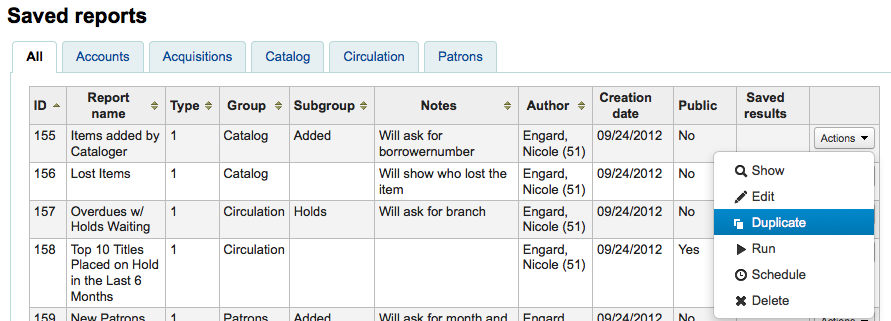
À direita de cada relatório há uma lista de ‘Ações’. Clicando nela e escolhendo ‘Duplicar’ você poderá utilizar um relatório existente como base para seu novo relatório. Essa operação irá preencher o formulário do novo relatório com a expressão SQL existente, facilitando a edição.
Edit custom reports
Every report can be edited from the reports lists. To see the list of reports already stored in Koha, click ‘Use saved.’
Note
You can customize the columns of this table in the ‘Table settings’ section of the Administration module (table id: table_reports).
Para encontrar o relatório que você deseja editar, você pode ordená-lo por qualquer coluna clicando no cabeçalho da tabela. Você também pode filtrar seus resultados usando o menu de filtros no lado esquerdo ou utilizar as abas para encontrar relatórios baseados em seus grupos personalizados.
A partir desta lista, você pode editar quaisquer relatórios personalizados clicando em ‘Ações’ no lado direito do relatório e selecionando ‘Editar’ no menu que surgir.
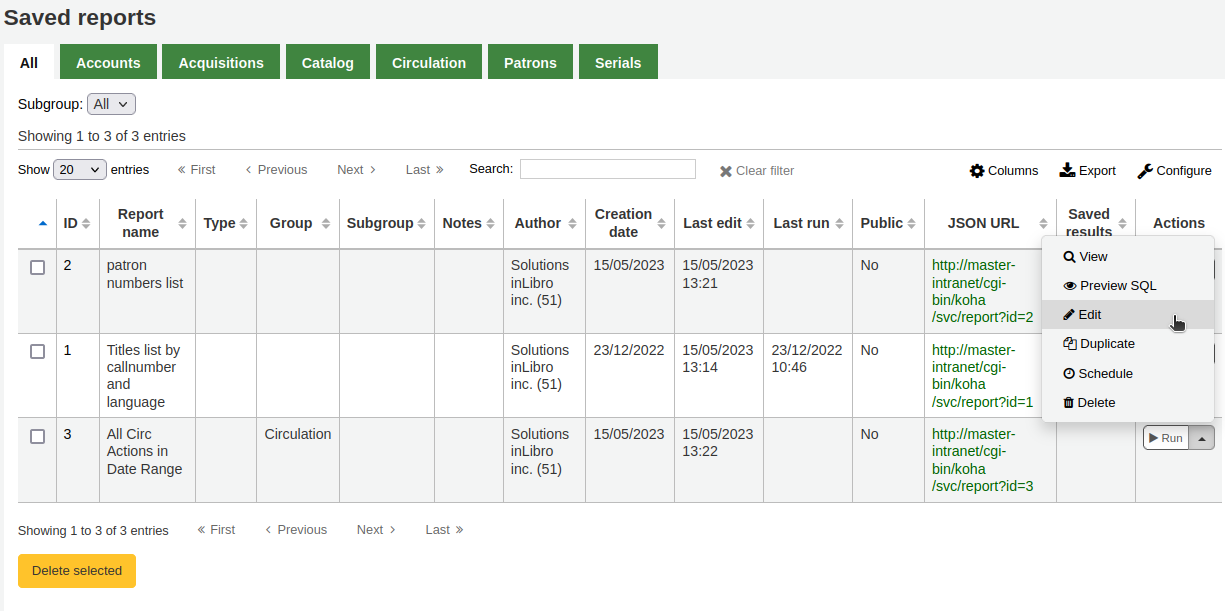
The form to edit the report will appear. Use the “update button” to save your modifications or click on “update and run SQL” to save and display the report results.
Running custom reports
Assim que um relatório personalizado é salvo, você pode gera-lo no link ‘Relatórios salvos’, clicando em ‘Ações’ ao lado do relatório e em seguida selecionando ‘Gerar’.
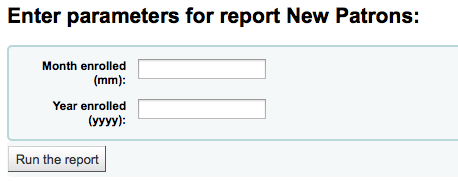
When you report runs you will either be asked for some values
or you will see the results right away
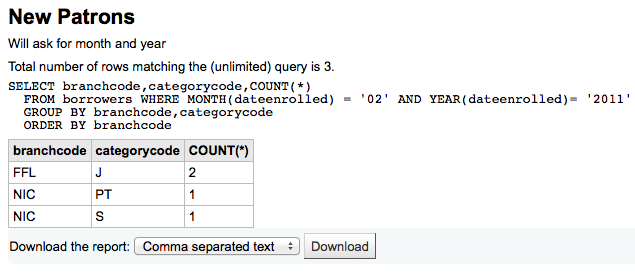
A partir dos resultados, você pode gerar novamente o relatório clicando em ‘Gerar relatório’ na barra superior, editar o relatório clicando em ‘Editar’ ou começando novamente e criando um novo relatório utilizando o botão ‘Novo’. Você também pode baixar os resultados em formato de arquivo clicando na barra inferior dos resultados na opção ‘Download de relatório’ e clicando ‘Download’
Note
A comma separated text file is a CSV file and it can be opened by any spreadsheet application.
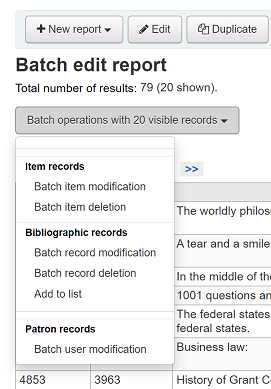
Send report output to batch modification tools
After running a report that contains itemnumbers, biblionumbers and/or patron cardnumbers the list of numbers can be imported directly into the relevant batch modification tool by clicking the ‘Batch operations with X visible records’ button in the report results. The X depends on the number of records you have chosen to display on screen (up to 1000).
Statistics reports
Statistic reports will show you counts and sums. These reports are all about numbers and statistics, for reports that return more detailed data, use the guided report wizard. These reports are limited in what data they can look at, so it’s often recommended to use custom reports for official end of the year statistics.
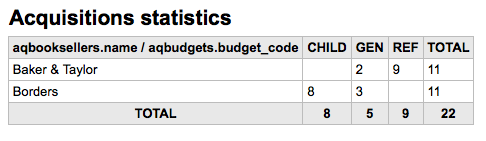
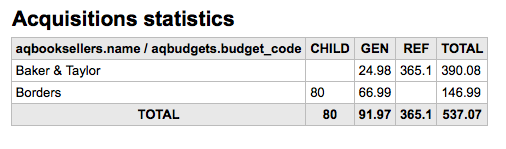
Acquisitions statistics
Note
These reports are limited in what data they can look at, so it’s often recommended to use custom reports for official end of the year statistics.
Using the form provided, choose which value you would like to appear in the column and which will appear in the row.
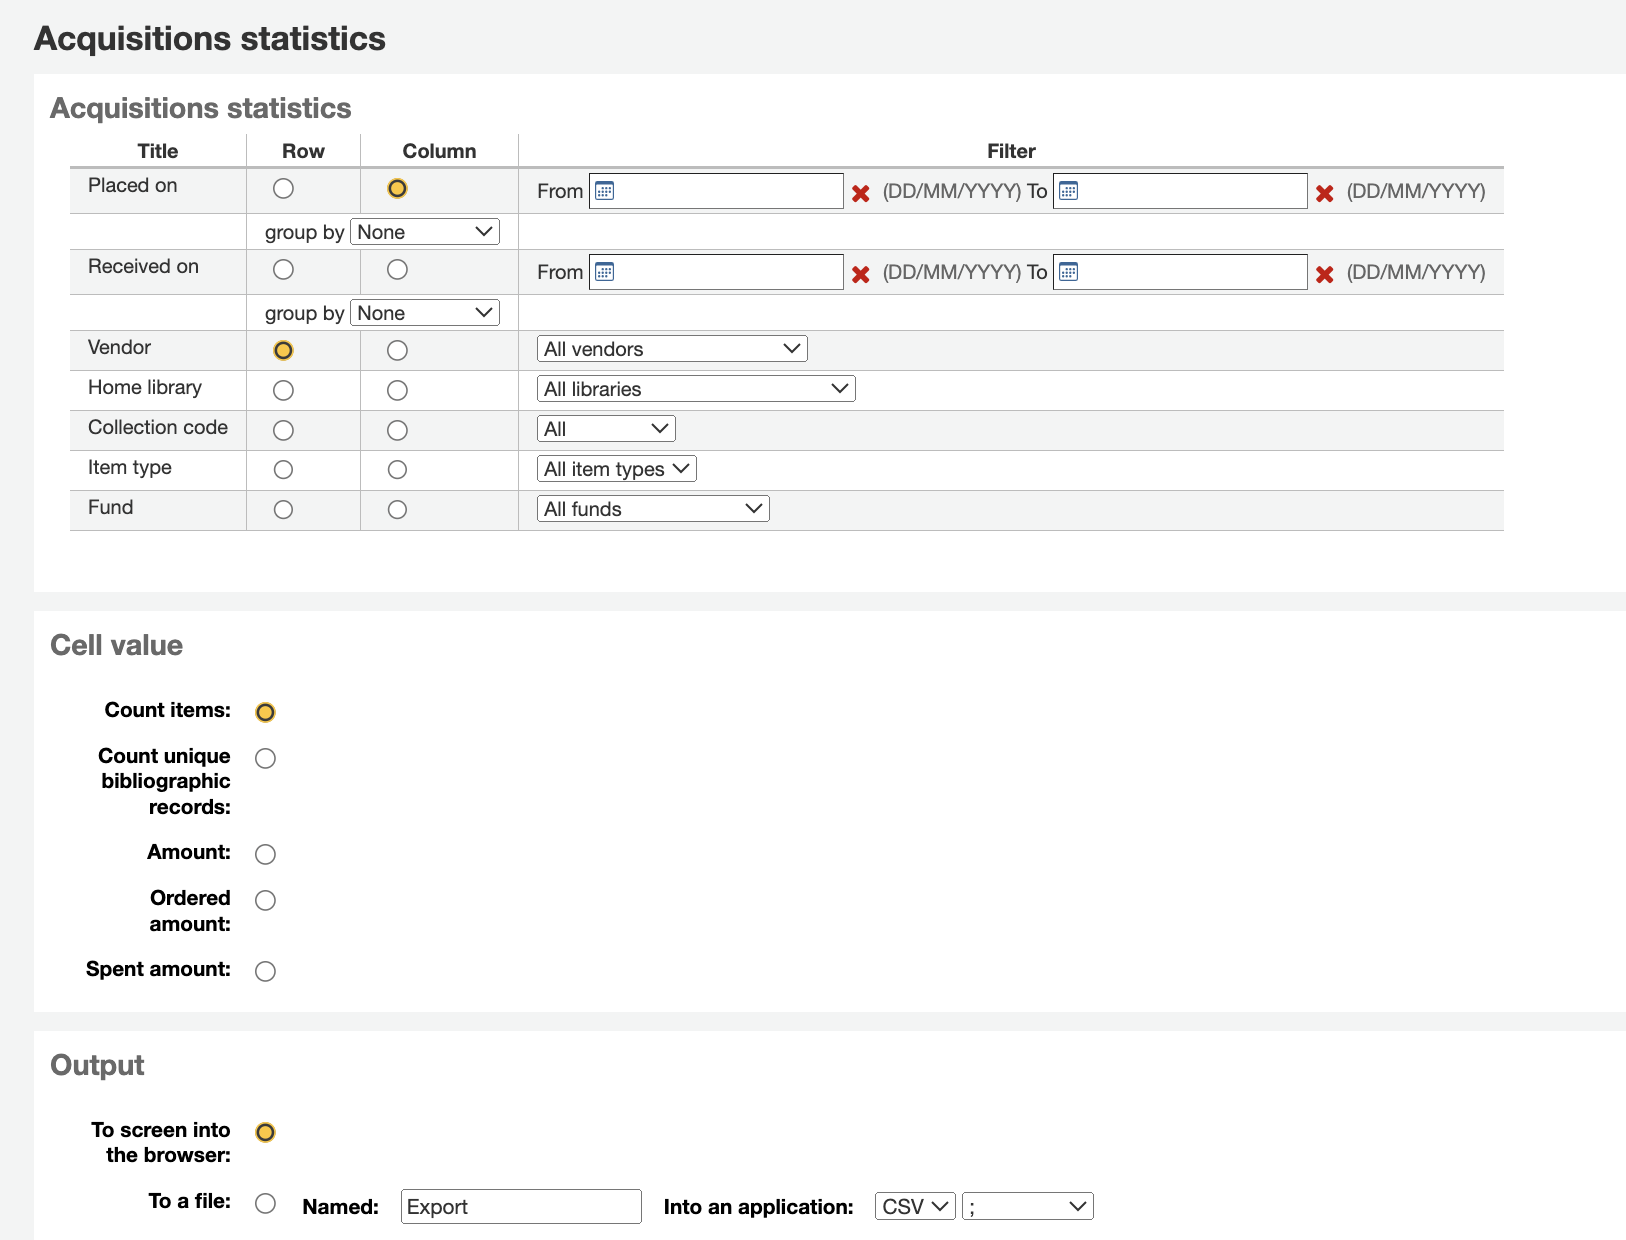
Se você optar por exibir no navegador, os resultados aparecerão na tela.
Você pode também escolher exportar para um arquivo que pode ser manipulado de acordo com suas necessidades.
Quando gerar seu relatório, note que você terá que escolher entre contar ou somar os valores.
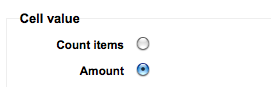
Escolher quantia irá alterar os resultados para que apareça a soma das quantias gastas.
Patron statistics
Note
These reports are limited in what data they can look at, so it’s often recommended to use custom reports for official end of the year statistics.
Using the form provided, choose which value you would like to appear in the column and which will appear in the row.
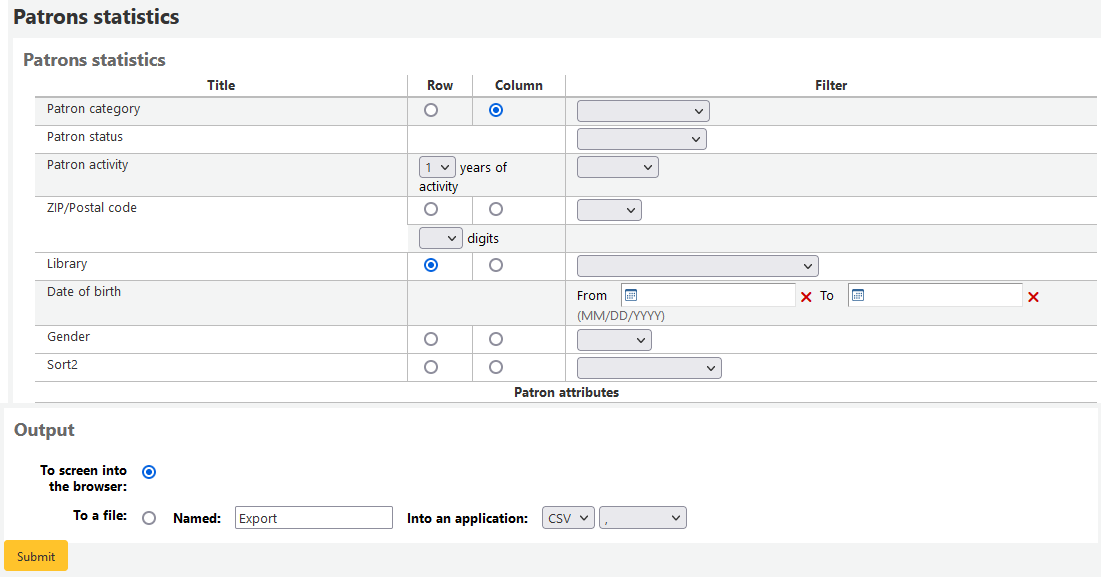
Se você optar por exibir no navegador, os resultados aparecerão na tela.
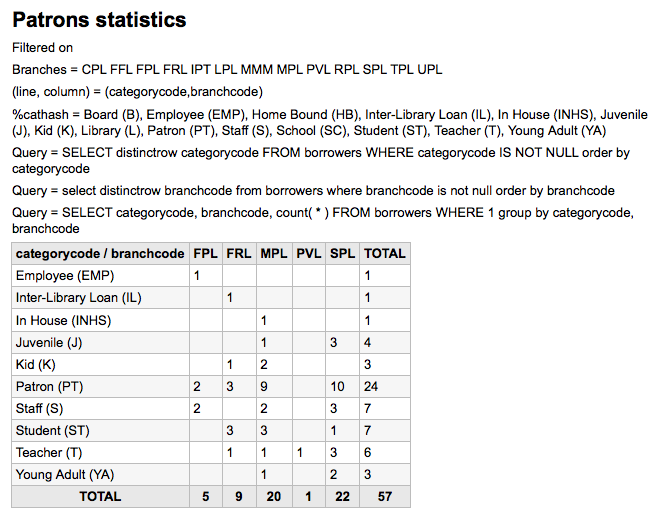
Com base nas suas seleções, você pode observar algumas informações acima dos resultados. Você também pode escolher exportar para o arquivo que você possa manipular.
Catalog statistics
Note
These reports are limited in what data they can look at, so it’s often recommended to use custom reports for official end of the year statistics.
Using the form provided, choose which value you would like to appear in the column and which will appear in the row.
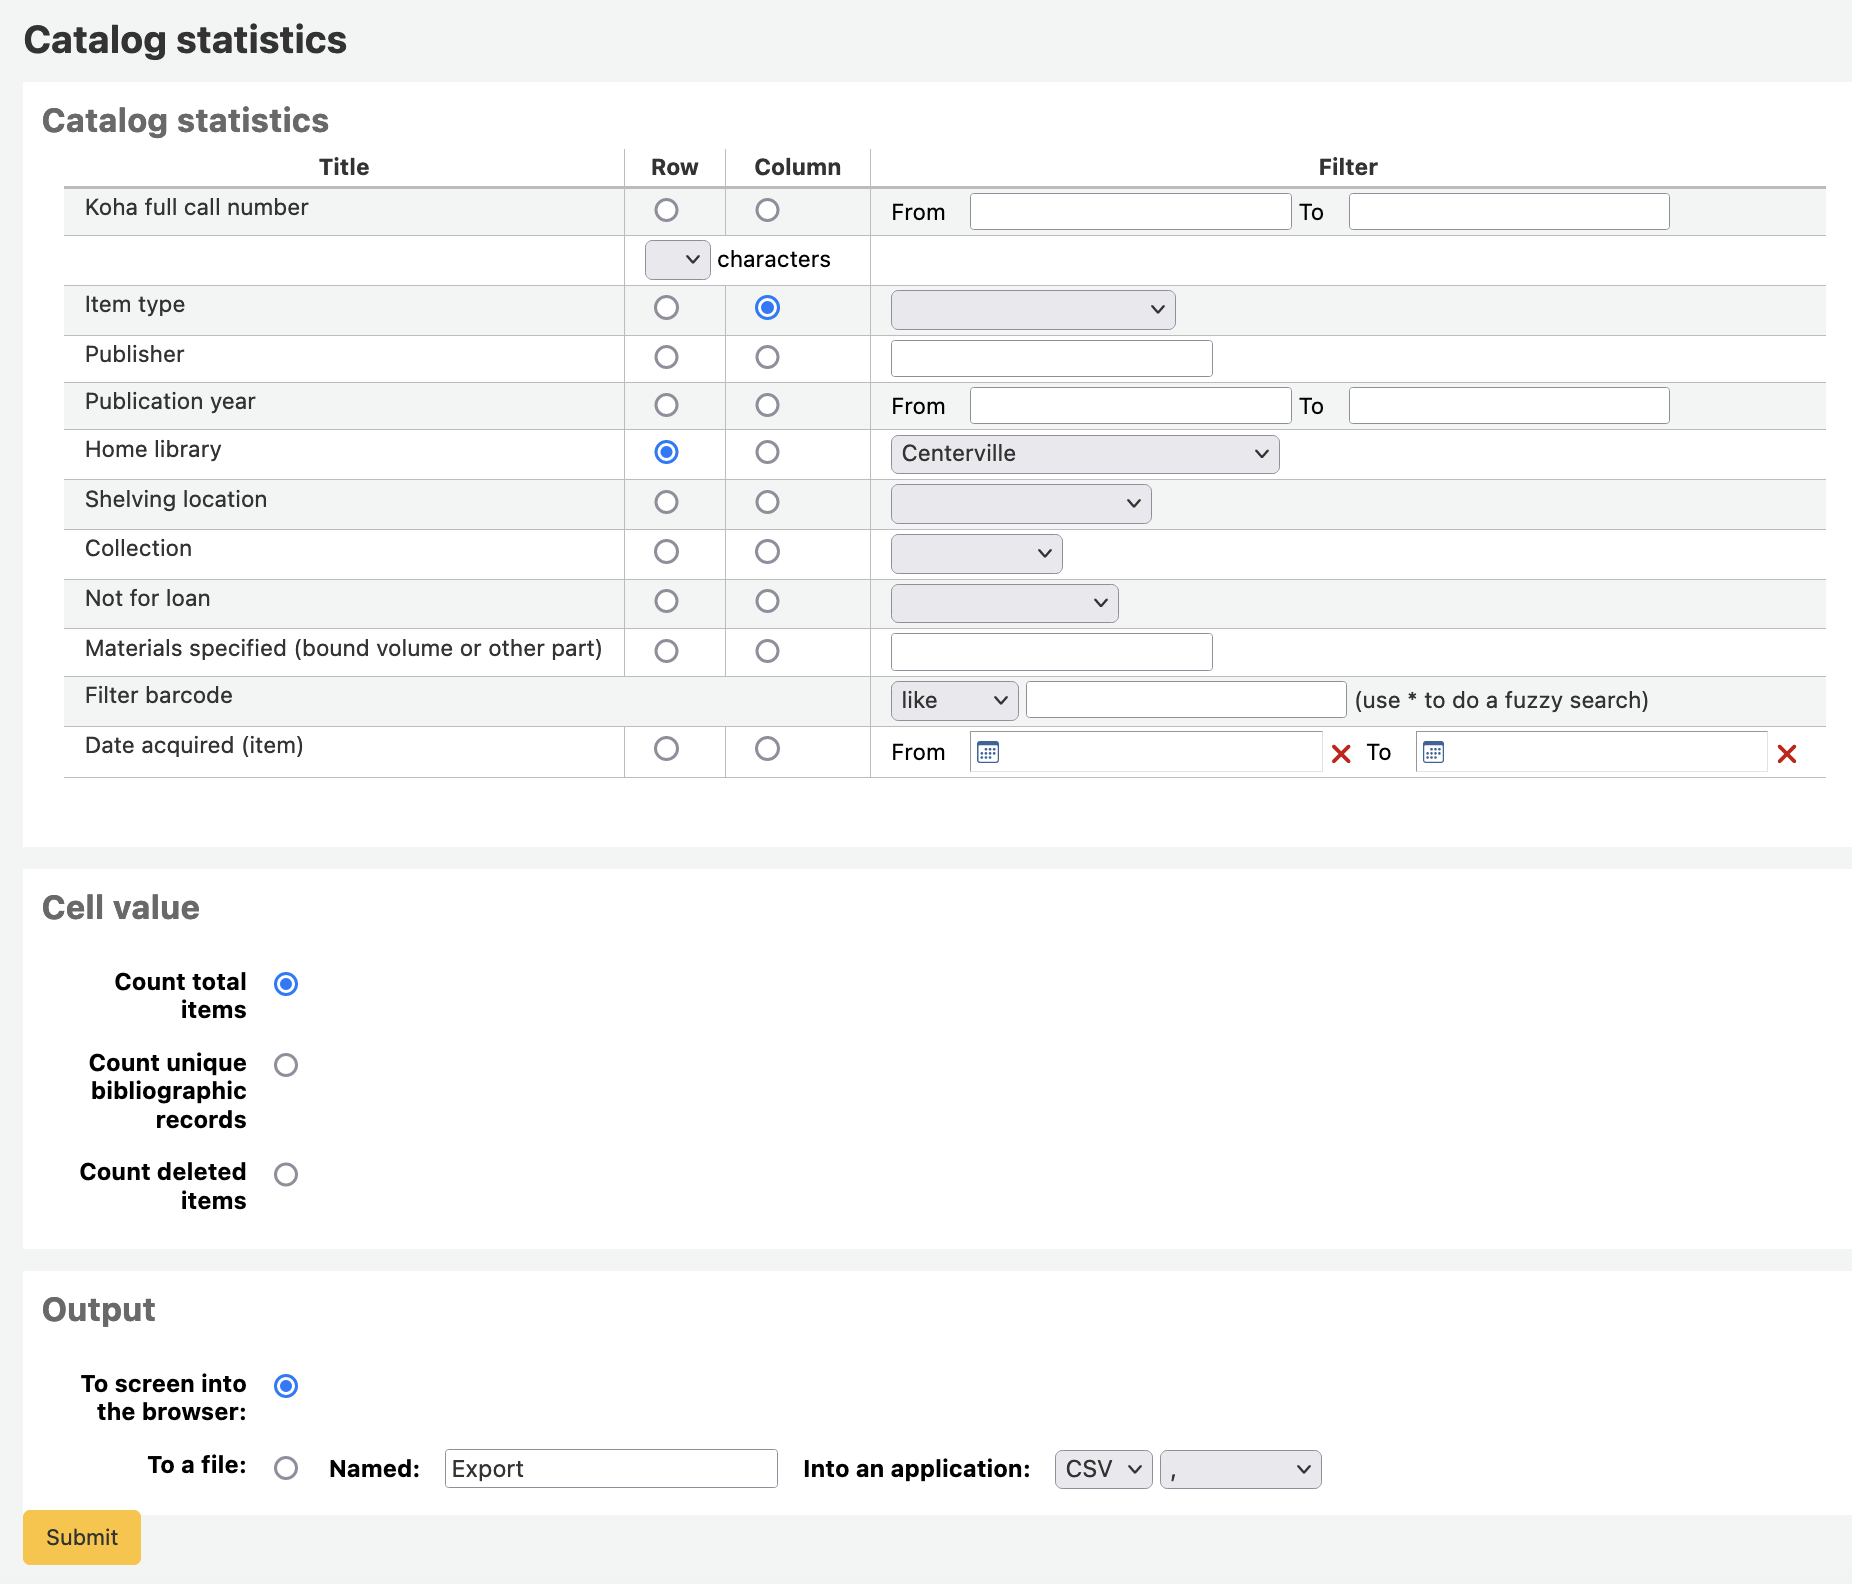
Se você optar por exibir no navegador, os resultados aparecerão na tela.
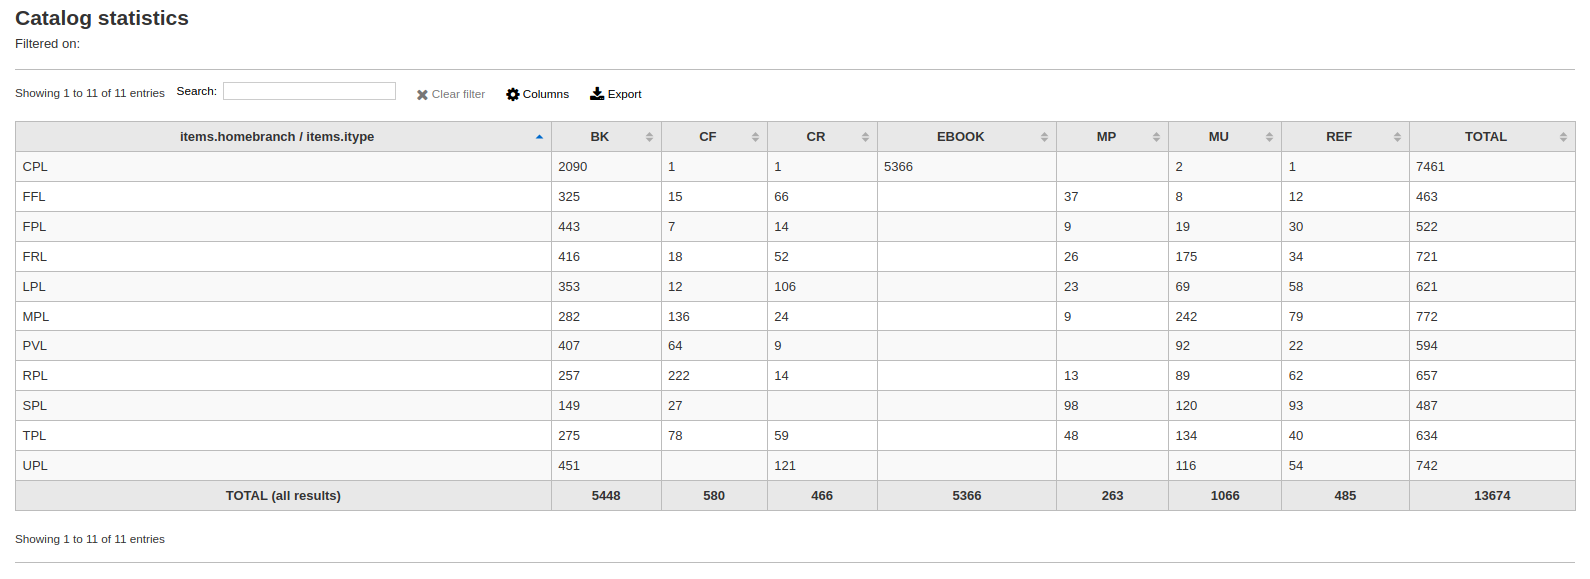
Você pode também escolher exportar para um arquivo que pode ser manipulado de acordo com suas necessidades.
Circulation statistics
Note
These reports are limited in what data they can look at, so it’s often recommended to use custom reports for official end of the year statistics.
Using the form provided, choose which value you would like to appear in the column and which will appear in the row.
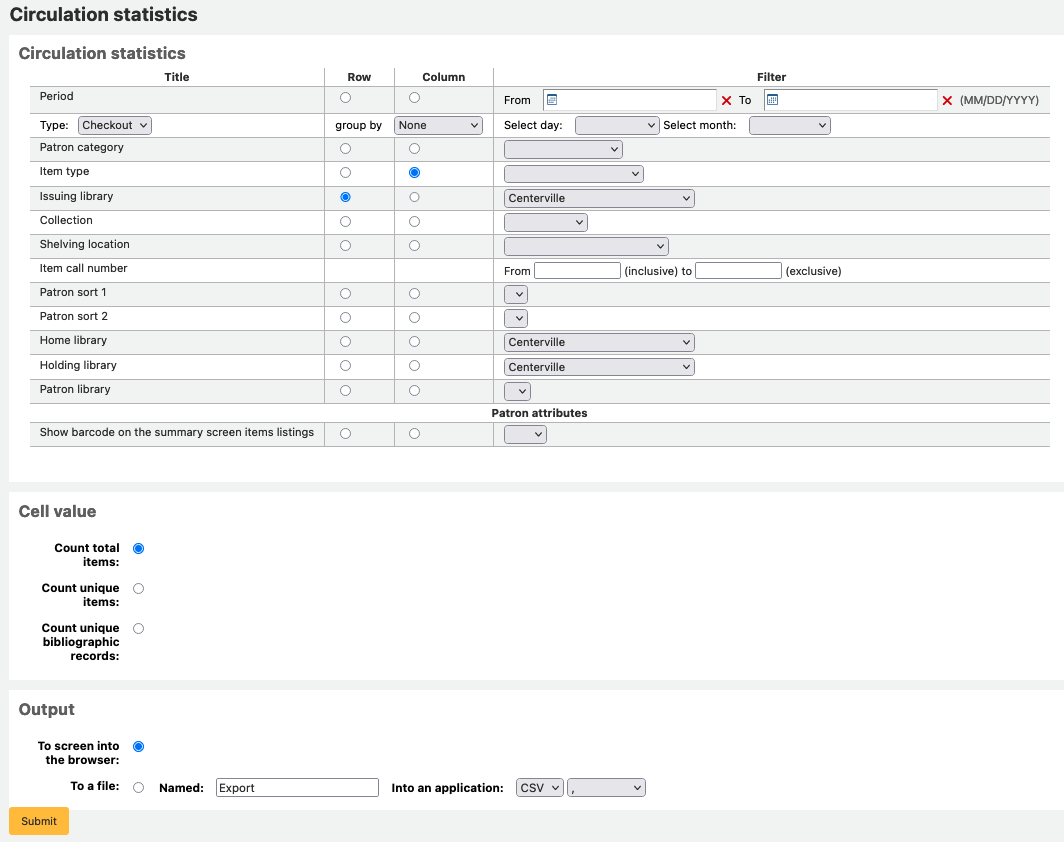
Se você optar por exibir no navegador, os resultados aparecerão na tela.
Você pode também escolher exportar para um arquivo que pode ser manipulado de acordo com suas necessidades.
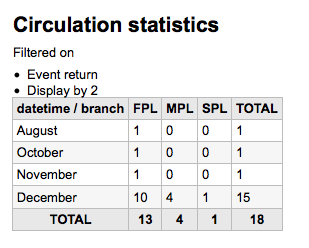
Note
Para obter um quadro completo de sua circulação mensal ou diária, você pode executar o relatório duas vezes, uma para o tipo Empréstimo e, novamente, para Renovação.
Este relatório usa ‘Período’, ou data, filtragem que permite limitar a um mês seleccionando o primeiro dia do primeiro mês através primeiro dia do mês seguinte. Por exemplo, 01/1 a 01/11 para encontrar as estatísticas do mês de Outubro.
To find daily statistics, set your date range.</br> Example: “I want circulation data starting with date XXX up to, but not including, date XXX.”
Durante um mês inteiro, os limites seriam por exemplo: 11/01/2009 para 2009/12/01
Durante um ano inteiro, seria uma gama por exemplo: 01/01/2009 a 2010/01/01
Para um único dia, seria um exemplo: 2009/11/15 a 2009/11/16 para encontrar o que circulou no dia 15
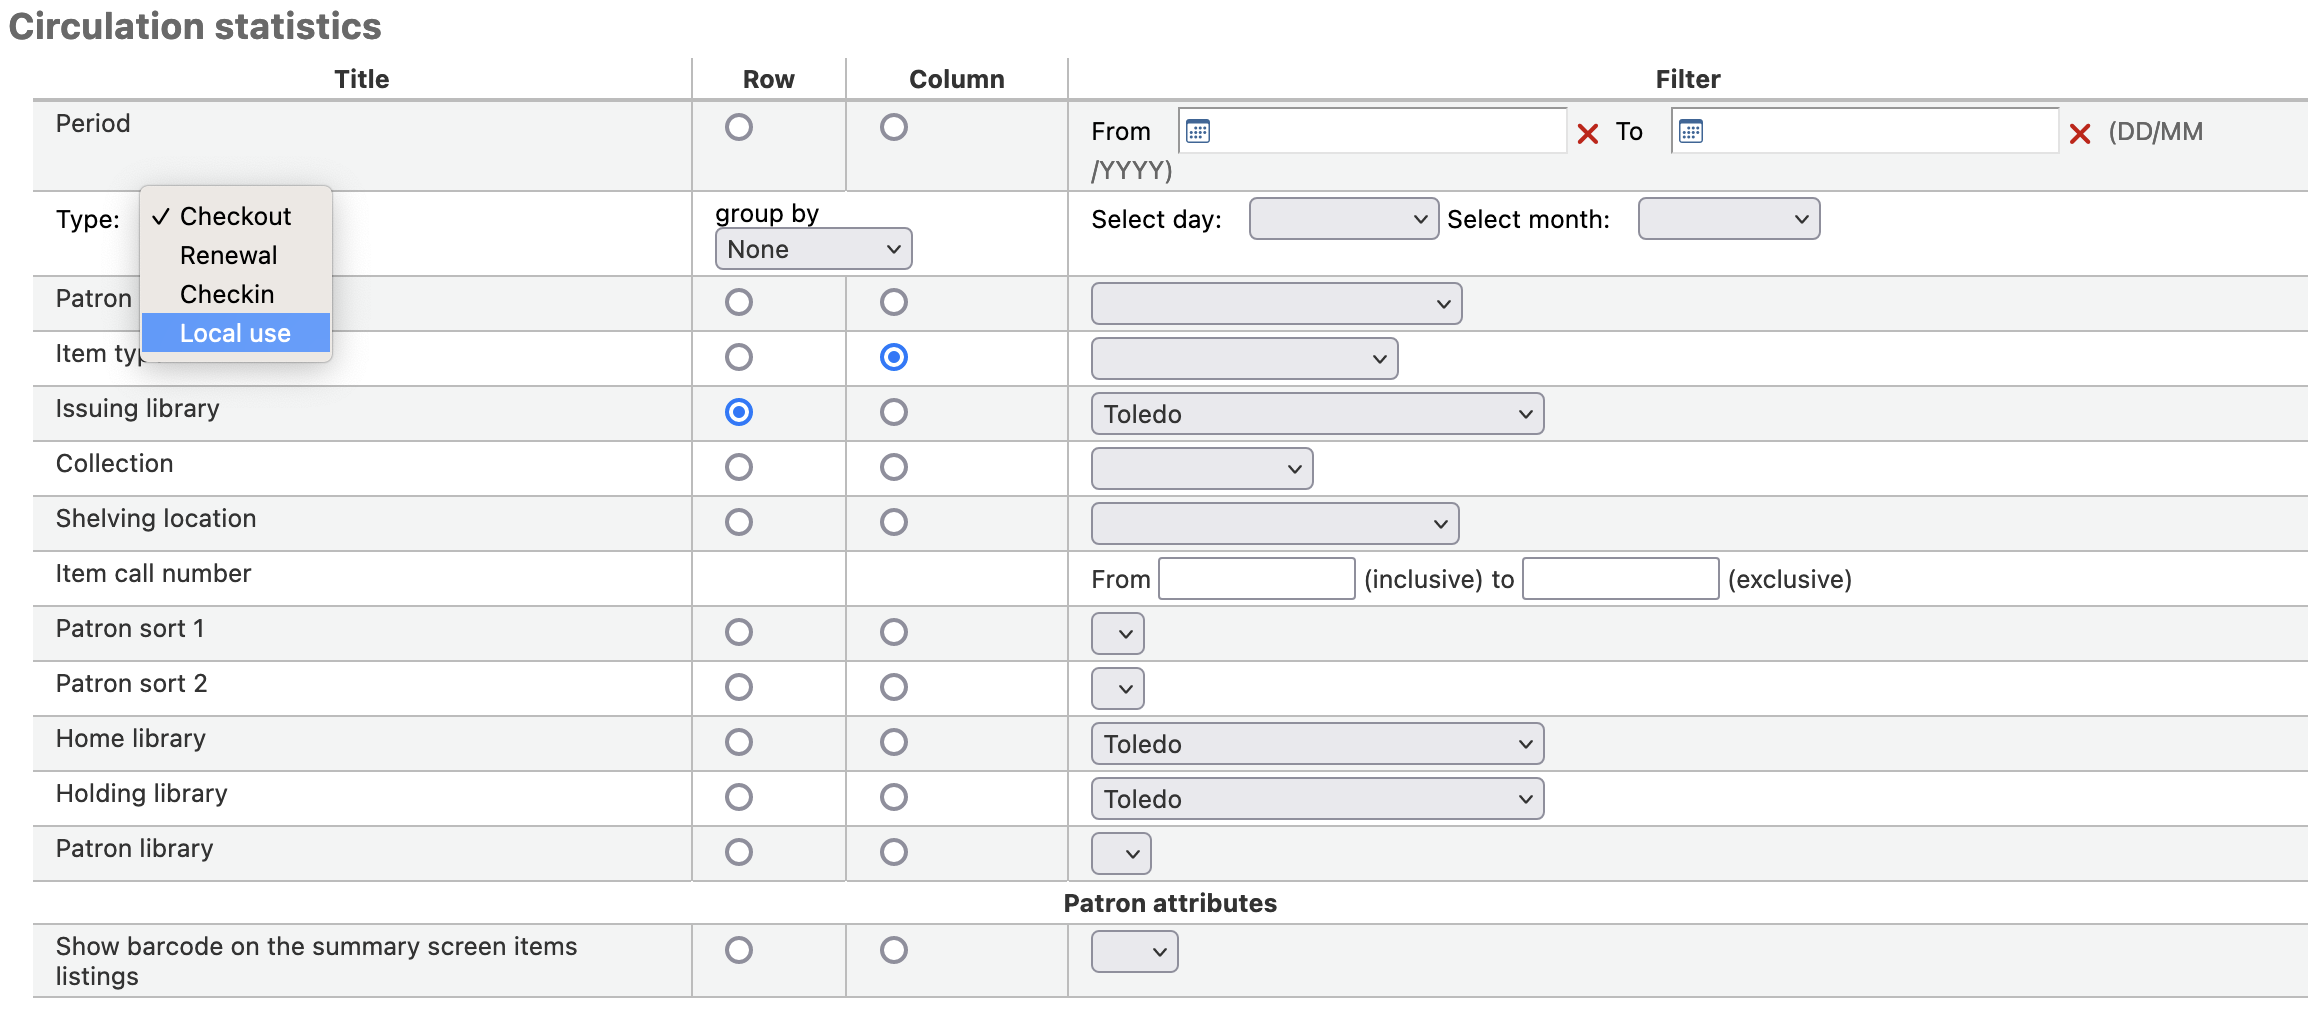
Tracking in house use
Using the Circulation statistics reporting wizard you can run reports on in house usage of items simply by choosing ‘Local use’ from the ‘Type’ pull down:
Serials statistics
Note
These reports are limited in what data they can look at, so it’s often recommended to use custom reports for official end of the year statistics.
Usando o formulário, escolha como você quer que sejam listados os periódicos em seu sistema.

Se você optar por exibir no navegador, os resultados aparecerão na tela.

Você pode também escolher exportar para um arquivo que pode ser manipulado de acordo com suas necessidades.
Holds statistics
Note
These reports are limited in what data they can look at, so it’s often recommended to use custom reports for official end of the year statistics.
No formulário próprio que você pode ver as estatísticas para detém colocado, cheio, cancelados e mais em sua biblioteca. A partir do formulário escolher o valor que você deseja exibir na coluna e qual o valor de mostrar na linha. Você também pode escolher entre os filtros à extrema direita do formulário.
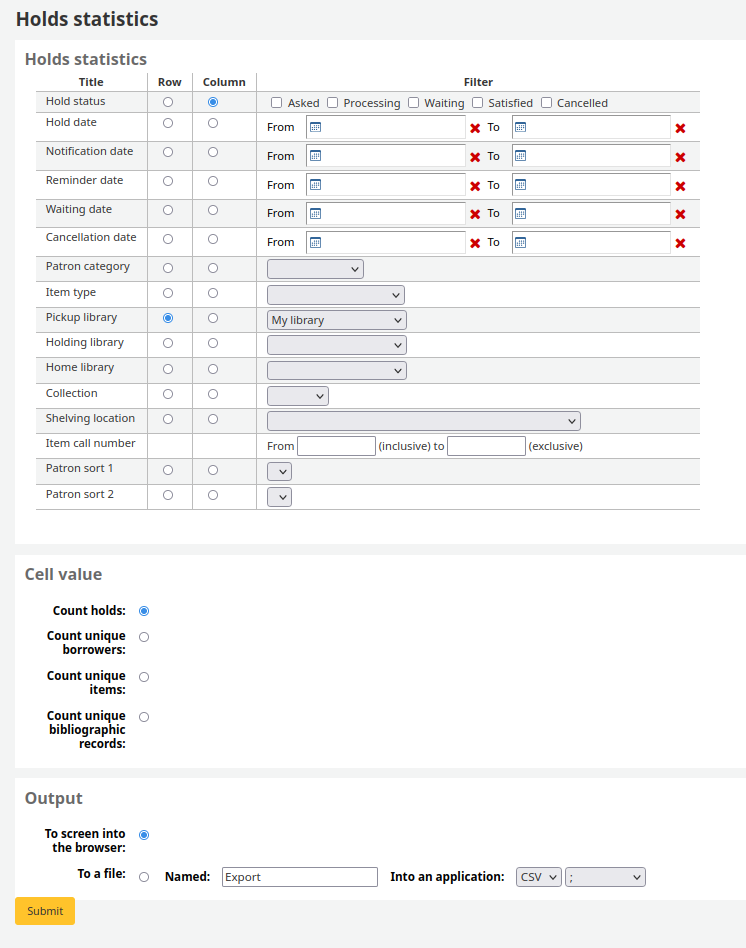
Se você optar por exibir no navegador, os resultados aparecerão na tela.

Você pode também escolher exportar para um arquivo que pode ser manipulado de acordo com suas necessidades.
Usuários com mais empréstimos
O relatório irá simplesmente listar os usuários que realizaram mais empréstimos.
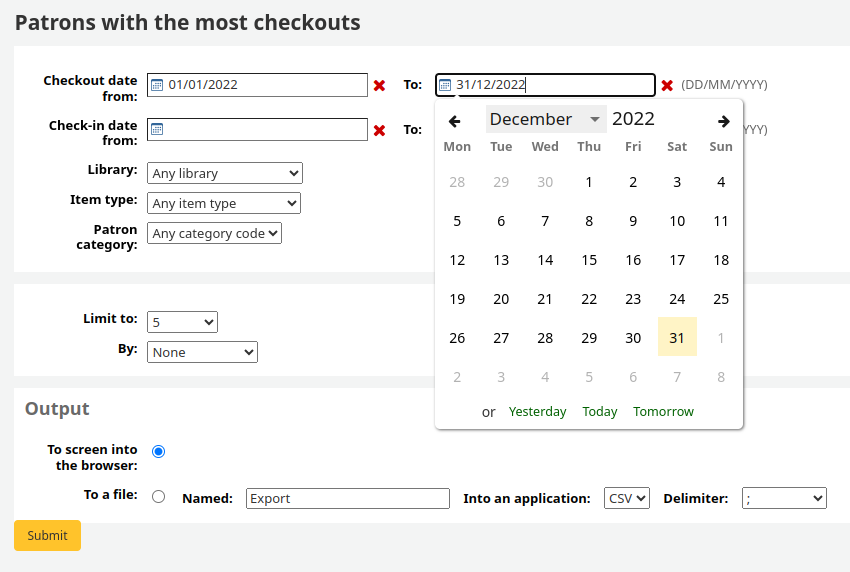
Se você optar por exibir no navegador, os resultados aparecerão na tela.
Você pode também escolher exportar para um arquivo que pode ser manipulado de acordo com suas necessidades.
Most circulated items
Este relatório irá simplesmente listar os itens que foram mais emprestados.
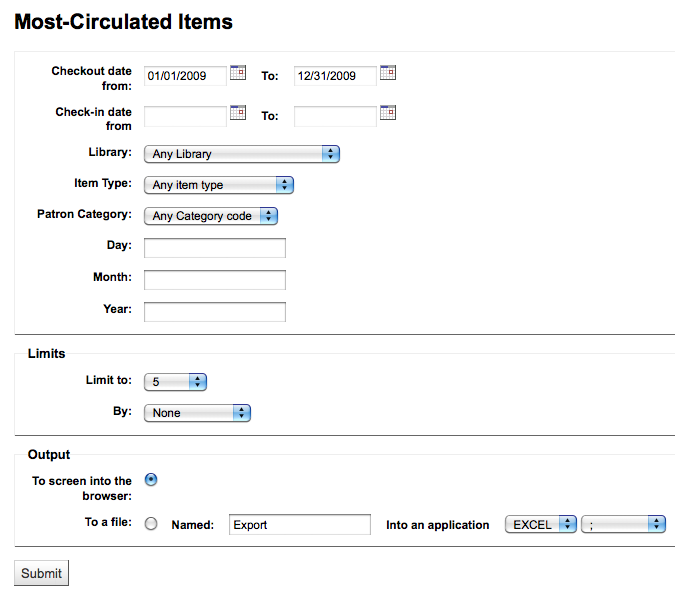
Se você optar por exibir no navegador, os resultados aparecerão na tela.
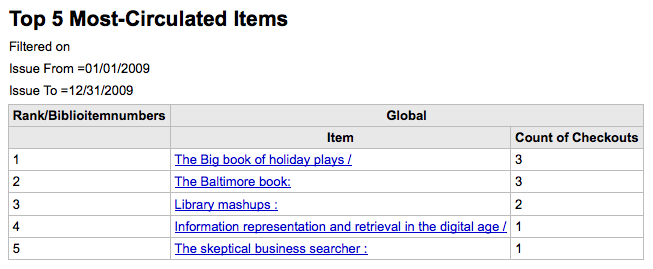
Você pode também escolher exportar para um arquivo que pode ser manipulado de acordo com suas necessidades.
Usuários sem empréstimos
Este relatório listará para você quais usuários em seu sistema não realizaram nenhum empréstimo.
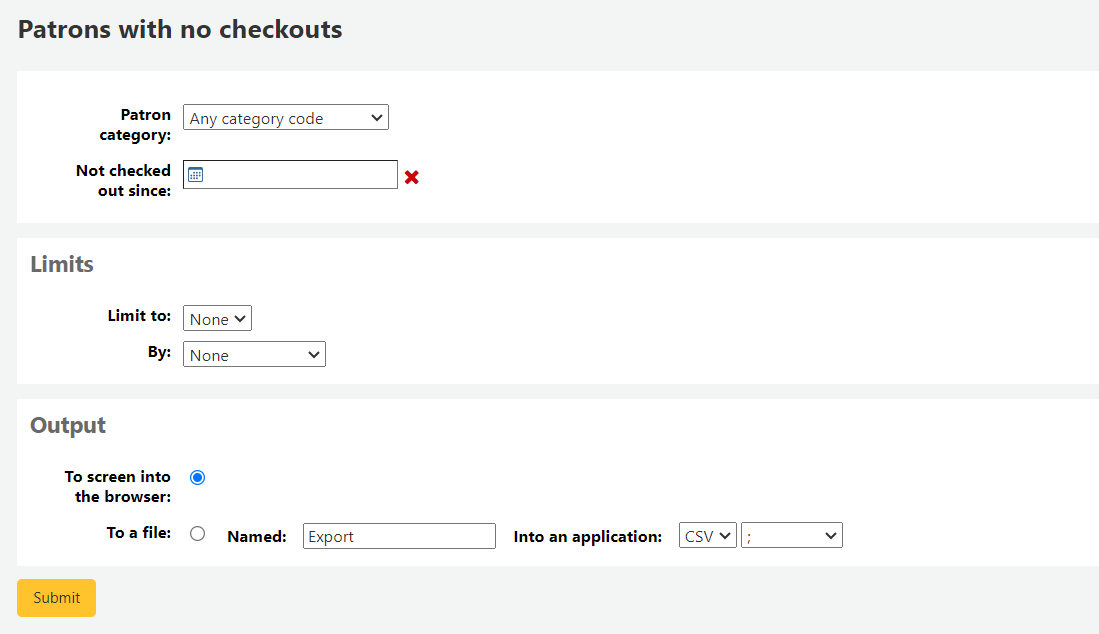
Se você optar por exibir no navegador, os resultados aparecerão na tela.
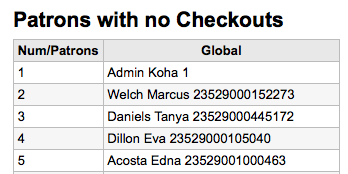
Você pode também escolher exportar para um arquivo que pode ser manipulado de acordo com suas necessidades.
Itens nunca emprestados
Este relatório irá listar exemplares em sua coleção que nunca foram emprestados.
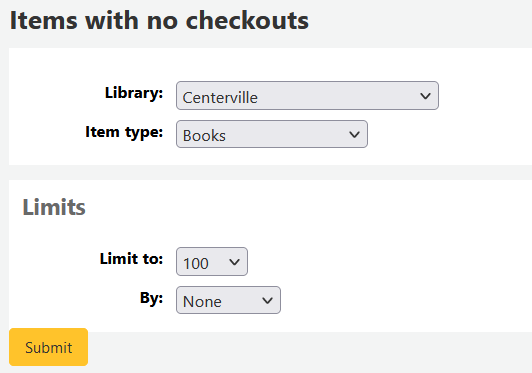
Se você optar por exibir no navegador, os resultados aparecerão na tela.
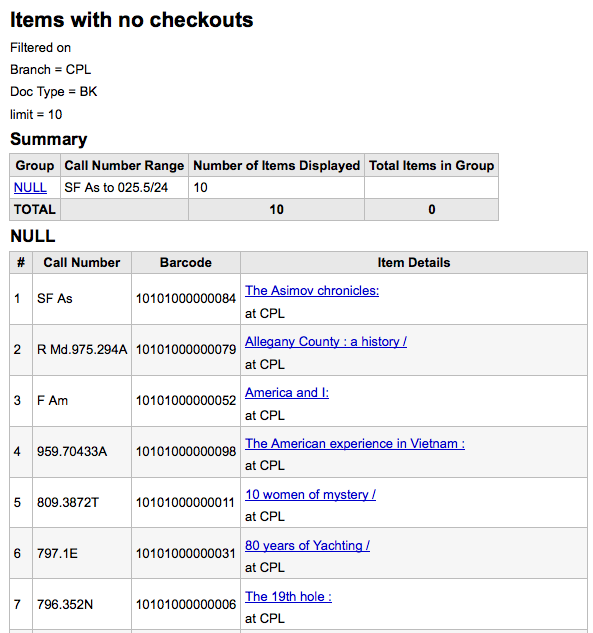
Você pode também escolher exportar para um arquivo que pode ser manipulado de acordo com suas necessidades.
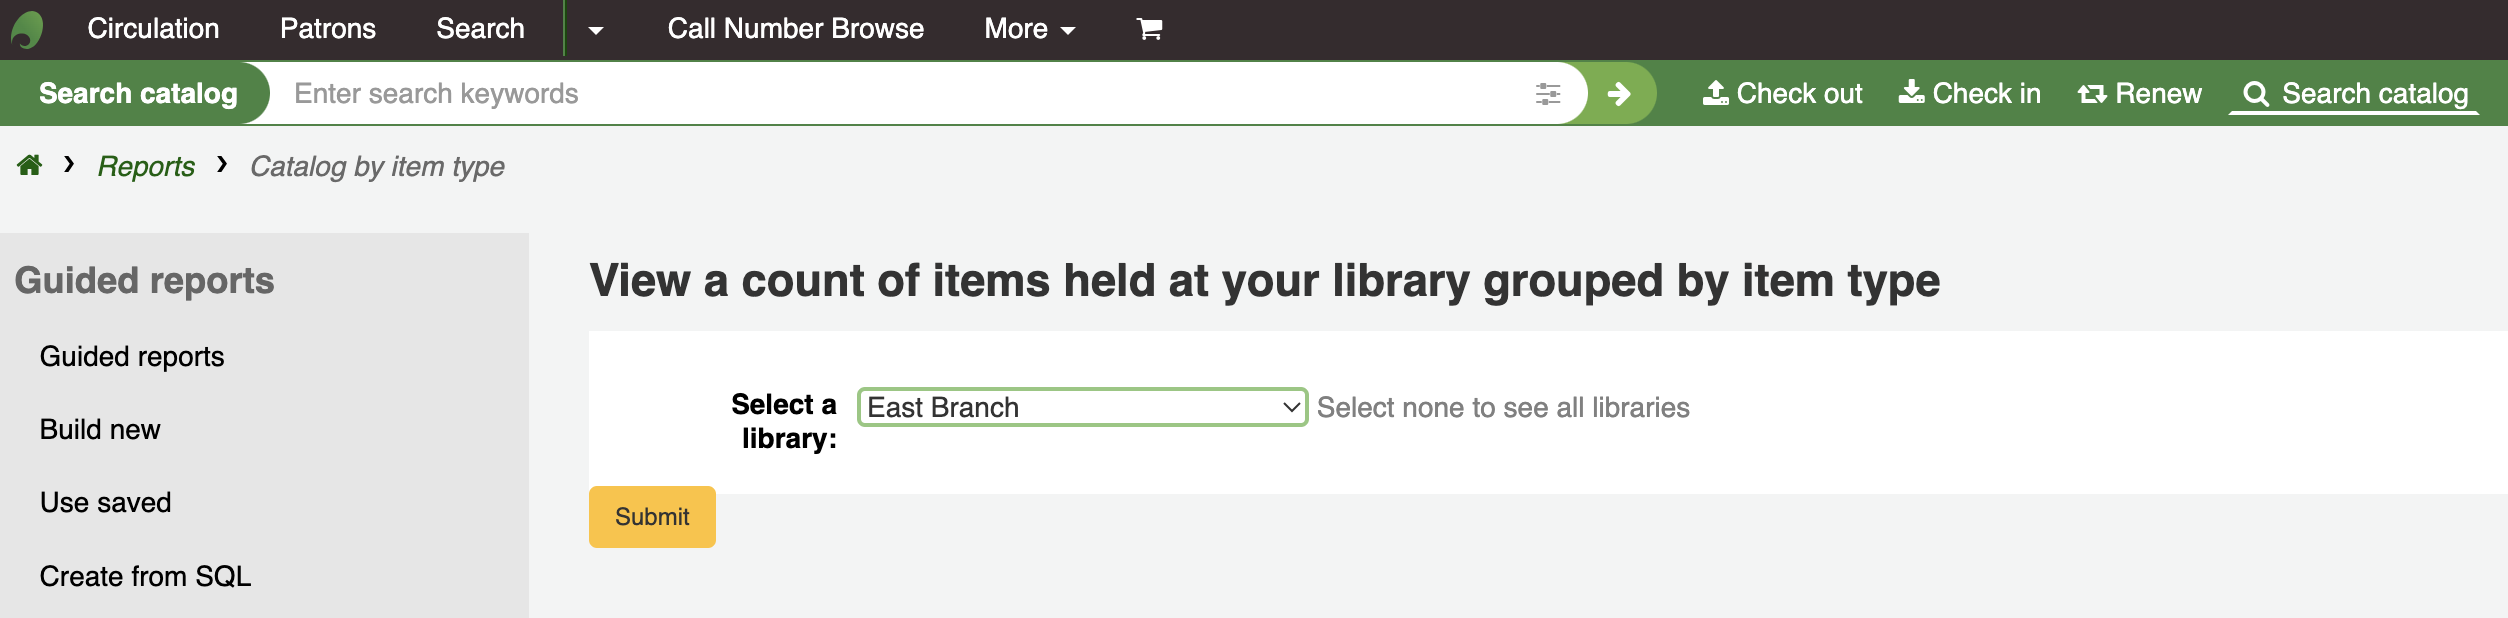
Catalog by item type
Este relatório irá listar o número total de exemplares de cada tipo de item por ramal.
Se você optar por exibir no navegador, os resultados aparecerão na tela.
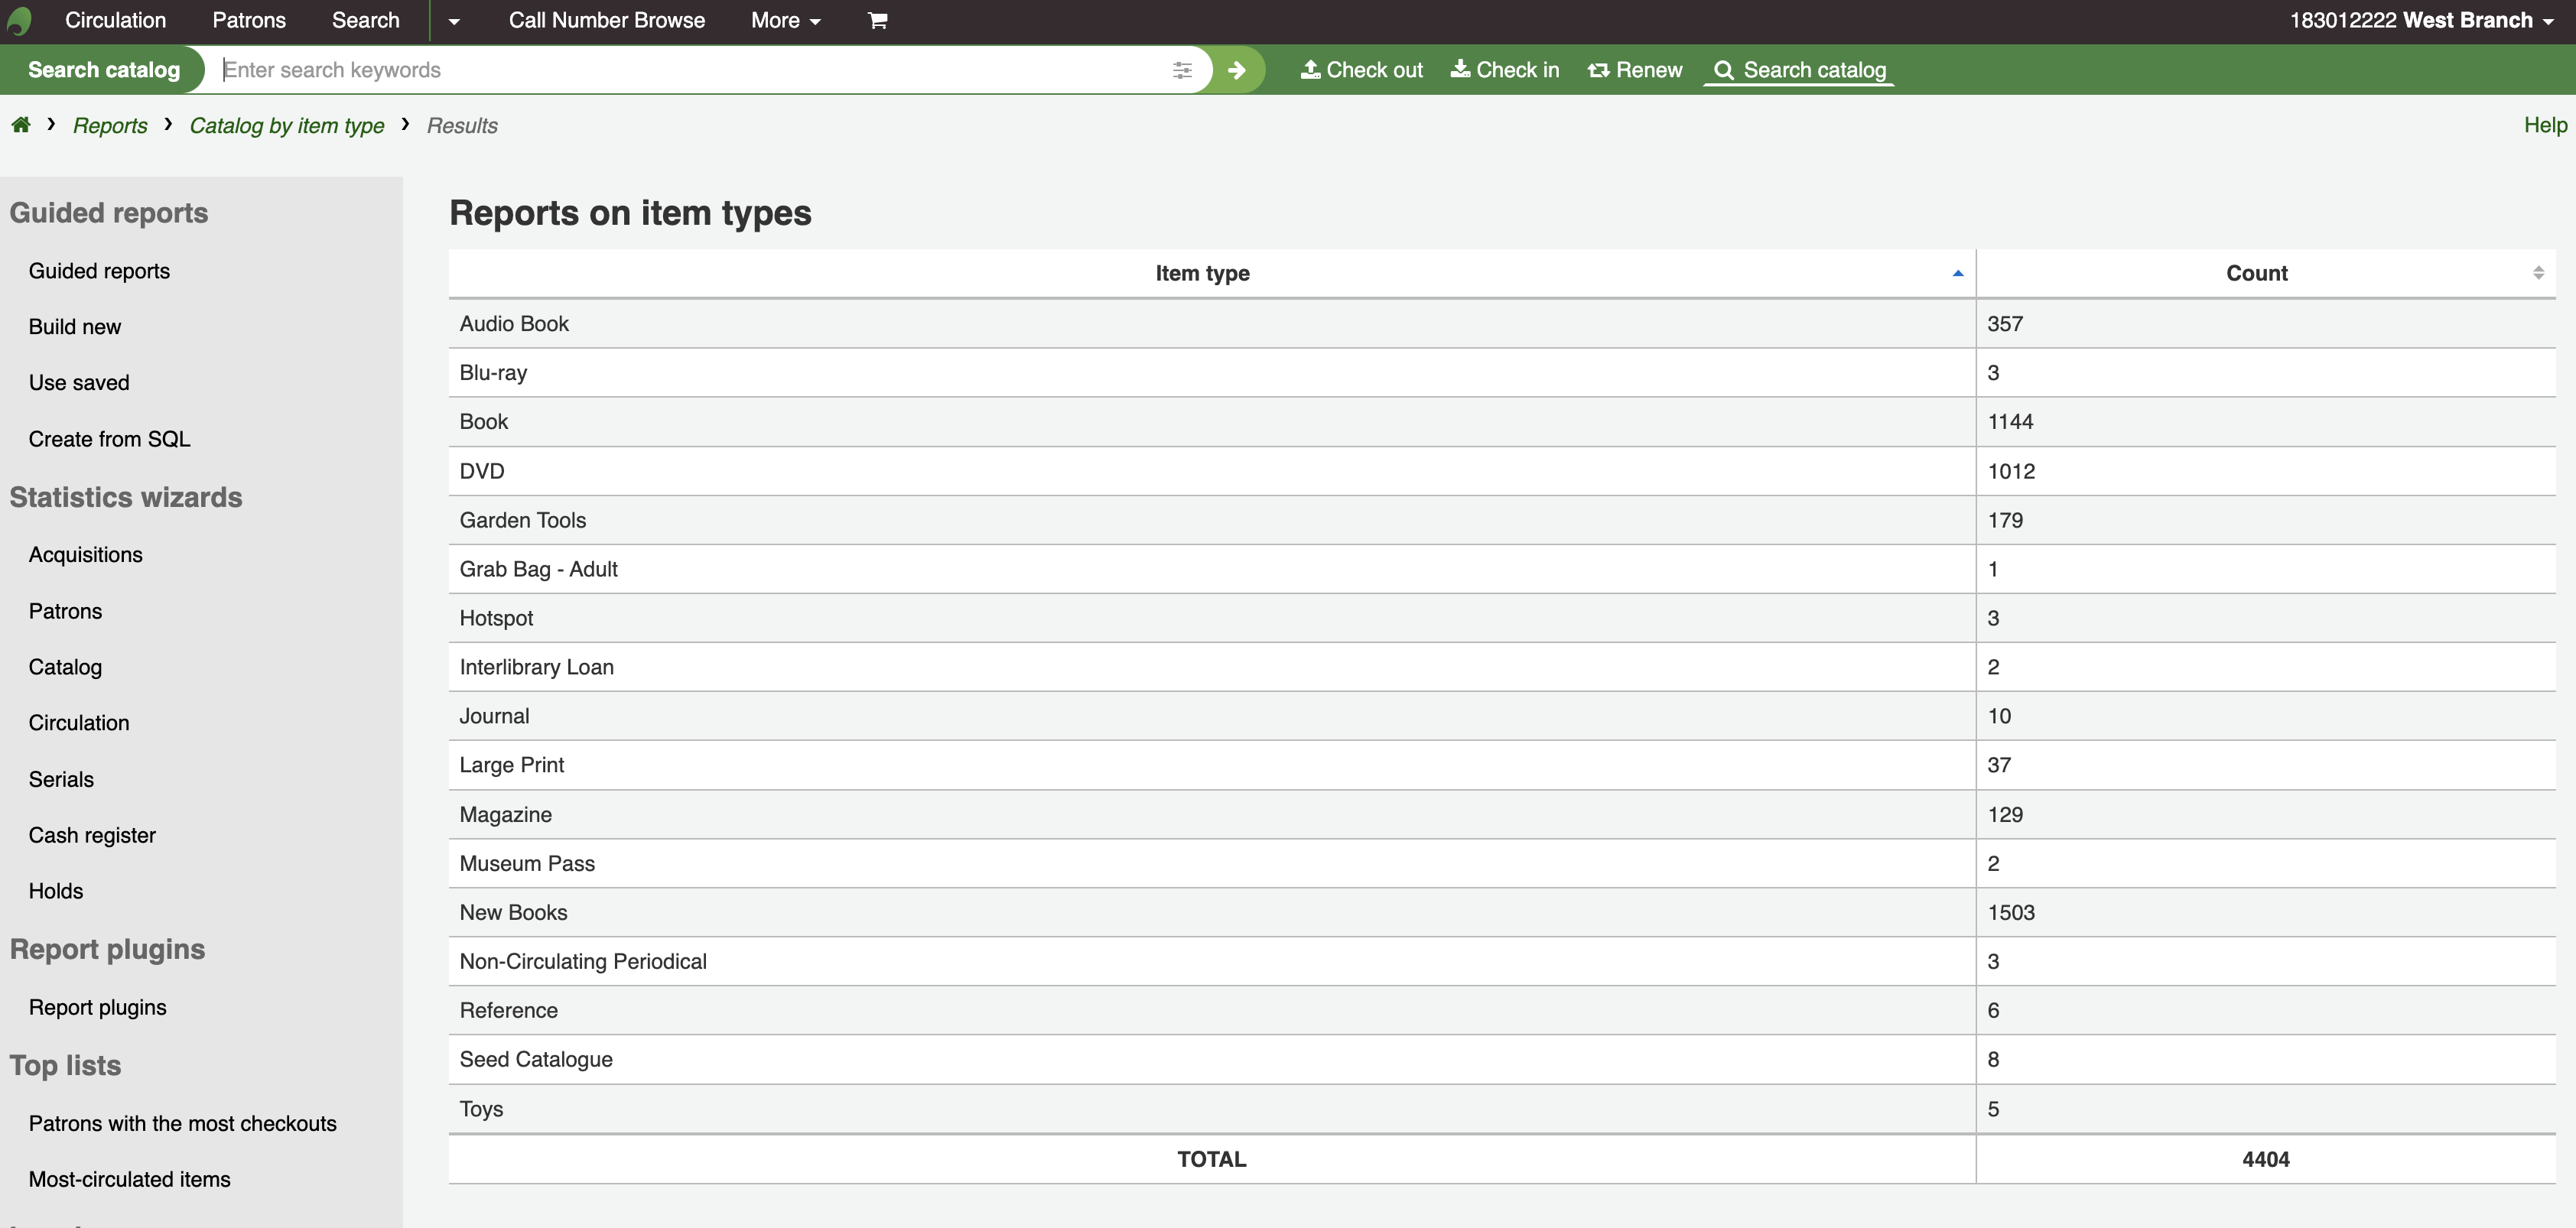
Você pode também escolher exportar para um arquivo que pode ser manipulado de acordo com suas necessidades.
Lost items
This report will allow you to generate a list of items that have been marked as Lost within the system
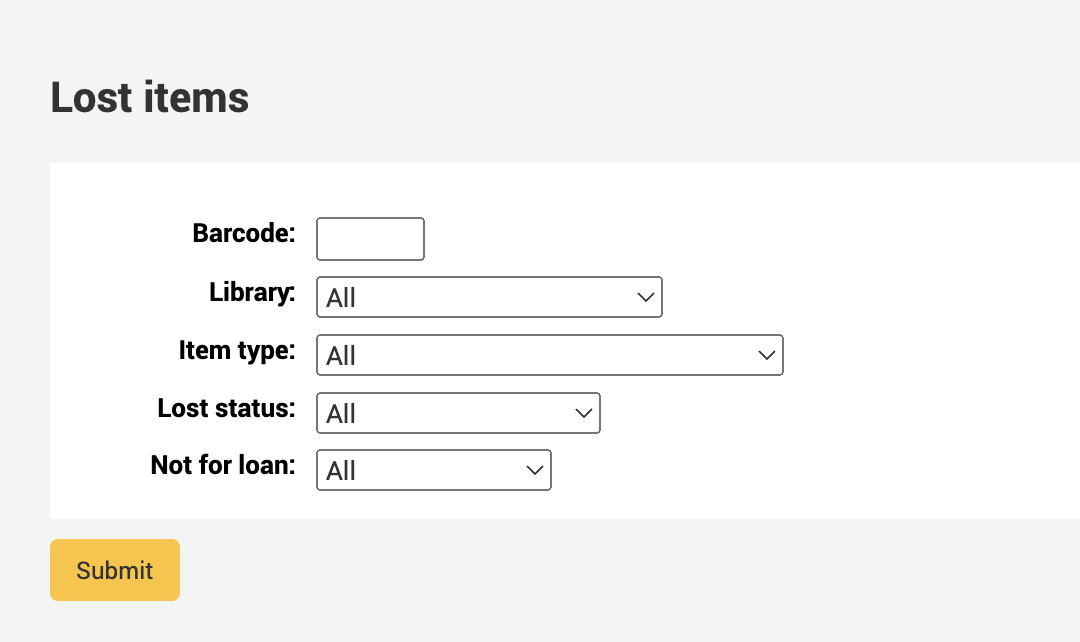
Once you have chosen parameters, you will see the corresponding list of items.
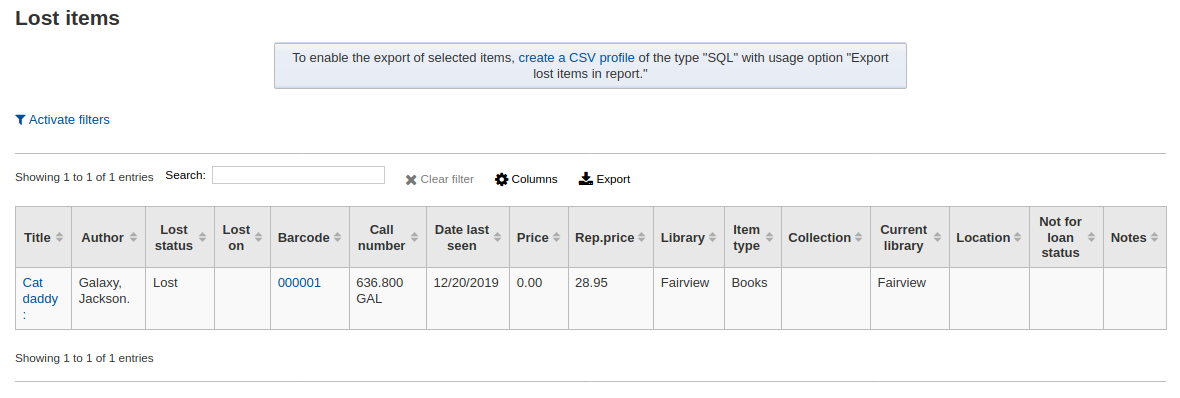
Note
You can customize the columns of this table in the ‘Table settings’ section of the Administration module (table id: lostitems-table).
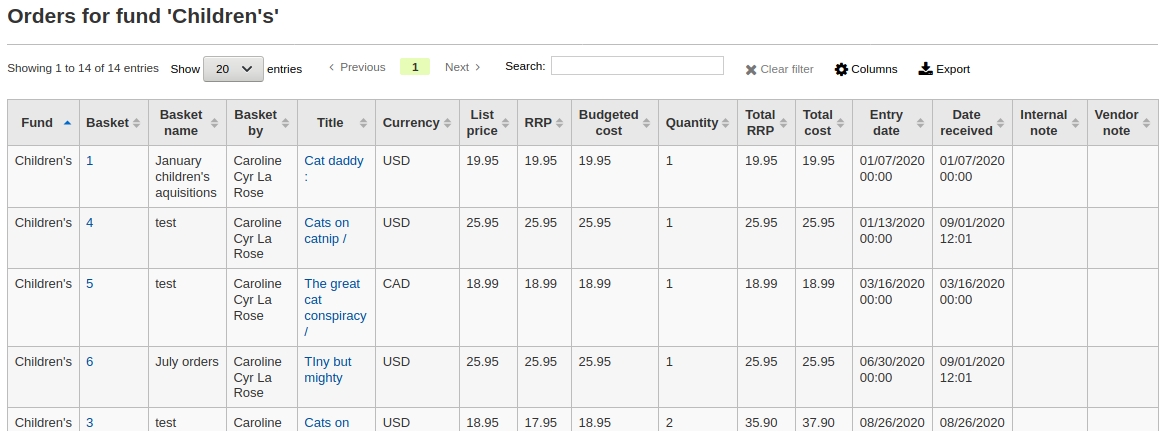
Orders by fund
If you use the Acquisitions module, you will be able to see all the items that were ordered in each fund.
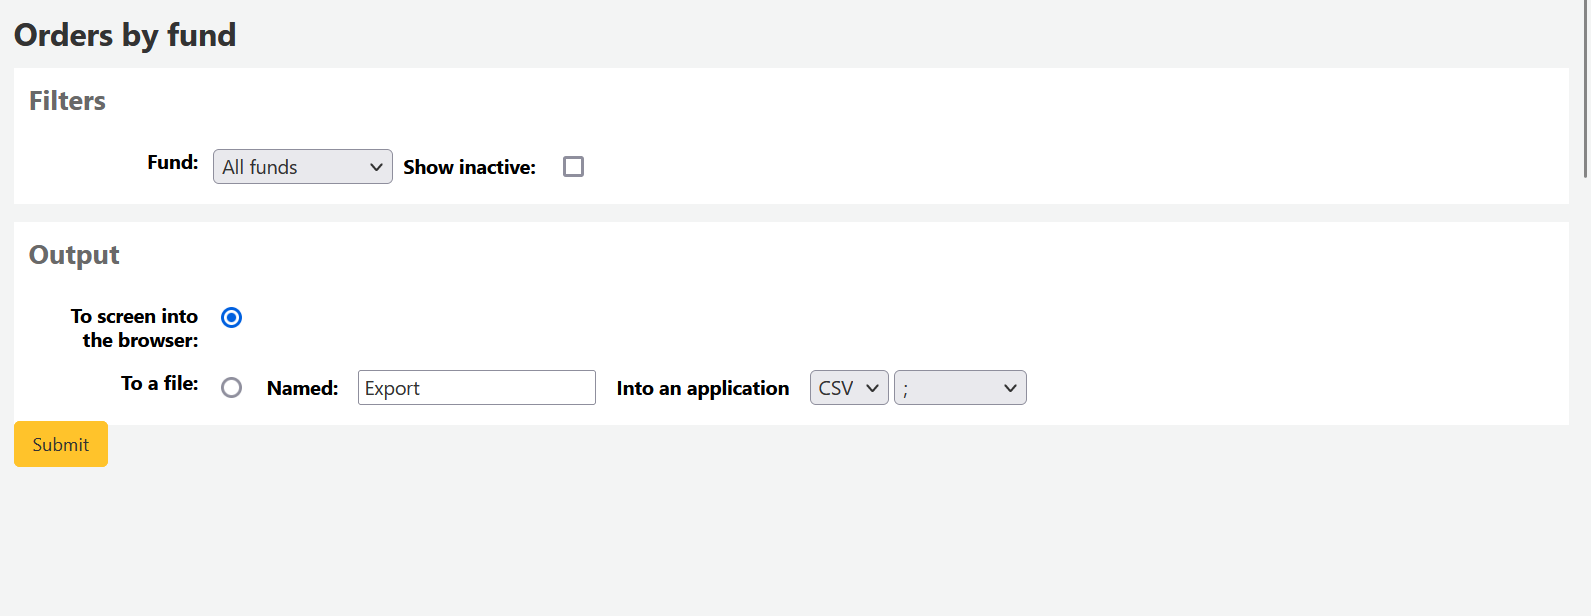
Once you choose the fund you wish to view, you can export the results or view them in the browser. If you choose to view them directly, you will be shown the list of orders.
Note
You can customize the columns of this table in the ‘Table settings’ section of the Administration module (table id: funds-table).
Average loan time
This report will list the average time items are out on loan based on the criteria you enter:
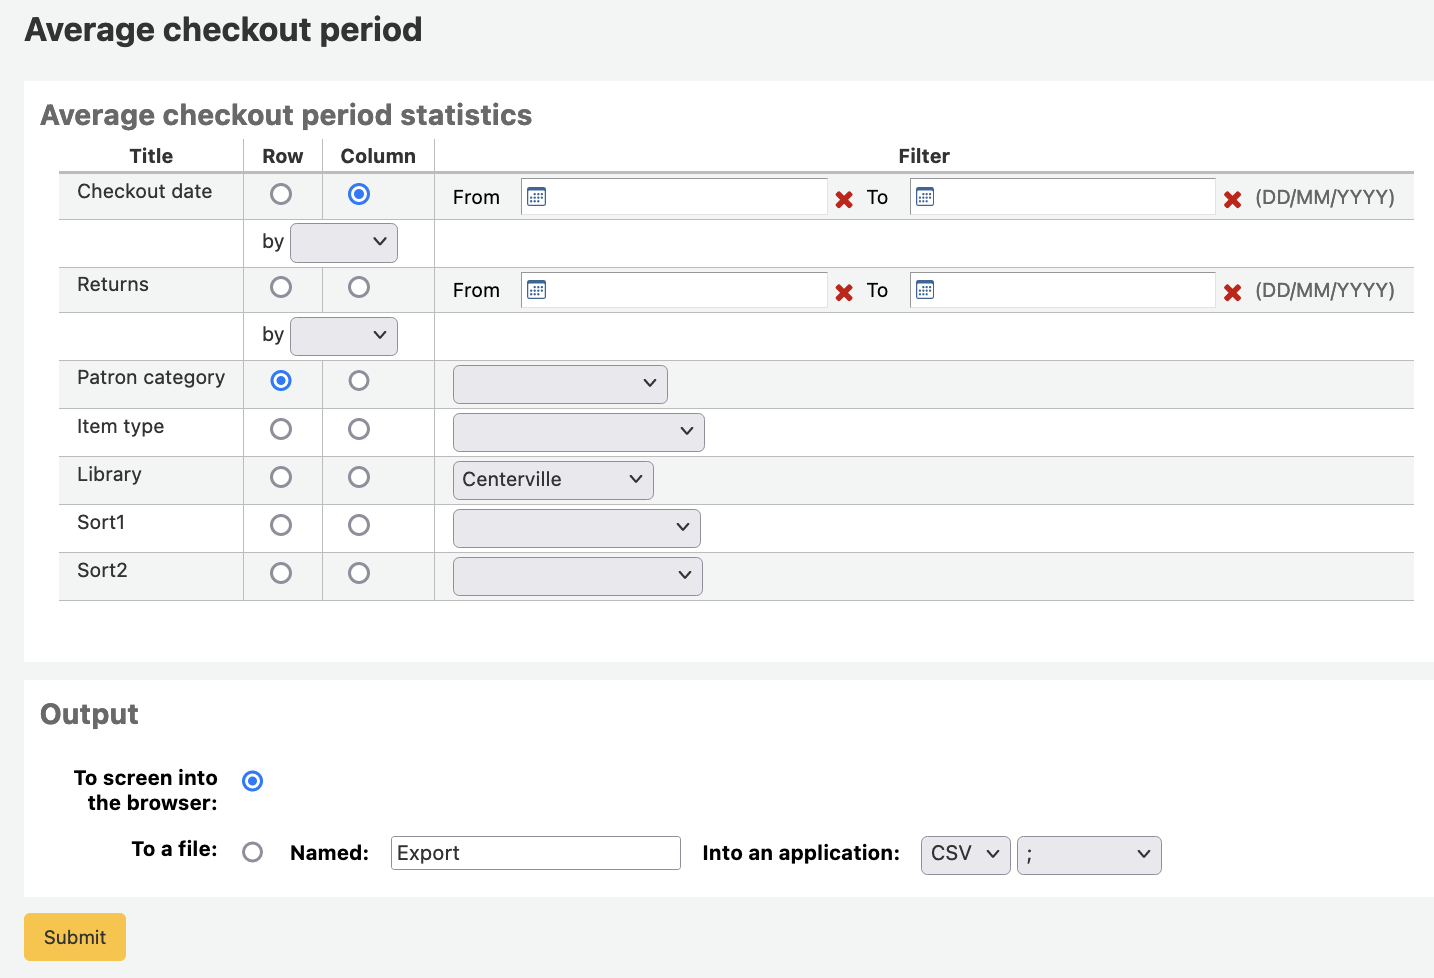
Se você optar por exibir no navegador, os resultados aparecerão na tela.
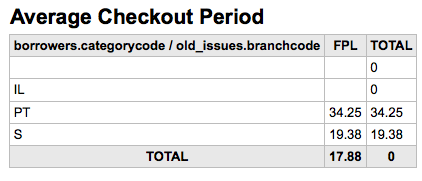
Você pode também escolher exportar para um arquivo que pode ser manipulado de acordo com suas necessidades.
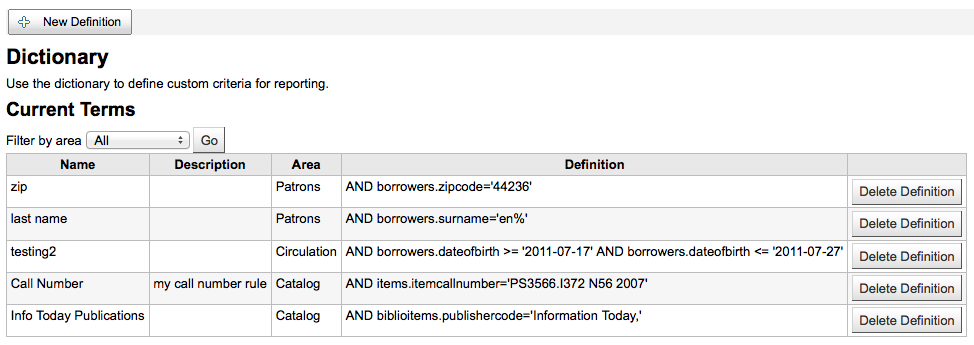
Report dictionary
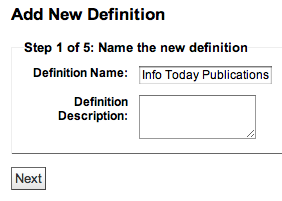
The report dictionary is a way to pre-define common filters you’d like to apply to your reports. This is a good way to add in filters that the report wizard doesn’t include by default. To add a new definition, or filter, click ‘New definition’ on the reports dictionary page and follow the 4 step process.
Passo 1: Nomeie a definição e informe uma descrição se necessário
Passo 2: Escolha o modulo que será consultado.

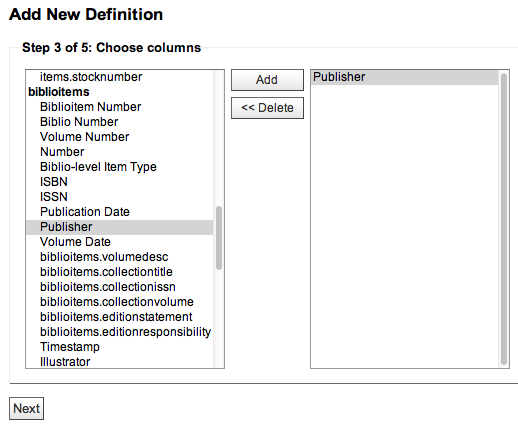
Passo 3: Escolha as colunas para consultar a partir das tabelas apresentadas.
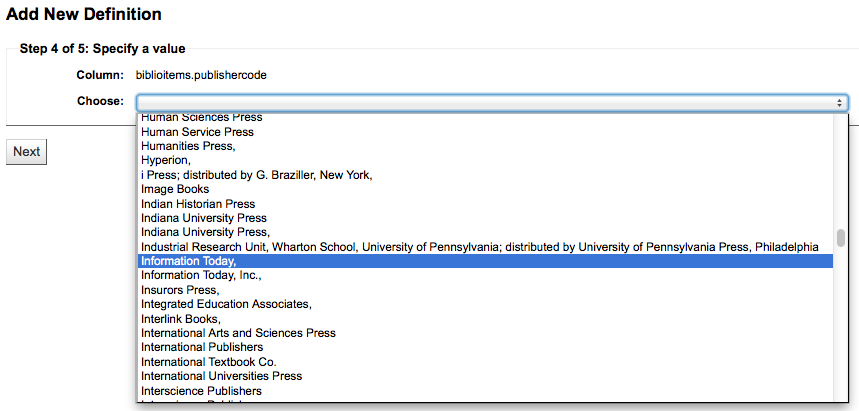
Passo 4: Escolha o valor do campo. Este será automaticamente inserido com as opções disponíveis em sua base de dados.
Corfirme suas seleções para salvar a definição.
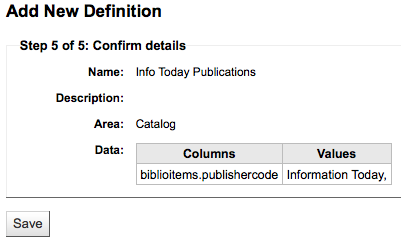
Suas definições irão aparecer na página do Dicionário de Relatórios
Então durante a geração de relatórios no módulo que você criou um valor que poderá ver uma opção para limitar pela definição abaixo dos filtros usuais.
Report plugins
Some plugins that are available can be used to make or enhance reports.
Get there: More > Reports > Report plugins > Report plugins
From this page, you will see only report-type plugins.
See the managing plugins section of this manual to learn how to manage your report-type plugins.