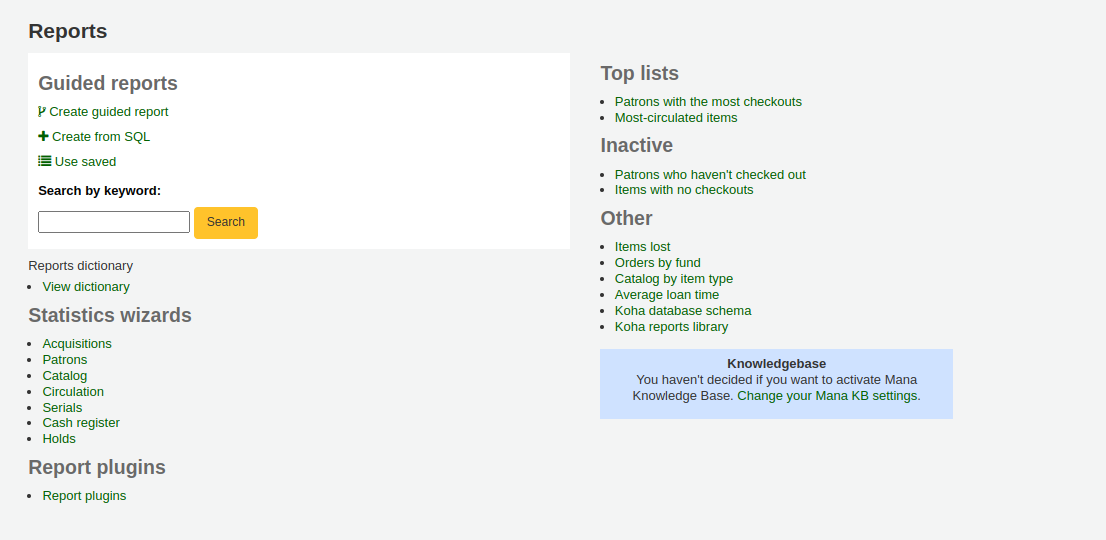
Rapports
Dans Koha, les rapports servent à réunir les données. Ils sont utilisés pour générer des statistiques, des listes d’adhérents ou n’importe quelle liste de données dans la base de données.
Aller à : Plus > Rapports
Custom reports
Koha’s data is stored in a MySQL database which means that librarians can generate nearly any report they would like by either using the guided reports wizard or writing their own SQL query.
Add custom report
Guided report wizard
L’assistant de rapport guidé vous accompagnera tout au long d’un processus en six étapes afin de produire un rapport.
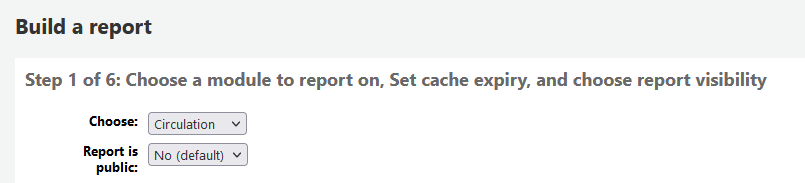
Étape 1: Choisissez le module sur lequel vous voulez faire le rapport. Cela déterminera quelles tables et champs sont disponibles pour votre requête.
“Report is public” should be left to the default of “No” in most cases especially if the report contains patron or other sensitive information. A public report can be accessed using the JSON reports services by anyone and without authentication.
Note
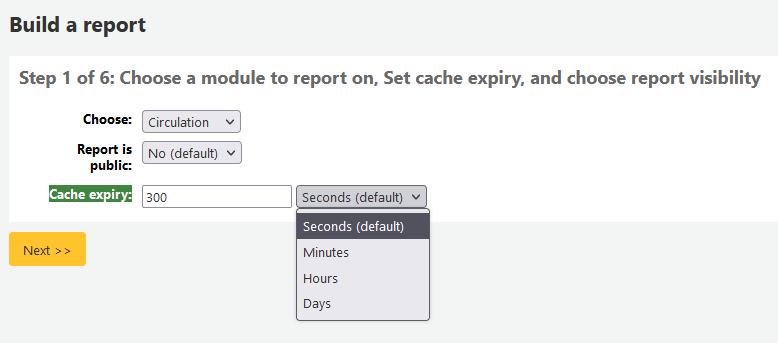
Si l’administrateur de votre système a configuré le memcache sur votre serveur, vous pourrez voir une option de plus pour l’expiration du Cache. Ceci est lié aux rapports publics. Si vous rendez votre rapport public, celui-ci s’exécutera en permanence et provoquera une charge importante dans votre système. Paramétrer cette valeur empêchera que cela arrive.
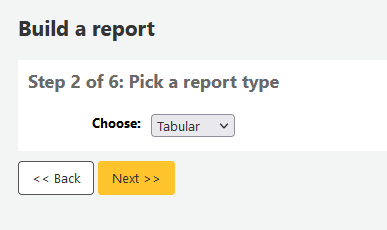
Etape 2: Choisir un type de rapport. Pour l’instant seul le type “Tabulaire” est disponible.
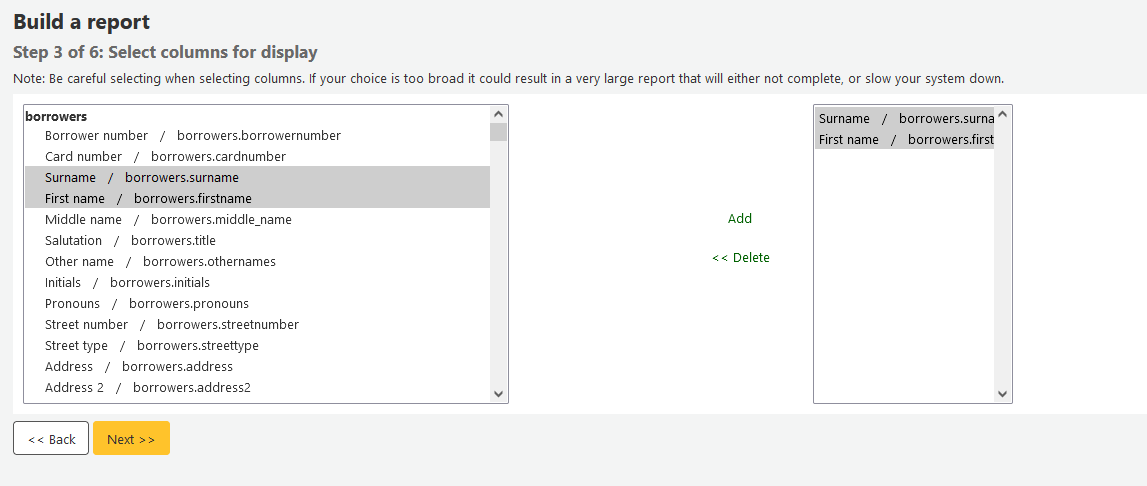
Step 3: Choose the fields you want in your report. You can select multiple fields and add them all at once by using CTRL+click on each item you want to add before clicking the Add button.
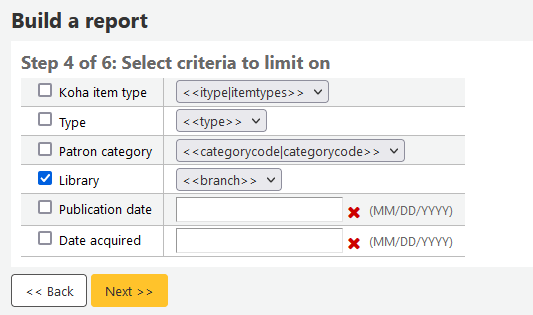
Step 4: Choose any limits you might want to apply to your report (such as item types or branches). If you don’t want to apply any limits, simply click “Next” instead of choosing an option.
Step 5: Perform math functions. If you don’t want to do any calculations, simply click “Next” instead of choosing an option.

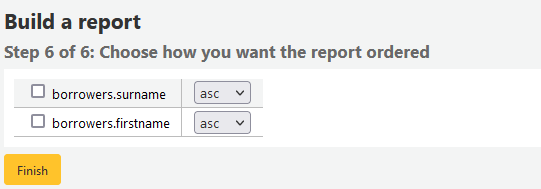
Step 6: Choose data order. If you want the data to print out in the order it’s found in the database, simply click “Finish”.
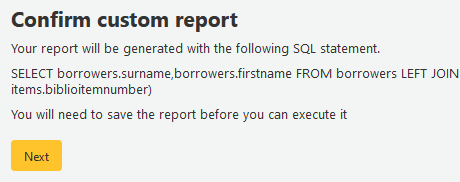
When you are finished you will be presented with the SQL generated by the report wizard. From here you can choose to save the report by clicking “Finish” or copy the SQL and make edits to it by hand.
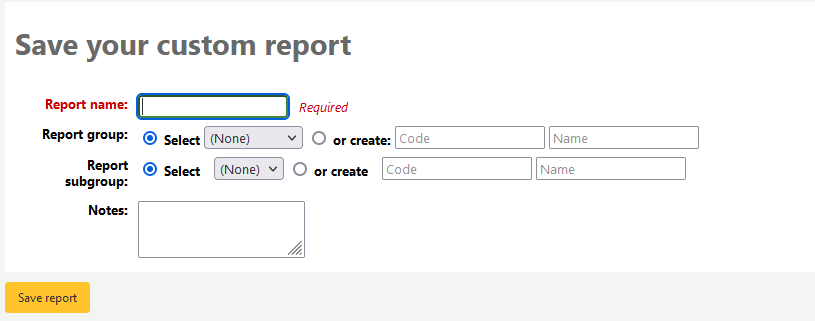
Si vous choisissez de sauvegarder le rapport, vous devrez lui donner un nom et pourrez le classer dans un groupe et un sous-groupe de rapports, et saisir des notes le concernant.
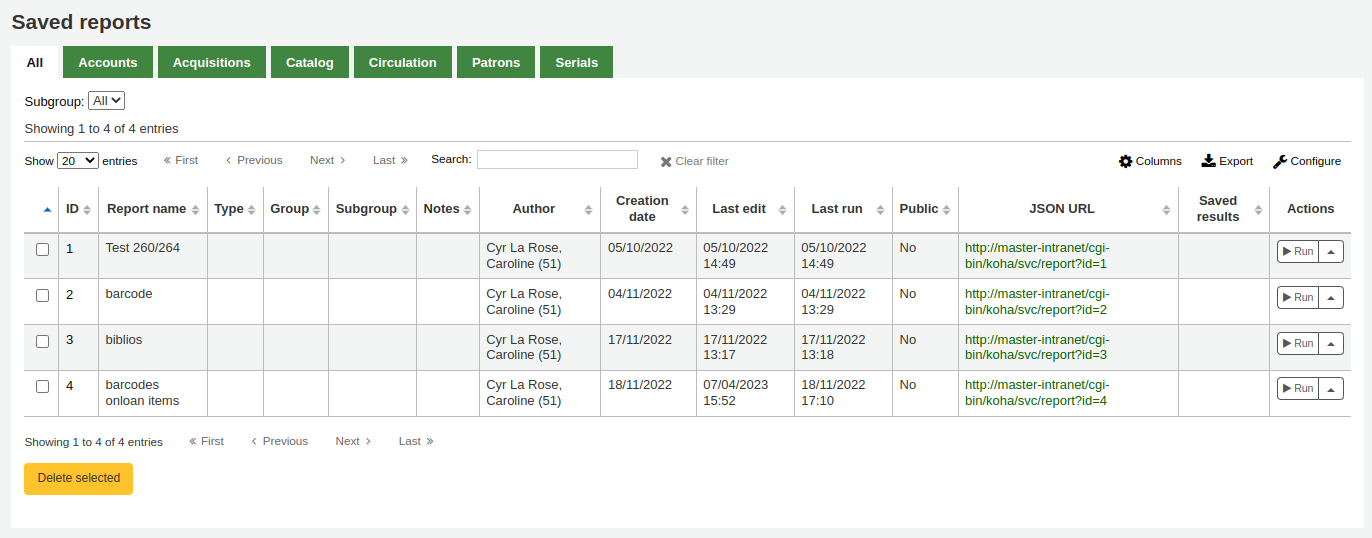
Once your report is saved it will appear on the “Use saved” page with all other saved reports.
Note
You can customize the columns of this table in the “Table settings” section of the Administration module (table id: table_reports).
D’ici vous pouvez faire des éditions, lancer le rapport, ou programmer une heure pour lancer le rapport. Pour trouver le rapport que vous vous avez créé vous pouvez trier par chacune des colonnes en cliquant sur l’en-tête de la colonne (la date de création est le meilleur choix pour trouver le rapport que vous venez juste d’ajouter). Vous pouvez également filtrer vos résultats utilisant le menu de filtre du côté gauche ou employer les onglets pour trouver des rapports basés sur vos groupes habituels.
Créer rapport à partir de SQL
In addition to the report wizard, you have the option to write your own queries using SQL. To find reports written by other Koha users, visit the Koha wiki: http://wiki.koha-community.org/wiki/SQL_Reports_Library. You can also find your database structure in /installer/data/mysql/kohastructure.sql or online at: http://schema.koha-community.org.
To add your query, click the link to “Create from SQL” on the main reports module
or the “New report” button at the top of the “Saved reports” page.

Remplir le formulaire présenté
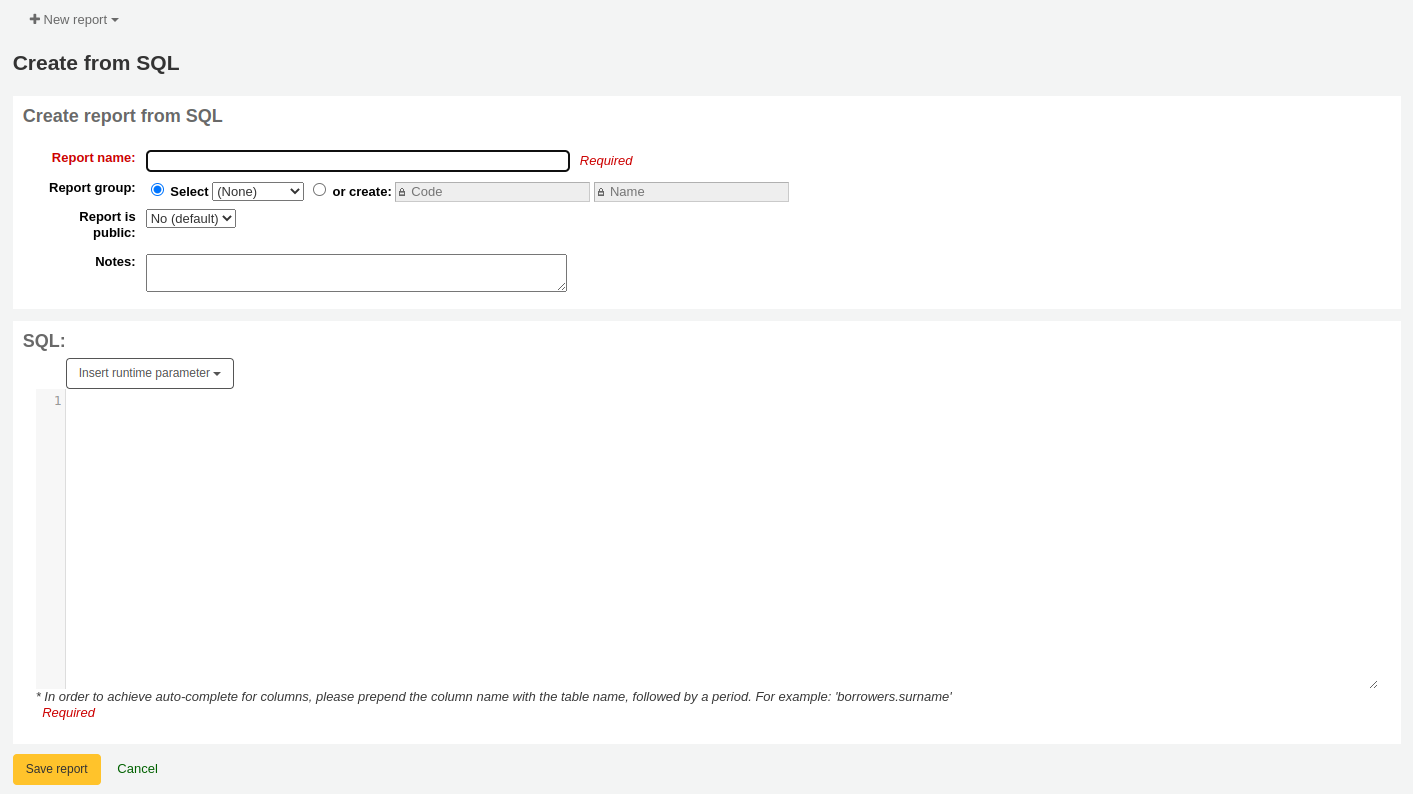
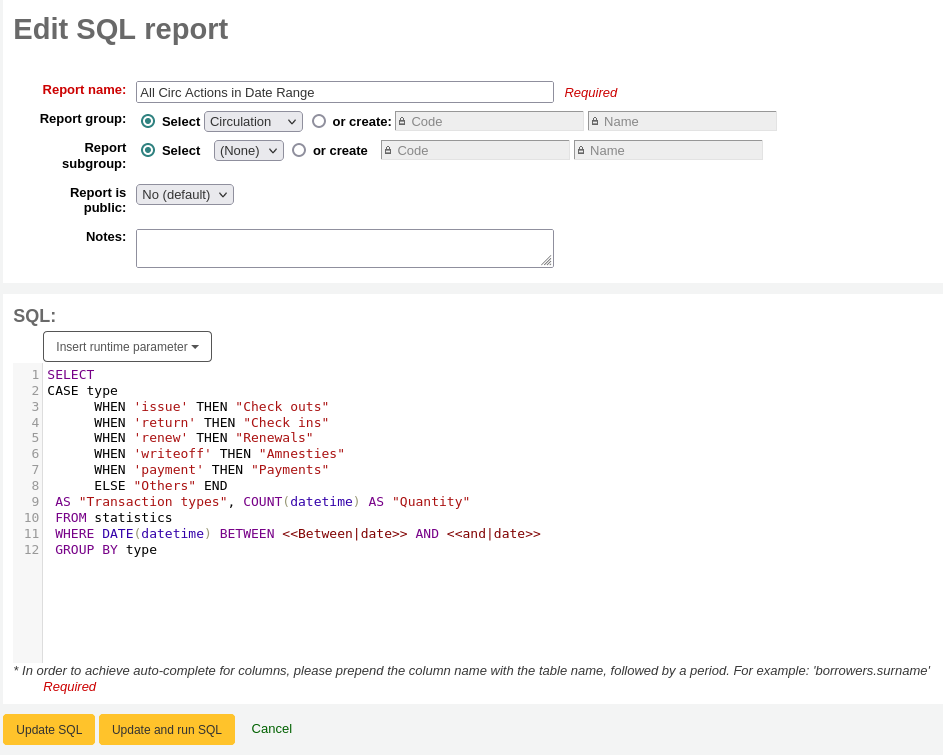
Report name: the name is what will appear on the “Saved reports” page to help you identify the report later. It will also be searchable using the filters found on the left of the “Saved reports” page.
Report group: you can use the “Report group” to organize your reports in tabs on the “Saved reports” page. You can choose from the list of existing groups, or create one on the fly by choosing the “or create” radio button.

Report groups are set in the REPORT_GROUP authorized value category.
Avertissement
If you’re adding a report group on the fly, the code should not include special characters or spaces.
Report subgroup: if you chose a report group, this field will appear to further organize your reports. Choose a subgroup from the list, or create one on the fly by choosing the “or create” radio button.
Report subgroups are set in the REPORT_SUBGROUP authorized value category.
Note
Report subgroups need to have unique values in “Authorized value” and “Description”. The “Description (OPAC)” field needs to contain the authorized value for the report group that the subgroup falls under.
Avertissement
If you’re adding a report subgroup on the fly, the code should not include special characters or spaces.
Report is public: this should be left to the default of “No” in most cases, especially if the report contains patron or other sensitive information. A public report can be accessed using the JSON reports services by anyone and without authentication.
Cache expiry: this field will only appear if your system administrator has set up memcache on your server. This is related to public reports. If you make the report public, it’s constantly running and will cause a large load on your system. Setting this value prevents that.
Notes: notes will appear on the “Saved reports” page, and can be used to provide more details about the report or tips on how to enter values when it runs.
SQL: type or paste the SQL for the report (see report writing tips below).
Once everything is entered click the “Save report” button and you’ll be presented with options to run it. From here, you can also edit it, duplicate it, or schedule it to be run later.
Once a report is saved, you do not have to recreate it, it will appear on the “Saved reports” page with all other saved reports.
Note
You can customize the columns of this table in the “Table settings” section of the Administration module (table id: table_reports).
From the “Saved reports” page, you can make edits, run the report, or schedule a time to run the report later. To find the report you created, you can sort by any of the columns by clicking on the column header (creation date is the best to find the report you just added). You can also filter your results using the filter menu on the left or use the tabs to find reports based on your custom groups.
Report writing tips
Autocomplete
When you start typing in the SQL field, autocomplete options will be displayed.
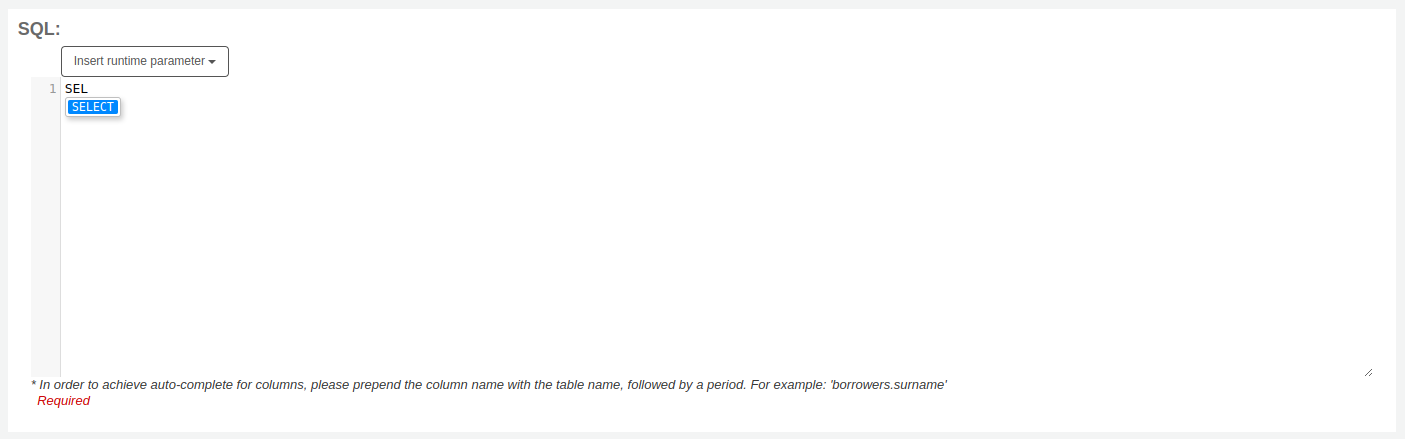
Use the arrows on your keyboard to choose the correct option and press “Enter” or “Tab” to insert it into your report, or simply click on the option to insert it.
Autocomplete options include:
SQL keywords such as SELECT, FROM, WHERE, etc.
table names
column names
Note
To have suggestions for column names, you must type the table name first, followed by a period, then start typing the column name.
For example, to have the suggestion for
cardnumber, you must typeborrowers.ca.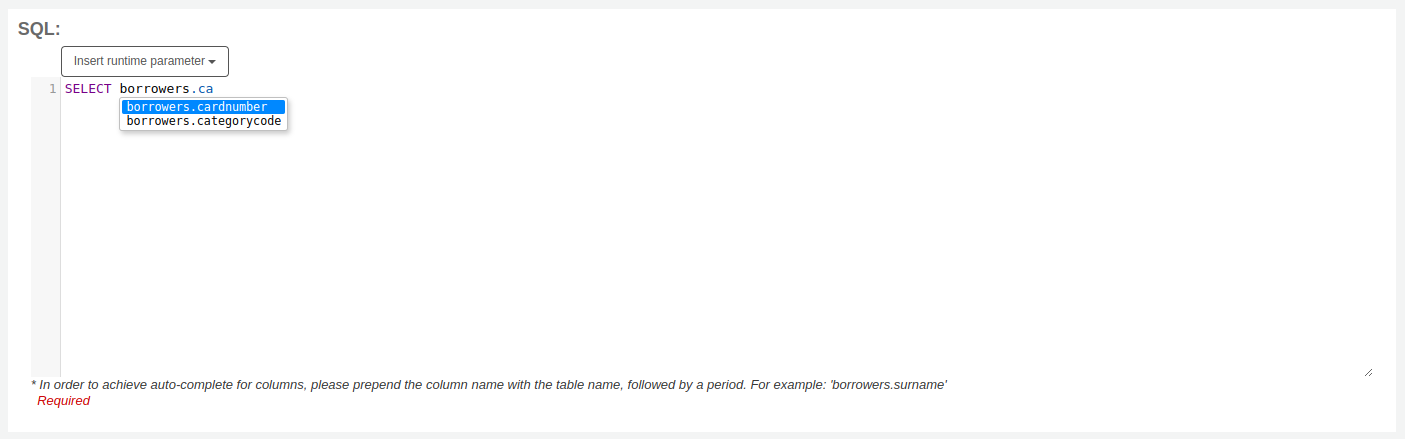
Runtime parameters
Si vous pensez que votre rapport pourrait consommer trop de ressources, vous pouvez utiliser des paramètres dynamiques dans votre requête. Les paramètres dynamiques font apparaître un filtre avant l’exécution du rapport pour économiser vos ressources système.
Click the button “Insert runtime parameter” and choose which parameter to add.
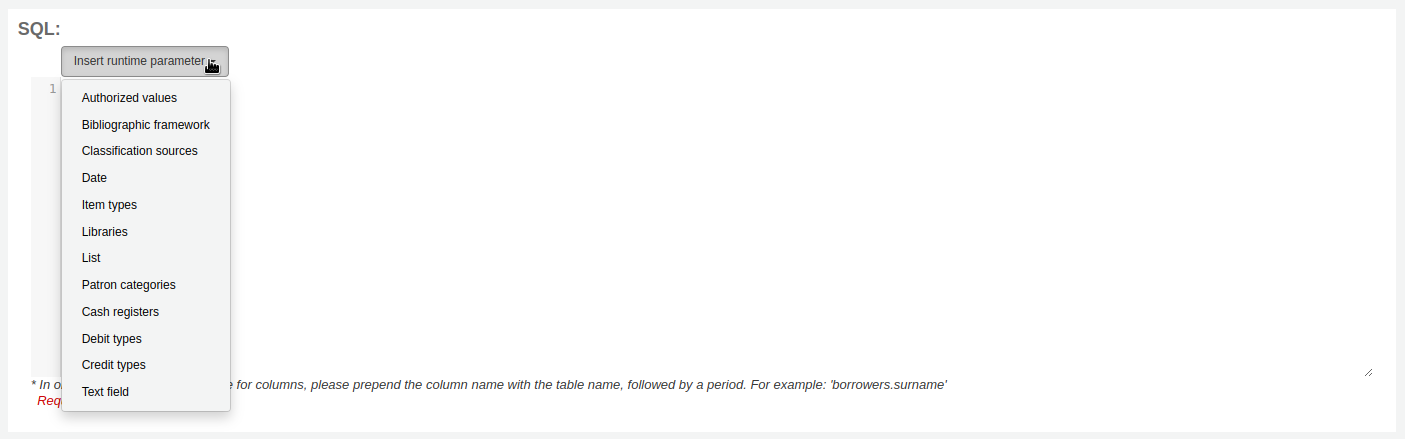
Authorized value: will display a drop down menu of the value descriptions from the chosen authorized value category. The authorized value code will be inserted in the report when it is run.
Bibliographic framework: will display a drop down menu of MARC bibliographic frameworks. The framework code will be inserted in the report when it is run.
Classification sources: will display a drop down menu of classification sources. The classification code will be inserted in the report when it is run.
Date: will display a calendar to pick a date. The date in YYYY-MM-DD format will be inserted in the report when it is run.
Item types: will display a drop down menu of item types. The item type code will be inserted in the report when it is run.
Libraries: will display a drop down menu of libraries. The library code (branchcode) will be inserted in the report when it is run.
List: will display a large text box in which the user can enter many values, one per line. Those values will be inserted in the report, separated by commas, when it is run.
Avertissement
In the case of the list parameter, users must write one value per line.
Patron categories: will display a drop down menu of patron categories. The category code will be inserted in the report when it is run.
Cash registers: will display a drop down menu of cash registers. The cash register’s internal id will be inserted in the report when it is run.
Debit types: will display a drop down menu of debit types. The debit type code will be inserted in the report when it is run.
Credit types: will display a drop down menu of credit types. The credit type code will be inserted in the report when it is run.
Text field: will display an empty text field in which the user can enter any text.
Note
Vous devez mettre « % » dans la barre de texte pour “le laisser vide”. Autrement, il cherchera littéralement « » (chaîne vide) comme valeur pour le champ.
For example entering nothing for: « title=<<Enter title>> » will display results with title=”” (no title).
If you want to have to have something not mandatory, use « title like <<Enter title>> » and enter a % at run time instead of nothing.
After you choose the type of runtime parameter, it will ask you for the parameter label. This is what the user will see as the label for the choice they have to make or text they have to enter.
The syntax inserted into the report is <<Label|authorized_value>>.
The << and >> are just delimiters to indicate the start and end of the runtime parameter.
The label will be displayed on the left of the choice or value to enter.
The authorized_value can be omitted if not applicable. If it is absent, a free text field will be displayed. If it contains an authorized code (see table below), a drop down of the values will be displayed.
Note
You can write those in manually as well, you don’t have to go through the “Insert runtime parameter” button. As long as the syntax is correct, Koha will interpret it as a runtime parameter.
List of parameters that can be used in runtime parameters
Parameter |
What the user sees |
What gets inserted in query |
|---|---|---|
date |
date picker |
validly formatted date |
branches |
drop down of branch names |
branch code |
itemtypes |
drop down of item type names |
item type |
categorycode |
drop down of patron category descriptions |
borrower category code |
biblio_framework |
drop down of MARC bibliographic frameworks |
framework code |
list |
large text box |
comma separated values |
(auth-value-category) |
drop down of auth-value descriptions in category |
authorized value |
(nothing) |
text box |
entered text |
Note
You can have more than one runtime parameter in a given SQL query.
Example 1
SELECT surname,
       firstname
FROM borrowers
WHERE branchcode = <<Enter patrons library|branches>>
    AND surname LIKE <<Enter filter for patron surname (% if none)>>

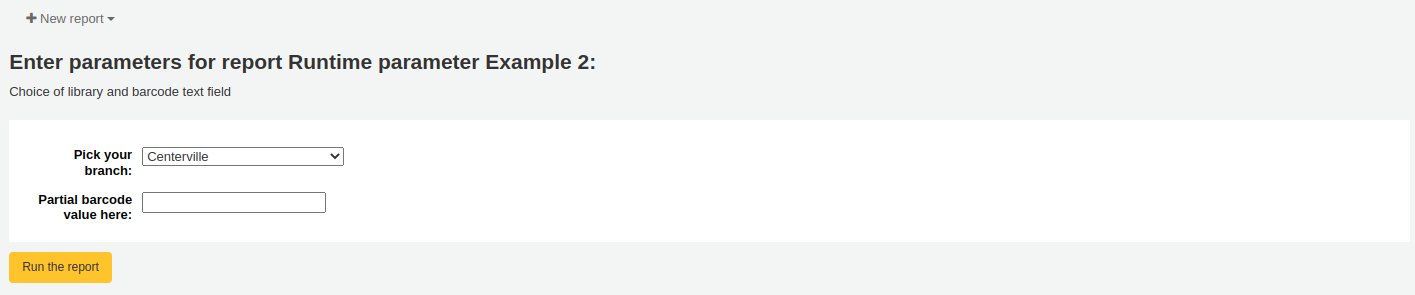
Example 2
SELECT *
FROM items
WHERE homebranch = <<Pick your branch|branches>>
    AND barcode LIKE <<Partial barcode value here>>
Example 3
SELECT title,
       author
FROM biblio
WHERE frameworkcode = <<Enter the frameworkcode|biblio_framework>>

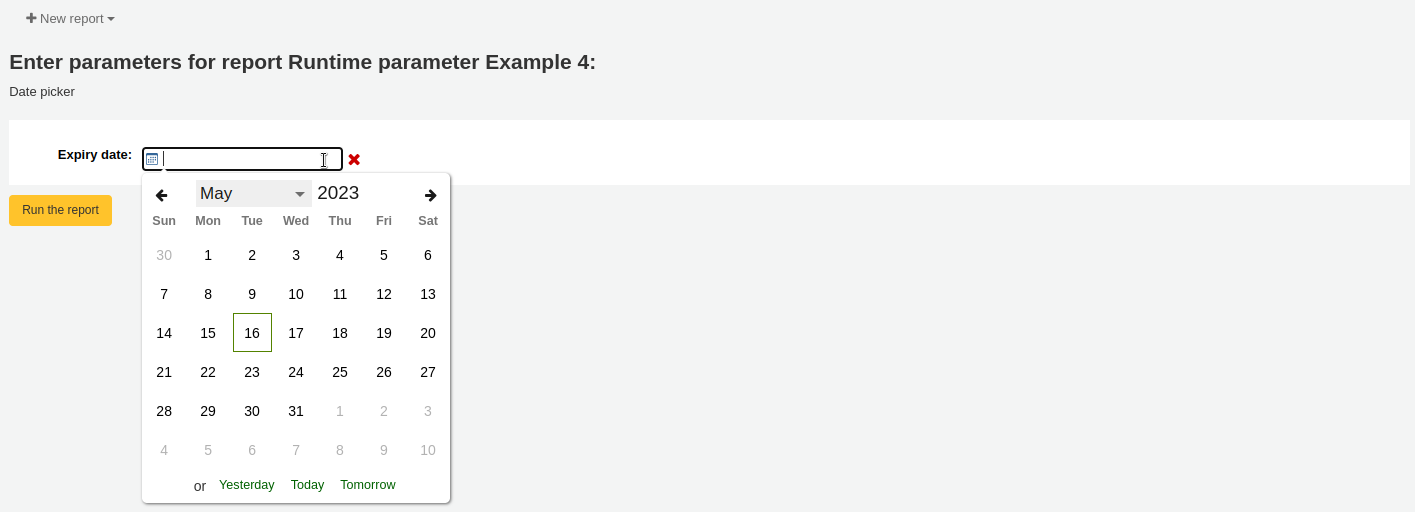
Example 4
SELECT cardnumber,
       surname,
       firstname
FROM borrowers
WHERE dateexpiry <= <<Expiry date|date>>
Example 5
SELECT *
FROM items
WHERE itemnumber IN <<List of itemnumbers (one per line)|list>>
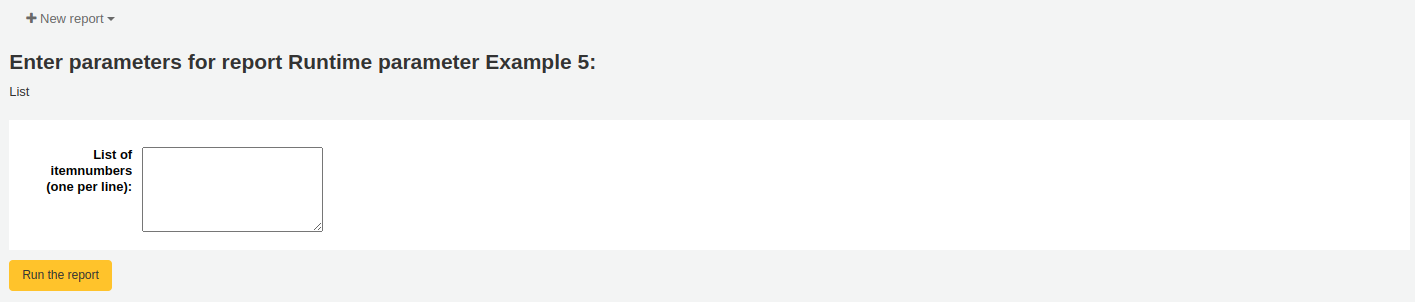
Avertissement
In the case of the list parameter, users must write one value per line.
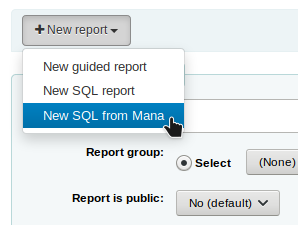
SQL report from Mana
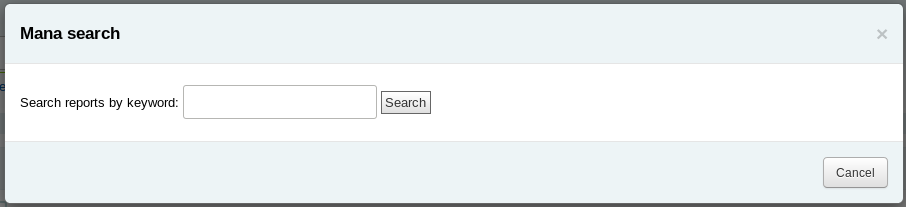
In the « Create report from SQL », you can search Mana KB for pre-made reports by clicking on « New report » and choosing « New SQL from Mana ».
Note
This option will only appear if you’ve configured Mana KB in the administration module.
You will be prompted to enter keywords to search the knowledge base.
In the search results, you will see
the details of the report (name, notes and type)
how many people have used this entry (# of users)
when it was used for the last time (last import)
additional comments made by other Koha users (comments)

Click on « Import » to import a copy of the report in your own saved reports.
You can then edit it, duplicate it, delete it, run it as you would any of your own reports.
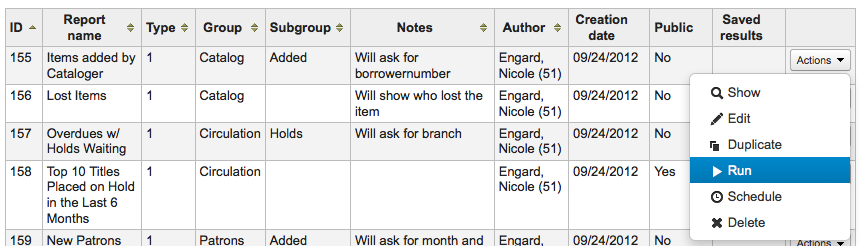
Duplicate report
Des rapports peuvent également être ajoutés par duplication de rapports existants. Consultez la page “Rapports sauvegardés” pour voir tous les rapports déjà enregistrés.
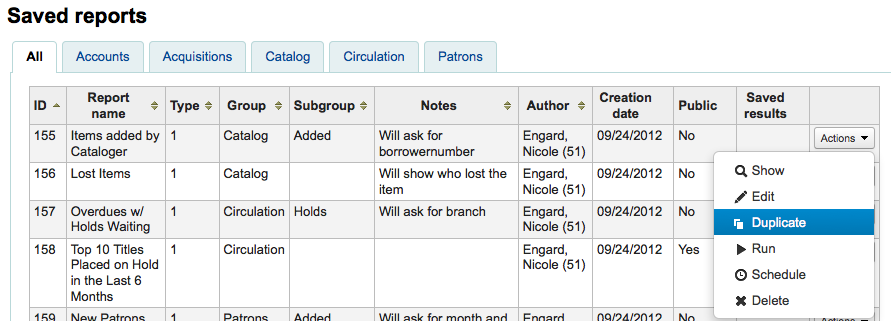
Un menu déroulant « Actions » figure à droite de chaque rapport. Cliquez dessus puis choisissez « Dupliquer » pour utiliser un rapport existant comme base de votre nouveau rapport.
Edit custom reports
Every report can be edited from the reports lists. To see the list of reports already stored in Koha, click “Use saved.”
Note
You can customize the columns of this table in the “Table settings” section of the Administration module (table id: table_reports).
Pour trouver le rapport que vous voudriez éditer, vous pouvez trier par chacune des colonnes en cliquant au dessus de l’en-tête de colonne. Vous pouvez également filtrer vos résultats en utilisant le menu de filtre du côté gauche ou employer les onglets pour trouver des rapports basés sur vos groupes personnalisés.
A partir de cette liste, vous pouvez modifier n’importe quel rapport personnalisé en cliquant sur “Actions” à droite du nom du rapport puis en choisissant “Modifier” dans le menu qui apparaîtra.

The form to edit the report will appear. Use the « update button » to save your modifications or click on « update and run SQL » to save and display the report results.
Running custom reports
Une fois les rapports personnalisés enregistrés dans Koha, vous pouvez les exécuter en vous rendant sur la page des Rapports sauvegardés puis en cliquant sur le bouton “Actions” à droite du nom du rapport, et sur le lien “Exécuter” qui apparaîtra.
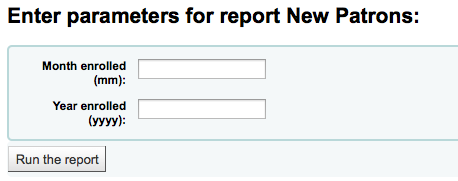
Lorsque vous lancez votre rapport, quelques valeurs vous seront demandées
ou vous verrez les résultats de suite
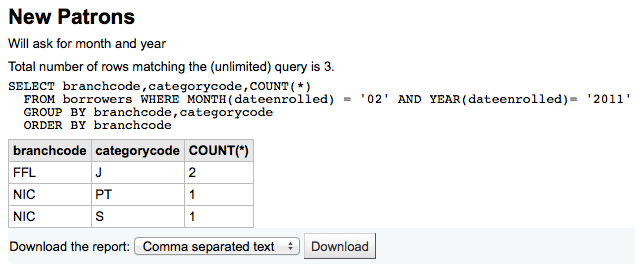
A partir des résultats, vous pouvez choisir de réexécuter le rapport en cliquant sur « Exécuter le rapport » au dessus, modifier le rapport en cliquant sur le bouton «Modifier » ou recommencer et créer un nouveau rapport à l’aide du bouton « Nouveau » . Vous pouvez également télécharger vos résultats en choisissant un type de fichier en bas des résultats à côté du libellé « télécharger le rapport » et en cliquant sur « Télécharger »
Note
A comma separated text file is a CSV file and it can be opened by any spreadsheet application.
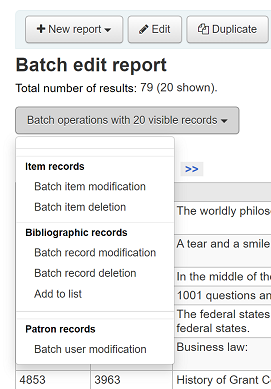
Send report output to batch modification tools
After running a report that contains itemnumbers, biblionumbers and/or patron cardnumbers the list of numbers can be imported directly into the relevant batch modification tool by clicking the “Batch operations with X visible records” button in the report results. The X depends on the number of records you have chosen to display on screen (up to 1000).
Statistics reports
Statistic reports will show you counts and sums. These reports are all about numbers and statistics, for reports that return more detailed data, use the guided report wizard. These reports are limited in what data they can look at, so it’s often recommended to use custom reports for official end of the year statistics.
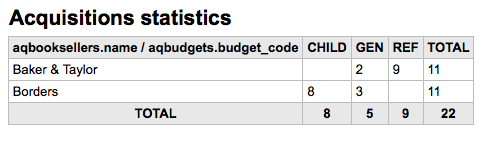
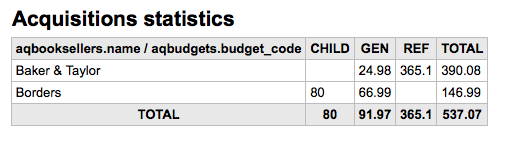
Acquisitions statistics
Note
Ces rapports se limitent aux données qui peuvent être vues, il est donc recommandé d’utiliser plutôt des rapports personnalisés pour les statistiques officielles de fin d’année.
Using the form provided, choose which value you would like to appear in the column and which will appear in the row.
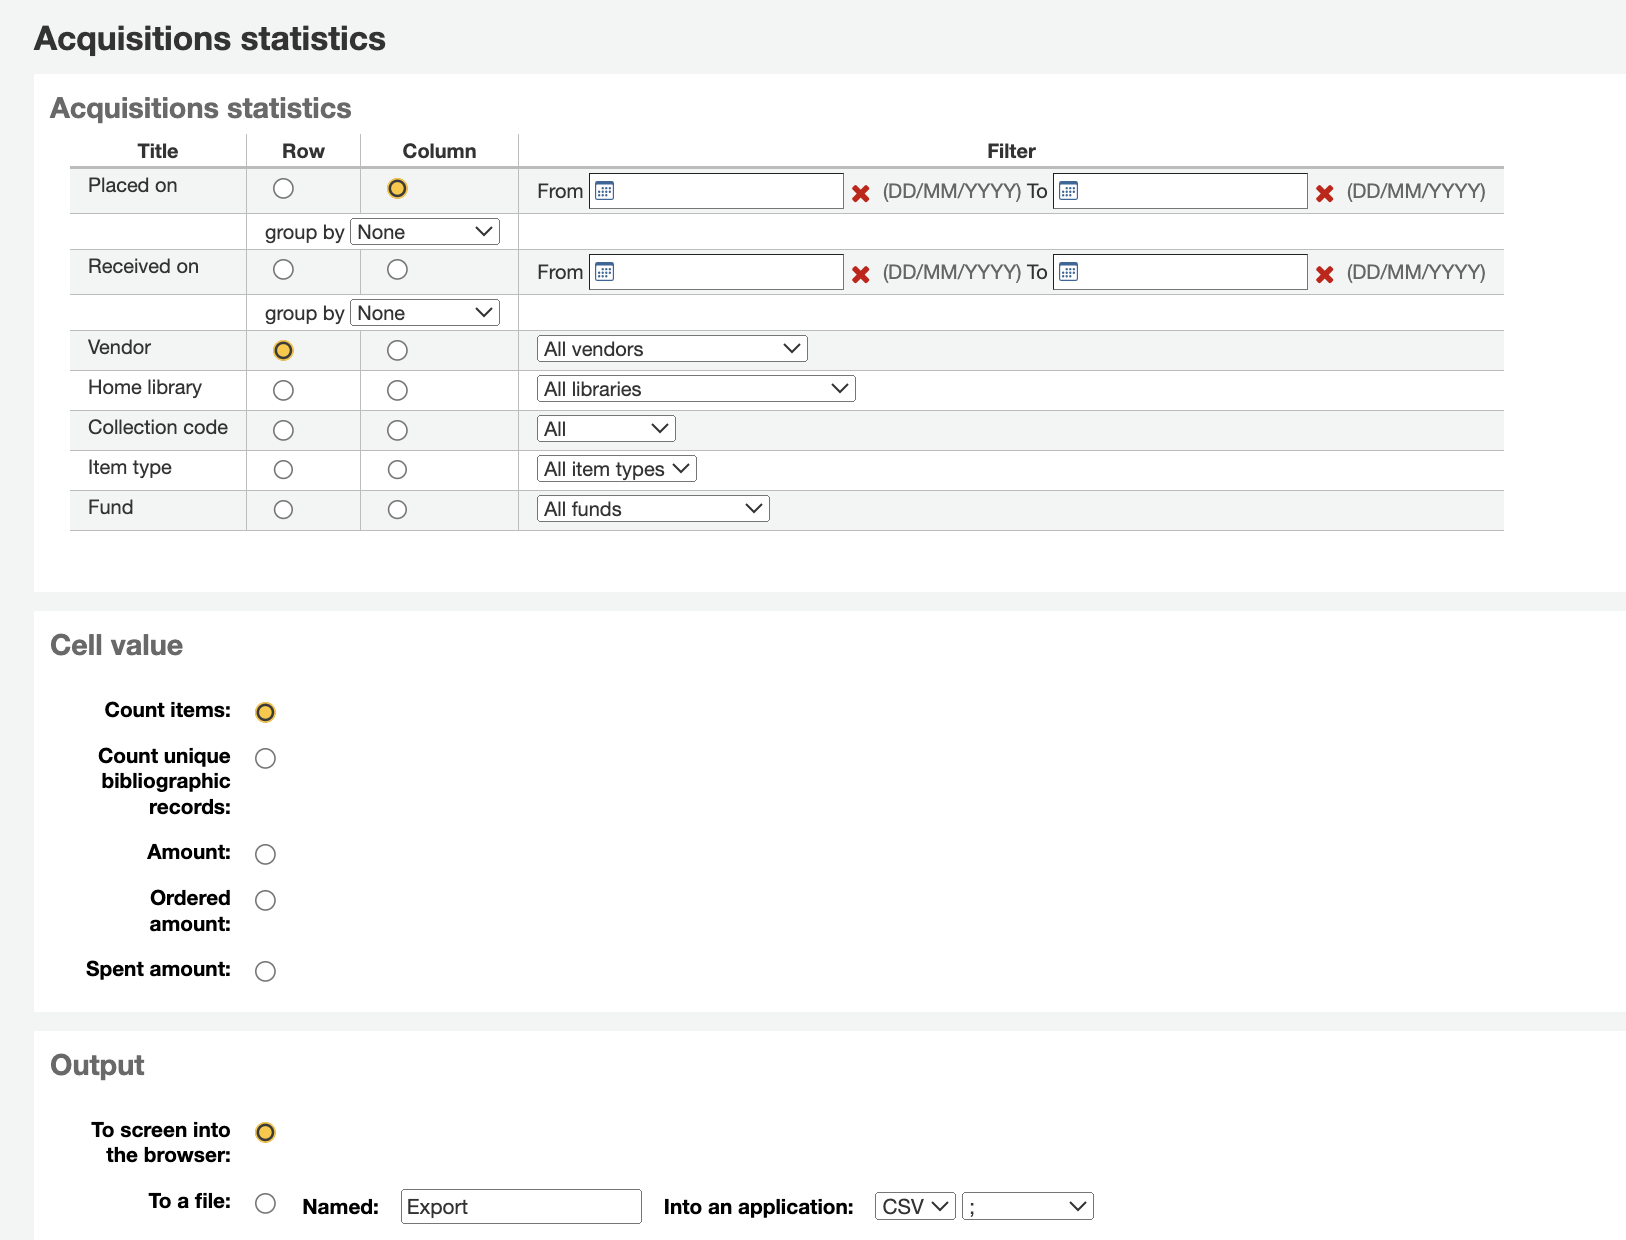
Si vous choisissez une sortie dans la navigateur, votre résultat sera imprimé à l’écran.
Vous pouvez également choisir d’exporter dans un fichier que vous pourrez modifier à loisir.
Quand vous générez le rapport, vous aurez à choisir entre compter et faire la somme des valeurs.
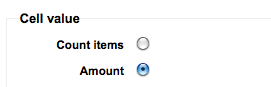
En choisissant le montant, vous modifiez le résultat pour qu’il soit la somme des montants.
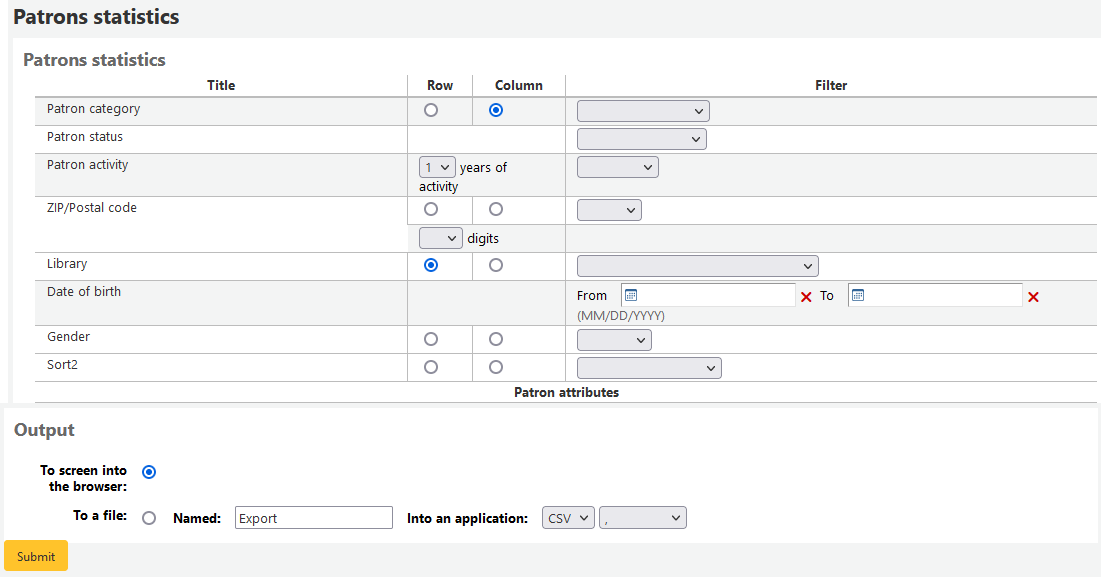
Patron statistics
Note
Ces rapports se limitent aux données qui peuvent être vues, il est donc recommandé d’utiliser plutôt des rapports personnalisés pour les statistiques officielles de fin d’année.
Using the form provided, choose which value you would like to appear in the column and which will appear in the row.
Si vous choisissez une sortie dans la navigateur, votre résultat sera imprimé à l’écran.
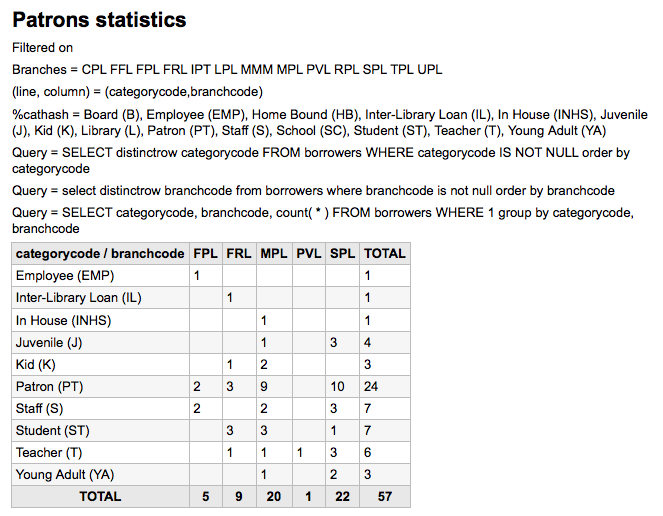
En fonction de vos choix, vous pourrez voir quelques informations sur la requête générée s’afficher au-dessus du résultat. Vous pouvez également exporter le résultat vers un fichier que vous pourrez manipuler à loisir.
Catalog statistics
Note
Ces rapports se limitent aux données qui peuvent être vues, il est donc recommandé d’utiliser plutôt des rapports personnalisés pour les statistiques officielles de fin d’année.
Using the form provided, choose which value you would like to appear in the column and which will appear in the row.
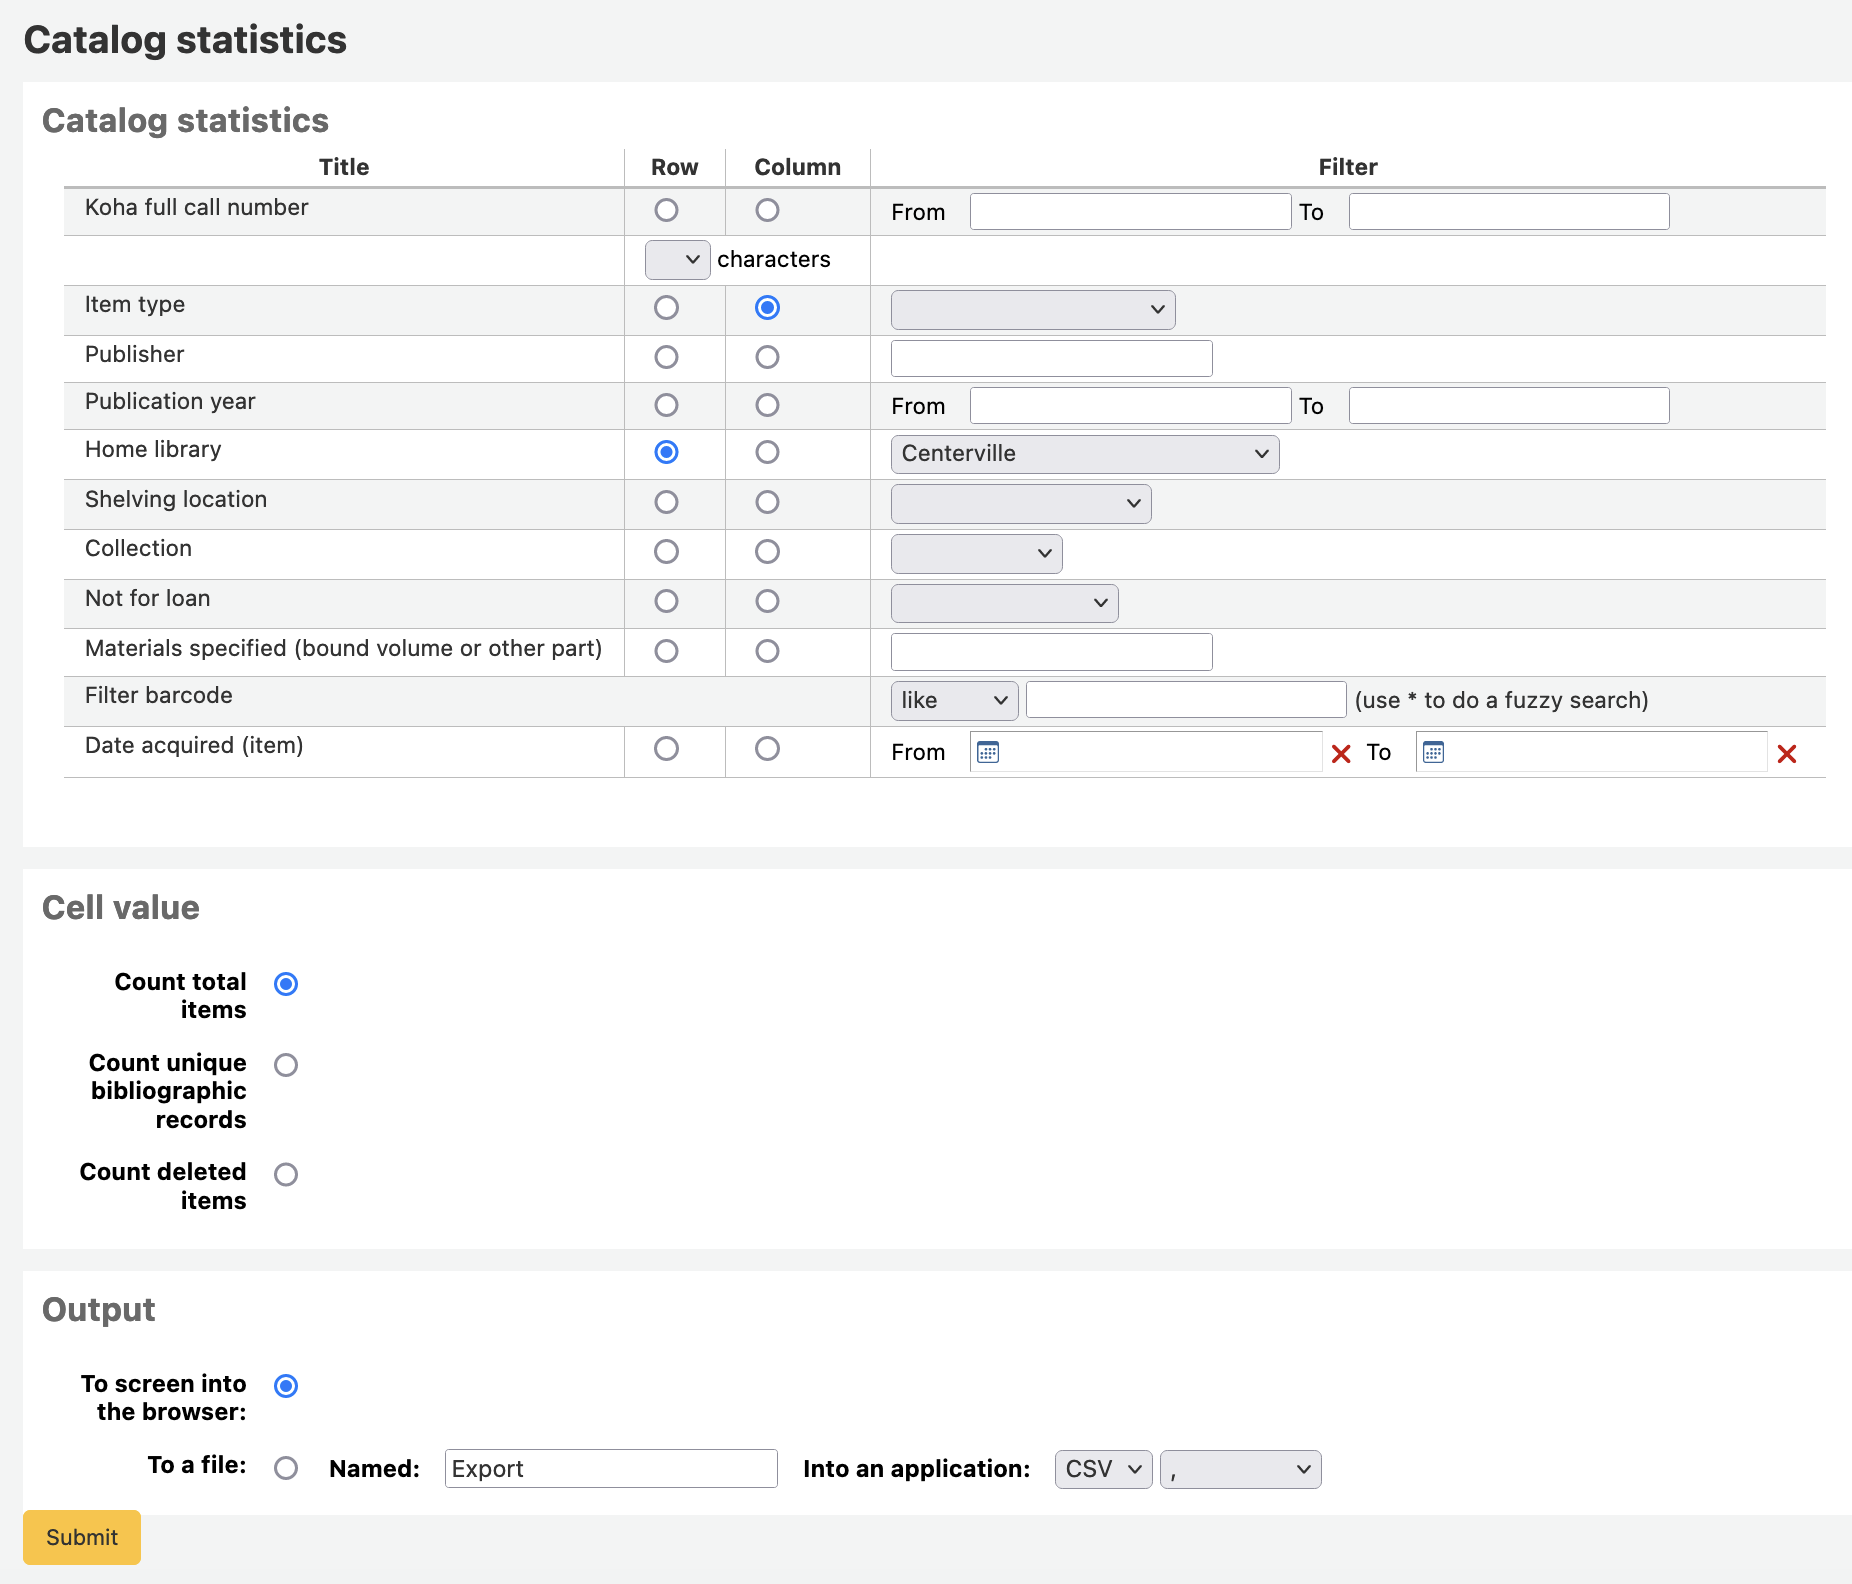
Si vous choisissez une sortie dans la navigateur, votre résultat sera imprimé à l’écran.
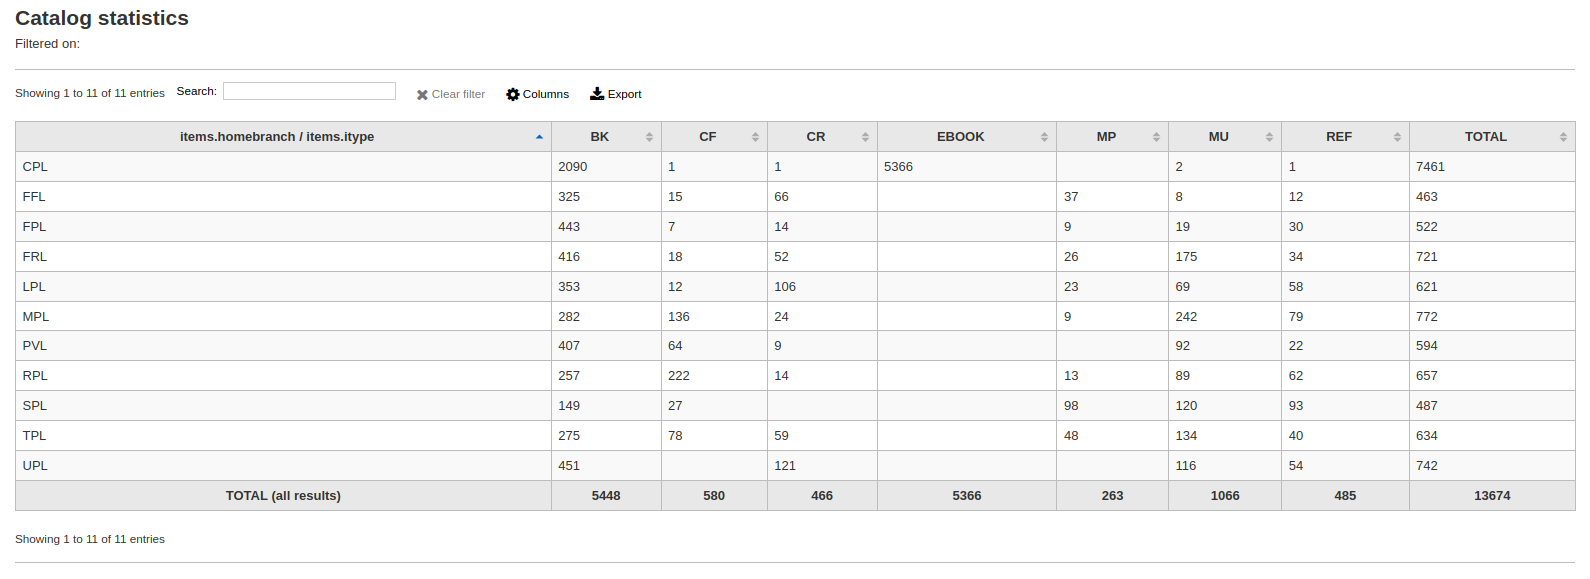
Vous pouvez également choisir d’exporter dans un fichier que vous pourrez modifier à loisir.
Circulation statistics
Note
Ces rapports se limitent aux données qui peuvent être vues, il est donc recommandé d’utiliser plutôt des rapports personnalisés pour les statistiques officielles de fin d’année.
Using the form provided, choose which value you would like to appear in the column and which will appear in the row.
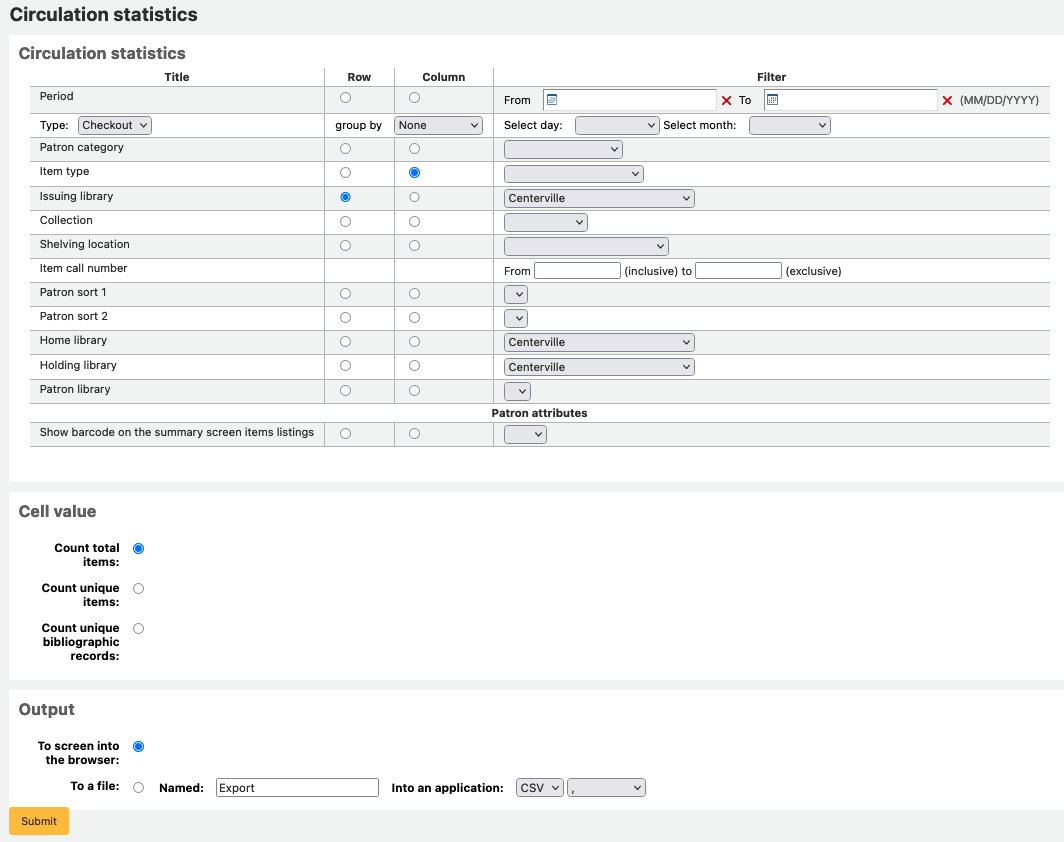
Si vous choisissez une sortie dans la navigateur, votre résultat sera imprimé à l’écran.
Vous pouvez également choisir d’exporter dans un fichier que vous pourrez modifier à loisir.
Note
Pour obtenir un aperçu complet des opérations de circulation mensuelles ou quotidiennes, vous pouvez exécuter le rapport deux fois. Une fois pour le Type « Prêt » et une autre fois pour le Type « Renouvellement ».
Ce rapport utilise les champs “Période” ou “Date”. C’est un filtre qui permet de limiter le résultat à un mois donné en sélectionnant simplement le premier jour du mois et le premier jour du mois suivant. Par exemple, 1/10 à 1/11 donne les statistiques du mois d’octobre.
Pour obtenir les statistiques quotidiennes, donnez un intervalle de dates. </br>Par exemple : « Je veux les dates qui commencent par XXX jusqu’à la date XXX, exclusivement. »
Pour un mois entier, un exemple d’intervalle serait : 01/12/2010 à 01/01/2011
Pour une année entière, un exemple d’intervalle serait : 01/01/2010 à 01/01/2011
Pour une seule journée, un exemple serait: 15/12/2010 à 16/12/2010 pour trouver tout ce qui a circulé le 15
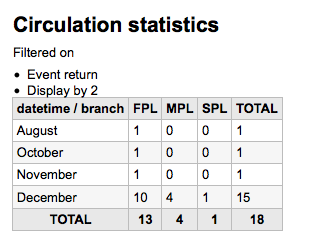
Suivi des consultations sur place
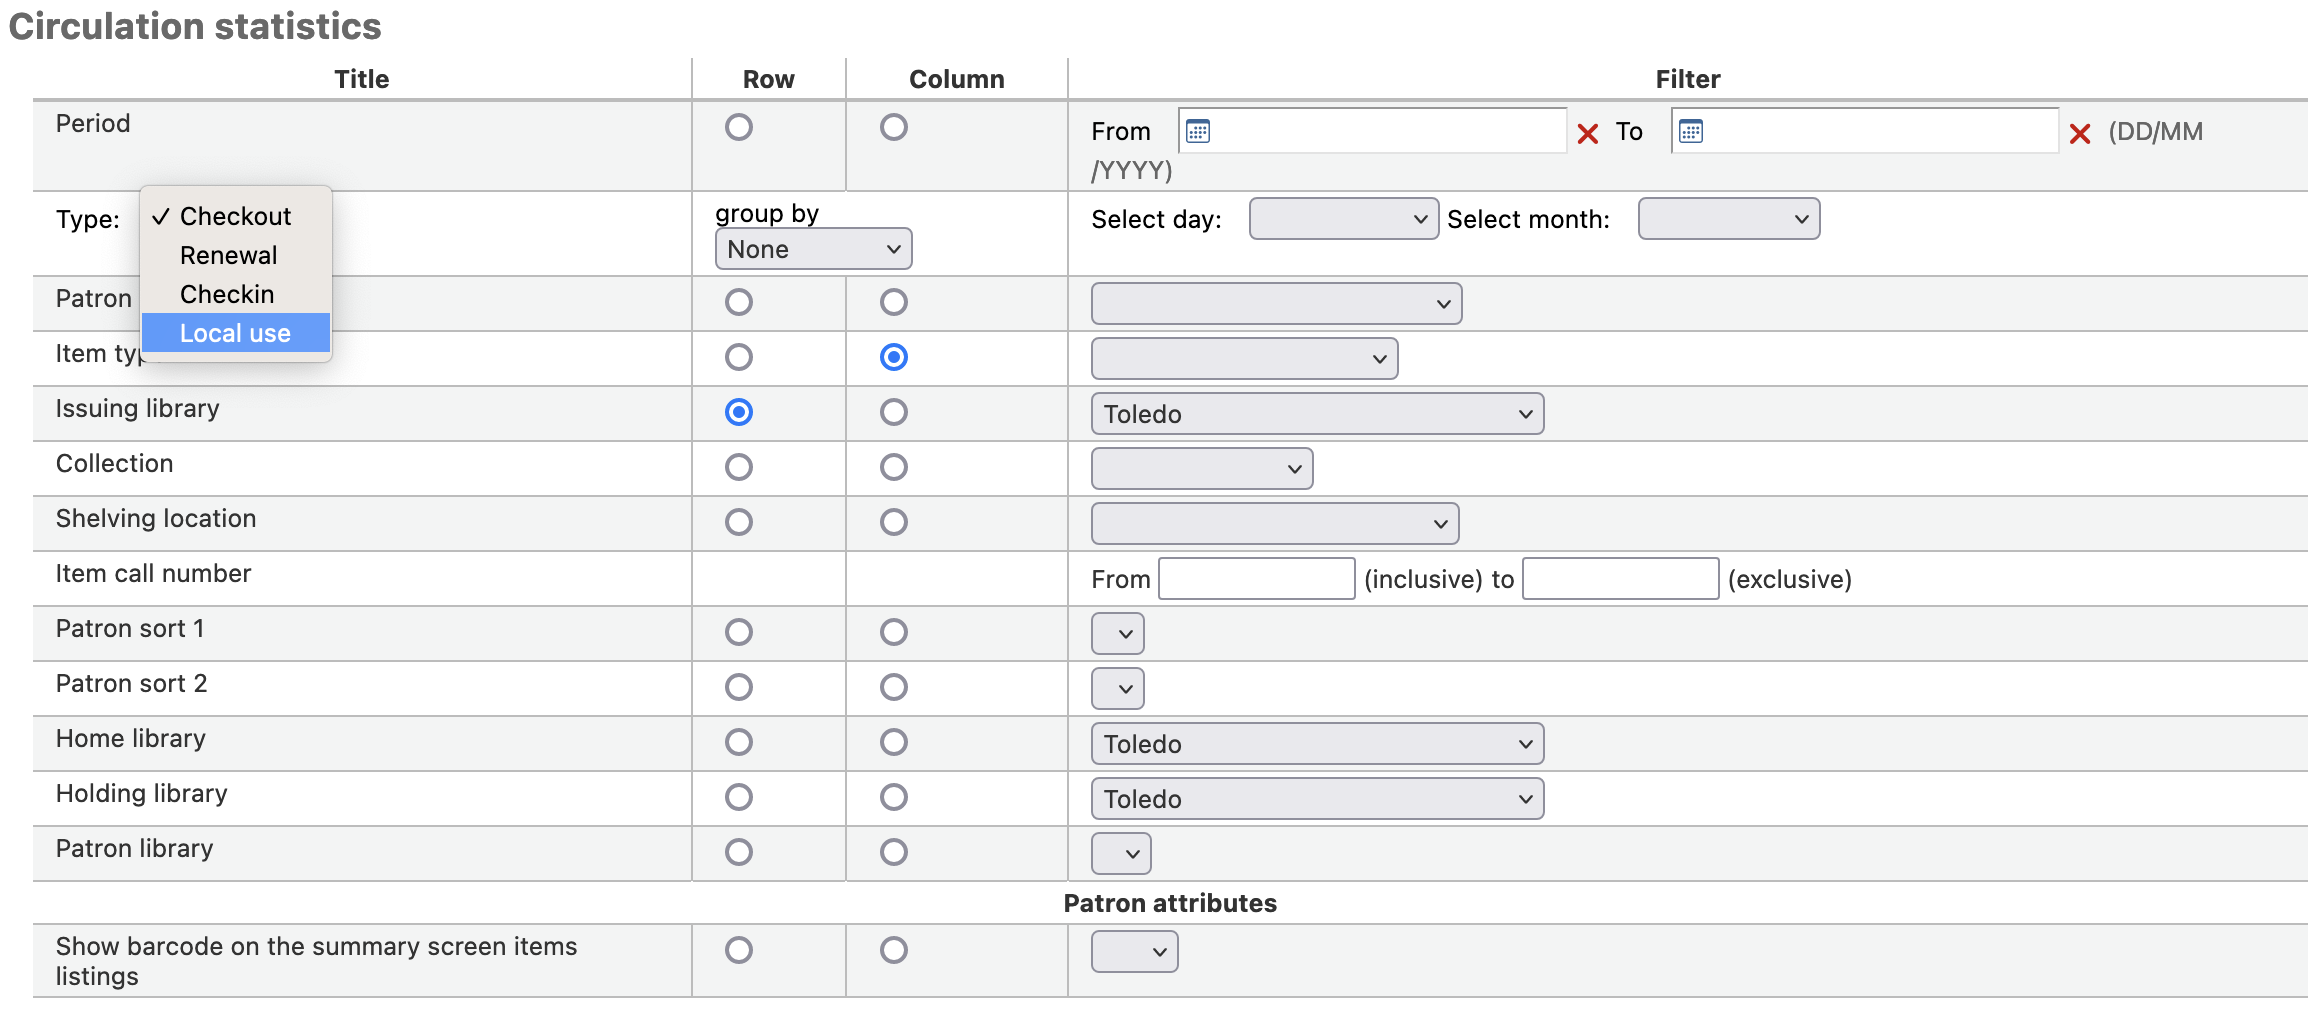
Using the Circulation statistics reporting wizard you can run reports on in house usage of items simply by choosing “Local use” from the “Type” pull down:
Serials statistics
Note
Ces rapports se limitent aux données qui peuvent être vues, il est donc recommandé d’utiliser plutôt des rapports personnalisés pour les statistiques officielles de fin d’année.
En utilisant le formulaire fourni, choisissez comment vous voulez lister vos périodiques dans votre système.

Si vous choisissez une sortie dans la navigateur, votre résultat sera imprimé à l’écran.

Vous pouvez également choisir d’exporter dans un fichier que vous pourrez modifier à loisir.
Holds statistics
Note
Ces rapports se limitent aux données qui peuvent être vues, il est donc recommandé d’utiliser plutôt des rapports personnalisés pour les statistiques officielles de fin d’année.
Avec le formulaire proposé vous pouvez obtenir des statistiques sur les réservations posées, satisfaites, annulées, et plus dans votre site. Dans le formulaire choisissez la valeur à afficher en colonne et la valeur à afficher en ligne. Vous pouvez aussi choisir à partir des filtres à droite du formulaire.
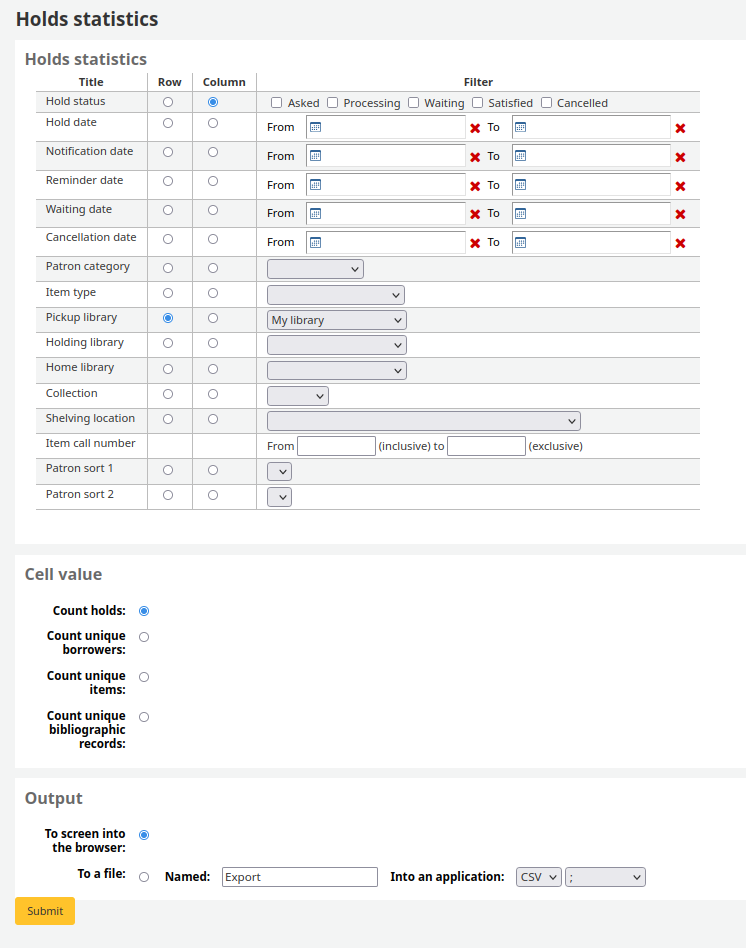
Si vous choisissez une sortie dans la navigateur, votre résultat sera imprimé à l’écran.

Vous pouvez également choisir d’exporter dans un fichier que vous pourrez modifier à loisir.
Adhérents empruntant le plus
Ce rapport liste les adhérents qui ont le plus empruntés.
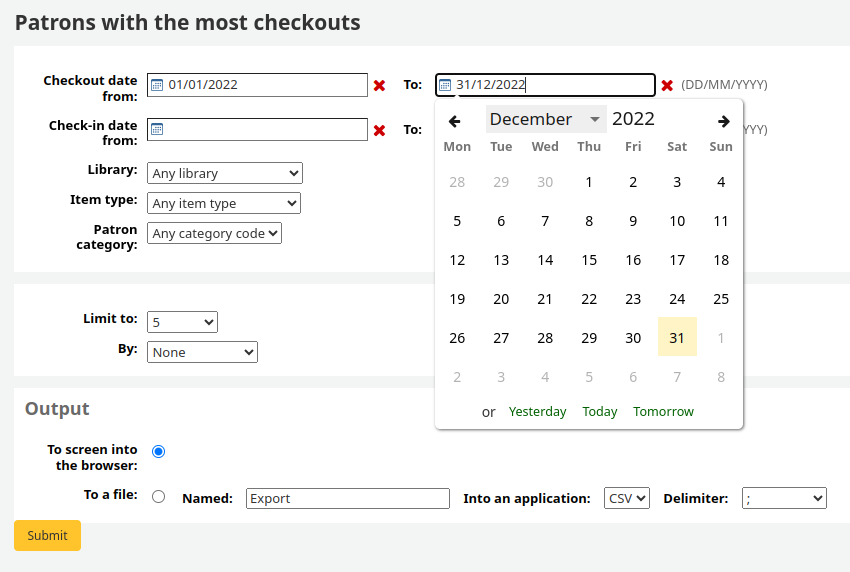
Si vous choisissez une sortie dans la navigateur, votre résultat sera imprimé à l’écran.
Vous pouvez également choisir d’exporter dans un fichier que vous pourrez modifier à loisir.
Most circulated items
Ce rapport liste les exemplaires qui ont été le plus empruntés.
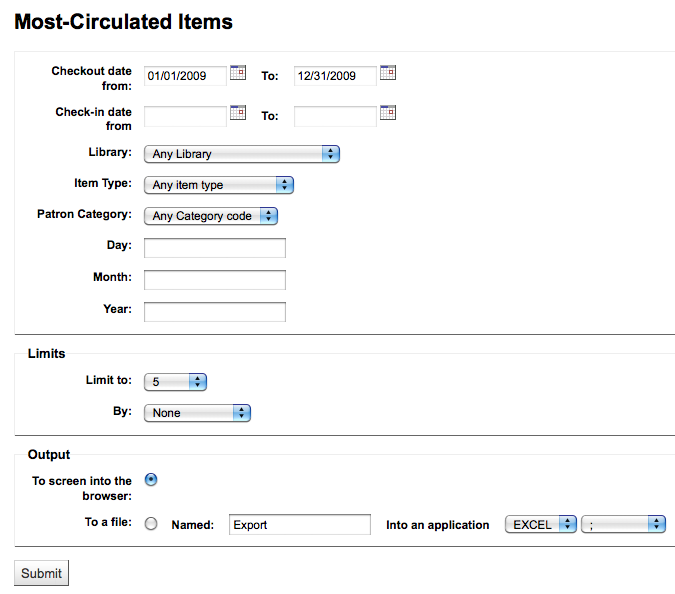
Si vous choisissez une sortie dans la navigateur, votre résultat sera imprimé à l’écran.
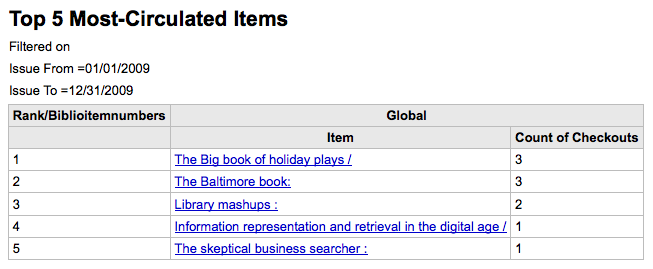
Vous pouvez également choisir d’exporter dans un fichier que vous pourrez modifier à loisir.
Adhérents sans emprunts
Ce rapport guidé vous dira quels adhérents ont le plus emprunté.
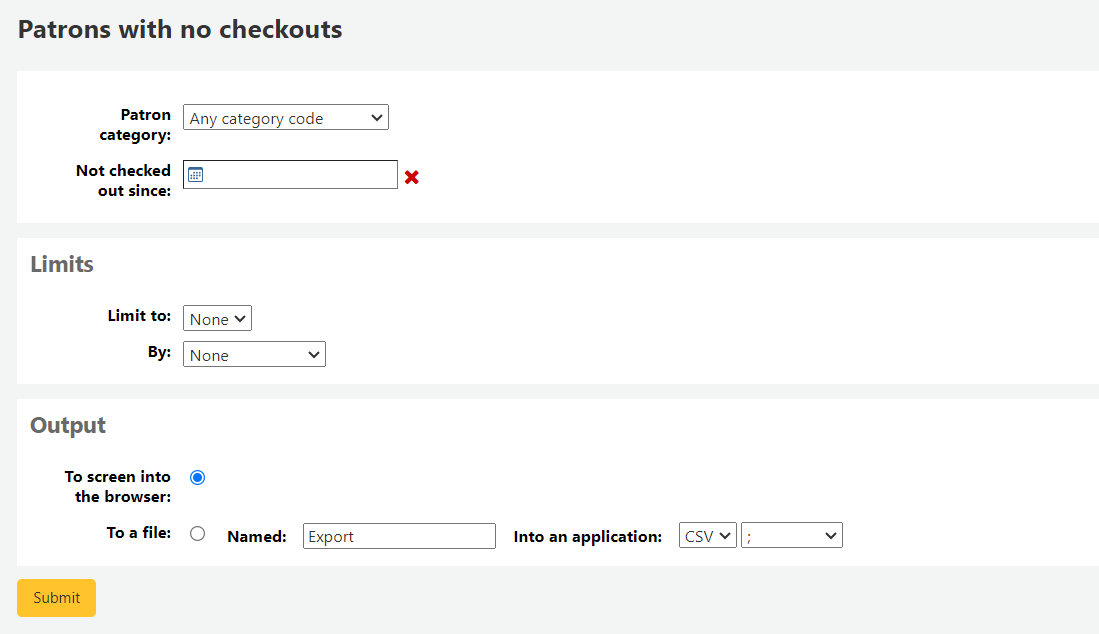
Si vous choisissez une sortie dans la navigateur, votre résultat sera imprimé à l’écran.
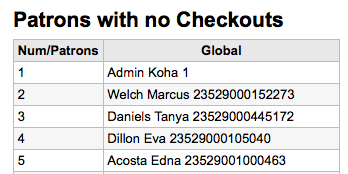
Vous pouvez également choisir d’exporter dans un fichier que vous pourrez modifier à loisir.
Documents jamais prêtés
Ce rapport liste tous les exemplaires qui n’ont jamais été empruntés.
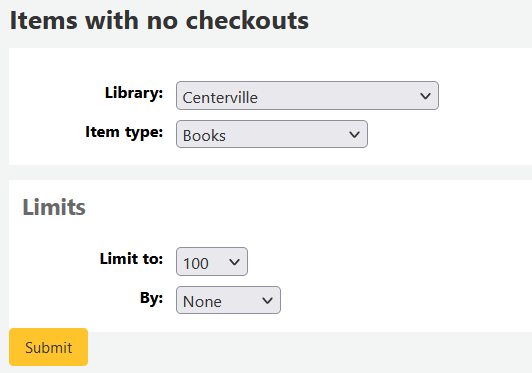
Si vous choisissez une sortie dans la navigateur, votre résultat sera imprimé à l’écran.
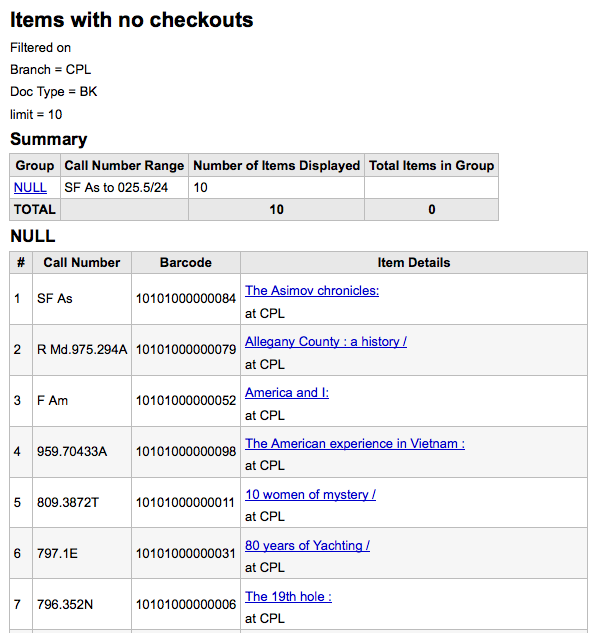
Vous pouvez également choisir d’exporter dans un fichier que vous pourrez modifier à loisir.
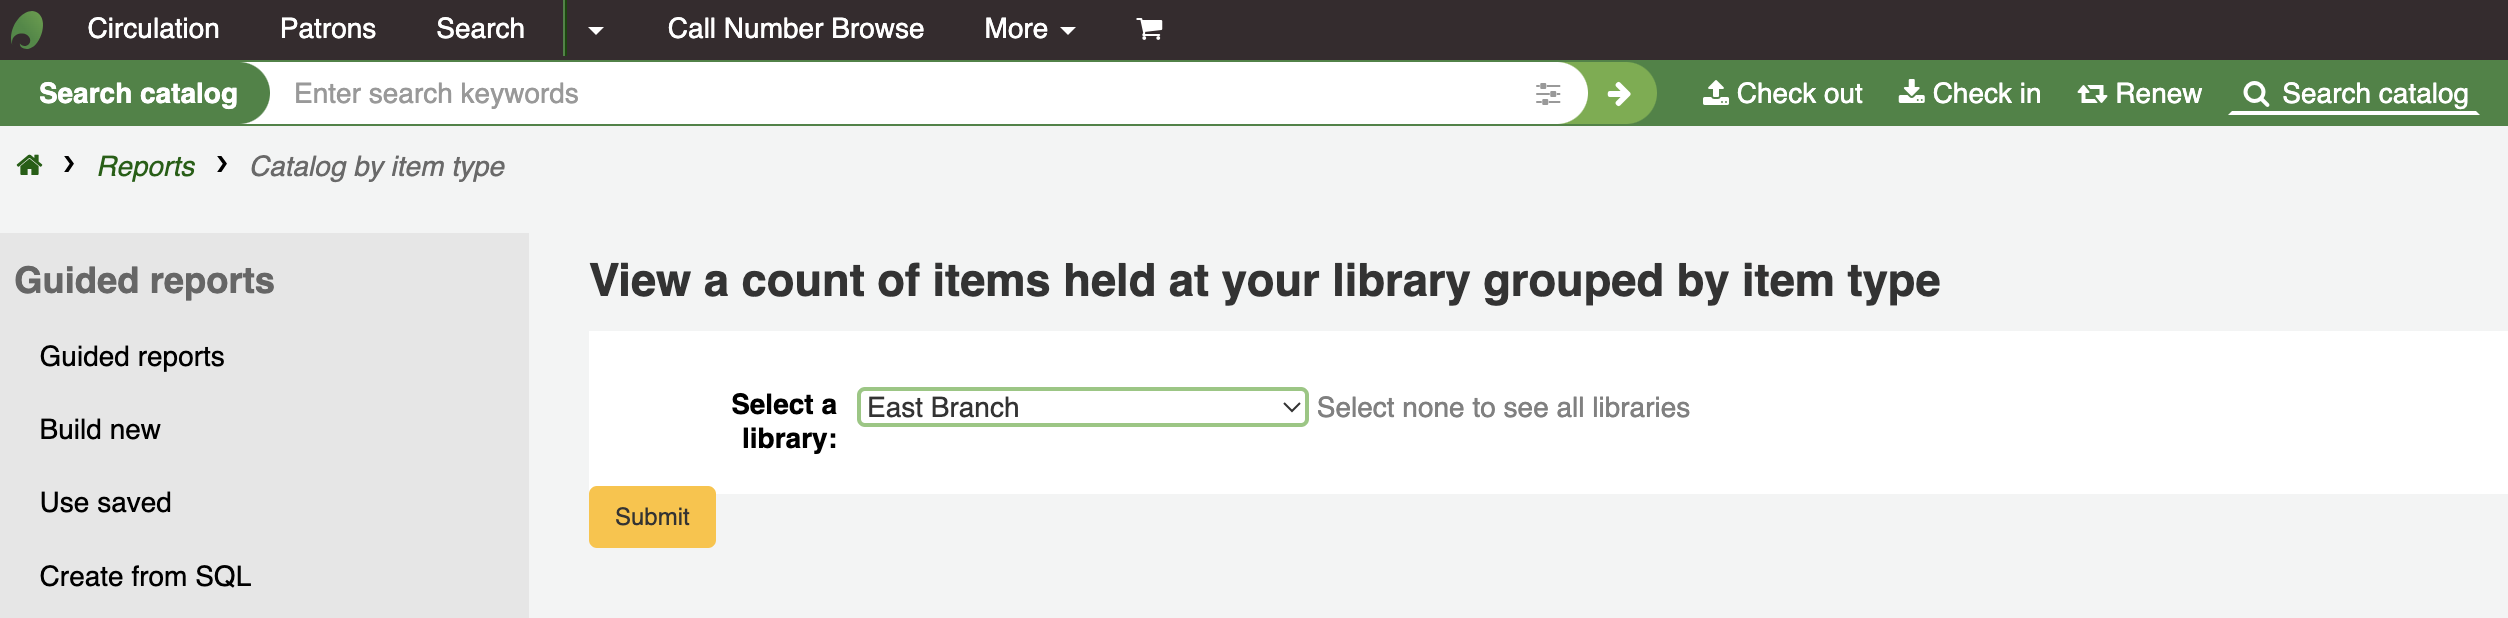
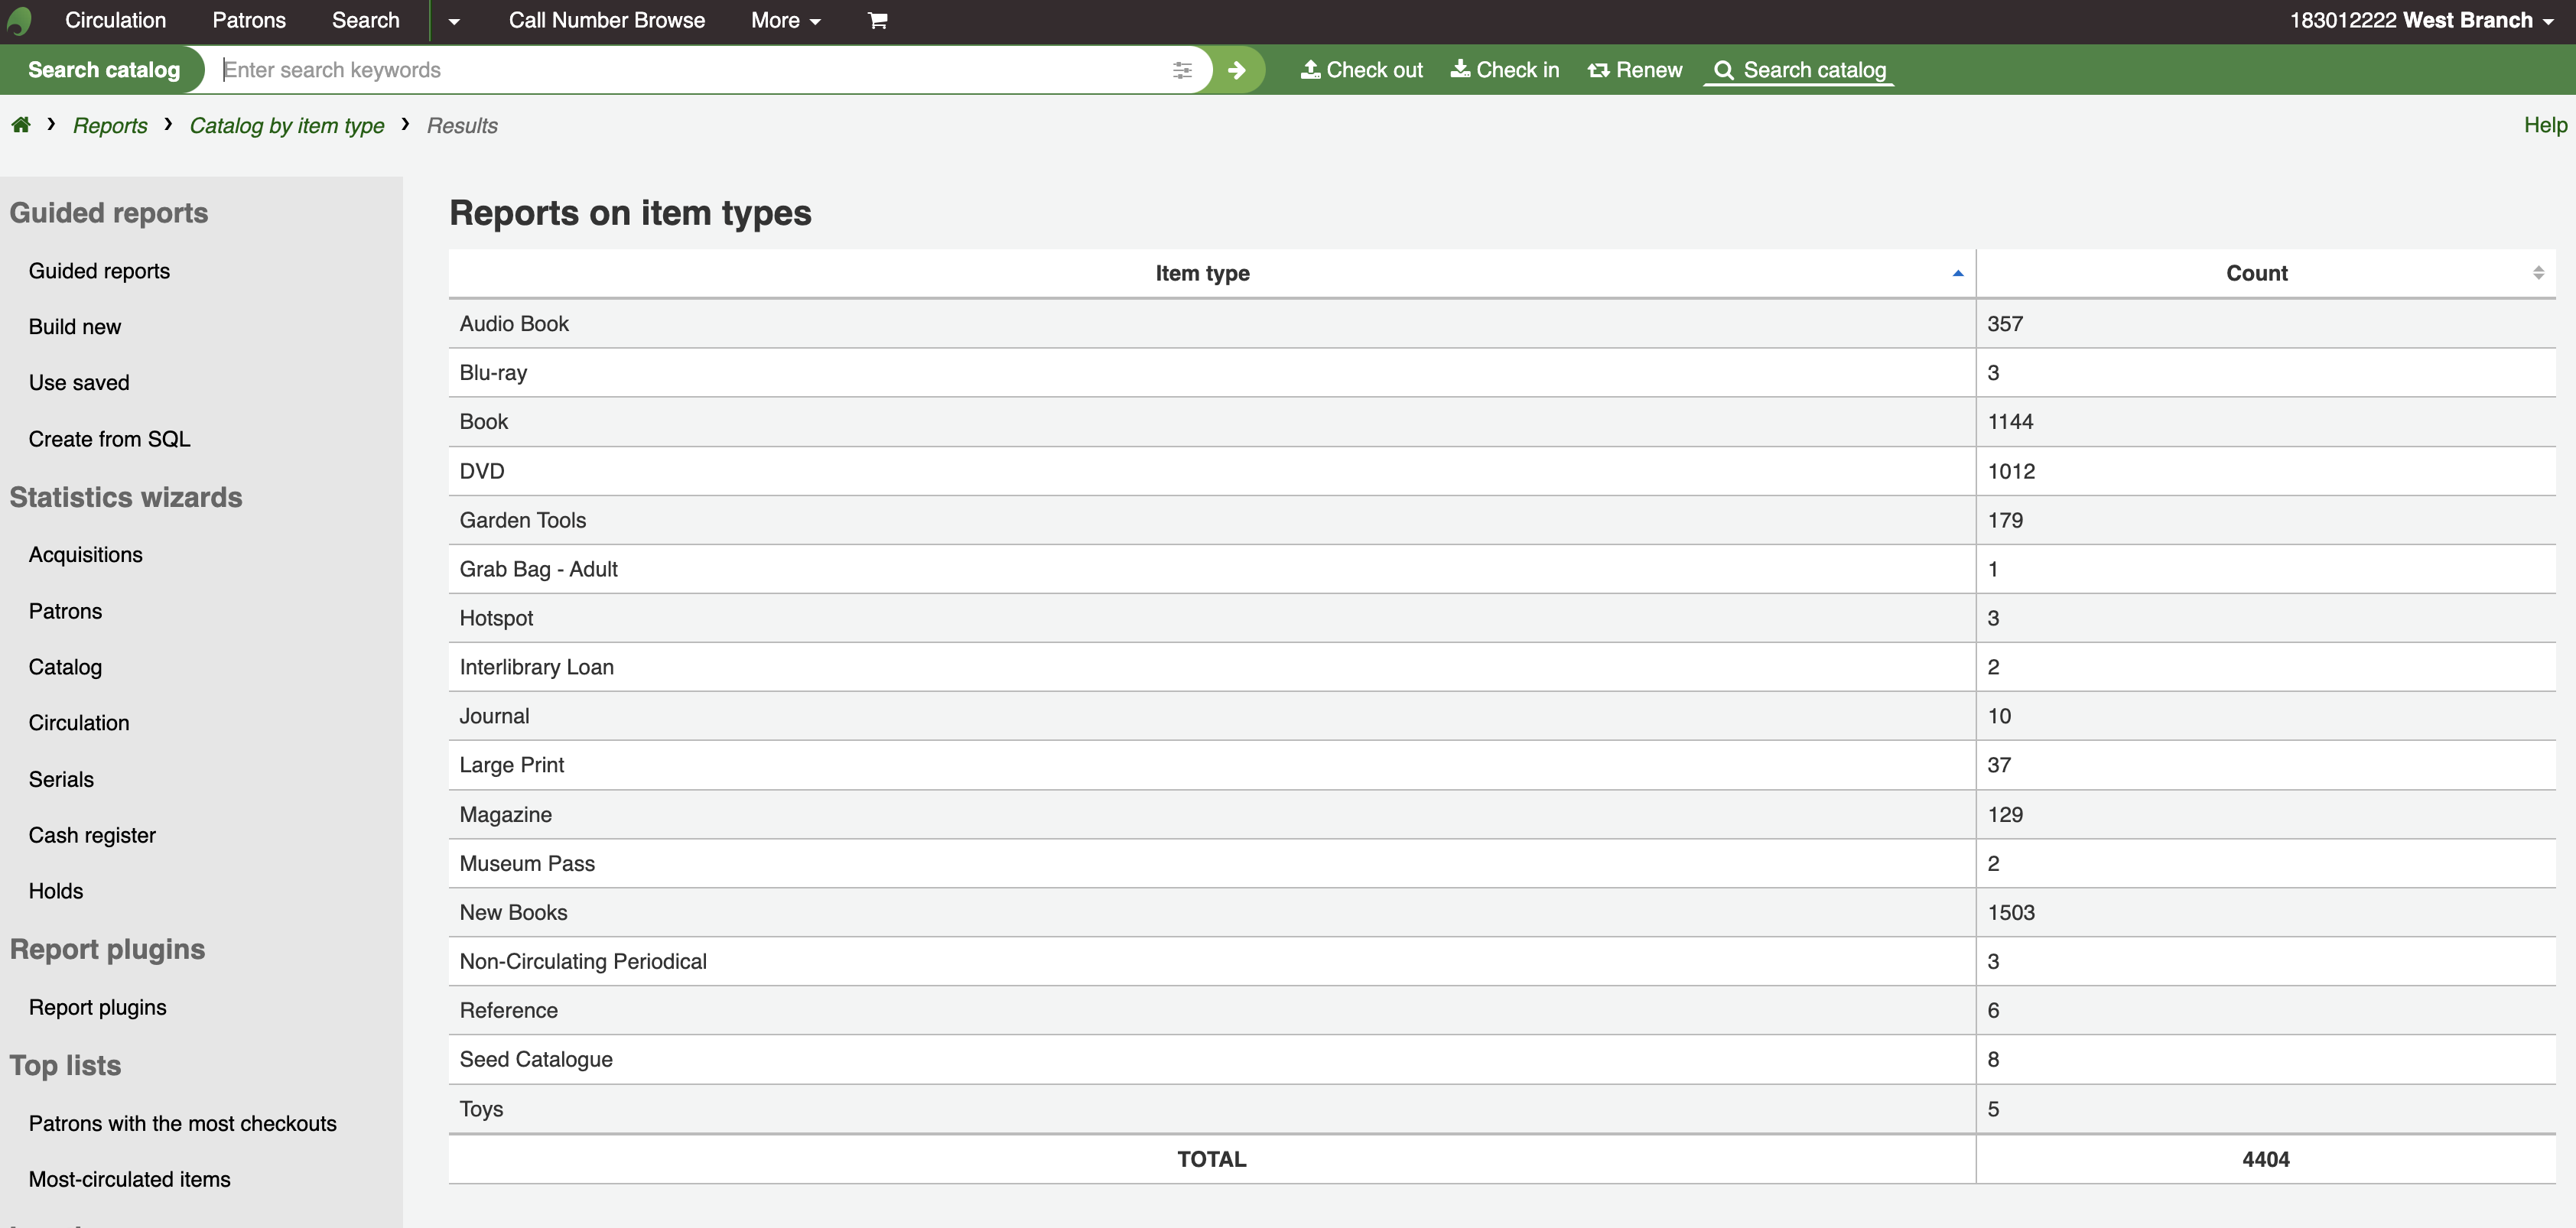
Catalog by item type
Ce rapport liste le nombre total de chaque type de documents par site.
Si vous choisissez une sortie dans la navigateur, votre résultat sera imprimé à l’écran.
Vous pouvez également choisir d’exporter dans un fichier que vous pourrez modifier à loisir.
Lost items
Ce rapport vous permettra de générer une liste des exemplaires du système marqués comme Perdus
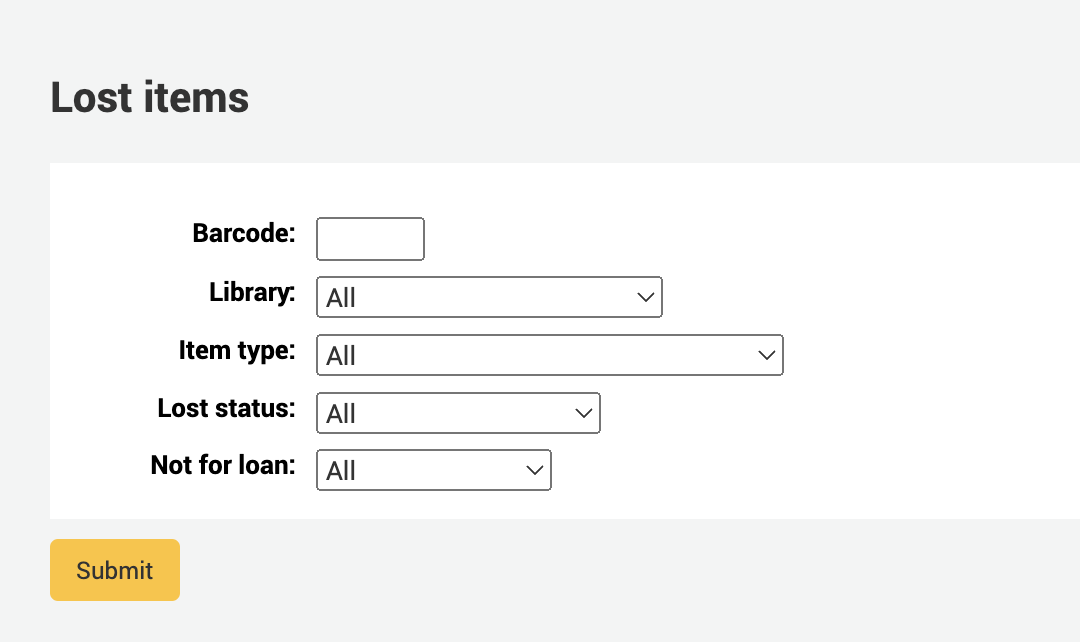
Once you have chosen parameters, you will see the corresponding list of items.
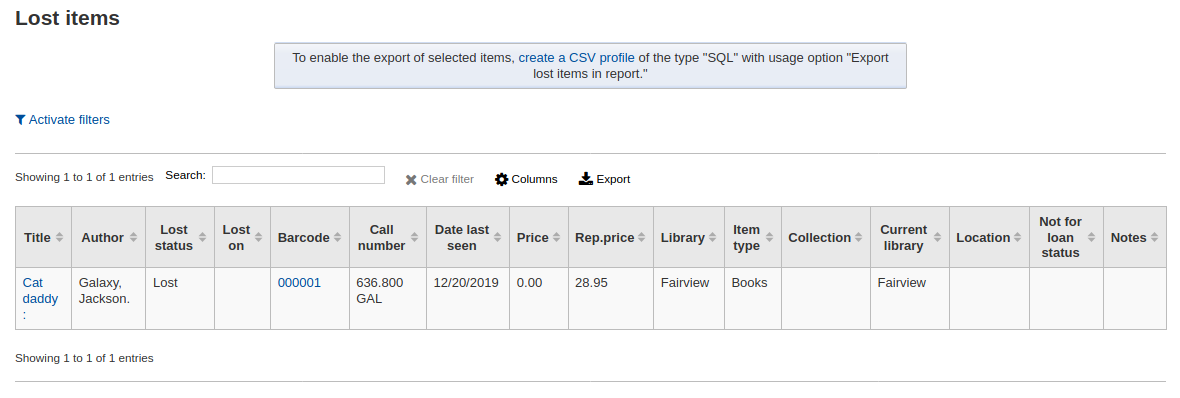
Note
You can customize the columns of this table in the “Table settings” section of the Administration module (table id: lostitems-table).
Orders by fund
If you use the Acquisitions module, you will be able to see all the items that were ordered in each fund.
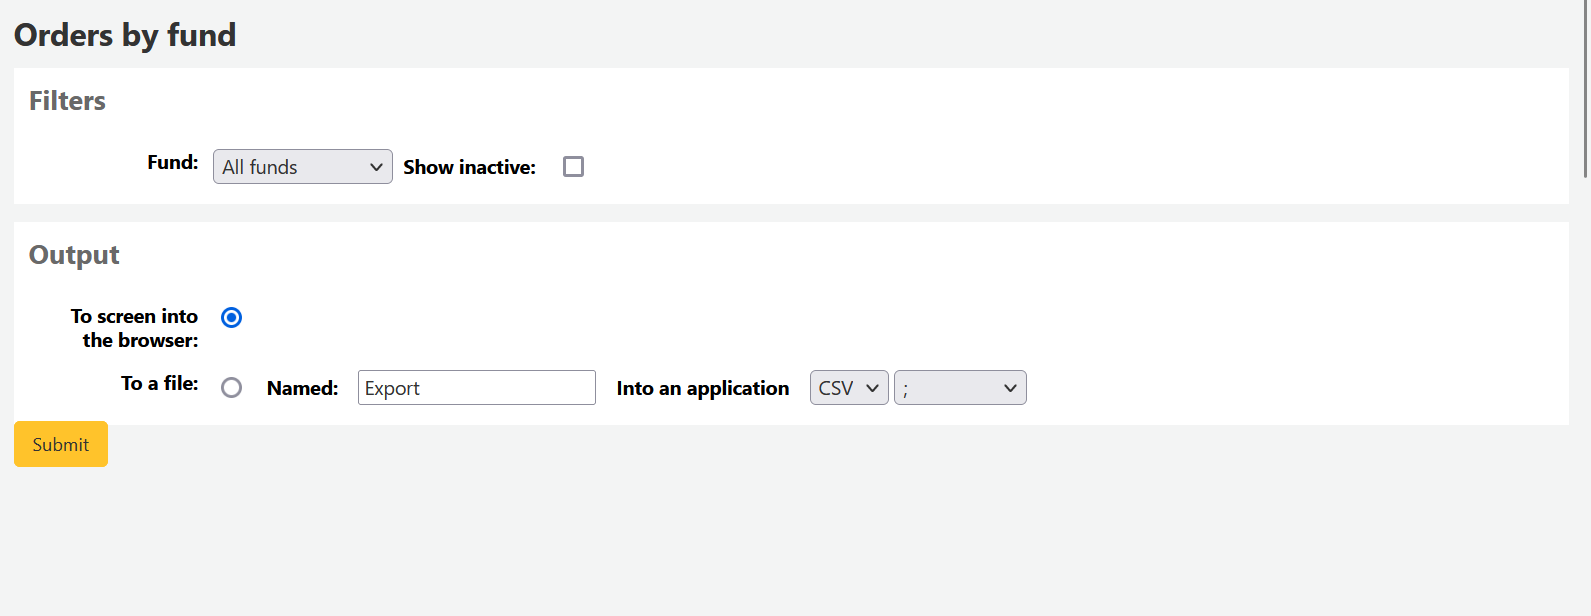
Once you choose the fund you wish to view, you can export the results or view them in the browser. If you choose to view them directly, you will be shown the list of orders.
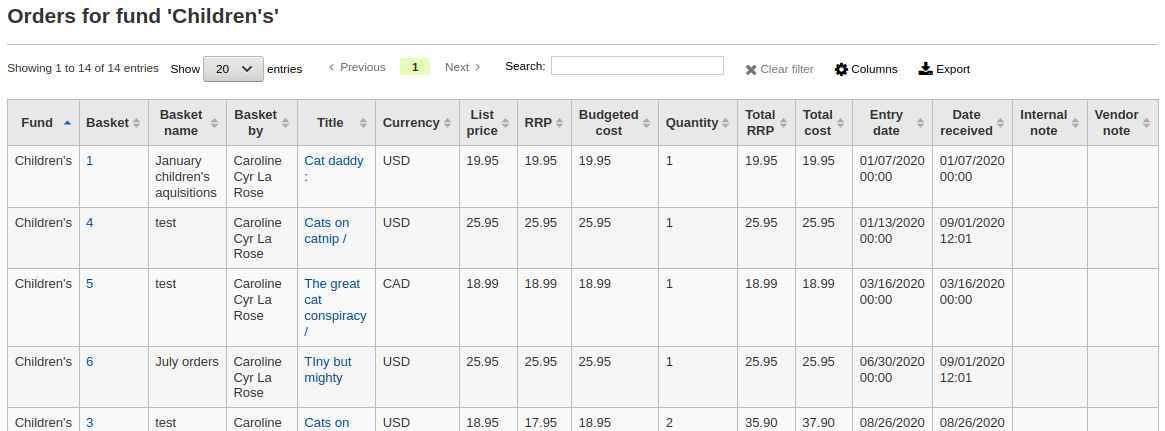
Note
You can customize the columns of this table in the “Table settings” section of the Administration module (table id: funds-table).
Average loan time
Ce rapport liste la durée moyenne de prêt des documents basés selon les critères que vous entrez :
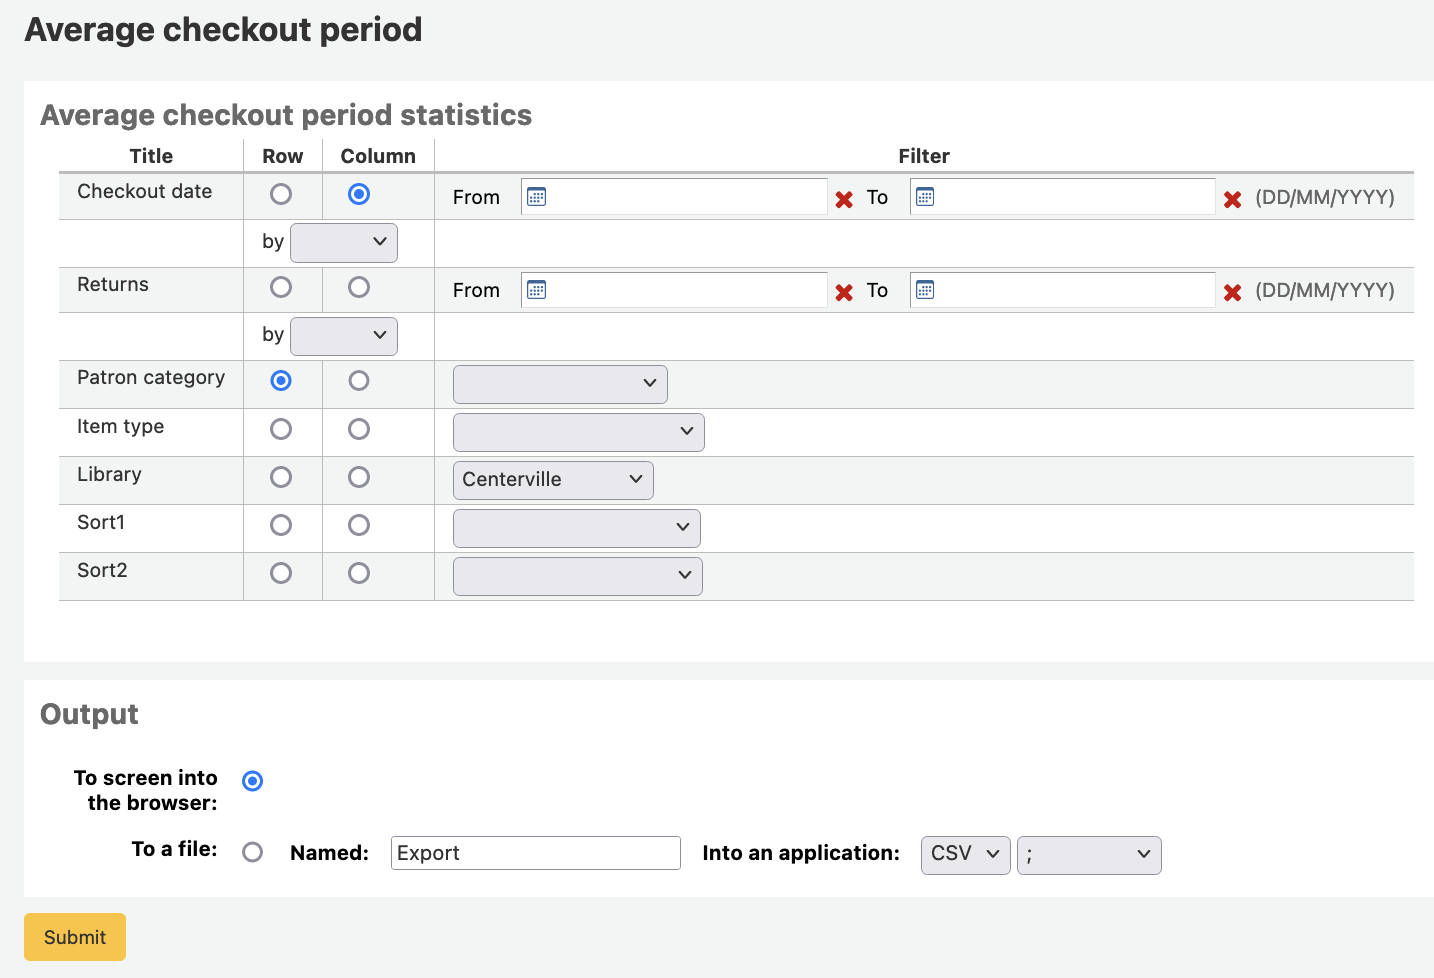
Si vous choisissez une sortie dans la navigateur, votre résultat sera imprimé à l’écran.
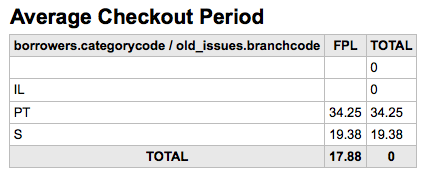
Vous pouvez également choisir d’exporter dans un fichier que vous pourrez modifier à loisir.
Report dictionary
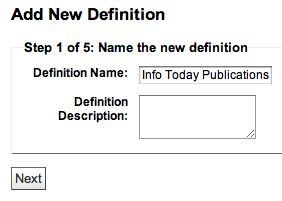
The report dictionary is a way to pre-define common filters you’d like to apply to your reports. This is a good way to add in filters that the report wizard doesn’t include by default. To add a new definition, or filter, click “New definition” on the reports dictionary page and follow the 4 step process.
Étape 1 : Nommez la définition et fournissez une description si nécessaire
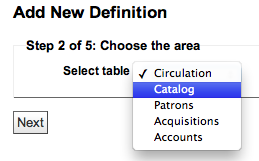
Étape 2 : Choisissez le module qui sera interrogé.
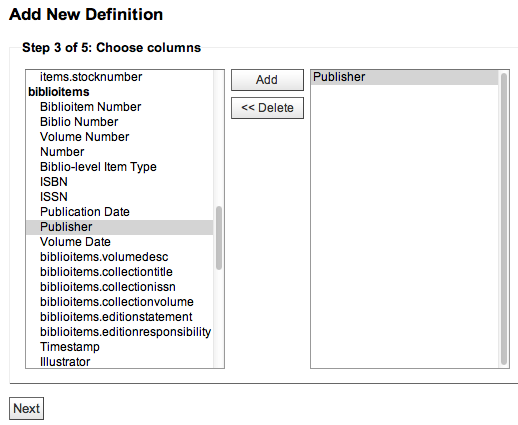
Étape 3 : Choisissez les colonnes à interroger dans les tables présentées.
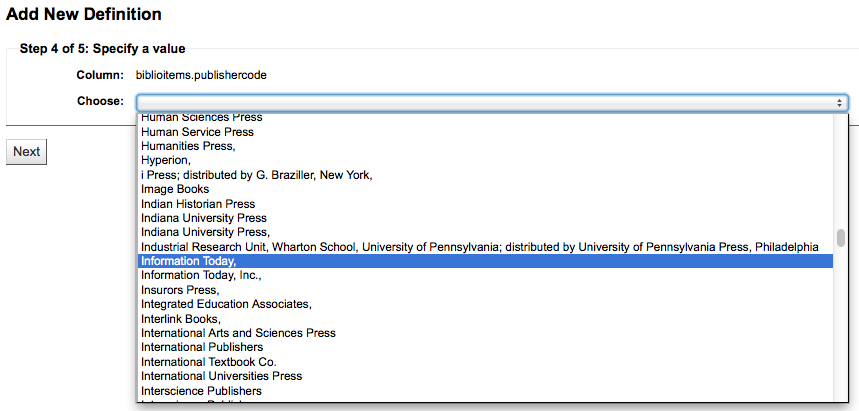
Étape 4 : Choisissez la/les valeur(s) dans le(s) champ(s). Elles seront automatiquement renseignées en fonction du contenu de votre base de données.
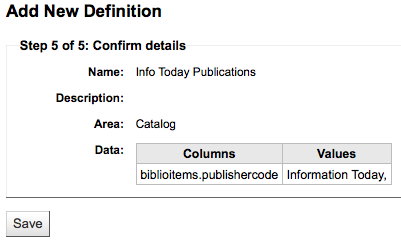
Confirmer votre sélection pour enregistrer la définition.
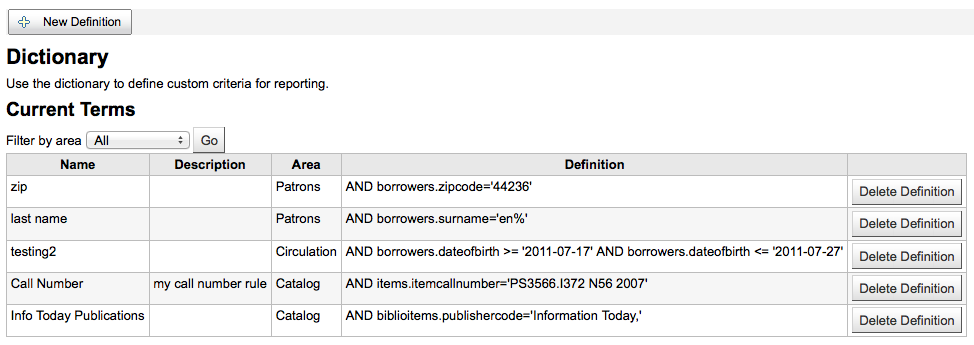
Vos définitions seront affichées dans la page Dictionnaire des rapports.
Désormais, quand vous générez un rapport sur le module pour lequel vous avez créé ce filtre, une option apparaît qui permet de limiter le résultat en utilisant votre définition.

Report plugins
Some plugins that are available can be used to make or enhance reports.
Get there: More > Reports > Report plugins > Report plugins
From this page, you will see only report-type plugins.
See the managing plugins section of this manual to learn how to manage your report-type plugins.