Sağlama
Koha sağlama modülü, kütüphanenin sağlayıcılardan sipariş ettiklerini kaydedebileceği ve satın alma bütçelerini yönetebileceği bir yöntem sağlar.
Gidiş yolu: Daha fazla > Sağlama
Kurulum
Before using the Acquisitions module you will want to make sure that you have completed all of the set up.
First, set your acquisitions system preferences and acquisitions administration to match your library’s workflow. Before setting your EDI hesapları and Kütüphane EAN’ları you will need to have entered your vendors.
Sağlama ana sayfasında kütüphanenizin ödeneklerini listelenmiş olarak göreceksiniz.
Not
Toplam satırı kurduğunuz fonlar için kafa karıştırıcı ise, yandaki tercihi ekleyerek bunu gizleyebilirsiniz
#funds_total {display:none;}:ref:`IntranetUserCSS ` tercihine.
Tüm aktif fonları görmek için, fonlar tablosunun üstündeki ‘Etkin olan ve etkin olmayanları göster’ opsiyonunun yanındaki onay kutusunu tıklayabilirsiniz.
Bir bütçedeki tüm sipariş geçmişini görmek için bağlantılı miktarı tıklayabilirsiniz ve sizin için bir arama gerçekleştirecektir.
Learn more in the Budget/fund tracking section of this manual.
Sağlayıcılar
Before any orders can be placed you must first enter at least one vendor.
Add a vendor
To add a vendor click the ‘New vendor’ button on the Acquisitions page

Sağlayıcı ekleme formu üç bölüme ayrılır
The first section is for basic information about the vendor
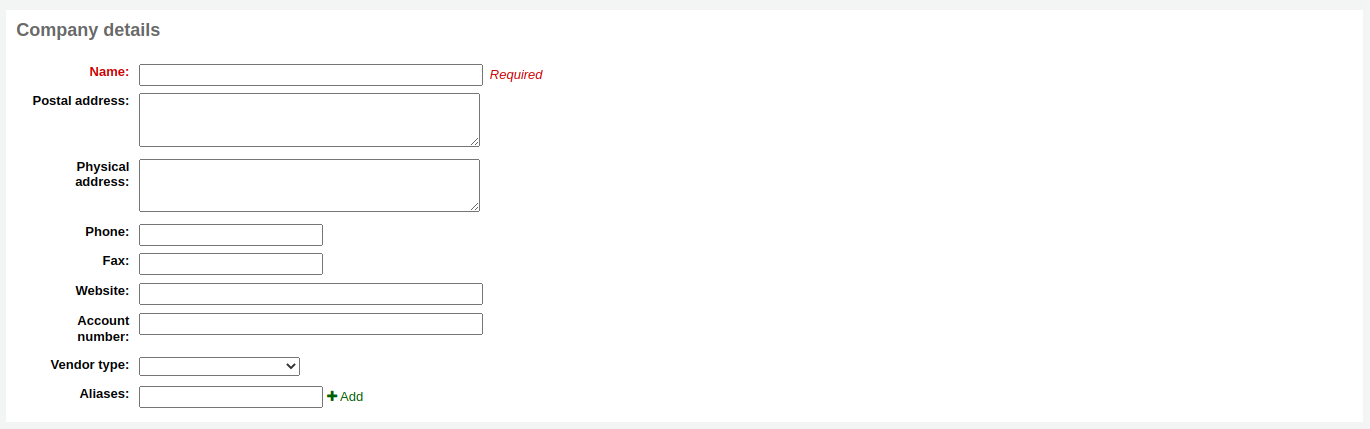
Of these fields, only the vendor name is required, the rest of the information should be added to help with generating claim letters and invoices
The second section is for information regarding your contact at the vendor’s office
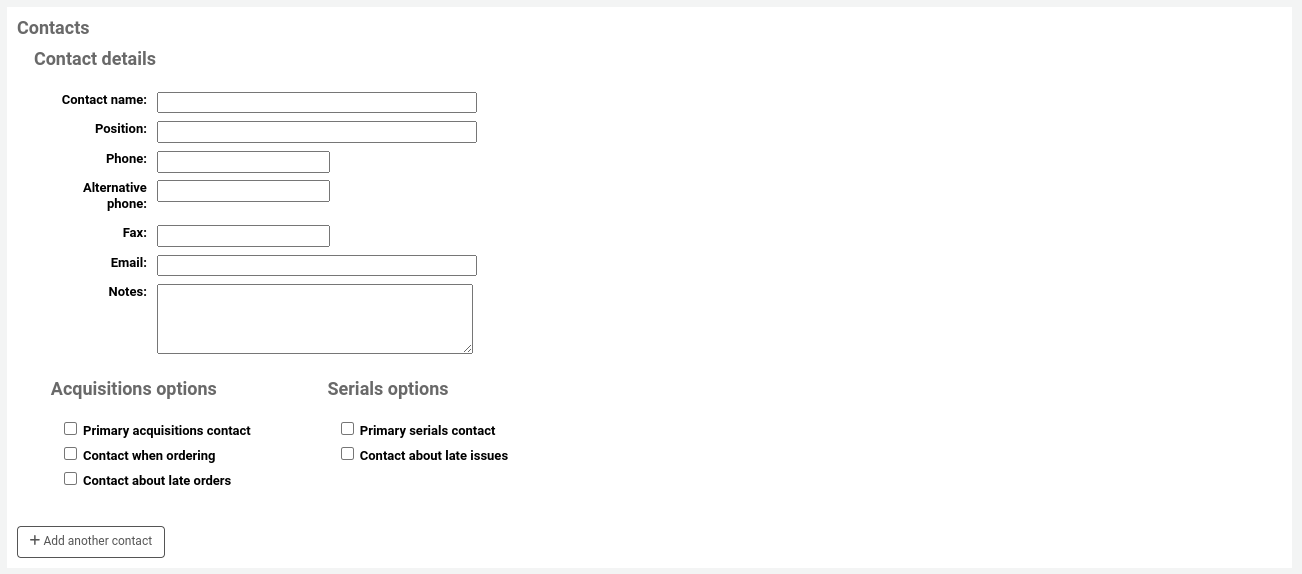
Bu alanların hiç biri zorunlu değildir, yalnızca irtibat kurulacak kişinin bilgilerini Koha içinde takip etmek istiyorsanız girilmelidir.
Birincil sağlayıcı bağlantısı: Bu kişi, bu satıcıdan edinme işlemleriyle ilgili birincil kişi ise bu kutuyu işaretleyin
Birincil süreli yayınlar bağlantısı: Bu kişi, bu satıcıdan gelen süreli yayın edinimleriyle ilgili birincil kişiyse, bu kutuyu işaretleyin.
Sipariş verirken iletişime geçin? Siparişlerinizi e-posta ile doğrudan bu kişiye gönderebilmeniz için bu kutuyu işaretleyin
Geciken siparişlerle ilgili iletişime geçin? Satın alma taleplerinizi doğrudan bu kişiye e-posta ile gönderebilmek istiyorsanız, bu kutuyu işaretleyin.
Geciken sayılarla ilgili iletişime geçin? Süreli yayın taleplerinizi doğrudan bu kişiye e-posta ile gönderebilmeniz için bu kutuyu işaretleyin.
‘Başka bir kişi ekle’ düğmesini tıklayarak satıcı başına birden fazla kişi ekleyebilirsiniz.
Son bölüm fatura bilgileri içindir
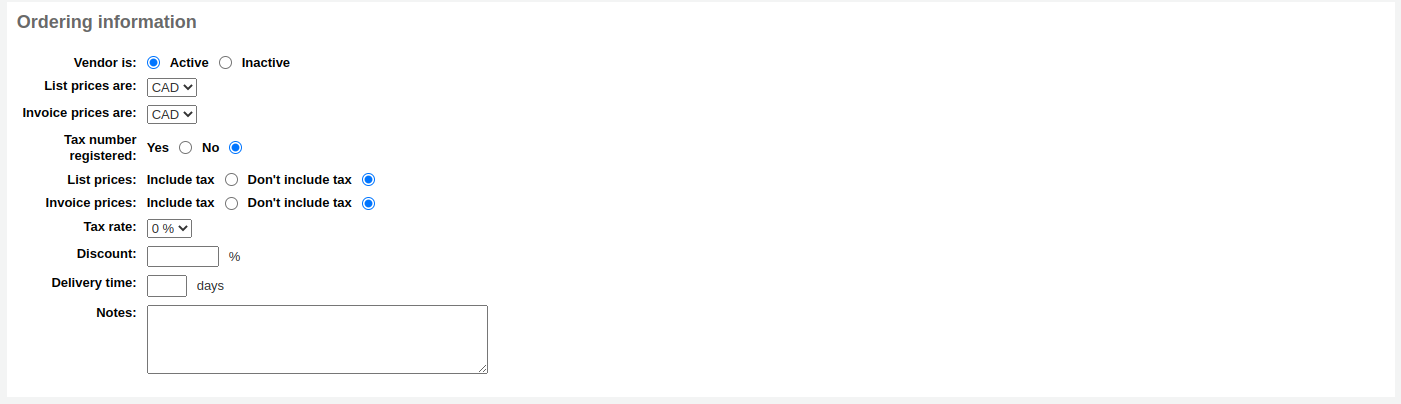
Bir sağlayıcıdan sipariş yapabilmek için sağlayıcıları ‘Etkin’ hale getirmelisiniz
For list prices and invoice prices choose the currency
Currencies are assigned in the Currencies and exchange rates admin area
If your library is charged tax mark your tax number as registered
Eğer liste ve/veya fatura fiyatlarına vergileri dahil ederseniz bunu belirtin
Sağlayıcı bir indirim teklif ederse, ‘İndirim’ alanına yüzdesini girin
Bir spariş gerçekleştirirken materyale özgü indirimler girebilirsiniz
Siparişlerde kütüphanenizden vergi tahsil ediliyorsa vergi oranını girin
Bu sağlayıcıdan siparişlerin genellikle ne kadar sürede geldiğini biliyorsanız bir teslimat süresi girebilirsiniz. Bu, Koha’nın geciken siparişler raporunda siparişlerin ne zaman kütüphanenize ulaşacağını hesaplamasını sağlayacaktır.
Notlar dahili kullanım içindir
View/edit a vendor
To view a vendor’s information page you must search for the vendor from the Acquisitions home page. Your search can be for any part of the vendor’s name:

Sonuçlardan, görmek ya da düzenlemek istediğiniz sağlayıcının adı üzerine tıklayın
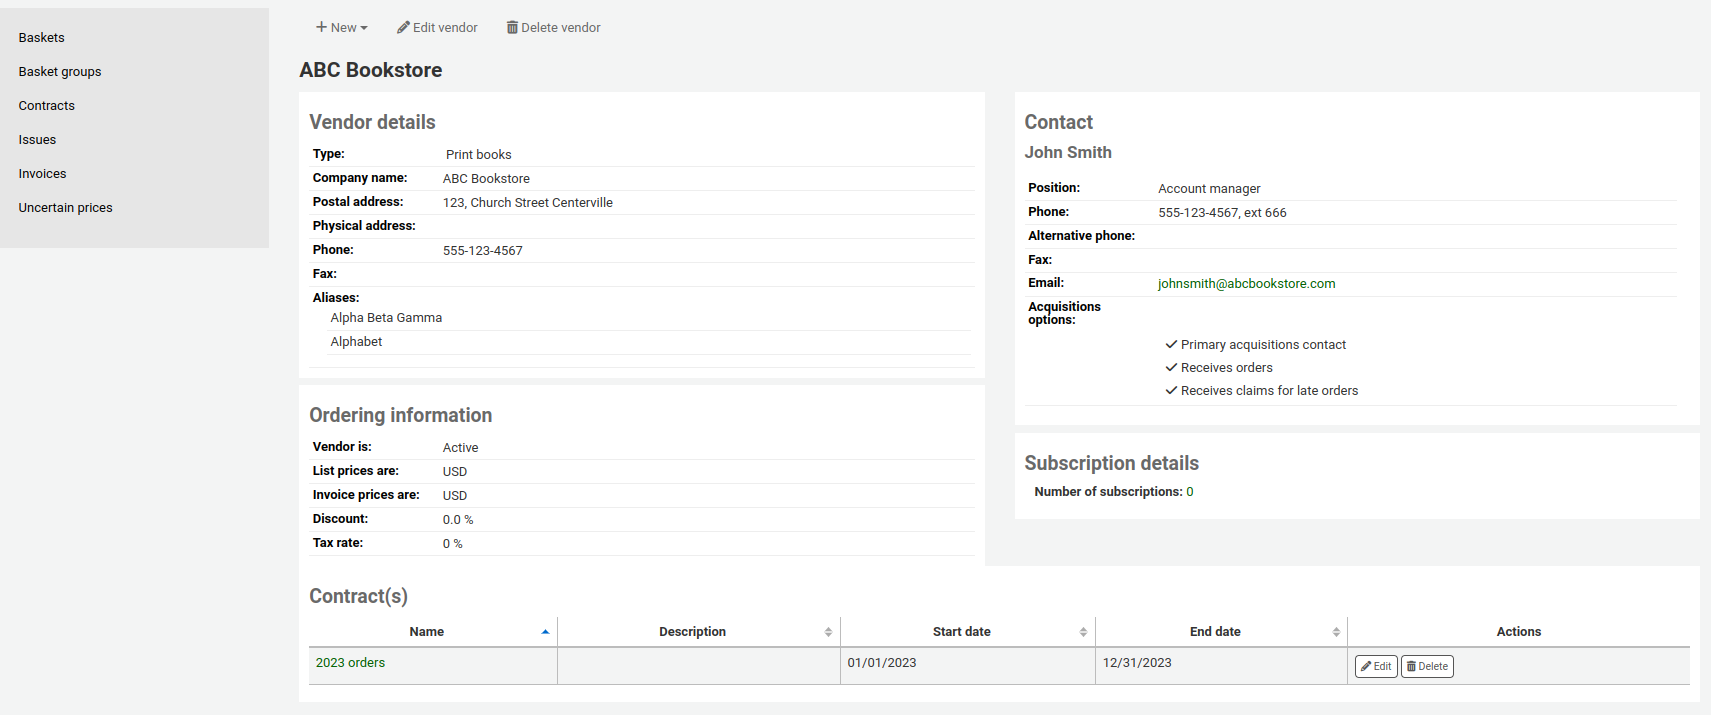
Sağlayıcı üzerinde değişiklik yapmak için ‘Sağlayıcı Düzenle’ butonu üzerine tıklamanız yeterlidir.
Sağlayıcıya bağlı olan hiç bir sepet yoksa ‘Sağlayıcı sil’ butonu da görünür olacaktır ve sağlayıcı silinebilir. Aksi halde bir ‘Sevkiyat alma’ butonu göreceksiniz.

Vendor contracts
Sözleşmeleri tanımlayabilir (başlangıç ve bitiş tarihiyle) ve bu sözleşmeleri bir sağlayıcıya ekleyebilirsiniz. Bu sözleşme, sağlayıcıyla yapılan özel sözleşmede yıl sonunda ne kadar harcadığınızı görebilmeniz için kullanılır. Bazı yerlerde, sözleşmelerin tutarı yıllık minimum ve maksimum olarak ayarlanır.
Add a contract
At the top of a vendor information Page, you will see a ‘New contract’ button.

Sözleşme formu, sözleşmeyle ilgili bazı temel bilgileri soracaktır
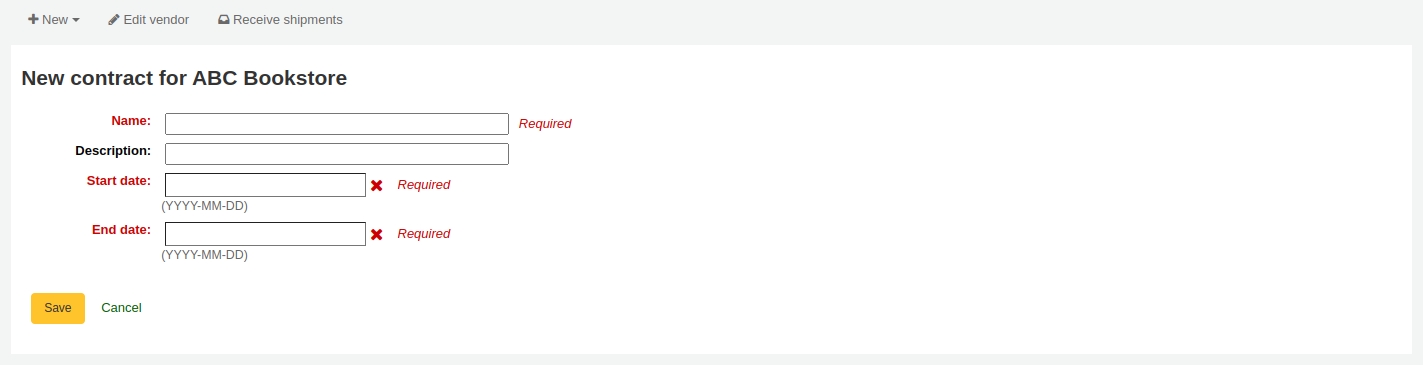
Önemli
Geriye dönük olarak sözleşme giremezsiniz. Bitiş tarihi bugünün tarihinden önce olmamalıdır.
Sözleşme kaydedildiğinde, sağlayıcı bilgisinin altında gözükecektir.

Bir sepet oluştururken aynı zamanda bir seçenek olacaktır

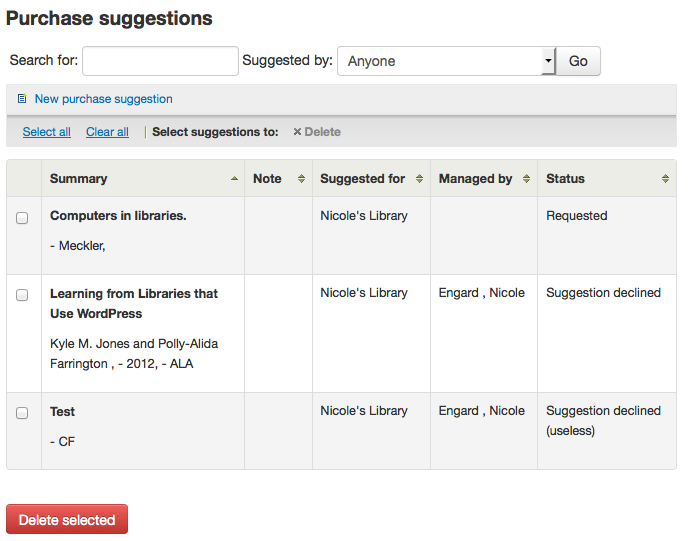
Managing purchase suggestions
Purchase suggestions can be generated in one of two ways. You can create suggestions via the staff client either for the library or on the patron’s behalf from their record. Depending on your settings in the suggestion system preference, patrons may also be able to make purchase suggestions via the OPAC.
Not
You need to be logged in as a staff member with the suggestions_manage acquisitions permission in order to view and work with purchase suggestions.
When a suggestion is waiting for library review, it will appear on the Acquisitions home page next to the vendor search.

Ayrıca modül etiketleri altında ana personel gösterge paneli üzerinde görünecektir:

‘Önerileri Yönet’e tıklamak sizi yönetim aracına yönlendirecektir. Askıda öneri yoksa ‘Önerileri Yönet’ bağlantısına tıklayarak, Ödünç Alma sayfasının solundaki menüden öneri yönetim aracına giriş yapabilirsiniz.

Not
You can customize the columns of this table in the ‘Table settings’ section of the Administration module (table id: suggestions).
Önerileriniz üç kategoride toplanacak: ‘Kabul Edildi’, ‘Beklemede’, ve ‘Reddedildi’. Kabul edilmiş ya da reddedilmiş önerileri yöneten kütüphanecilerin isimleri gösterilecektir ve bu önerileri kabul etme ya da reddetme sebepleri de gösterilecektir. (‘Durumun’ altında bulunan).
‘Kabul edilmiş’ öneri, önerilerin altındaki formları kullanarak ‘Kabul edildi’ olarak işaretlediğiniz öneridir. ‘Bekleyen öneri’ kütüphaneden işlem bekleyen öneridir. ‘Onaylanmış’ öneri önerilerden önce formları kullanarak ‘Onaylandı’ olarak işaretlenen öneridir. ‘Sipariş edilmiş’ öneri, sepetinizdeki Satın alma önerisinden bağlantısı kullanılarak sipariş edilmiş öneridir. ‘Reddedilmiş’ öneri, öneriler listesinin altındaki formu kullanarak ‘Reddedildi’ olarak işaretlediğiniz öneridir.
Birçok önerileri olan kütüphaneler için, Önerileri Yönet sayfasının sol tarafında ekranda gösterilen başlıkların azaltılmasında yardımcı olmak üzere fitreler mevcuttur.
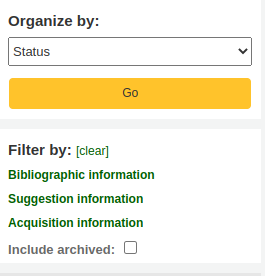
Mavi başlıklara tıklamak filtreleme seçeneklerini artıracaktır ve ‘[temizle]’ ye tıklamak tüm filtreleri temizleyecek ve tüm önerileri gösterecektir.
Not
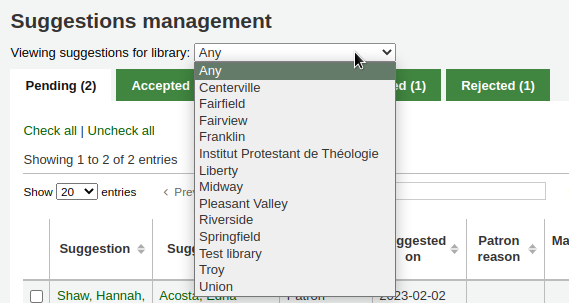
Öneri sayfası kütüphaneniz önerileri otomatik olarak sınırlayacaktır. Tüm kütüphaneler için (ya da her hangi bir kütüphane için) ‘Sağlama bilgisi’ filtresine tıklayınız ve kütüphaneyi değiştiriniz.
When reviewing ‘Pending’ suggestions you can choose to check the box next to the item(s) you want to approve/reject and then choose the status and reason for your selection.

Önerileri kabul ve reddetme sebepleri SUGGEST otorize değeri tarafından tanımlanır.

Neden olarak ‘Diğerlerini …’ seçerseniz, metin kutusuna nedeninizi girmeniz için yönlendirileceksiniz. Kutunun sağındaki ‘İptal’e tıklamak yetki nedenleriyle birlikte açılır menüyü ekrana getirecektir.

You can also change the item type of the suggestions by selecting them and choosing the new item type in the ‘Update item types with’ drop down menu.

You can also change the manager of the selected suggestions by clicking the ‘Select manager’ link and searching your user database. Note that only users who have the ‘superlibrarian’ or the ‘suggestions_manage’ permission will show in the results. The new manager will receive the NOTIFY_MANAGER notice.
You can also choose to completely delete the selected suggestions by clicking the ‘Delete’ button in the the ‘Delete selected’ box.
Kütüphanelere uzun listeler halindeki öneriler için diğer bir seçenek, öneri değiştirme sayfasını açıp önerinin üstündeki başlığa tıklayarak, önerileri materyalin satın alınma bilgisiyle beraber teker teker onaylamak ya da reddetmektir.

Clicking ‘edit’ to the right of the suggested title or at the top of the suggestion detail page will open a suggestion editing page.

Bu formdan öneri düzenlemeleri yapabilirsiniz (daha fazla detay ekleyerek ya da kullanıcı tarafından sağlanan yanlış bilgiyi güncelleyerek ). Önerileri bireysel temelde kabul etmeyi ya da geri çevirmeyi de seçebilirsiniz.
Bir isteği ‘Askıda’ olarak işaretlemeyi seçmek bu isteği ‘Askıda’ sekmesine taşıyacaktır.
Aynı zamanda bu öneriyi bir fona atayabilirsiniz.

This edit can trigger a notice (defined in the Notices & slips tool with the TO_PROCESS notice) to the fund owner that there is a suggestion ready for them to manage if you have turned on the cron job to generate these notices.
Once you have clicked ‘Submit’ the suggestion will be moved to the matching tab. The status will also be updated on the patron’s account in the OPAC and an email notice will be sent to the patron using the template that matches the status you have chosen.
Once the suggestion has completed the acquisitions process, it is possible to archive it by clicking the small arrow next to the ‘Edit’ button and choosing ‘Archive’. This will remove it from the search results. If you have a lot of suggestions, and the page takes a long time to load, archiving old suggestions will improve the performance.

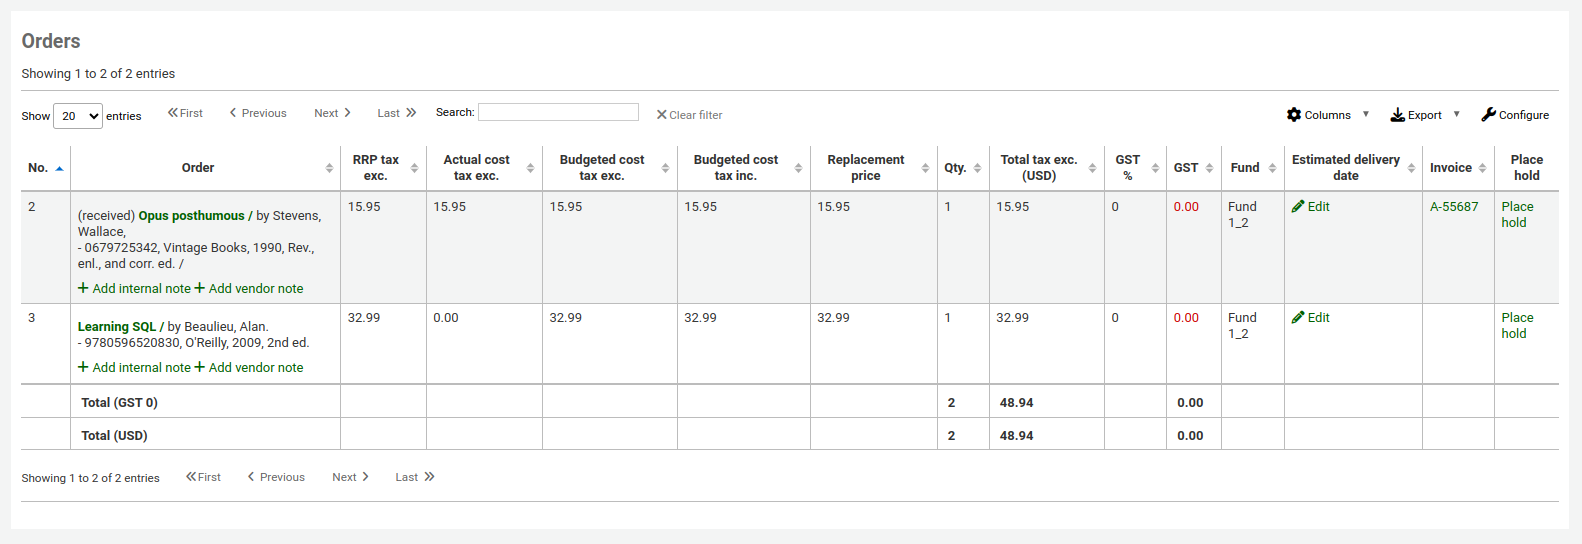
Placing orders
Bir sipariş yerleştirmek için öncelikle siparişi göndermek istediğiniz kitap satıcısı ya da sağlayıcı için arama yapmalısınız.
Önemli
If you are planning on using EDIFACT to submit your order you will need to first set up your library’s EDI hesapları and EANs.
Bir sepet oluştur
Not
Sipariş vermek için EDI kullanıyorsanız, Koha’daki işlemi başlatmadan önce sağlayıcınızdan sipariş kaydınızı indirmek isteyeceksiniz.
Bir sepet oluşturmak için öncelikle siparişi gerçekleştireceğiniz sağlayıcı için arama yapmalısınız:

Ve sağlayıcı adının sağındaki ‘Yeni Sepet’ butonuna tıklayın.
Not
You can also add to an existing basket by clicking the arrow next to the ‘View’ button at the far right of each basket’s information in the results table, and choosing ‘Add to basket’.

‘Yeni sepet’ butonuna tıkladıktan sonra siparişiniz hakkında bazı bilgiler girmeniz istenecektir:
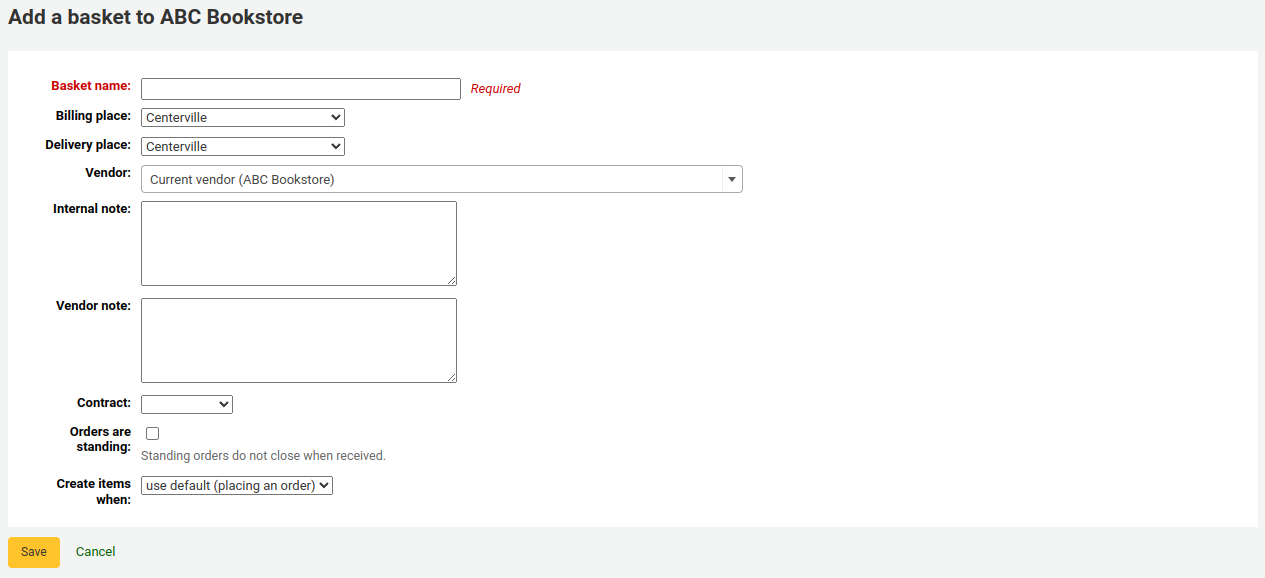
Sepet eklerken, size daha sonra yardımcı olması için bir isim vermek isteyebilirsiniz.
Enter in the billing place and delivery place (this will default the library you’re logged in at)
Sipariş verdiğiniz sağlayıcıyı değiştirmek istiyorsanız, Sağlayıcı açılır menüsünü kullanabilirsiniz.
Not alanları isteğe bağlıdır ve her türlü bilgiyi içerebilir
If you’re ordering standing items (items which arrive regularly) then you will want to check the ‘Orders are standing’ box for this basket.
Note that any one basket cannot contain both firm and standing orders.
You can choose to create items either upon placing the order, upon receiving the order, or upon cataloging the item. If you choose an option other than the default, it will apply only to this basket. The default is set by the AcqCreateItem system preference.
Eğer sipariş verdiğiniz sağlayıcıya eklenmiş sözleşmeler varsa, bu materyalleri hangi sözleşme altında sipariş ettiğinizi seçme opsiyonunuz olacaktır.

When finished, click ‘Save’.

Once your basket is created, click on ‘Add to basket’ you are presented with several options for adding items to the order.
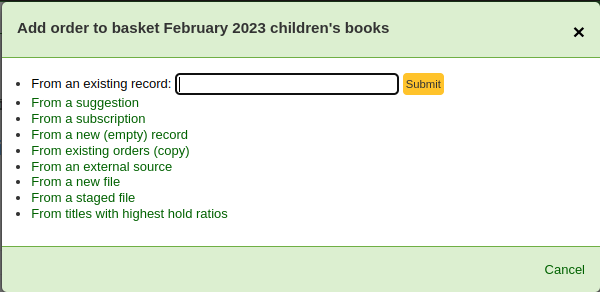
Order from an existing record
Var olan bir materyalin diğer bir kopyasını istiyorsanız, sisteminizdeki kaydı arayabilirsiniz.
From the results, you can click ‘Add order’ to be brought to the order form.
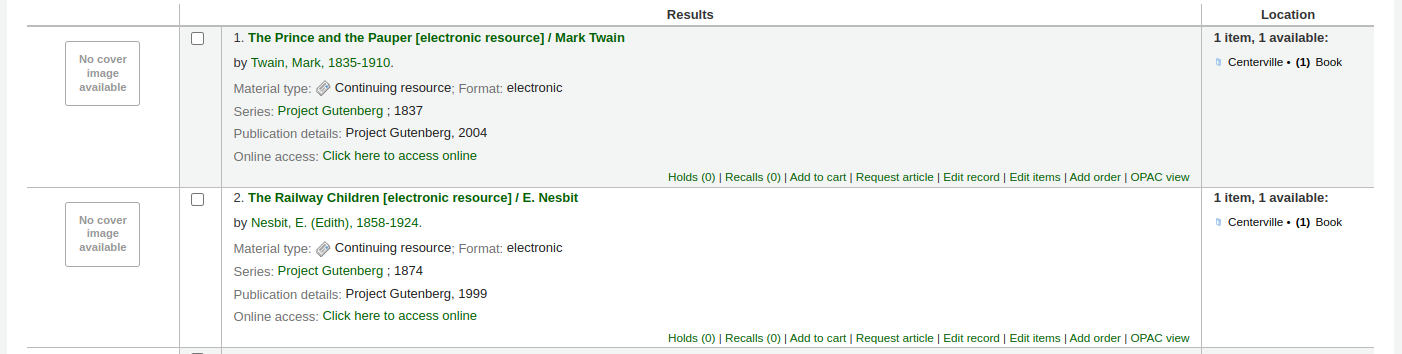
From the record’s detailed view, you can click on the ‘Add order’ button.

You will be brought to the order form
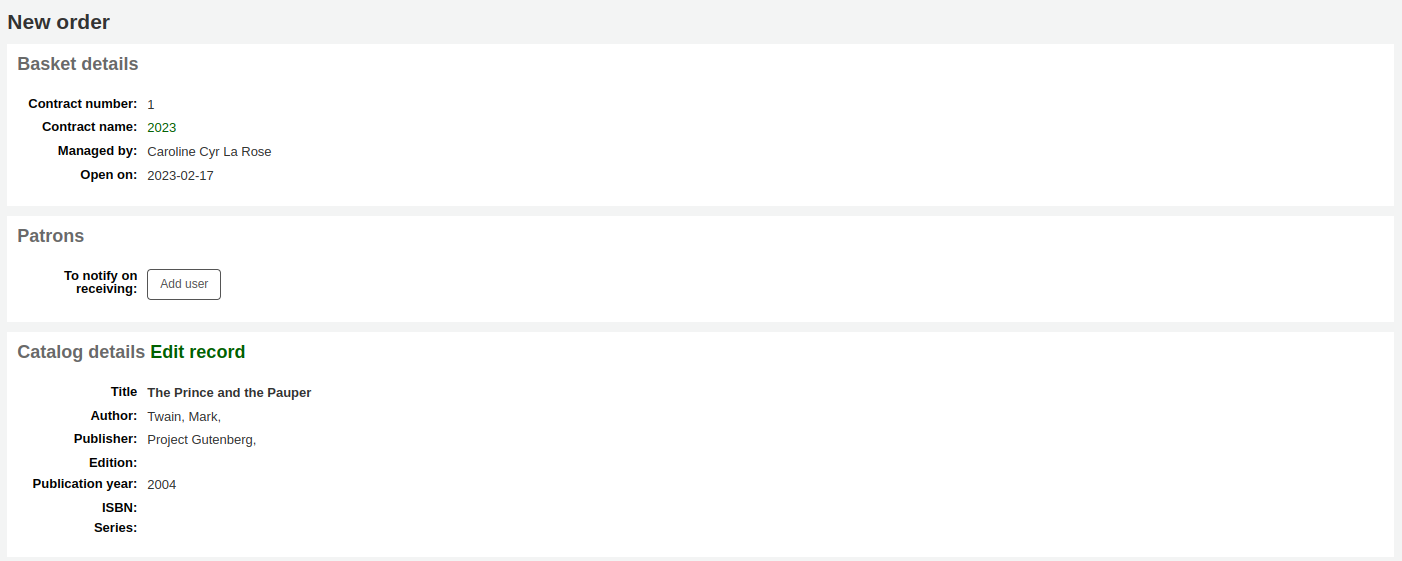
Materyalle ilgili olan tüm detaylar ‘Katalog detayları’ adı altında listelenecektir
Order from a purchase suggestion
Kullanıcılarınızın satın alma önerileri yapmalarına izin veriyorsanız (bu kılavuzun Önerilerin Yönetimi bölümünde daha fazla bilgi edinebilirsiniz), bu öneriler üzerinden sipariş verebilirsiniz. Sipariş edilen ve teslim alınan önerileri takip etmek için siparişi bu bağlantıyı kullanarak vermelisiniz.
Önemli
Suggestions must be accepted before you can order them.
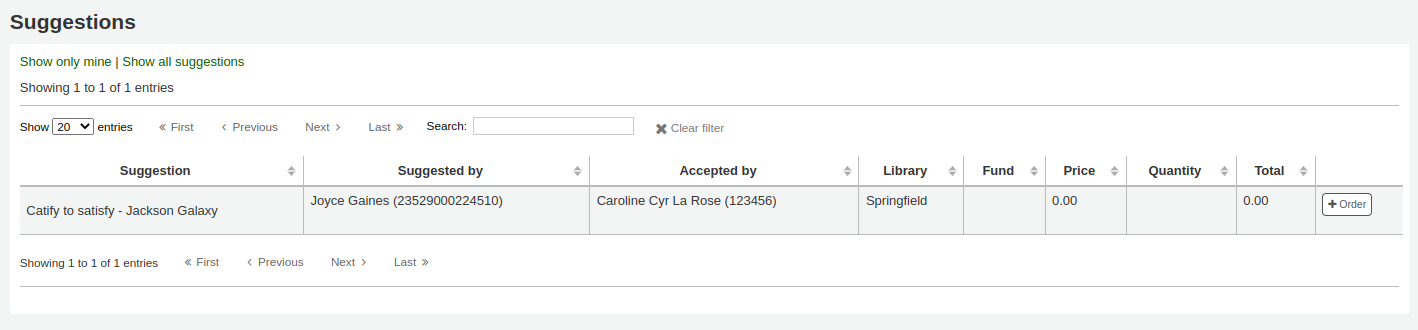
Sonuçlardan, sipariş etmek istediğiniz materyalin yanındaki ‘Sipariş et’ üzerine tıklayın ve öneriye bir bağlantı içeren bir sipariş formu karşınıza gelecektir.
From this form you can make changes to the catalog details if necessary.
Materyal sepetinizde gözüktüğünde, öneri bağlantısı içerecektir.

Orders added to the basket in this way will notify the patron via email that their suggestion has been ordered (with the ‘ORDERED’ notice in Tools > Notices & slips) and will update the patron’s ‘your purchase suggestions’ page in the OPAC.
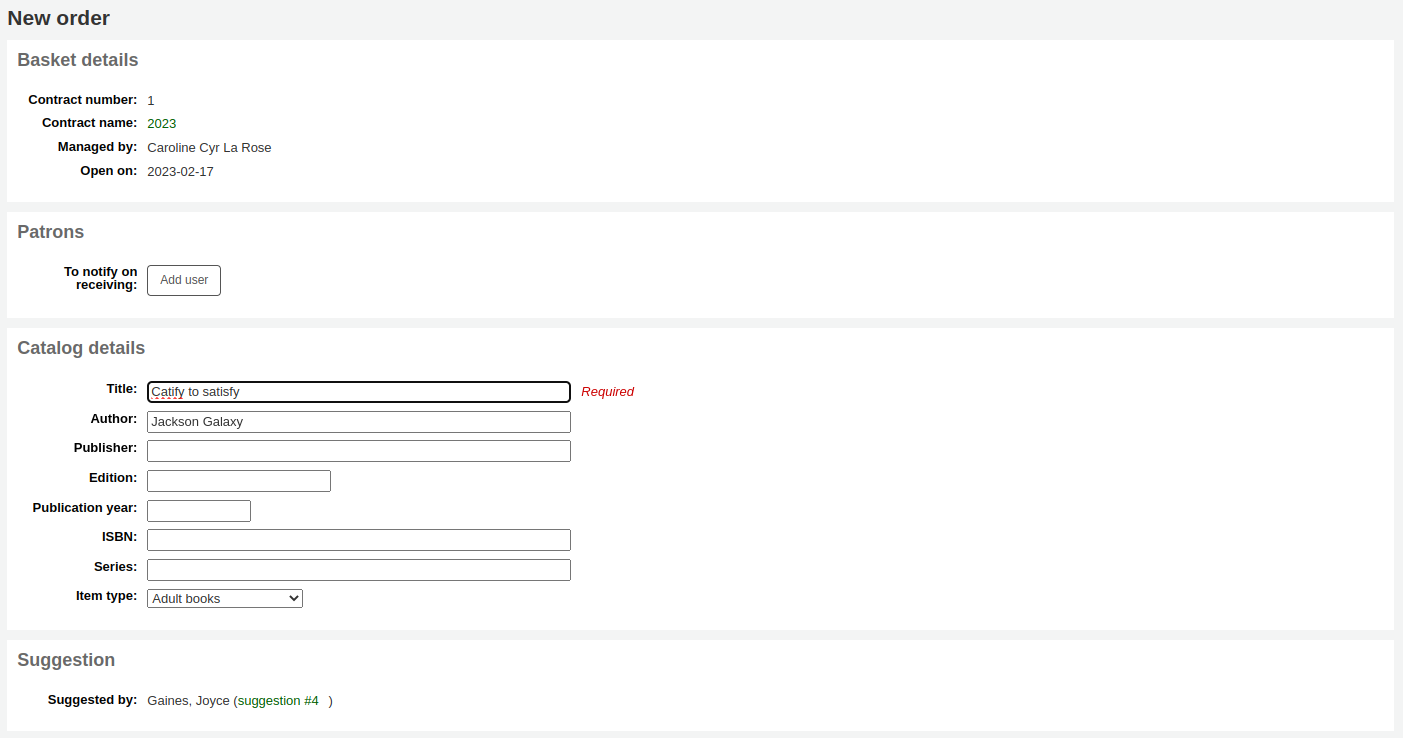
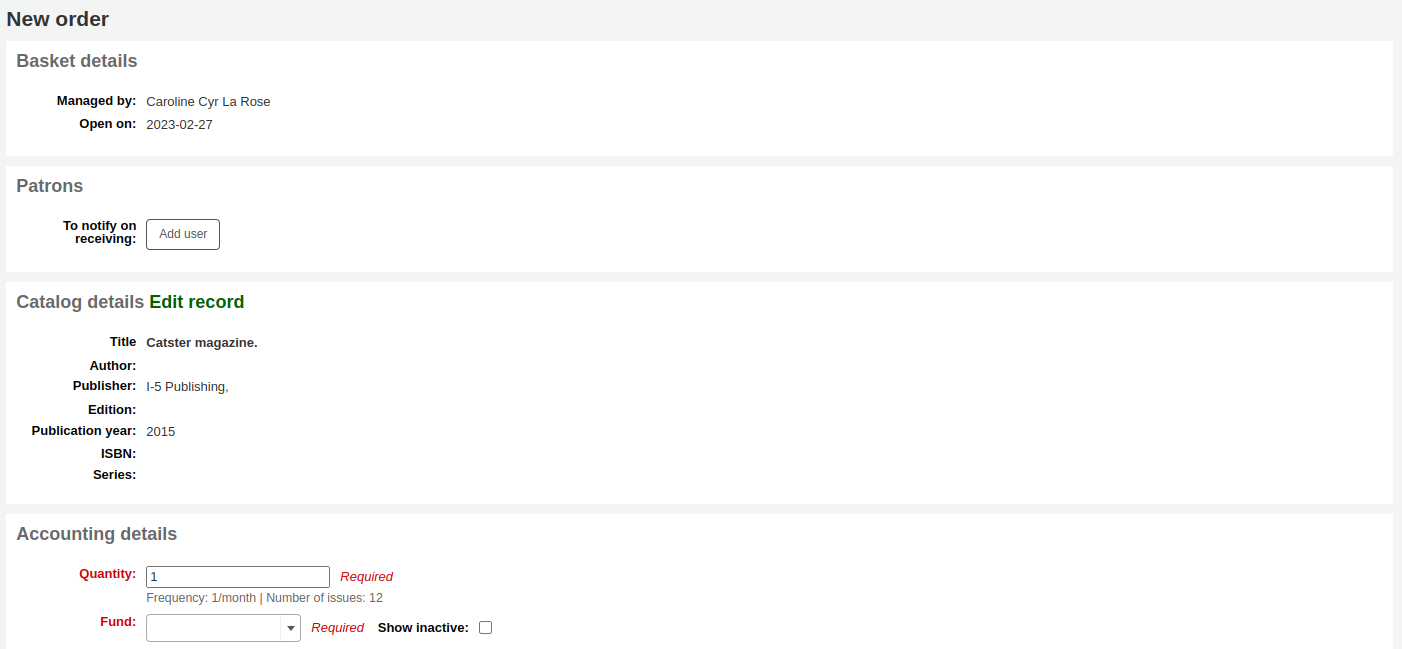
Order from a serial subscription
Süreli yayınlar modülünü kullanıyorsanız, abonelik sipariş bilgilerinizi ‘Abonelikten’ sipariş etmeyi seçerek abonelik sipariş bilgilerinizi sağlamaya bağlayabilirsiniz.
Sipariş bağlantısına tıkladıktan sonra aboneliğinizi bulmanıza yardımcı olacak bir arama sayfasına getirileceksiniz
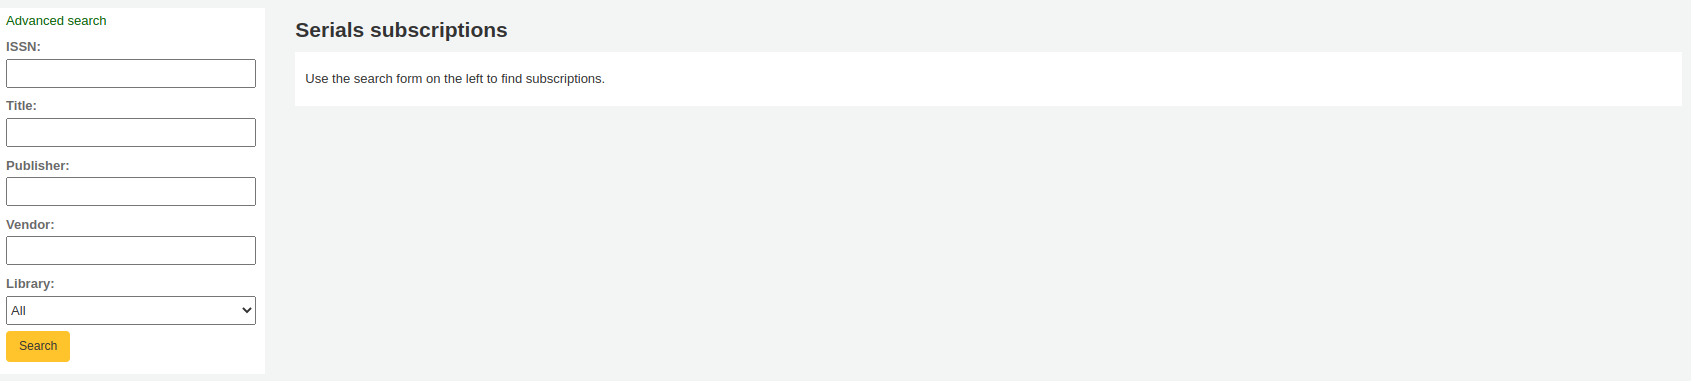
Sonuçlarınız formun sağında görünecek ve her aboneliğin sağ tarafında bir ‘Sipariş’ bağlantısı olacaktır.
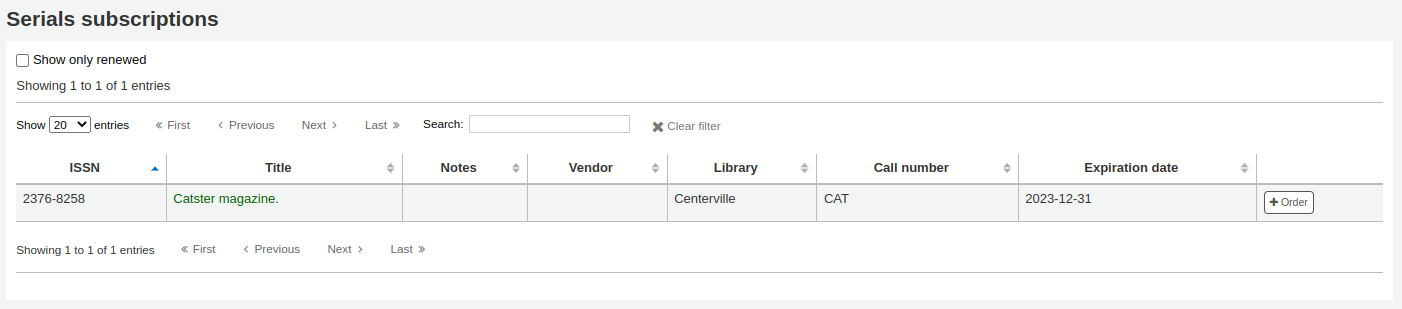
‘Sipariş et’ bağlantısına tıklamak, sadece bir abonelik siparişi verdiğiniz ve bir materyale ihtiyacınız olmayacağı için abonelik bilgisini sipariş formu üzerine ‘Materyal ekle’ bölümü olmadan getirecektir
Order from a new (empty) record
To order from a record that can’t be found anywhere else, choose the ‘From a new (empty) record’ option.

Size sipariş ettiğiniz materyalle ilgili tüm gerekli detayları dolduracağınız boş bir form sunulacak.
Not
If the default form does not have catalog details fields necessary to place an order, enable the UseACQFrameworkForBiblioRecords preference which will allow the ACQ MARC framework to customize the display of fields when ordering.
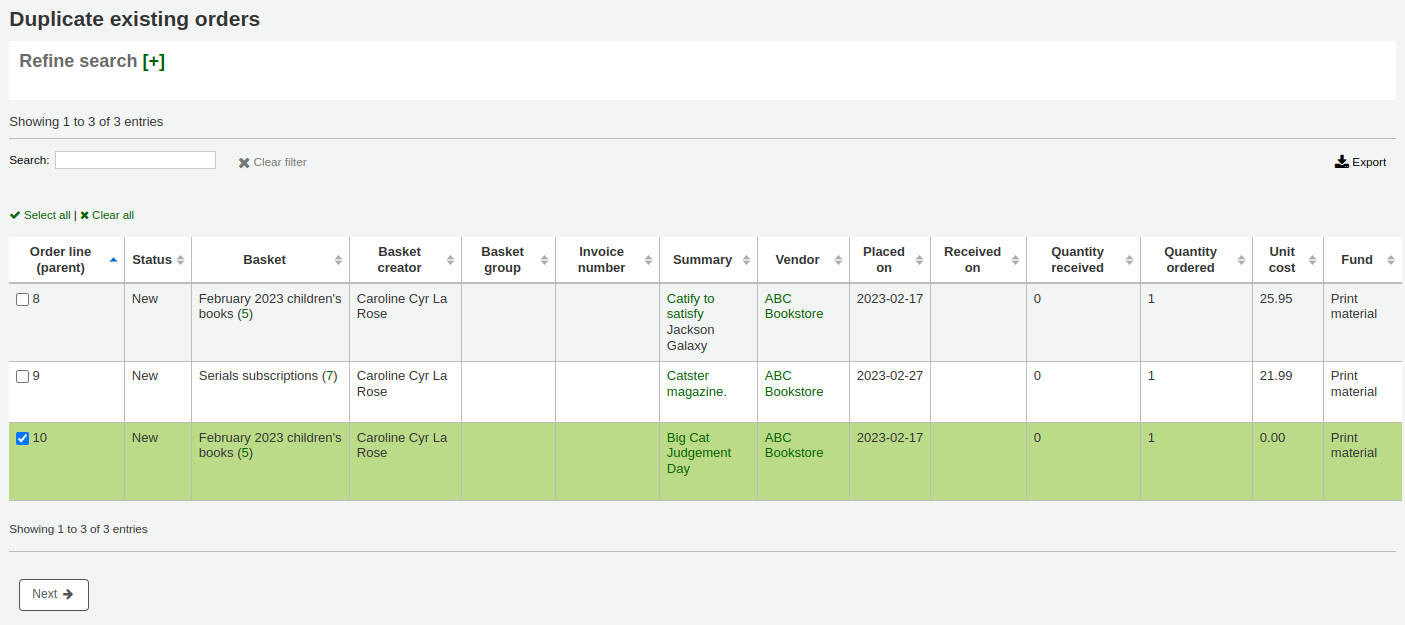
Duplicate orders (order from existing orders)
You can duplicate an existing order line by choosing the ‘From existing orders (copy)’ option.
You will be presented with a search form to search your existing orders.
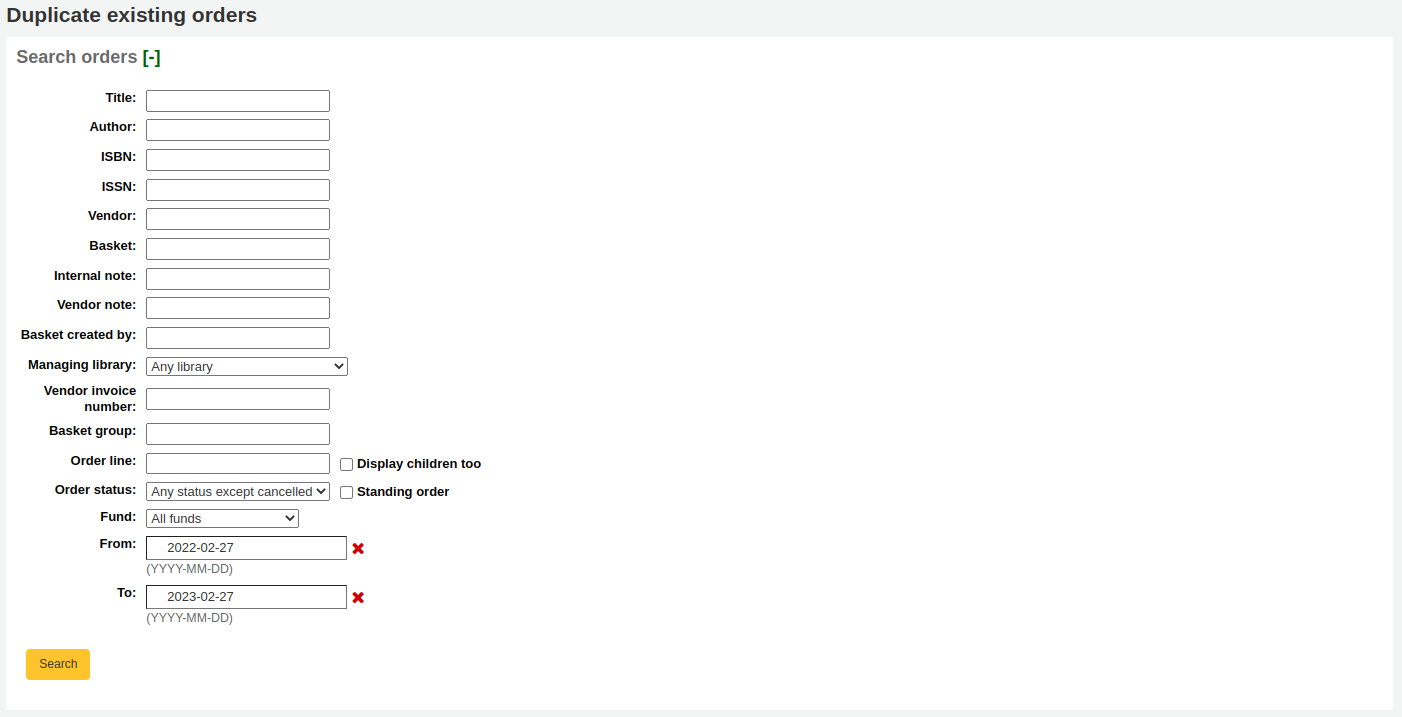
Check the boxes next to the order(s) you want to duplicate.
Order from an external source
Bir materyal satın almak için diğer kütüphanelerde arama yapmak istiyorsanız, Z39.50 araması vasıtasıyla bulunan bir MARC kaydından sipariş yapmanıza izin veren ‘Harici bir kaynaktan’ seçeneğini kullanabilirsiniz.

From the results, click the ‘Order’ button next to the item you want to purchase.

Eğer harici bir kaynaktan sipariş ettiğiniz materyal çift kopya olabilir gibi görünüyorsa, Koha sizi uyaracak ve nasıl devam etmek istediğiniz doğrultusunda seçenekler sunacaktır.

From the warning, you can choose to order another copy on the existing bibliographic record, create a new bibliographic record, or cancel your order of this item.
Açılan sipariş formunda katalog ayrıntılarını düzenlemeniz mümkün olmayacaktır.

Order from a new file
If your vendor sent you a record file (a .mrc file for example), you can add orders using the records in that file. Choose the ‘From a new file’ option.
Not
Note that you need the stage_marc_import tool permission in order to be able order from a new file.
You will be taken to the Stage MARC records for import tool. Stage your file as described in that section.
Once the files are staged, you can click on the ‘Add staged files to basket’ button.

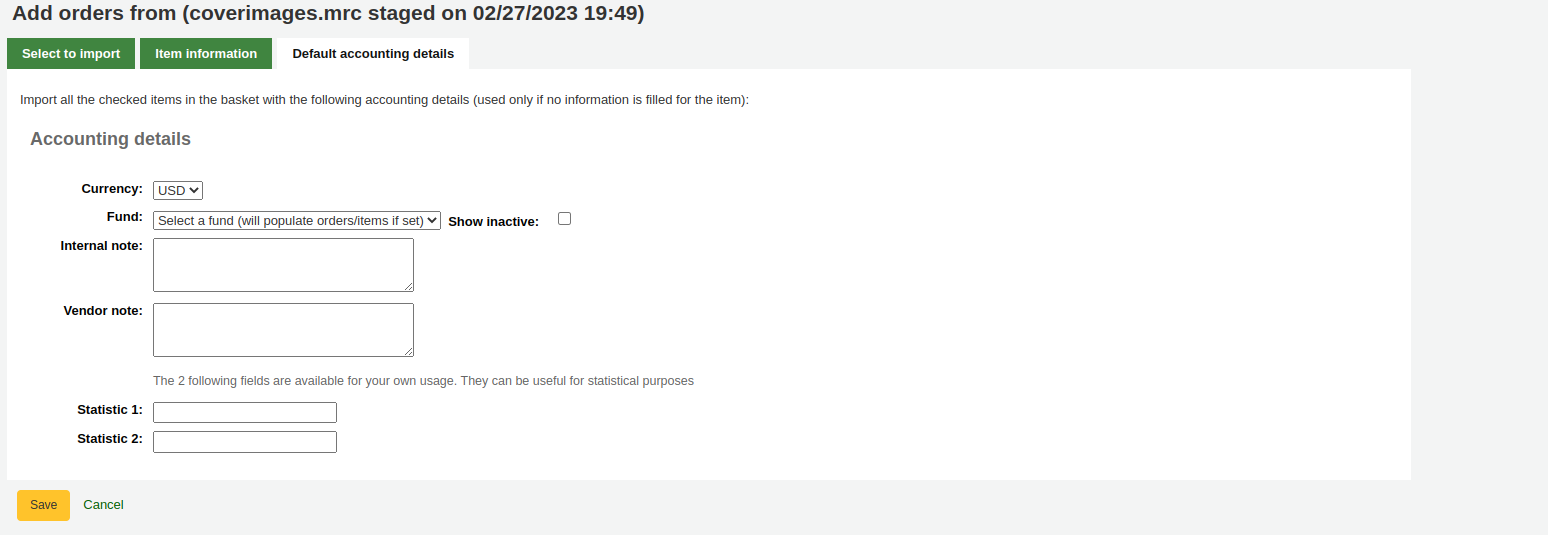
Next to each title is a checkbox, check the items you would like to order, or choose ‘Select all’ at the top. Depending on your settings in the MarcFieldsToOrder preference, Koha will populate the next screen with with the relevant Quantity, Price, Fund, Statistic 1, and Statistic 2 found within the staged file.
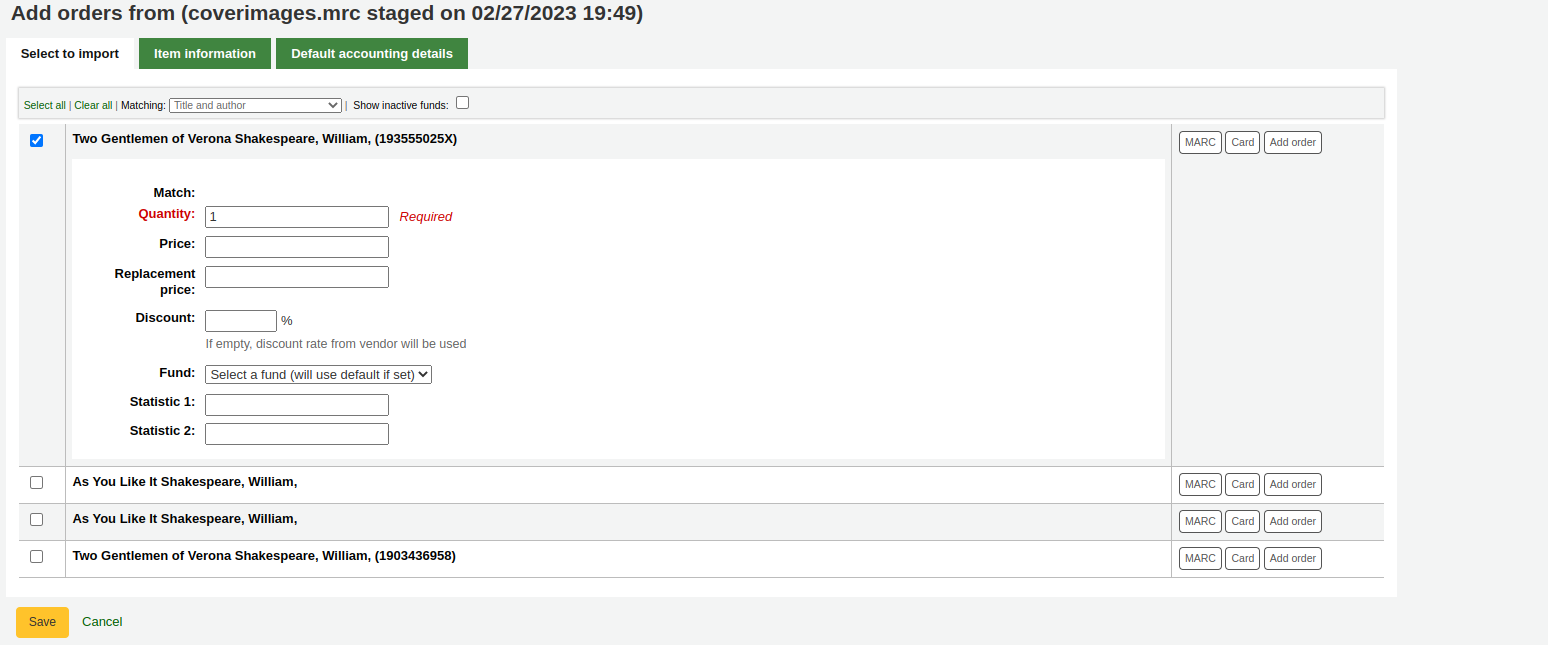
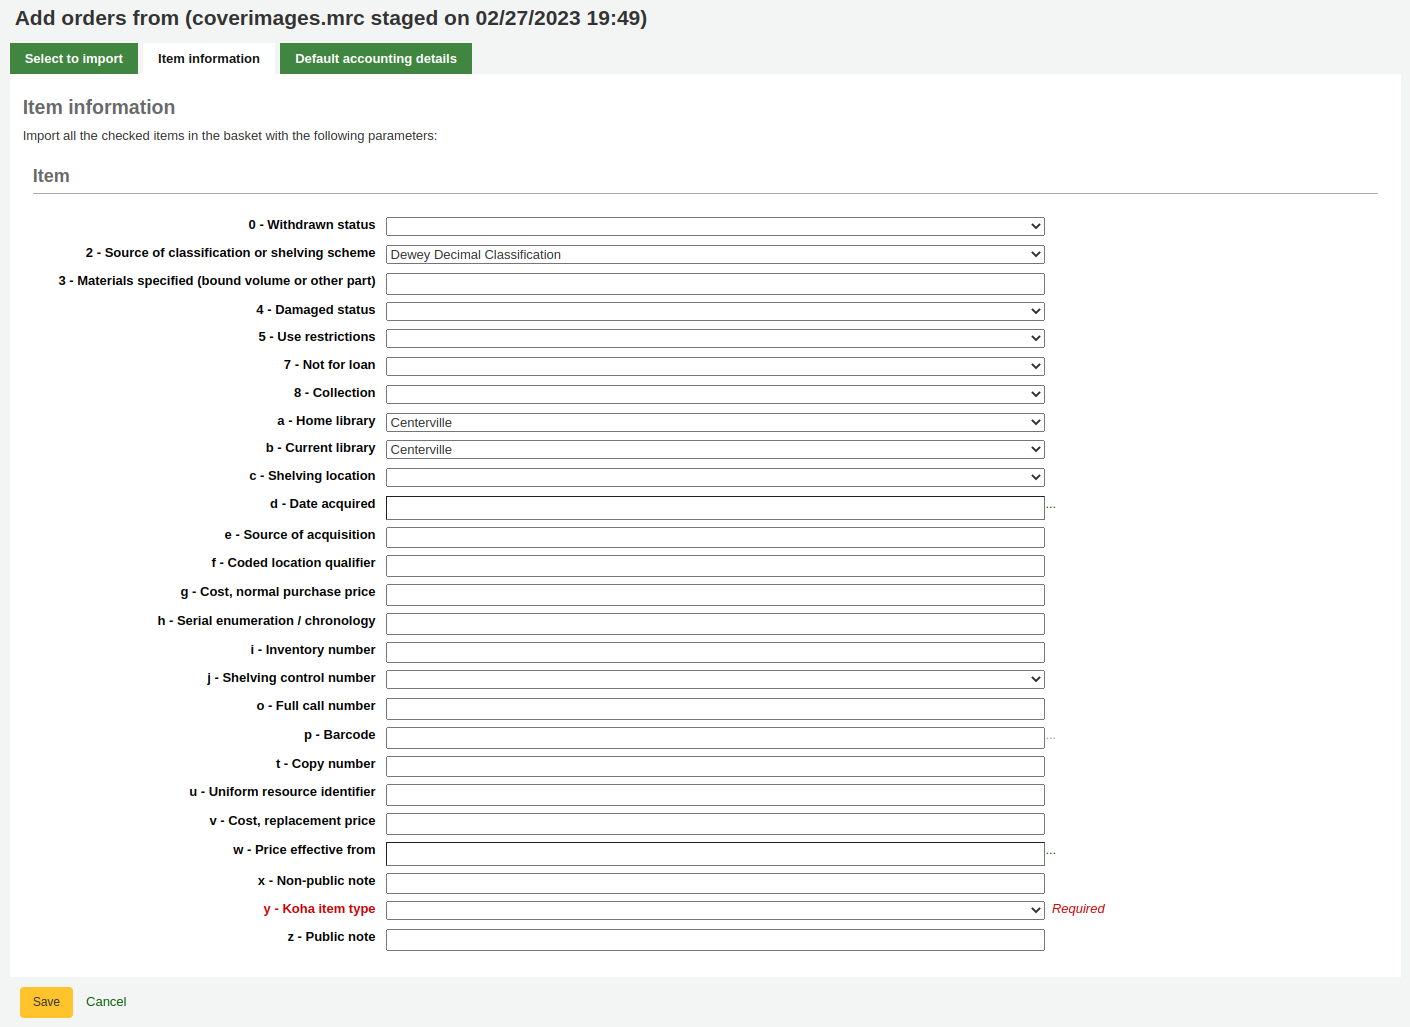
In the ‘Item information’ tab you can enter information that will be added to every ordered item such as item type, collection code and not for loan status.
ref:MarcFieldsToOrder tercihi ile fon bilgisine ilişkin MARC kaydından aktarılan bir bilgi yoksa, ‘Varsayılan hesap ayrıntıları’ sekmesi hesaplamayla ilgili değerleri uygulamak için kullanılabilir.
Hazırlanmış bir dosyadan istek yap
This option is the same as the previous one, but in this case, your file has already been staged. Whether you choose to ‘order from a new file’ or ‘order from a staged file’ will depend on your acquisitions workflow or your permissions.
Once you click on ‘From a staged file’, you will get a list of all the staged files in your system.
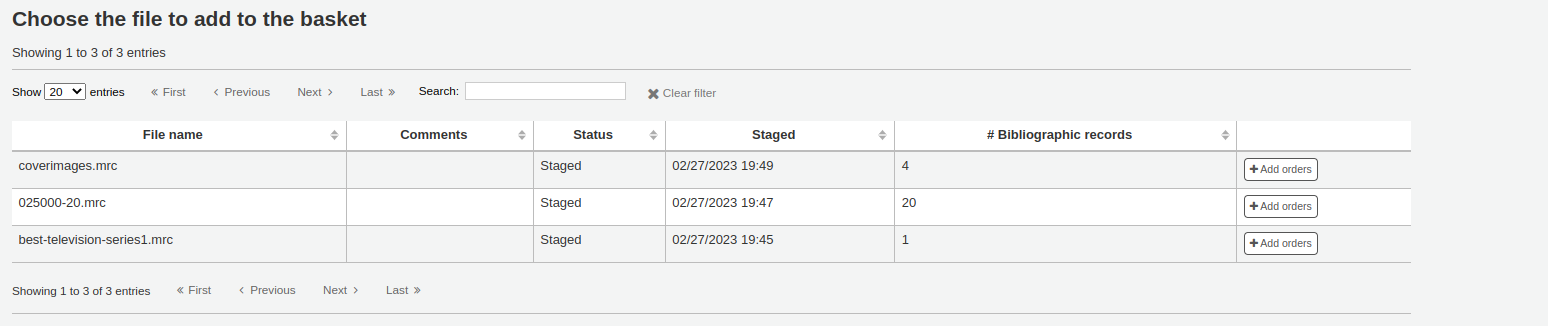
From the list of files you are presented with, click on the ‘Add orders’ button to add the records in the staged file to your order.

Next to each title is a checkbox, check the items you would like to order, or choose ‘Select all’ at the top. Depending on your settings in the MarcFieldsToOrder preference, Koha will populate the next screen with with the relevant Quantity, Price, Fund, Statistic 1, and Statistic 2 found within the staged file.
In the ‘Item information’ tab you can enter information that will be added to every ordered item such as item type, collection code and not for loan status.
ref:MarcFieldsToOrder tercihi ile fon bilgisine ilişkin MARC kaydından aktarılan bir bilgi yoksa, ‘Varsayılan hesap ayrıntıları’ sekmesi hesaplamayla ilgili değerleri uygulamak için kullanılabilir.
Order from titles with highest hold ratios
Sipariş için son seçenek en yüksek ayırma oranlarına sahip başlıkların listesinden sipariştir
This option will take you to the holds ratio report where you can find items with a high hold ratio and order additional copies. Next to each title will be a button with the number of items to order, click that and it will add the item to your basket.

With any of the above ordering options you’re presented with an option to notify patrons of the new item when it’s received. The contents of that notification can be edited in the Notices & slips tool and will have the code of ACQ_NOTIF_ON_RECEIV. In the ‘Patrons’ section you will see an option to ‘Add user’. Click that button to add patrons who will be notified of the new issue.
Kullanıcı bildirimi arama
In the window that pops up search for the patrons you’d like to notify and click ‘Add’

İşiniz bittikten sonra pencereyi kapatabilirsiniz ve ‘Kullanıcılar’ bölümü altında kullanıcıların listesini göreceksiniz

After bringing in the record information (for all order methods except for the staged files), if your AcqCreateItem system preference is set to add an item when ordering you will enter the item information next. You need to fill out at least one item record and then click the ‘Add item’ button at the bottom left of the item form.
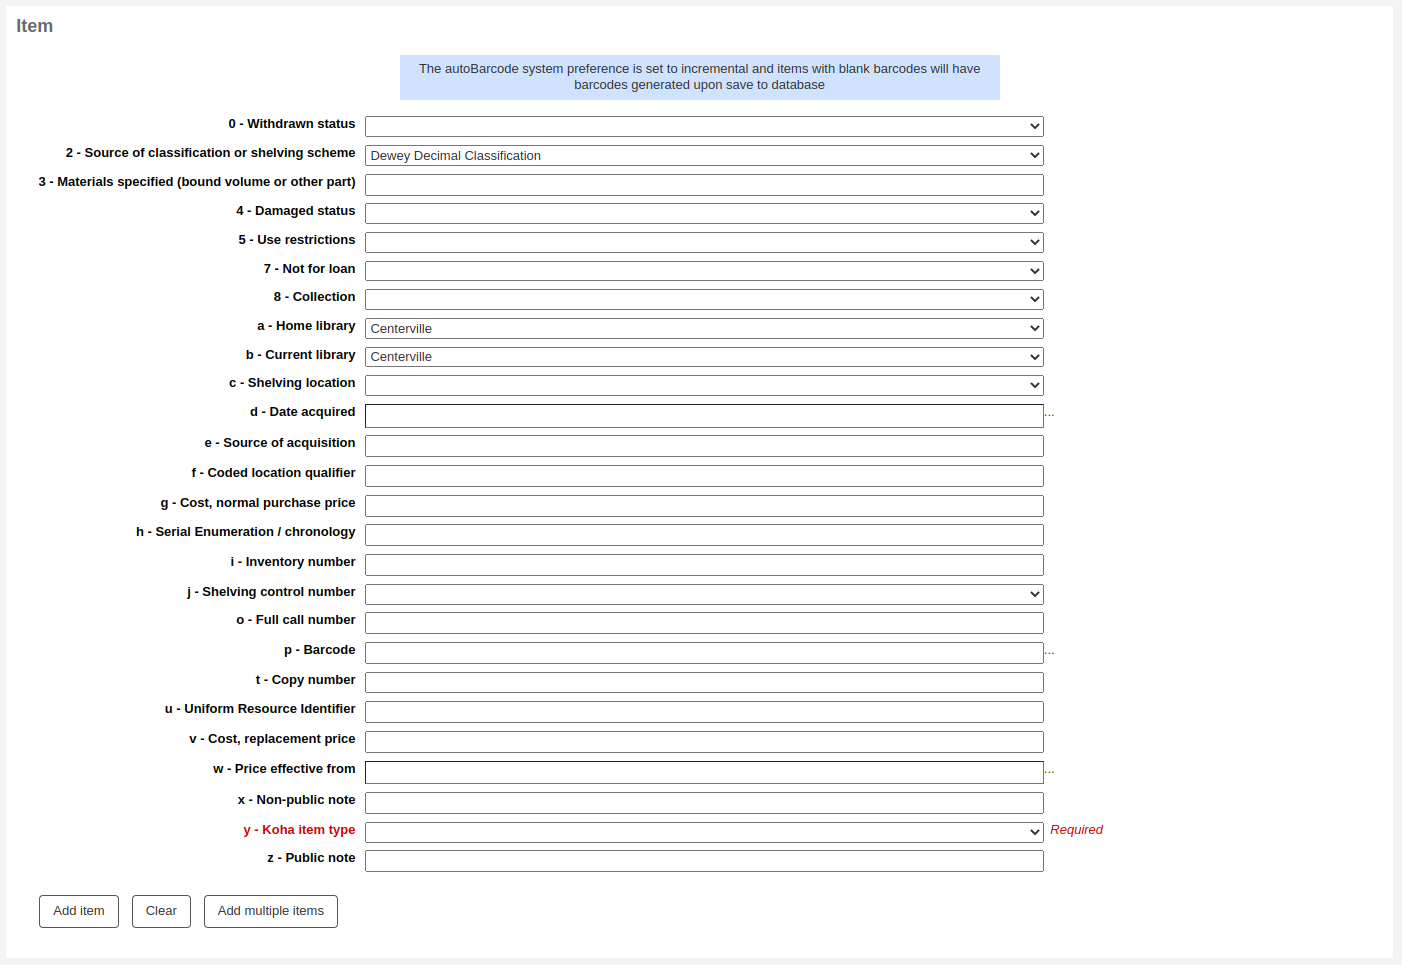
Materyal kaydının altında bulunan ‘Materyal ekle’ butonuna tıkladıktan sonra materyal formun üstünde belirecek ve böylece bir sonraki materyali aynı şekilde girebileceksiniz (eğer birden fazla materyal sipariş ediyorsanız).

If you are ordering several items, you can click on the ‘Add multiple items’ instead of adding them one by one. This will ask you how many items you want to add. Simply enter that number in the box and click on ‘Add’.

Materyalle ilgili bilgiyi girdiğinizde, Hesaplama bilgisini de girmek durumundasınız.
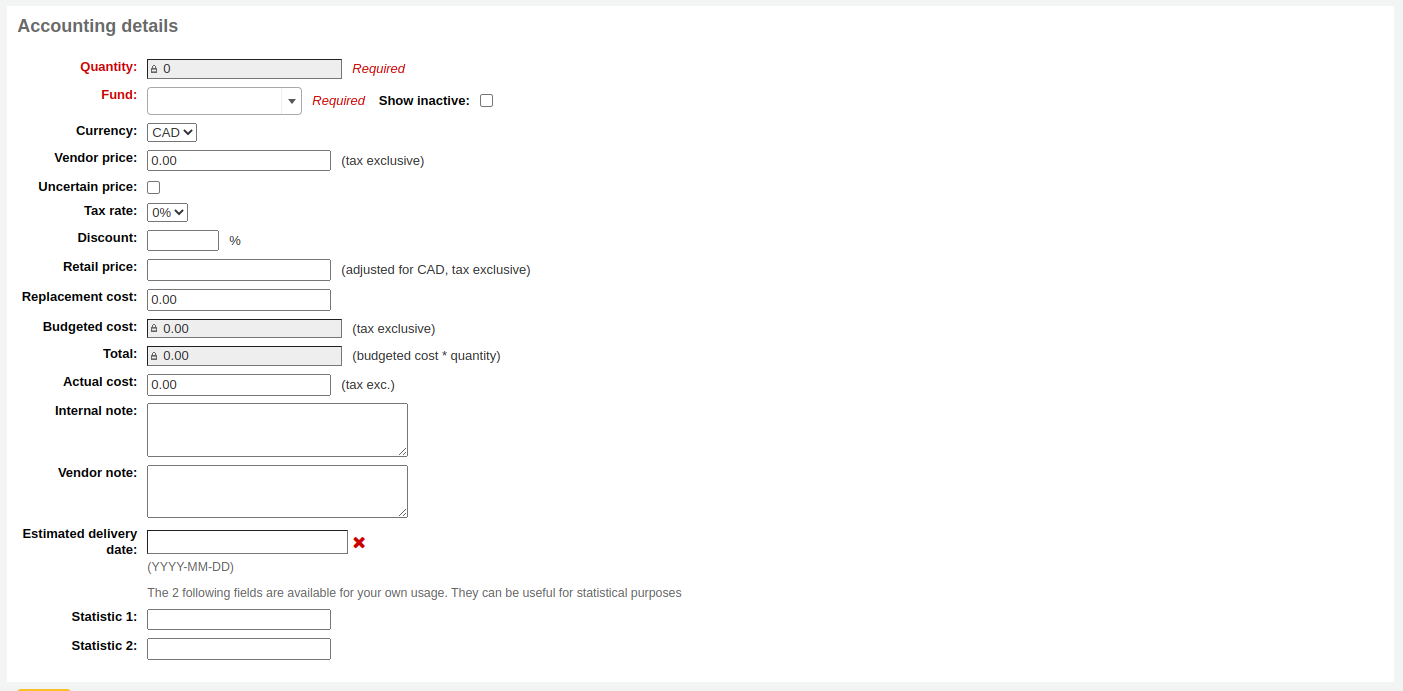
Miktar, Yukarıdaki siparişe eklediğiniz materyal sayısına göre doldurulur.
Önemli
If the item is created upon ordering, you will not be able to edit the quantity manually, you must click ‘Add item’ below the item form to add as many items as you’re ordering.
The list of funds is populated by the funds you have assigned in the Acquisitions administration area.
The currency pull down will have the currencies you set up in the Acquisitions administration area.
Sağlayıcı fiyatı her hangi bir verginin ya da indiriminin uygulanmadan önceki fiyatıdır.
Fiyat belirsiz ise, belirsiz fiyat kutusunu işaretleyin.
Not
En az bir belirsiz fiyattaki sepet kapatılamaz.
If you are charged sales tax, choose that from the ‘Tax rate’ field. This field is populated by the gist system preference.
Bu siparişte aldığınız indirim yüzdesini giriniz, bu yüzdeyi girdiğinizde, sekmeye tıklayınız ve Koha aşağıdaki fiyat alanının gerisini dolduracaktır.
Retail price is the recommended retail price (RRP), the price set by the publisher or the manufacturer as a recommendation to booksellers.
Replacement cost is the price it will cost to replace the item. This is the price charged to the user when an item is declared lost (if the WhenLostChargeReplacementFee system preference is set to ‘Charge’).
Budgeted cost is the amount that will be removed from the ‘spent’ budget. Whether this number includes or excludes taxes will depend on the ‘List price’ setting for your vendor.
Total is the budgeted cost multiplied by the quantity of items ordered.
You can add an internal note. This will only appear in the acquisitions module and in the staff interface catalog, under the ‘Acquisitions details’ tab in the detailed record.
You can also add a vendor note. This will appear in the acquisitions module as well as on the order when exported as CSV.
If you added statistical categories when creating the Fund, those values will appear in the two statistics fields.
Tüm alanları bir kez doldurduktan sonra materyali sepetinize eklemek için ‘Kaydet’ üzerine tıklayın. Eğer fiyat mevcut bütçenin üzerine çıkarsa onay vermeniz istenecektir.

Onay uyarısı, bunu seçerseniz bütçe miktarınız üzerinde sipariş yapmanıza izin verecektir.
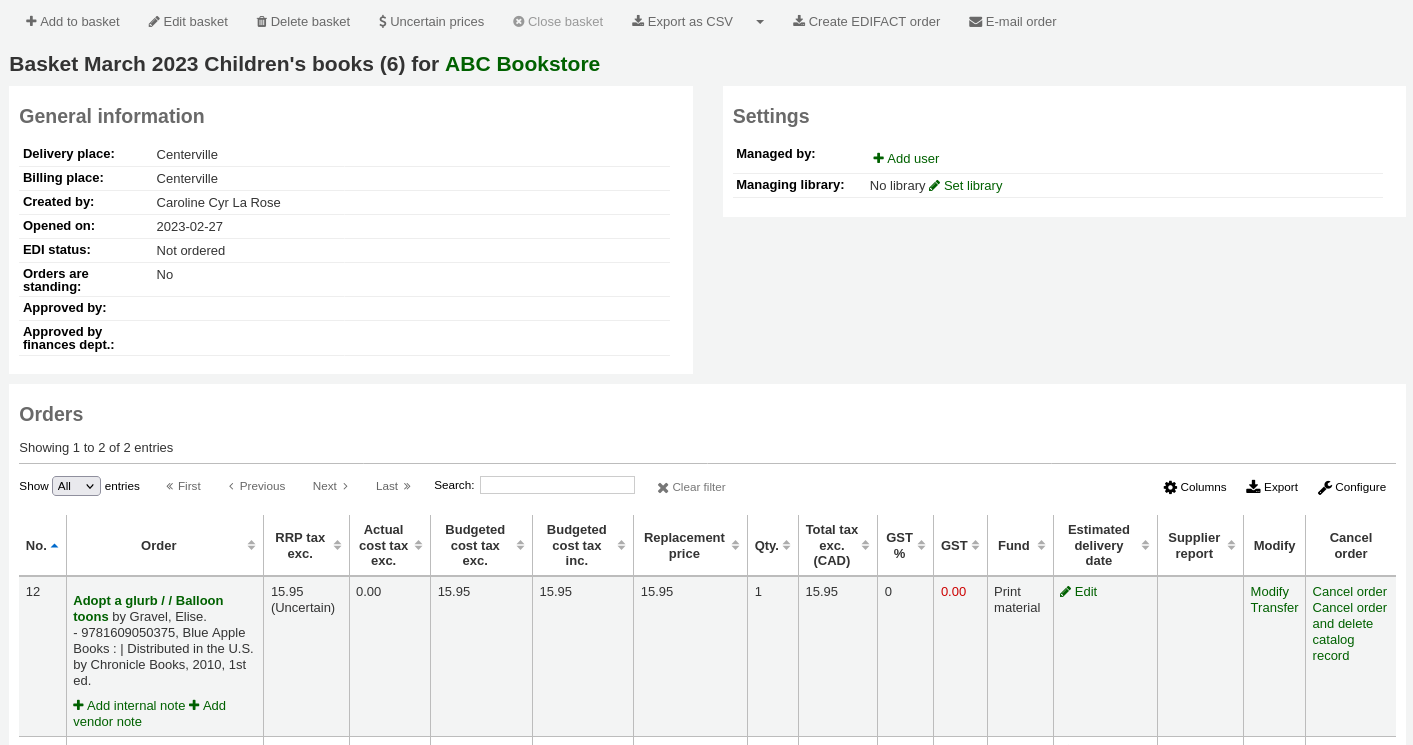
Materyal sepete eklendikten sonra karşınıza bir sepet özeti gelecektir.
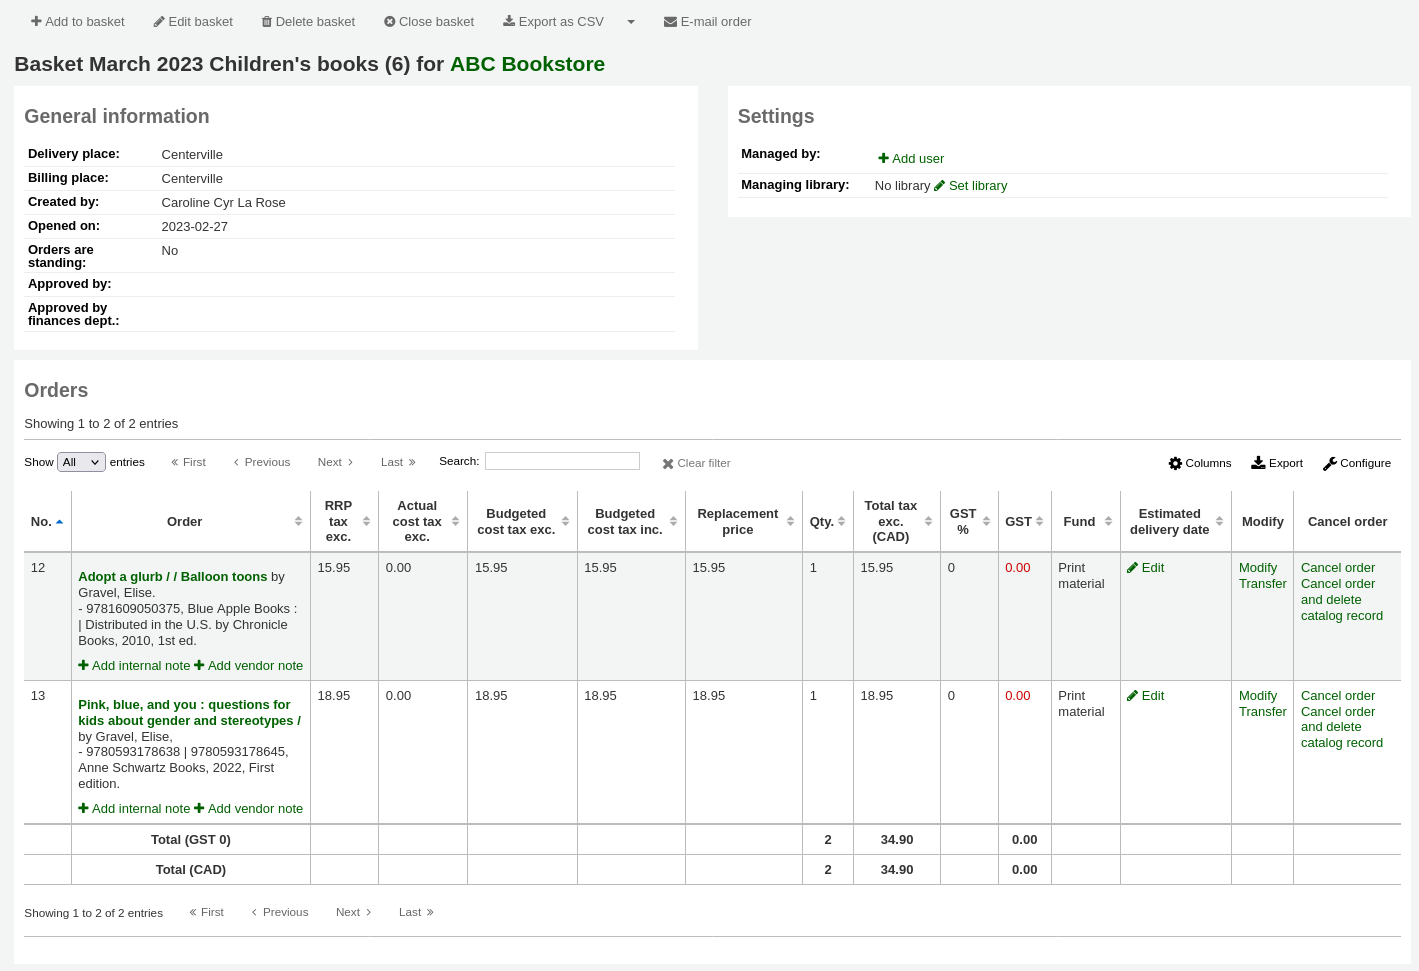
Not
You can customize the columns of this table in the ‘Table settings’ section of the Administration module (table id: orders).
Burada, eklemiş olduğunuz materyalleri düzenleyebilir ya da kaldırabilirsiniz.
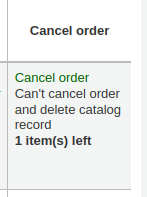
Choosing to ‘Cancel the order’ will delete the order line but leave the record in the catalog.
Choosing to ‘Cancel order and delete catalog record’ removes both the order line and the record in the catalog.
Katalog kaydı her zaman silinemez. Neden silinemediğini açıklayan notlara bakabilirsiniz.
On the summary page, you also have the several option through the buttons at the top of the basket header.

Edit basket: edit the basket information, such as the name or the billing place.
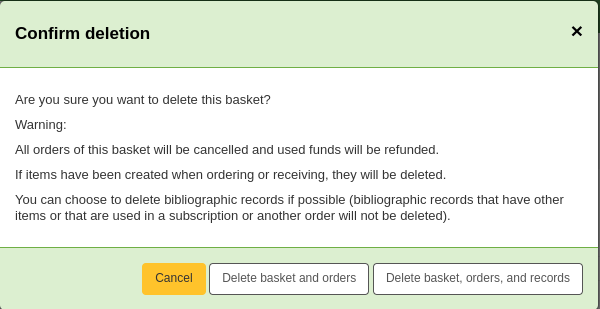
Delete this basket: if the basket is empty, you will get a simple confirmation message before deleting the basket. If the basket contains orders, you will get a confirmation message with several options.
Delete basket and orders: this will delete the basket, cancel the orders, refund the used funds, and delete the items (ordered or received).
Delete basket, orders, and records: this will delete all of the above plus the bibliographic records associated with the orders (except the ones which can’t be deleted because they have remaining items, orders or subscriptions attached).
Close this basket: closing the basket will enable you to add it to a basket group (this is optional) and receive its items.
Export as CSV: this will create a CSV file with all your orders from this basket. You can add several CSV profiles options by going to the CSV profiles tool.
E-mail order: this will send the order information to your contact for this vendor. Make sure your contact has a email address in the vendor profile.
Siparişiniz için EDI kullanıyorsanız, dosyayı sağlayıcıya göndermek ve sepeti kapatmak için işiniz bittiğinde ‘EDIFACT siparişini oluştur’ butonuna tıklayabilirsiniz.

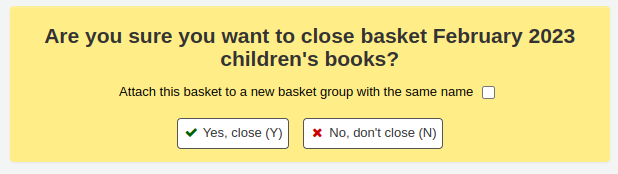
Sepetinizin tamamlandığına eminseniz, bu sepetin tamamlandığını ve sağlayıcıya gönderilmiş olduğunu göstermek üzere ‘Bu sepeti kapat’ butonuna tıklayabilirsiniz.
Önemli
Gelen materyalleri alabilmek için sepetinizi kapatmış olmalısınız. Yalnızca kapalı sepetler içerisindeki materyaller alınmaya hazır olarak gösterilecektir.
BasketConfirmations tercihiniz onay isteyecek şekilde ayarlı ise, size bu sepeti kapatmak istediğinizden emin olup olmadığınız sorulacaktır.

When closing the basket you can choose to add the basket to a group for easy printing and retrieval. If you check the box to ‘Attach this basket to a new basket group’ you will be brought to the group list where you can export a PDF of the order.
Önemli
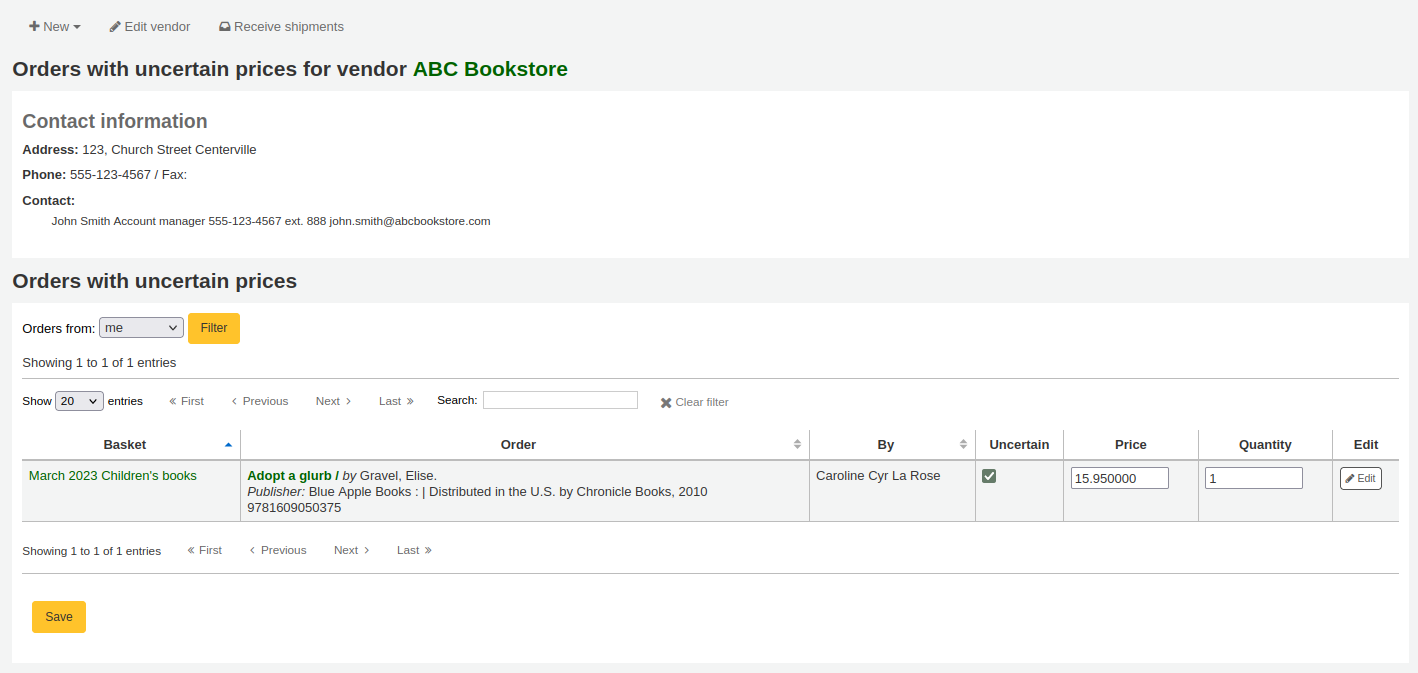
A basket with at least one item marked as ‘uncertain price’ will not be allowed to be closed.
Clicking the ‘Uncertain prices’ button will call up a list of items with uncertain prices to quick editing. From that list, you can quickly edit the items by entering new prices and quantities.
Önemli
The Uncertain prices page is independent of the basket. It is linked to the vendor so you will see all items on order with uncertain prices for that vendor.
Siparişiniz bir kez girildikten sonra satın almalar yoluyla siparişiniz için arama yapabilir ya da personel arayüzünde bibliyo ayrıntıları sayfasında siparişiniz hakkındaki bilgileri görebilirsiniz (eğer AcquisitionDetails tercihi ‘Görüntüle’ olarak ayarlanmış ise).

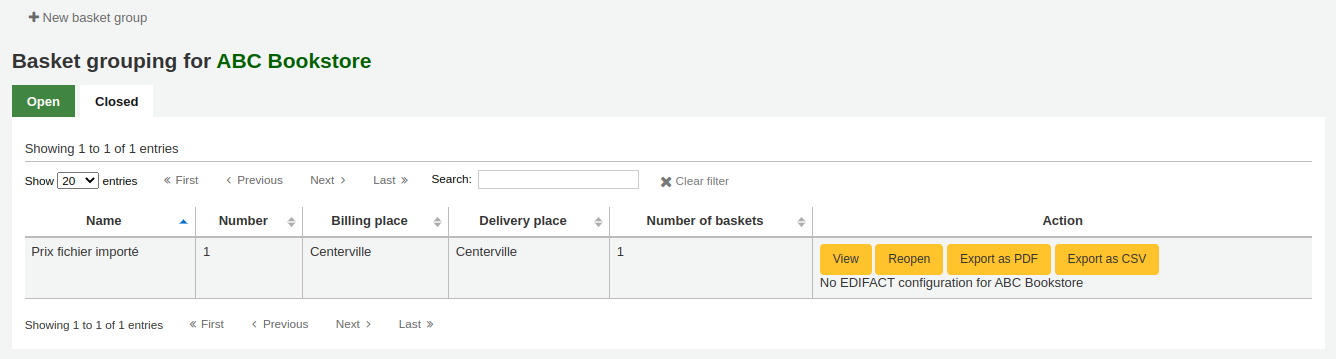
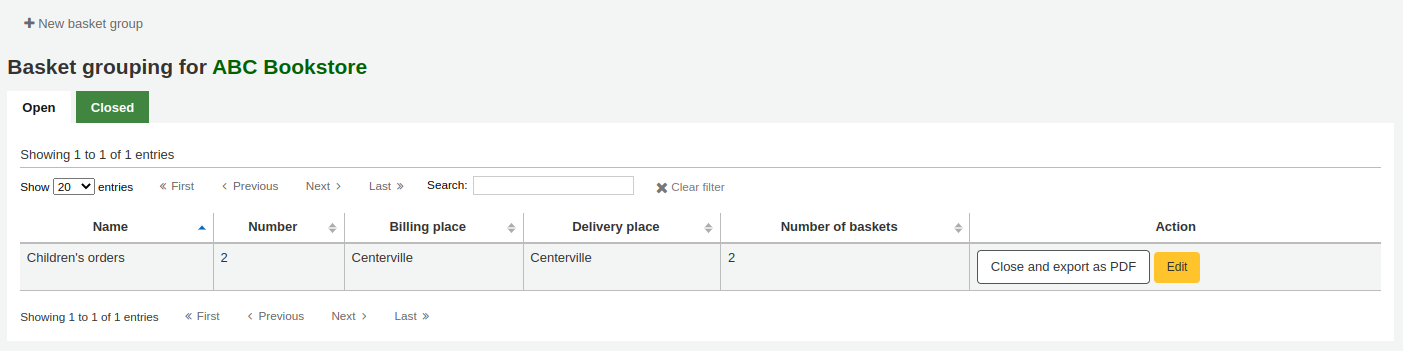
Bir sepet grubu oluştur
A basket group is simply a group of baskets. In some libraries, you have several staff members that create baskets, and, at the end of a period of time, someone then groups them together to send to the vendor in bulk. That said, it is possible to have one basket in a basket group, or no basket groups at all if that’s the workflow used in your library.
To create a basket group, go to the vendor detail page and click on the ‘Basket groups’ tab on the left side.
Click on the ‘New basket group’ button.
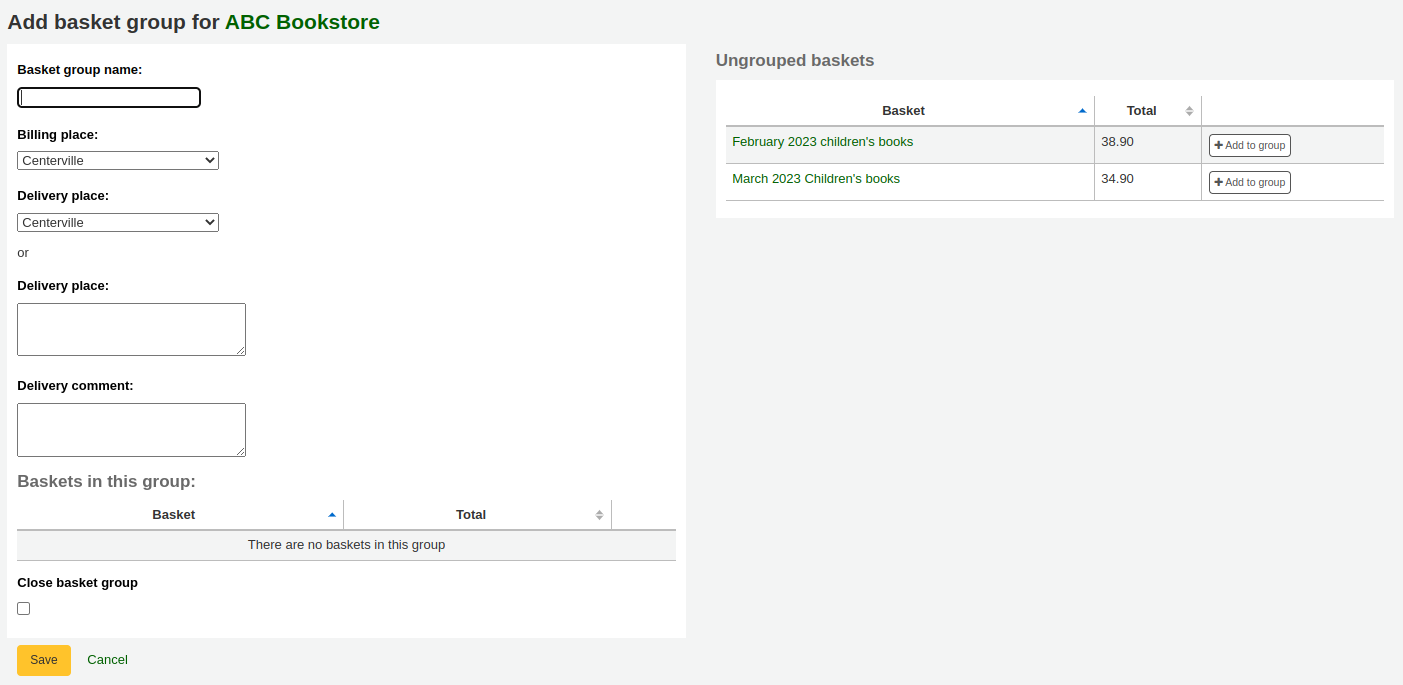
Basket group name: this is the name the basket group will go by in Koha
Billing place: this is the billing address that will appear on the basket group order
Delivery place: pick a library where these orders should be sent, this will appear on the basket group order under delivery address You can also enter a different address
Delivery comment: this comment will appear on the basket group order
Close basket group: if you know that once you’re done with this basket group, you will not be modifying it anymore, you can close it right away
Drag the ungrouped baskets to the ‘Baskets in this group’ box to add baskets to the basket group.

Click on ‘Save’ to finish creating your basket.
From there, you can export your order as a PDF file to send to your vendor.

Receiving orders
Önemli
Gelen materyalleri alabilmek için sepetinizi kapatmış olmalısınız. Yalnızca kapalı sepetler içerisindeki materyaller alınmaya hazır olarak gösterilecektir.
Siparişler sağlayıcı bilgileri sayfasından alınabilir
ya da sağlayıcı arama sonuçları sayfasından

After clicking ‘Receive shipment’ you will be asked to enter a vendor invoice number, a shipment received date, a shipping cost and a fund to subtract that shipping amount from.

Alış sayfası sepetteki materyalin nereden geldiğini dikkate almaksızın, halen siparişteki tüm materyalleri sağlayıcısıyla listeleyecektir

Not
If you have a lot of orders, you can filter the orders using the ‘Filter’ box on the left, the ‘Search’ box just above the table, of the filter boxes at the top of each table column.
You could, for example, scan the ISBN of the book you are receiving in the filter box and the table will only show the corresponding orders.
Just make sure to clear the filter boxes when you’re done, otherwise, the other items won’t appear.


Belirli bir materyal almak için, öğenin sağındaki ‘Alma’ bağlantısını tıklayın.
Depending on when you chose to create the item (either in the AcqCreateItem system preference, or upon creating your basket), the form will look slightly different.
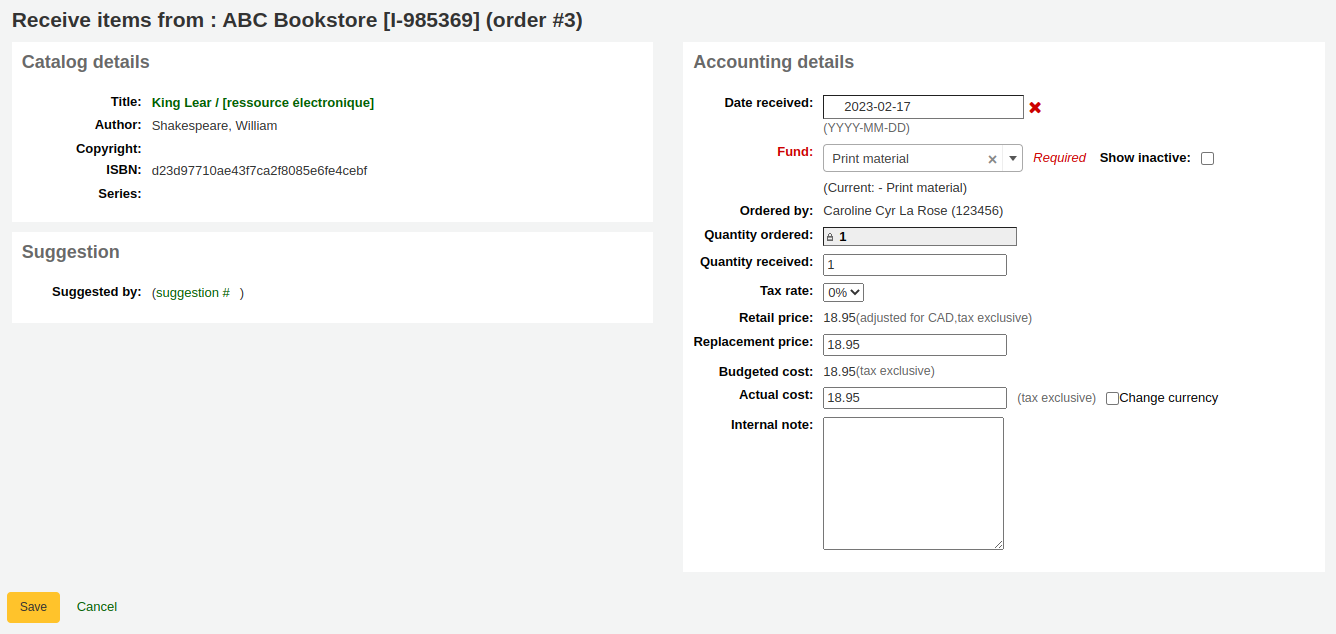
If you chose to create your item when placing the order, you will have your item information on the left side and financial information on the right side.
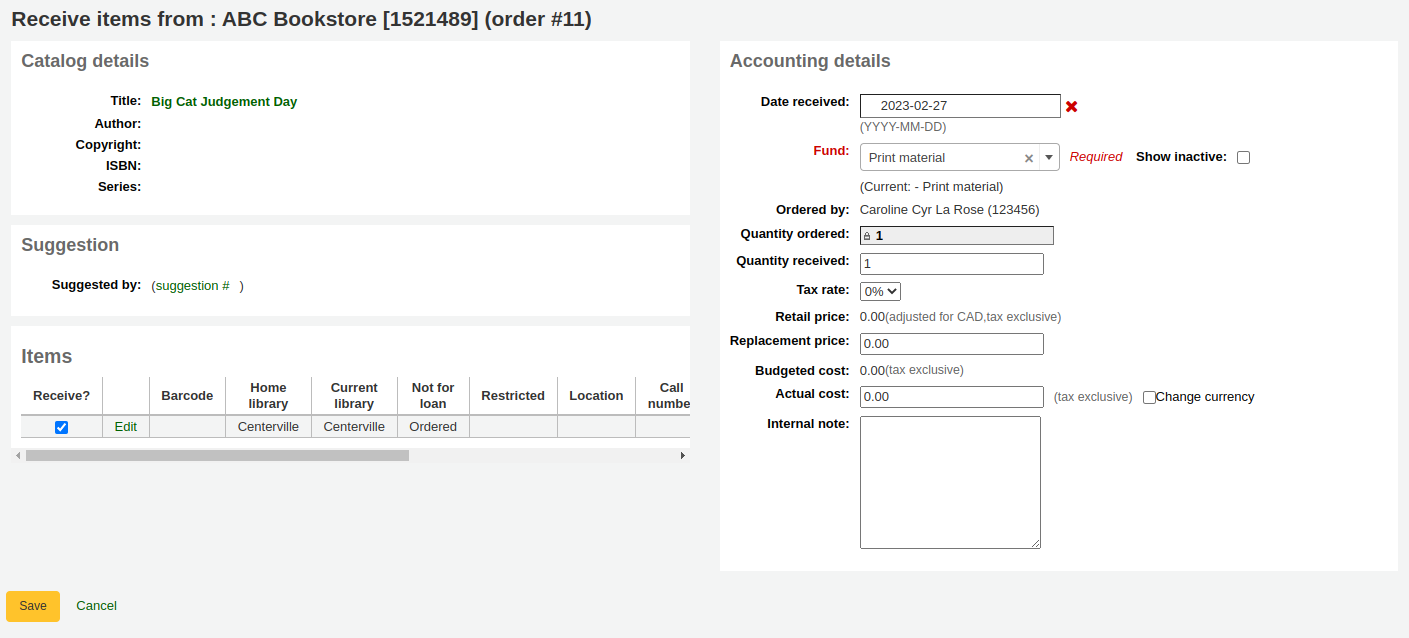
You can check the box next to the item to receive it, or fill out the ‘Quantity received’ field on the left side.
Note You can choose to mark only part of the order as received if he vendor didn’t send your entire order by checking only the boxes next to the items on the left that you want to receive or by entering the right amount in the ‘Quantity received’ field.
You can edit the item if needed by clicking on the ‘Edit’ link. This will allow you to enter in accurate call numbers and barcodes if you’d like to do that at the point of receipt.
You can also alter the cost information (replacement cost and actual cost). The values you enter there will automatically populate the item record by filling in subfield v (Cost, replacement price) and subfield g (Cost, normal purchase price) on the item record after saving.
If you chose to create your item when receiving the order, you will see the item creation form on the left side and the financial information on the right side.
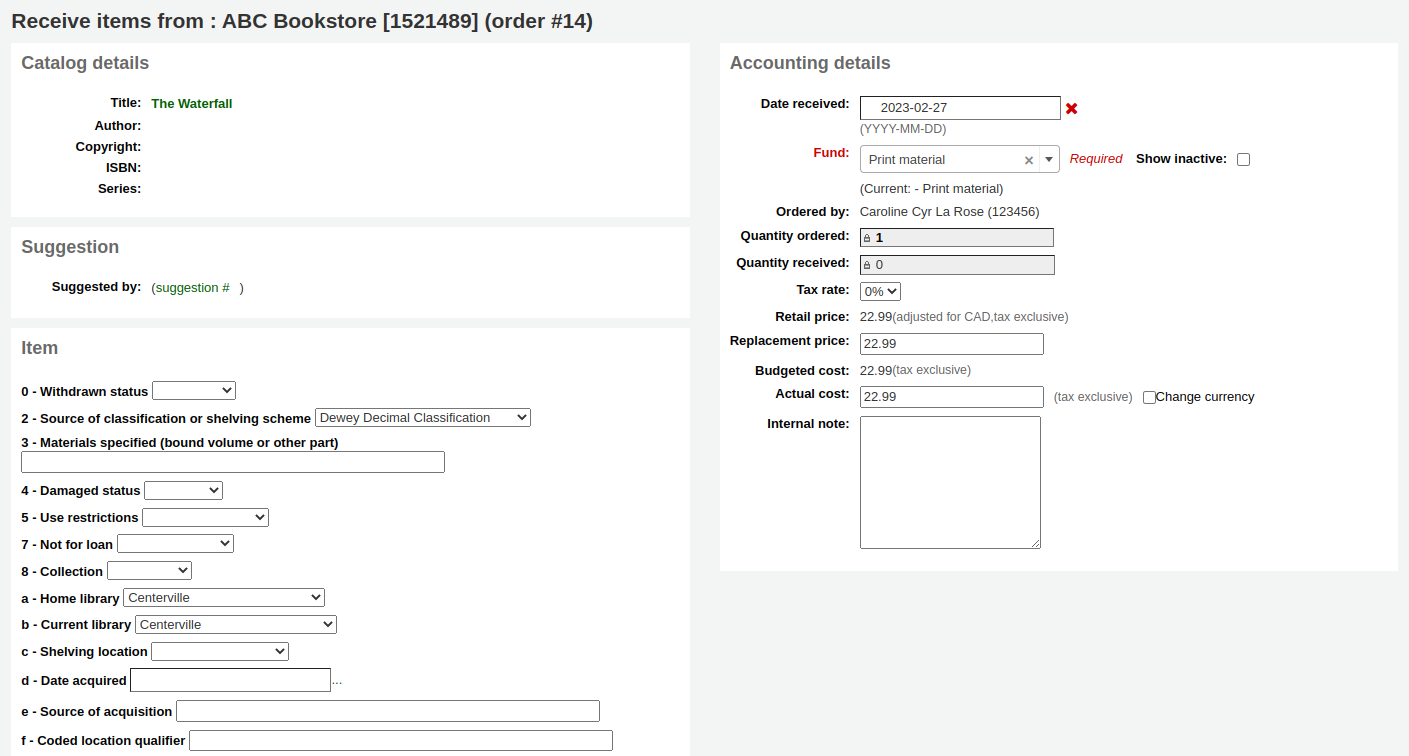
Important You must fill out the item form and click on ‘Add item’ or ‘Add multiple items’ in order to receive the order. You will not be able to simply change the ‘Quantity received’ amount.
You can alter the cost information (replacement cost and actual cost). The values you enter there will automatically populate the item record by filling in subfield v (Cost, replacement price) and subfield g (Cost, normal purchase price) on the item record after saving.
Finally, if you chose to create your item when cataloging the record, you will only see the financial information on the right.
You can alter the cost information (replacement cost and actual cost).
Note The financial information will not be transferred to the item if the item is created when cataloging.
Once you have made any changes necessary (to the order and/or items, click ‘Save’ to mark the item(s) as received.

Not
AcqItemSetSubfieldsWhenReceived tercihini teslim alınan materyaller üzerinde değerleri ekle ya da değiştire ayarladıysanız, bu değişiklikler ‘Kaydet’ üzerinde tıkladıktan sonra gerçekleşecektir.
Materyal almayı bitirdiğinizde, bu sayfadan ayrılabilir ya da ekranın üstündeki ‘Almayı bitir’ butonuna tıklayabilirsiniz.
Received orders will have ‘(received)’ before the title in the basket view.
Note When all the orders in a basket have been received, the basket will be removed from the list of baskets for that vendor. You can click ‘Show all baskets’ to view the inactive baskets.


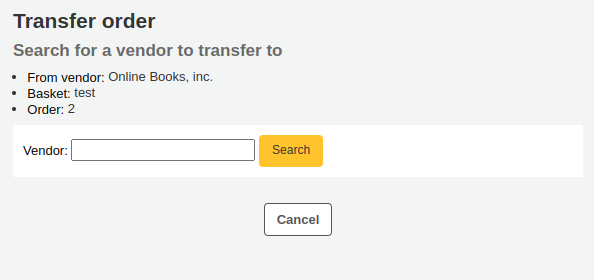
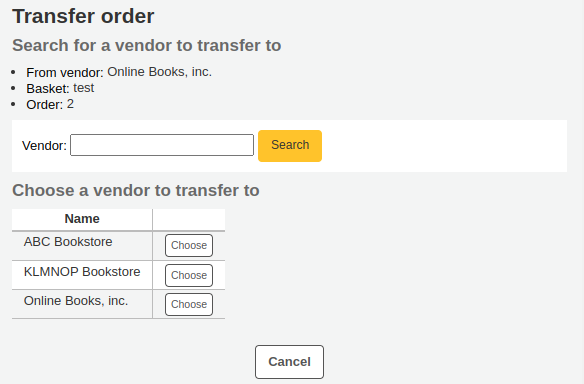
Transferring orders
Eğer materyal artık bu sağlayıcıdan sağlanamıyorsa başlığın sağındaki ‘Transfer’ bağlantısına tıklayarak siparişinizi başka bir sağlayıcının sepetine transfer edebilirsiniz. Bu işlem ekranda bir sağlayıcı arama kutusu açacaktır.
Sonuçlardan, bu materyali yeniden sipariş etmek istediğiniz sağlayıcının sağ tarafında bulunan ‘Seç’ bağlantısı üzerine tıklayabilirsiniz.
Daha sonra size bu sağlayıcıdan seçmeniz için açık sepetler sunulacak. Materyali taşımak için materyali eklemek istediğiniz sepetin sağ tarafındaki ‘Seç’ bağlantısı üzerine tıklamanız yeterlidir.
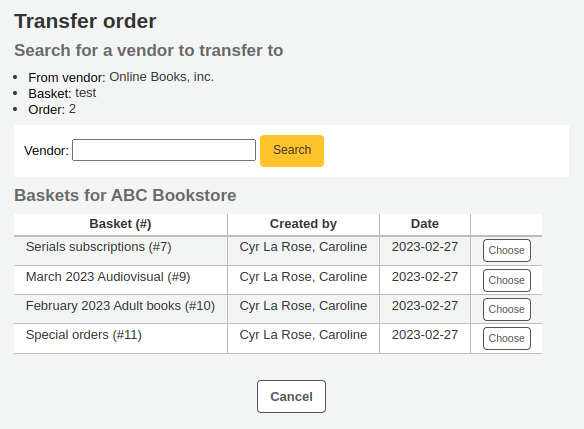
Seçiminiz tamamlandıktan sonra bir onay mesajı alacaksınız.

You will see transferred orders when viewing the basket.
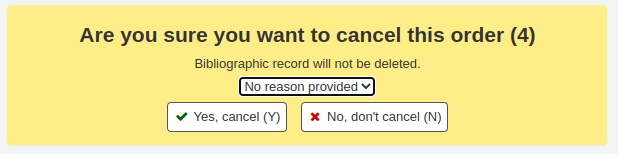
Cancelling orders
Eğer materyal hiç bir yerde bulunamıyorsa en sağda bulunan ‘Siparişi sil’ seçeneği üzerine tıklayarak siparişi iptal edebilirsiniz. Bu işlemden sonra iptal sebebinizi girmeniz ve iptal işlemini onaylamanız istenecektir.
You will also see that the item is cancelled if you view the basket.
Not
Whilst it is possible to re-open your basket, cancel one or more orders and re-close the basket, this is not recommended. This procedure will update the ‘basket closed’ date, which in turn will cause your ‘late order’ calculations to be incorrect.
Not
You cannot re-open a basket that is attached to a basket group. The re-open basket button will be greyed out.
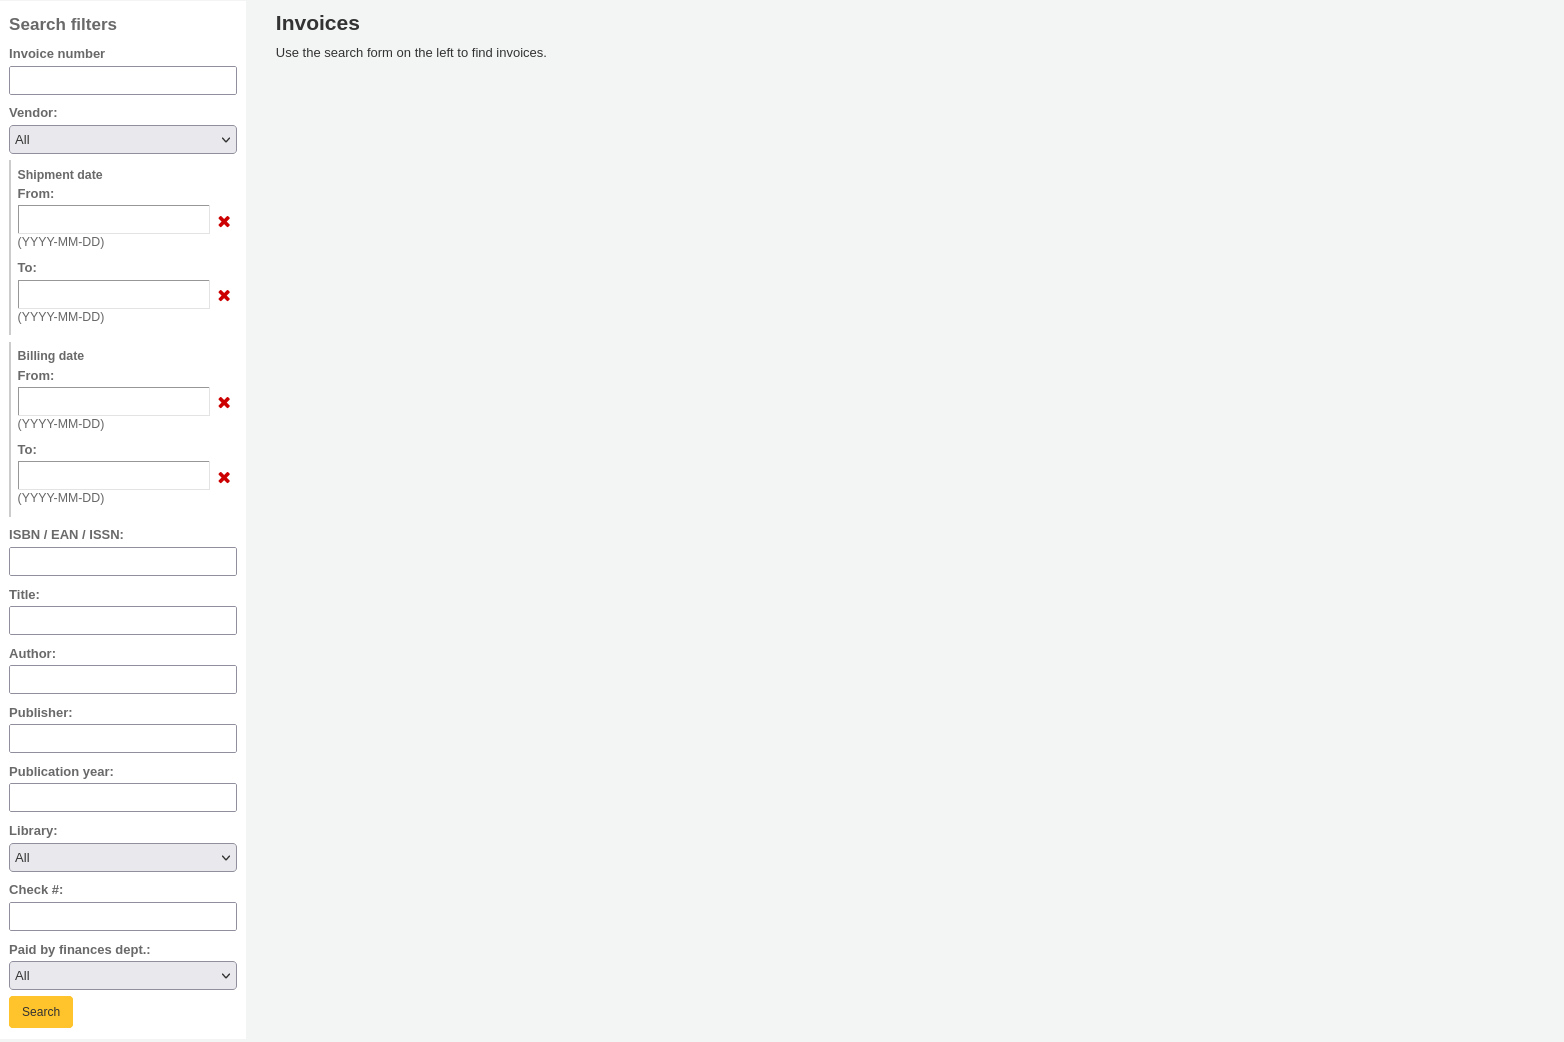
Faturalar
Siparişler alındığında, faturalar oluşturulur. Faturalar Sağlama sayfasının solundaki ‘Faturaların’ üstüne tıklayarak aranabilir.
Kaydettikten sonra, profilleriniz ‘Profilleri Yönet’ sayfasında gözükecektir.
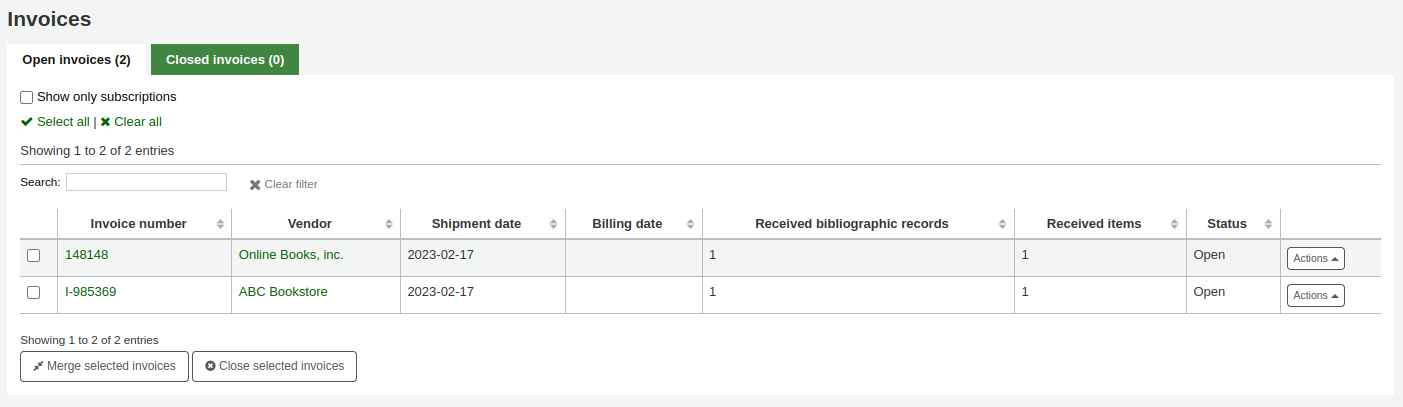
From the ‘Actions’ button, you can click the ‘Details’ link to see the full invoice or ‘Close’ to note that the invoice is closed/paid for.
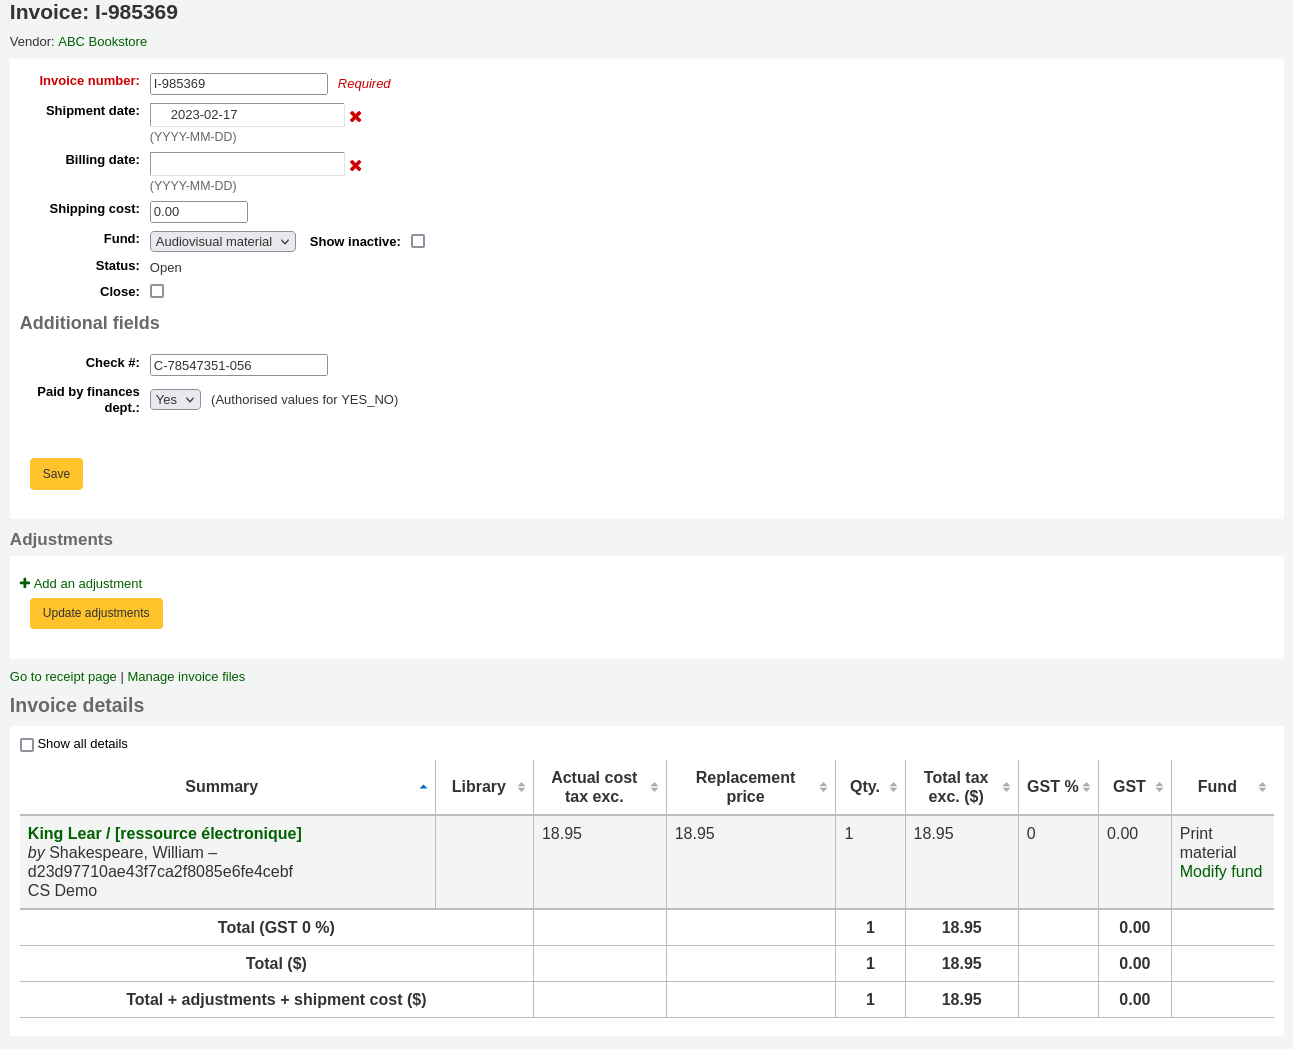
In the Adjustments section, you can add adjustments to your invoices. These adjustments can be for adjusting the price that is offset by rounding or adding a credit to the invoice, for example.
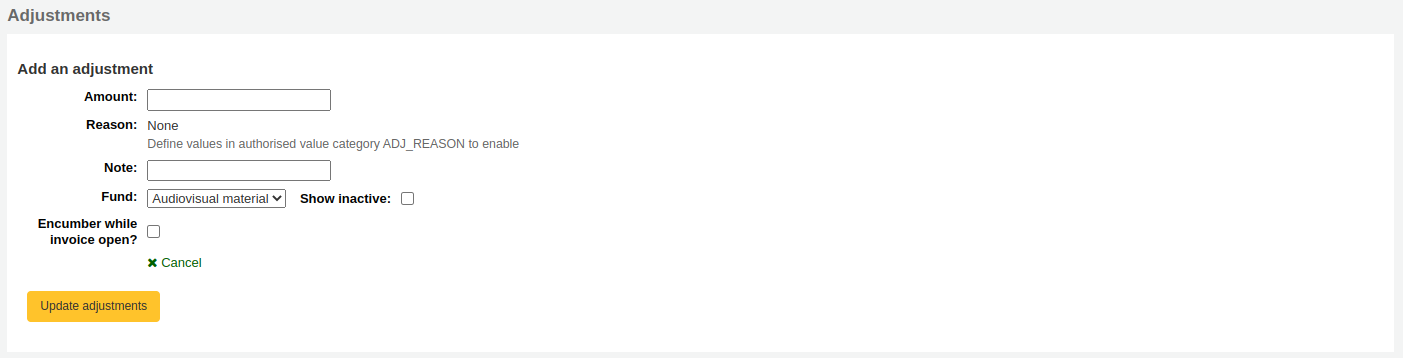
Click on ‘Add an adjustment’
Enter the amount of the adjustment
Choose a reason, if needed
Not
The reasons are authorized values. Use the category ADJ_REASON to add custom reasons for adjustments.
Enter a note, if needed
Choose the fund from which the adjustment amount should be taken
If ‘Encumber while invoice open’ is checked, the amount of the adjustment will be taken out of the fund immediately. If it isn’t checked, the amount will be subtracted only when the invoice is closed.
Click on ‘Update adjustments’ to save your adjustments
If you need to change the adjustment afterwards, you can do so in the table and click on ‘Update adjustments’.

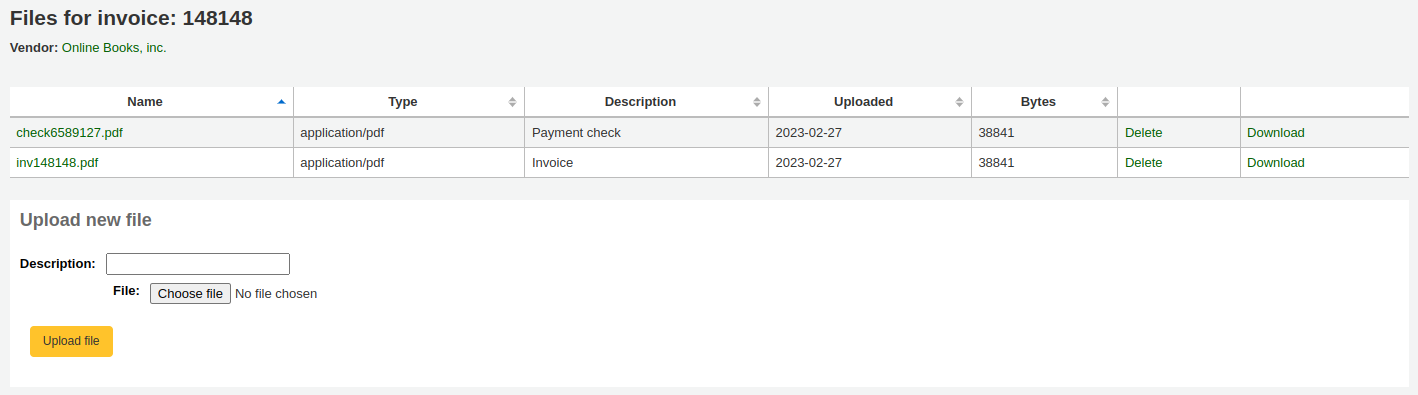
Attaching files to invoices
Eğer sağlama dosyalarının AcqEnableFiles tercihi ile karşıya yüklenmesine izin veriyorsanız, ‘Alındı bildirimi sayfasına git’ bağlantısının yanında fatura dosyalarını yönetmek için bir seçenek göreceksiniz.

Yeni dosyalar görmek ya da eklemek için ‘Fatura dosyalarını yönet’ bağlantısına tıklayın
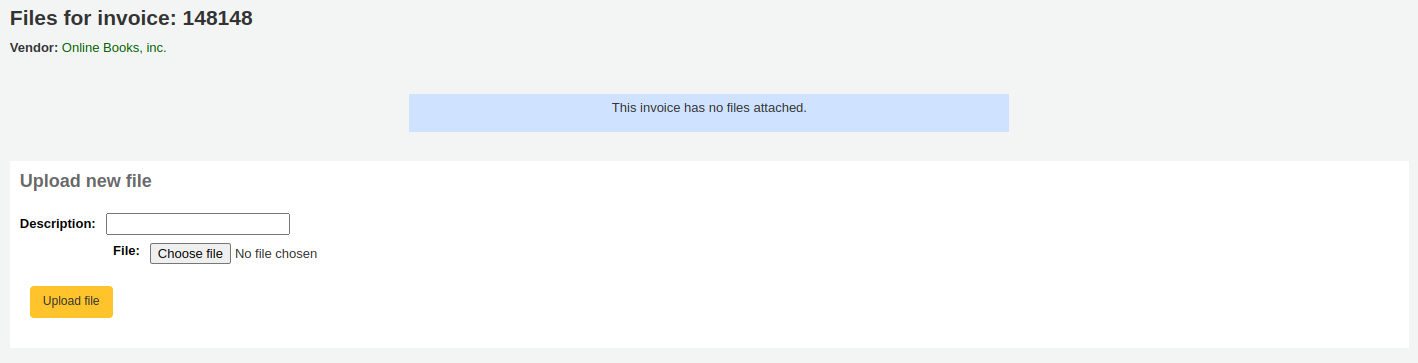
Buradan karşıya yüklemek için bir dosya bulabilir ve/veya zaten eklemiş olduğunuz dosyaları görebilirsiniz.
Merging two invoices
Fatura arama sonuçlarından gerekli olduğu durumda iki faturayı birleştirebilirsiniz. Sayfanın altındaki ‘Seçili faturaları birleştir’ butonuna tıklamanız ve birleştirmek istediğiniz faturaların solundaki onay kutusunu tıklamanız yeterlidir. Karşınıza bir onay ekranı gelecektir:
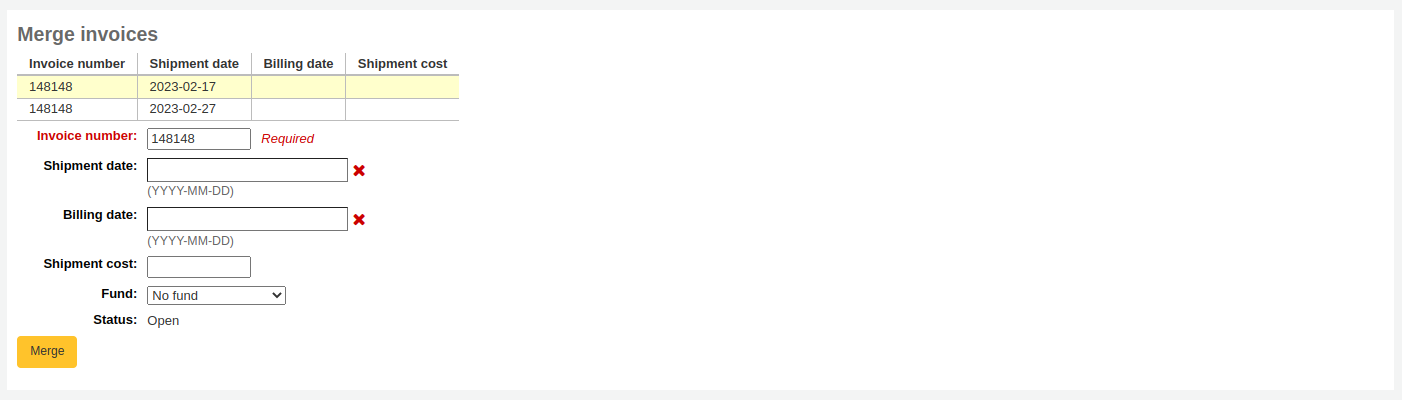
Saklamak istediğiniz fatura numarasının satırı üzerine tıklayın ve bu satırın üzeri sarı renkle çizilecektir. Sağlanan alanlara herhangi bir farklı fatura bilgisini girip ‘Birleştir’ butonuna tıklayın. İki fatura tek fatura heline gelecektir.
Claims and late orders
Sisteminize sağlayıcıların e-posta adreslerini kaydettiyseniz, bir sipariş geciktiğinde claim e-postaları gönderebilirsiniz. Claim göndermeden önce bir sağlama claim uyarısı ayarlamanız gerekli olacaktır.
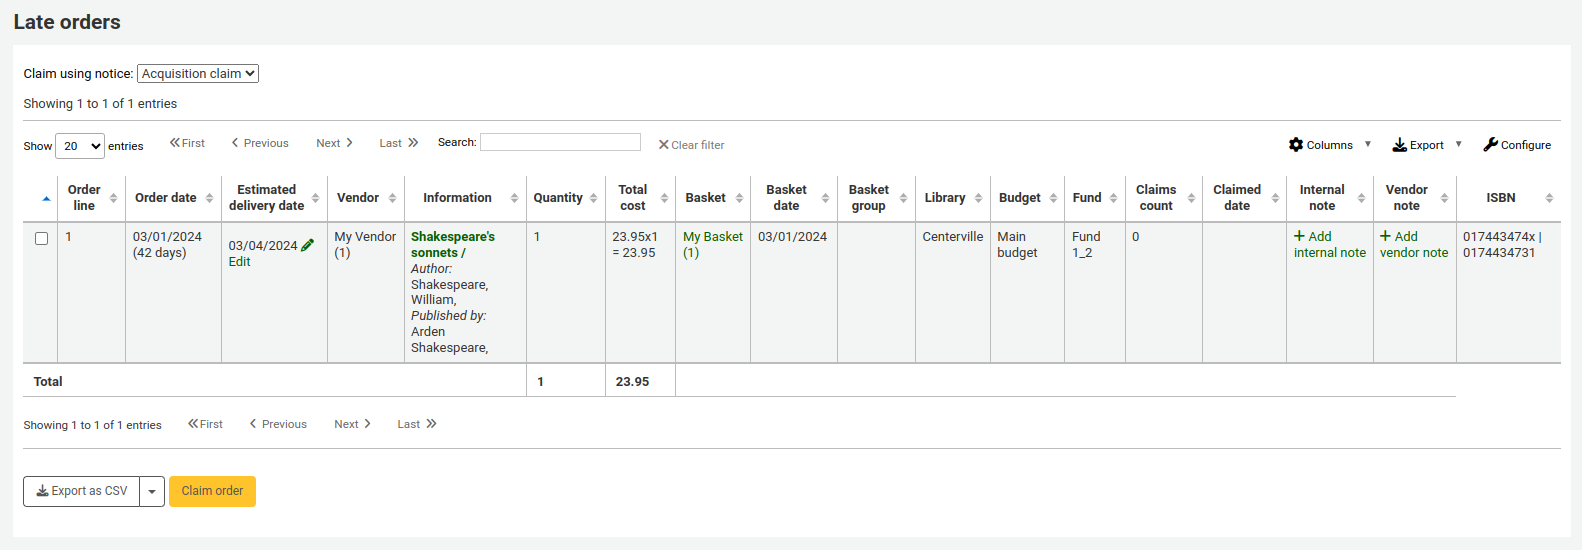
Upon clicking on the link to ‘Late orders’ from the Acquisitions page you will be presented with a series of filter options on the left hand side. These filters will be applied only closed baskets.
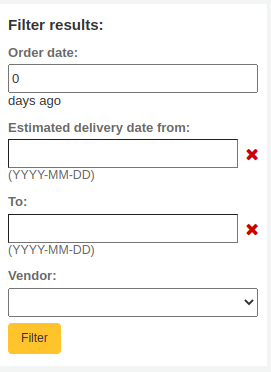
Not
Sağlayıcı çekme menüsü sadece kapalı sepetteki geciken sağlayıcıları gösterir.
Bir kez siparişlerinizi geciktiğini düşündüğünüz materyalleri göstermesi için filtrelediğinizde, karşınıza bu materyallerin bir listesi gelecektir.
Not
You can customize the columns of this table in the ‘Table settings’ section of the Administration module (table id: late_orders).
To the right of each late title you will be see a checkbox. Check off the ones you want a claim letter sent to and click ‘Claim order’ at the bottom right of the list. This will automatically send an email to the vendor at the email address you have on file.
Not
The estimated delivery date is based on the delivery time value entered on the vendor record.
If you would rather use a different acquisition claim letter (other than the default) you can create that in the notices module and choose it from the menu above the list of late items.

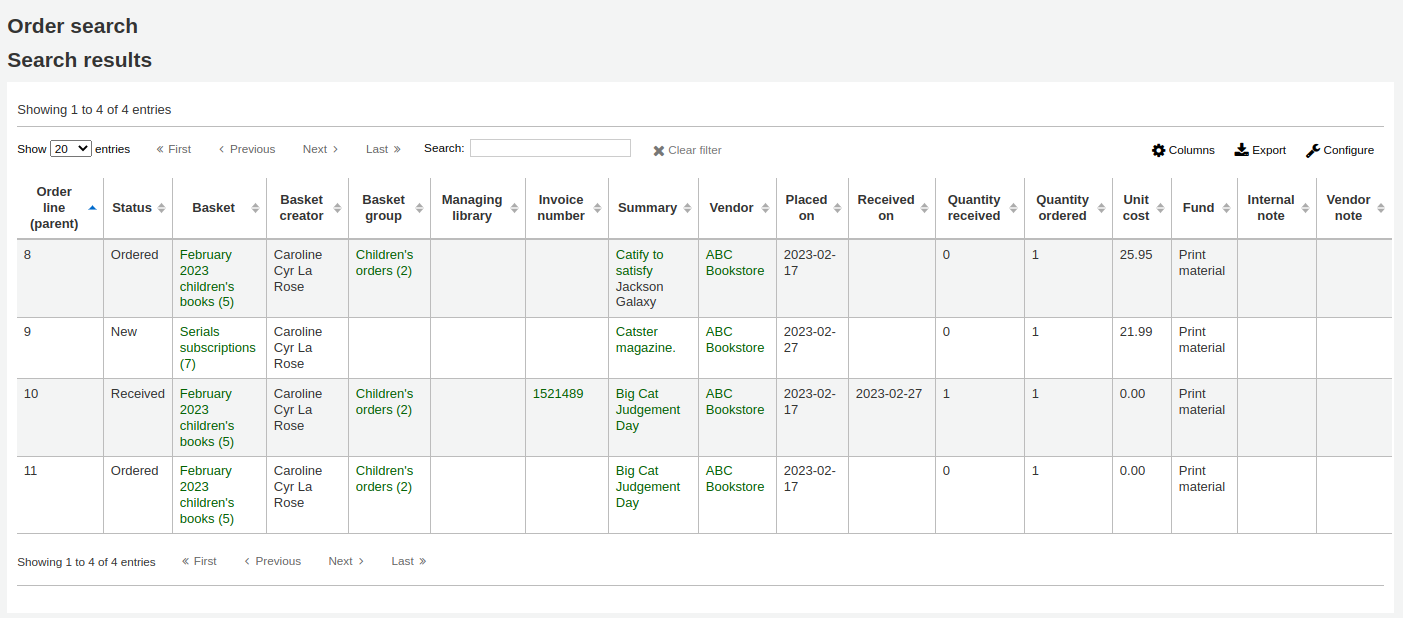
Acquisition searches
At the top of the various Acquisition pages there is a quick search box where you can perform either a Vendor search or an Order search.

In the Vendor search you can enter any part of the vendor name to get results.

Using the Orders search you can search for items that have been ordered with or without the vendor.

Bilgiyi bir ya da iki alana girebilirsiniz ve başlığın her hangi bir kısmını ve/veya sağlayıcı ismini girebilirsiniz.
Not
You can customize the columns of this table in the ‘Table settings’ section of the Administration module (table id: histsearcht).
Arama sağlayıcı kutusunun sağındaki + işaretine tıklamak daha detaylı arama yaptıracak ve size ek alanlar arama imkanı sunacaktır.

Clicking Advanced search to the right of the search button will give you all of the order search options available.

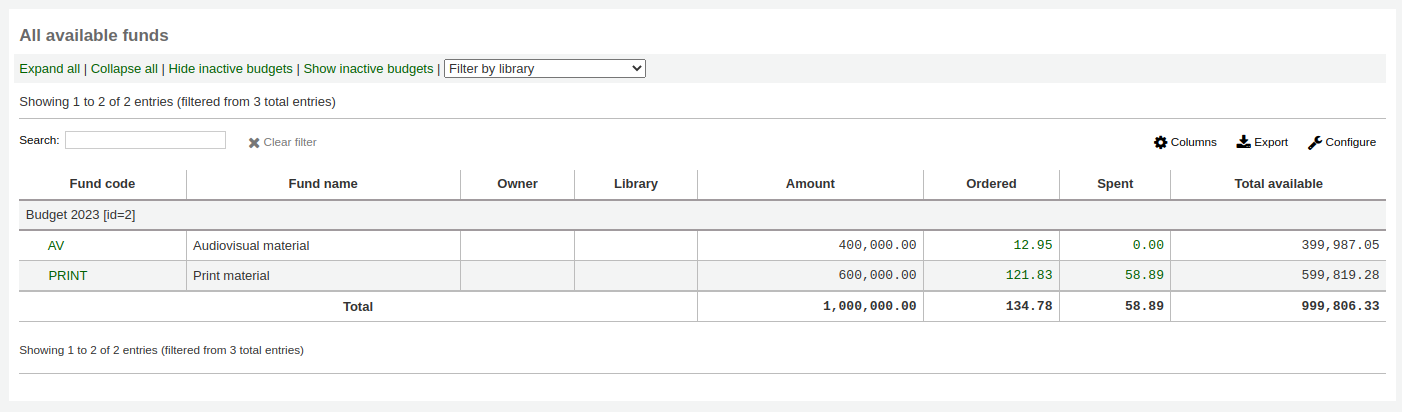
Budget/fund tracking
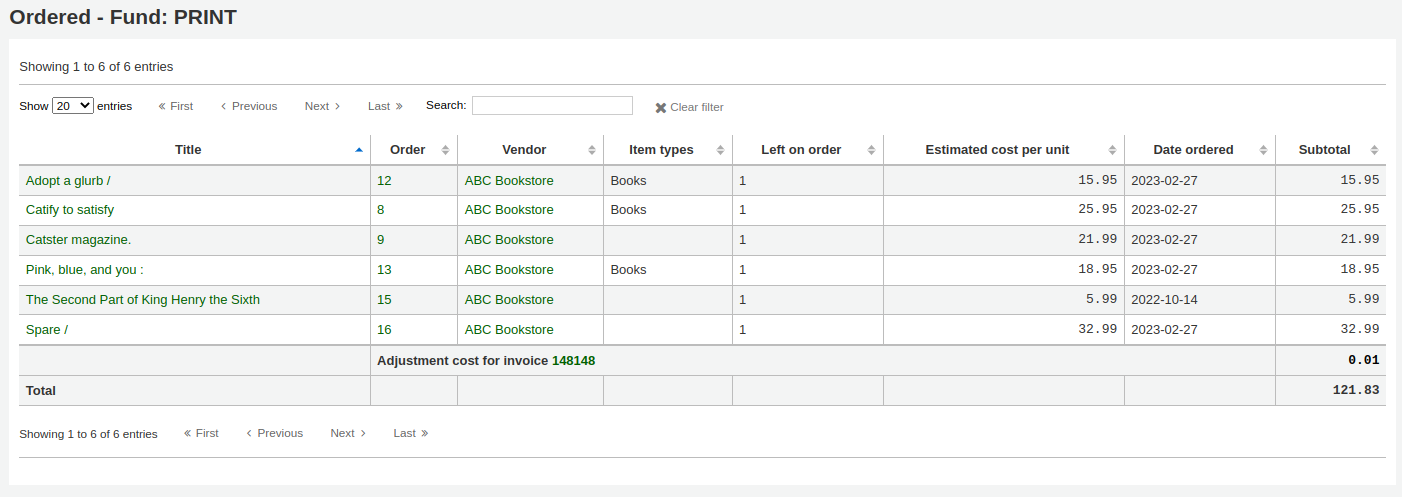
Sağlama ana sayfasında tüm aktif fonlarınızı gösteren bir tablo ve mukabilinde sipariş edilen ve harcananların bir dökümü olacaktır.
Harcanan ya da sipariş edilenlerin altındaki bağlantılı miktarları tıklayınca bu bütçe üzerinde sipariş edilen/teslim alınan başlıkların bir özetini göreceksiniz.

EDI process
Önceki bölümlerde tüm sipariş seçenekleri açıklanmaktadır, bu bölüm sipariş için yalnızca EDI kullananlara yardımcı olması için EDI veya EDIFACT siparişine ilişkin parçaları çıkarmaktadır.
Önemli
Koha, elektronik sipariş için X12 standardı değil EDIFACT standardını kullanmaktadır.
EDI questions for vendors
Koha’da kurulum işlemine başlamadan önce satıcılarınızdan aşağıdaki bilgileri toplamak isteyeceksiniz.
EDI accounts: This is the basic connection information for your vendor. This will be used to fill in the :ref:`EDI accounts` section.
Satıcı: Satıcının adı
Açıklama: Eğer ek açıklama gerekiyorsa kısa bir açıklama (özellikle bir satıcı için birden çok hesabınız varsa).
Taşıma: Sağlayıcı, EDI dosyalarını FTP, SFTP veya başka bir şey yoluyla özel işlem gerektiren şekilde iletiyor mu?
Uzak ana makine: FTP/SFTP sunucusunun URL’si veya IP adresi
Kullanıcı adı: Yukarıdaki sunucuya ait kullanıcı adı
Şifre: Yukarıdaki sunucuya ait şifre
İndirme dizini: Sunucuda Koha’nın karşıdan yükleyeceği ve işleyeceği dosyaları içeren yol
Yükleme dizini: Koha’nın sunucunuzu işleme koymak için dosyaları karşıya yükleyeceği sunucu üzerindeki yol
Eleme: Aşağıdaki SAN’ı kim atadı?
Aşağıdakilerden birini seçin:
EAN International
(31B) US SAN Agency
Sağlayıcı tarafından atandı
Alıcı tarafından atandı
SAN: Sağlayıcının tanımlayıcısı
Alıcı niteleyicisi ve SAN isteğe bağlıdır. Bazı sağlayıcılar EAN hesabına ek olarak ikinci bir alıcı tanımlayıcıya ihtiyaç duyar
Alıcı niteleyicisi: Aşağıdaki SAN’ı kim atadı?
Aşağıdakilerden birini seçin:
EAN International
(31B) US SAN Agency
Sağlayıcı tarafından atandı
Alıcı tarafından atandı
Alıcı SAN: Kütüphanenin tanımlayıcısı
Quotes enabled: [y/n] Does this vendor support sending and receiving quotes via EDIFACT and do you want to send and receive quotes via EDIFACT?
Orders enabled: [y/n] Does this vendor support sending and receiving orders via EDIFACT and do you want to send and receive orders via EDIFACT?
Invoices enabled:[y/n] Does this vendor support sending and receiving invoices via EDIFACT and do you want to send and receive invoices via EDIFACT?
Sipariş dosyası son eki: Sipariş dosyaları için dosya son eki
Teklif dosyası son eki: Teklif dosyaları için dosya son eki
Fatura dosyası son eki: Fatura dosyaları için dosya son eki
Hesap numaraları: (hepsini listeleyin)
Hesap açıklaması: (bu sayının ne için olduğunun özeti)
EANs: Each library using EDIFACT needs to specify a buyer identifier know as a SAN or EAN. This will fill in the :ref:`Library EANs <library-eans-label>` setting.
Kütüphane
EAN
Aşağıdakilerden birini seçin:
EAN International
(31B) US SAN Agency
Sağlayıcı tarafından atandı
Alıcı tarafından atandı
MARC order fields or grid ordering: These values will fill in the :ref:`MarcFieldsToOrder` preference.
fiyat: materyal fiyatını içeren MARC21 alanı
miktar: Verilen kayıt için materyal sayısını içeren MARC21 alanı
budget_code: Borçlandırılacak Koha bütçe kodunu içeren MARC21 alanı
indirim: Fiyatın indirim yapılacak yüzdesi olarak indirimi içeren MARC21 alanı
sort1: MARC21 field that will populate custom field sort1
sort2: Özel alan sort2’yi dolduracak MARC 21 alanı
EDI setup
EDI kullanarak sipariş vermeye başlamadan önce aşağıdaki adımları atmak isteyeceksiniz:
Sağlayıcınız/kitapçınız/toptancınızdan bağlantı bilgilerini isteyin
Satıcınızdan birkaç örnek EDIFACT dosyası istemek te yararlı olabilir
kütüphane kodları, materyal türü kodları, fon kodları ve sağlayıcınızın MARC sipariş kayıtlarınızı oluşturmak için ihtiyaç duyabileceği diğer tüm kodları veya yetkili değerleri satıcınız/kitapçınız/toptancınız ile paylaşın
Satıcınızın yanıtlarını temel alarak bir eklentiye ihtiyacınız olup olmayacağını destek sağlayıcınıza veya topluluğa bildirin
Örneğin ByWater Solutions buradaki belirli satıcılar için eklentiler yayınladı: https://github.com/bywatersolutions/koha-plugin-edifact-enhanced
Sağlamaya sağlayıcı/kitapçı/toptancı bilgilerini girin
Review your Acquisitions system preferences
MarcFieldsToOrder tercihini sipariş dosyaları için değerlerle doldurduğunuza emin olun
EDI Hesaplarınızı girin
Kütüphane EAN’larınızı girin
Dosyaları işleyebilmesi için EDI Cron özelliğini açın
EDI ordering
EDI kullanarak sipariş vermenin ilk adımı kitap satıcısının web sitesinde olur. Her satıcı farklı bir dil kullanacaktır, ancak siparişinizi kendi sitelerine yerleştirmeniz ve ardından MARC sipariş dosyasını indirmeniz gerekecektir. Görebileceğiniz bazı diller “sepet”, “sipariş”, “alışveriş sepeti” ve/veya “MARC sipariş” i içeriyordu. Bu MARC dosyasını bilgisayarınıza indirdikten sonra, Koha’ya giriş yapmak ve orada işlemi yapmak isteyeceksiniz.
Visit the Stage MARC records for import tool and upload your file. Once presented with the confirmation screen proceed to Acquisitions.
Sağlama bölümünde sipariş verdiğiniz satıcı için :ref:`bir sepet oluşturun <create-a-basket-label>`Sepetten `hazırlanmış bir dosyadan sipariş <#orderfromstagedfile>`__ seçeneğini seçin ve satıcınızdan indirdiğiniz ve Koha’da hazırlanan dosyanın yanındaki ‘Sipariş’ düğmesini tıklayın.
Onay ekranından siparişinizle ilgili MARC dosyasındaki tüm verileri görürsünüz. Bütçe ve miktar gibi alanları dolu olarak görmüyorsanız MarcFieldsToOrder tercihinin doğru olarak ayarlandığından emin olun.
Tüm materyalleri sepete ekledikten sonra, ‘EDIFACT siparişini oluştur’ düğmesini tıklayabilirsiniz.
EDIFACT order
Bu, Koha’daki :ref:EDIFACT İletilerinde <edifact-messages-label>` bekleyen bir dosya oluşturacaktır. Bekleyen dosyalar :ref:EDI Cron Job <cron-edi-message-processing-label>` tarafından işlenir ve satıcınıza gönderilir.
EDI invoicing
Kitap satıcısı dosyalarınızı işleme koyduklarında EDI vasıtasıyla bir fatura gönderecektir. EDI Cron Job; faturayı alır ve faturada bulunanları işaretleyerek elle müdahale gerekmeden fonlarınızı günceller.
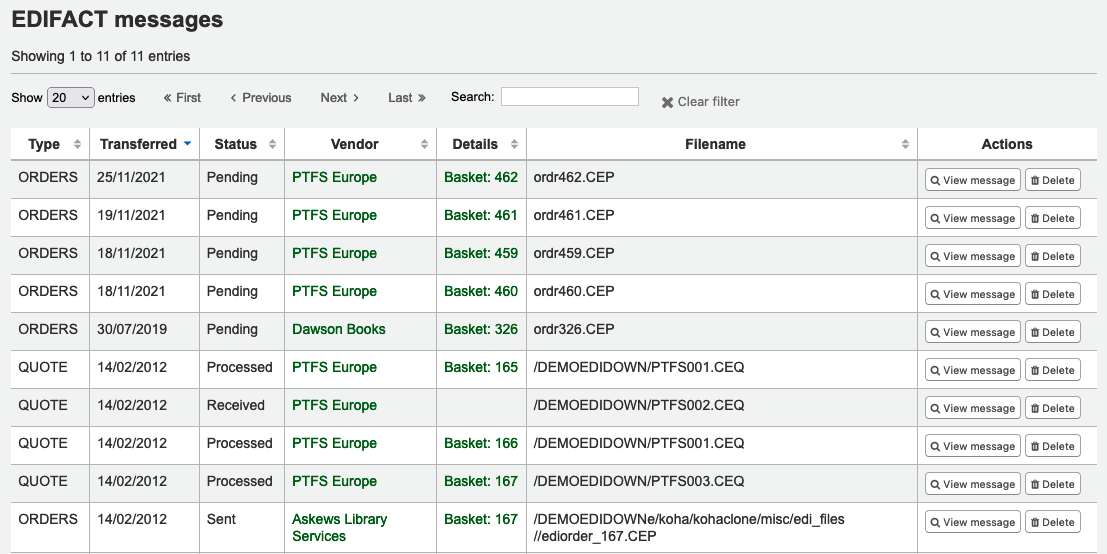
EDIFACT messages
A log of all messages sent and received via EDIFACT can be found under EDIFACT messages.